
Yardlong Bean Growing Guide: Unleash the Secrets to Bountiful Harvests!
Have you ever dreamed of strolling through your garden, casually plucking beans that are, well, ridiculously long? I’m talking about yardlong beans – those fascinating, slender legumes that can grow up to a meter in length! Forget boring green beans; these are the showstoppers of the vegetable patch, and I’m here to guide you through every step of cultivating your own impressive crop.
The yardlong bean, also known as the asparagus bean or Chinese long bean, boasts a rich history, deeply rooted in Asian cuisine. For centuries, it has been a staple ingredient, prized for its unique texture and subtly sweet flavor. Beyond its culinary appeal, growing yardlong beans connects us to a tradition of sustainable gardening practices passed down through generations.
But why should you, specifically, dive into the world of yardlong bean cultivation? In today’s world, where fresh, homegrown produce is increasingly valued, mastering the yardlong bean growing guide is more relevant than ever. Imagine the satisfaction of serving up a stir-fry featuring beans you nurtured from seed to plate! Plus, these vigorous climbers are incredibly space-efficient, making them perfect for small gardens or even container gardening on balconies. This yardlong bean growing guide will equip you with the knowledge to overcome common challenges, maximize your yield, and enjoy a truly rewarding gardening experience. Let’s get started!
DIY Vertical Yardlong Bean Trellis: From Seed to Spectacular Harvest
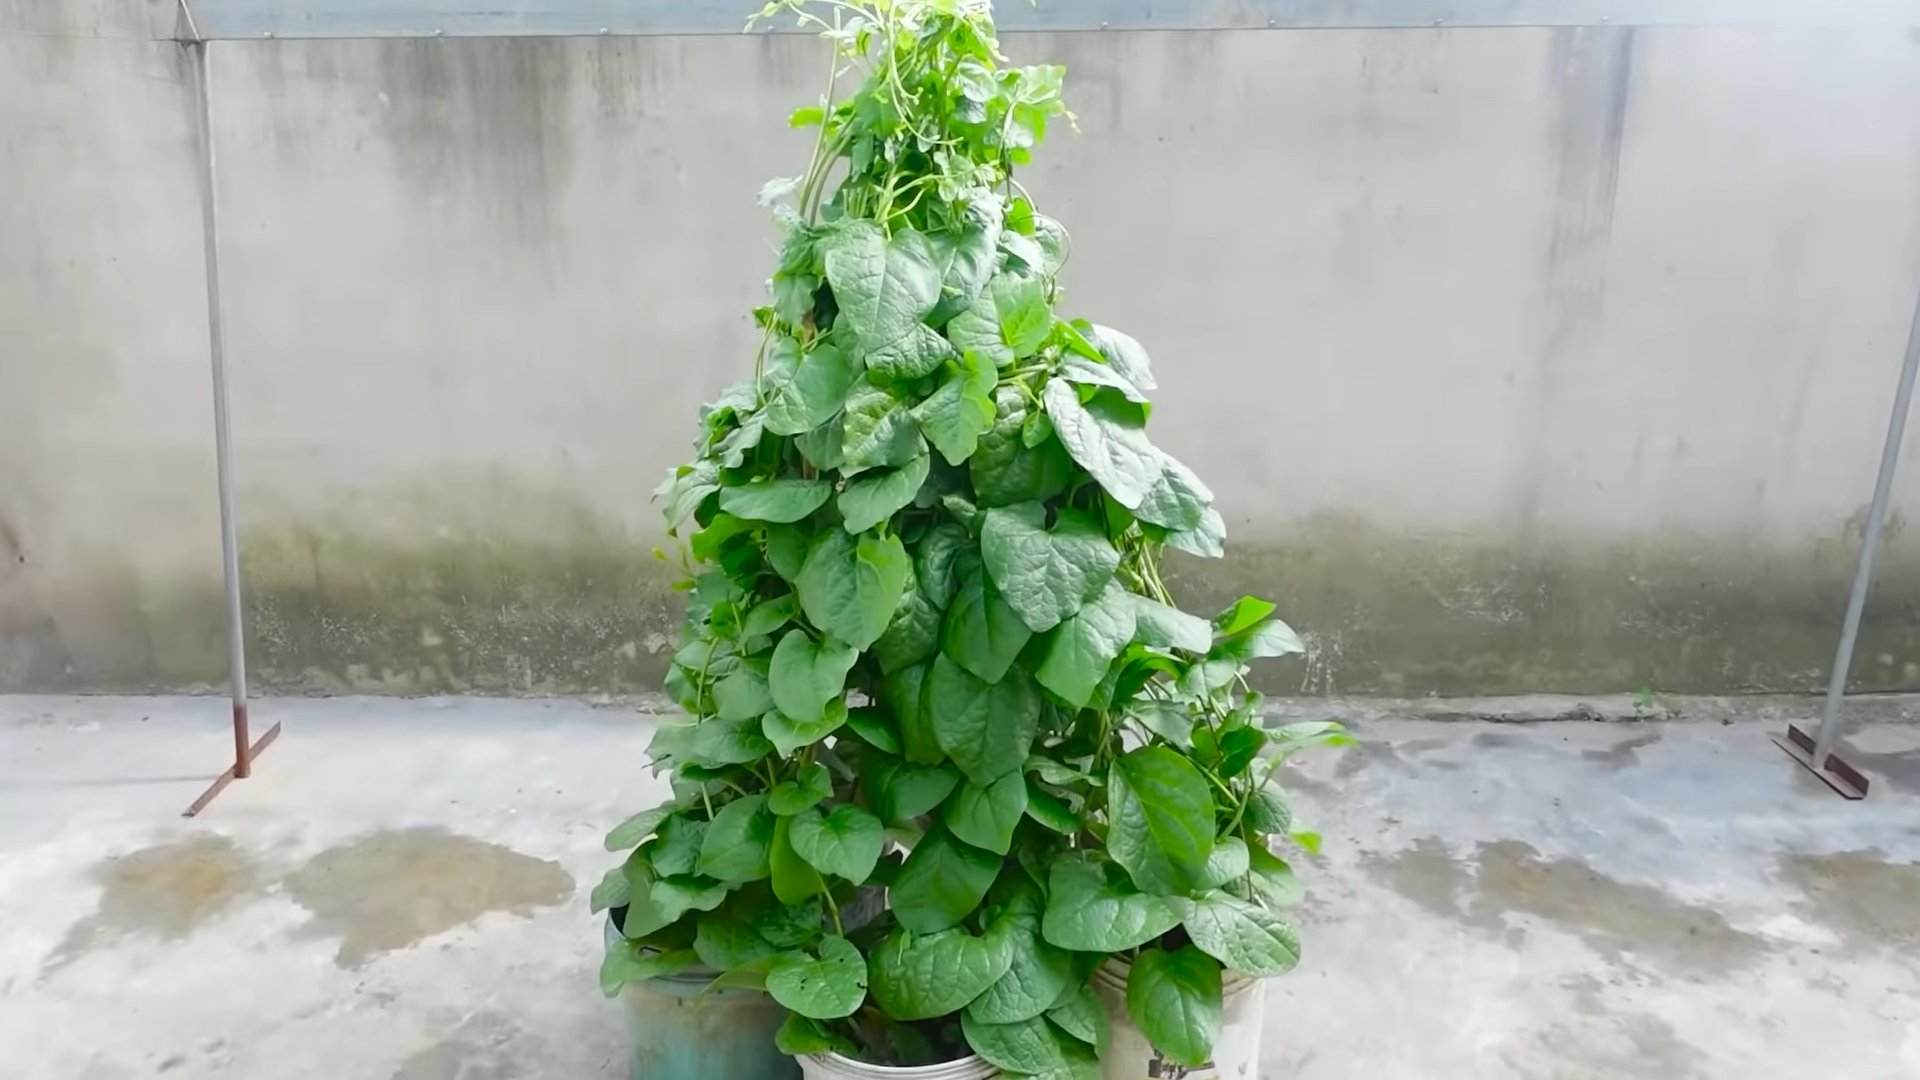
Hey there, fellow gardening enthusiasts! I’m so excited to share my tried-and-true method for growing yardlong beans – those incredibly long, delicious beans that can reach up to three feet in length! The secret? A sturdy, DIY vertical trellis. Forget sprawling vines taking over your garden; this trellis will keep your beans organized, healthy, and producing like crazy. Plus, it looks fantastic!
Why a Vertical Trellis for Yardlong Beans?
Before we dive into the how-to, let’s talk about why a vertical trellis is a game-changer for yardlong beans:
* Space Saving: Yardlong beans are vigorous climbers. Without support, they’ll spread everywhere, hogging valuable garden space. A trellis keeps them contained and growing upwards.
* Improved Air Circulation: Vertical growth promotes better air circulation around the plants, reducing the risk of fungal diseases like powdery mildew.
* Easier Harvesting: No more bending and searching through tangled vines! The beans are easily visible and accessible when they’re hanging vertically.
* Increased Yield: Happy, healthy plants produce more beans! The trellis provides optimal growing conditions, leading to a bountiful harvest.
* Aesthetic Appeal: Let’s be honest, a trellis covered in lush green vines and dangling beans is a beautiful addition to any garden.
Materials You’ll Need
Okay, let’s gather our supplies. This trellis is designed to be durable and long-lasting, so we’re using sturdy materials. Don’t worry, it’s still budget-friendly!
* Four 4×4 Wooden Posts (8 feet long): These will be the main supports for your trellis. Cedar or pressure-treated wood is ideal for longevity.
* Two 2×4 Wooden Boards (8 feet long): These will connect the top of the posts, creating a strong frame.
* Two 2×4 Wooden Boards (8 feet long): These will connect the bottom of the posts, creating a strong frame.
* Galvanized Wire Mesh (4 feet wide, at least 16 feet long): This is what the beans will climb on. Choose a mesh with openings large enough for you to easily reach through to harvest the beans. Chicken wire is not strong enough.
* Heavy-Duty Staples or U-Nails: For attaching the wire mesh to the wooden frame.
* Exterior Wood Screws (3-inch): For assembling the wooden frame.
* Post Hole Digger or Shovel: For digging the holes for the posts.
* Level: To ensure your trellis is straight and stable.
* Measuring Tape: For accurate measurements.
* Drill: For pre-drilling holes and driving screws.
* Staple Gun (optional, but recommended): Makes attaching the wire mesh much easier.
* Gloves: To protect your hands.
* Safety Glasses: Always a good idea when working with tools.
* Wood Stain or Paint (optional): To protect and beautify your trellis.
Building Your Yardlong Bean Trellis: Step-by-Step
Alright, let’s get building! This project is definitely manageable for a weekend afternoon.
Phase 1: Preparing the Posts and Frame
1. Cut the Posts (if needed): If your 4×4 posts are longer than 8 feet, cut them down to size. I prefer 8-foot posts because they give the beans plenty of room to climb, but you can adjust the height to suit your garden.
2. Treat the Wood (optional): If you’re using untreated wood, now’s the time to apply a wood preservative or stain to protect it from the elements. Let it dry completely before proceeding.
3. Dig the Post Holes: Decide where you want to place your trellis. Dig four holes, each about 2 feet deep, in a rectangular shape. The distance between the holes will depend on the length of your 2×4 boards (8 feet in this case). Make sure the holes are evenly spaced. I usually aim for about 7.5 feet between posts to account for the width of the 4×4 posts themselves.
4. Set the Posts: Place the 4×4 posts into the holes. Use a level to ensure they’re perfectly vertical. Backfill the holes with soil, tamping it down firmly around the posts to secure them. You can also use concrete for extra stability, but I’ve found that well-tamped soil works just fine.
5. Attach the Top and Bottom Boards: Now, we’ll create the frame that will hold the wire mesh. Take your 2×4 boards and attach them to the top and bottom of the posts using the exterior wood screws. Pre-drill holes to prevent the wood from splitting. Make sure the boards are flush with the outside of the posts. Use a level to ensure the top and bottom boards are parallel.
Phase 2: Attaching the Wire Mesh
1. Unroll the Wire Mesh: Carefully unroll the galvanized wire mesh. Be careful, the edges can be sharp!
2. Attach the Mesh to the Frame: Starting at one end of the frame, attach the wire mesh to the wooden frame using heavy-duty staples or U-nails. Stretch the mesh taut as you go to prevent sagging. I find a staple gun makes this process much faster and easier. Make sure the staples are securely embedded in the wood.
3. Trim Excess Mesh: Once the mesh is attached to the entire frame, trim off any excess wire mesh with wire cutters. Be careful not to leave any sharp edges exposed.
4. Inspect for Sharp Edges: Run your hand along the wire mesh to check for any sharp edges or loose staples. Use pliers to bend down any sharp points to prevent injuries.
Phase 3: Planting Your Yardlong Beans
1. Prepare the Soil: Before planting, amend the soil around the base of the trellis with compost or other organic matter. Yardlong beans prefer well-drained, fertile soil.
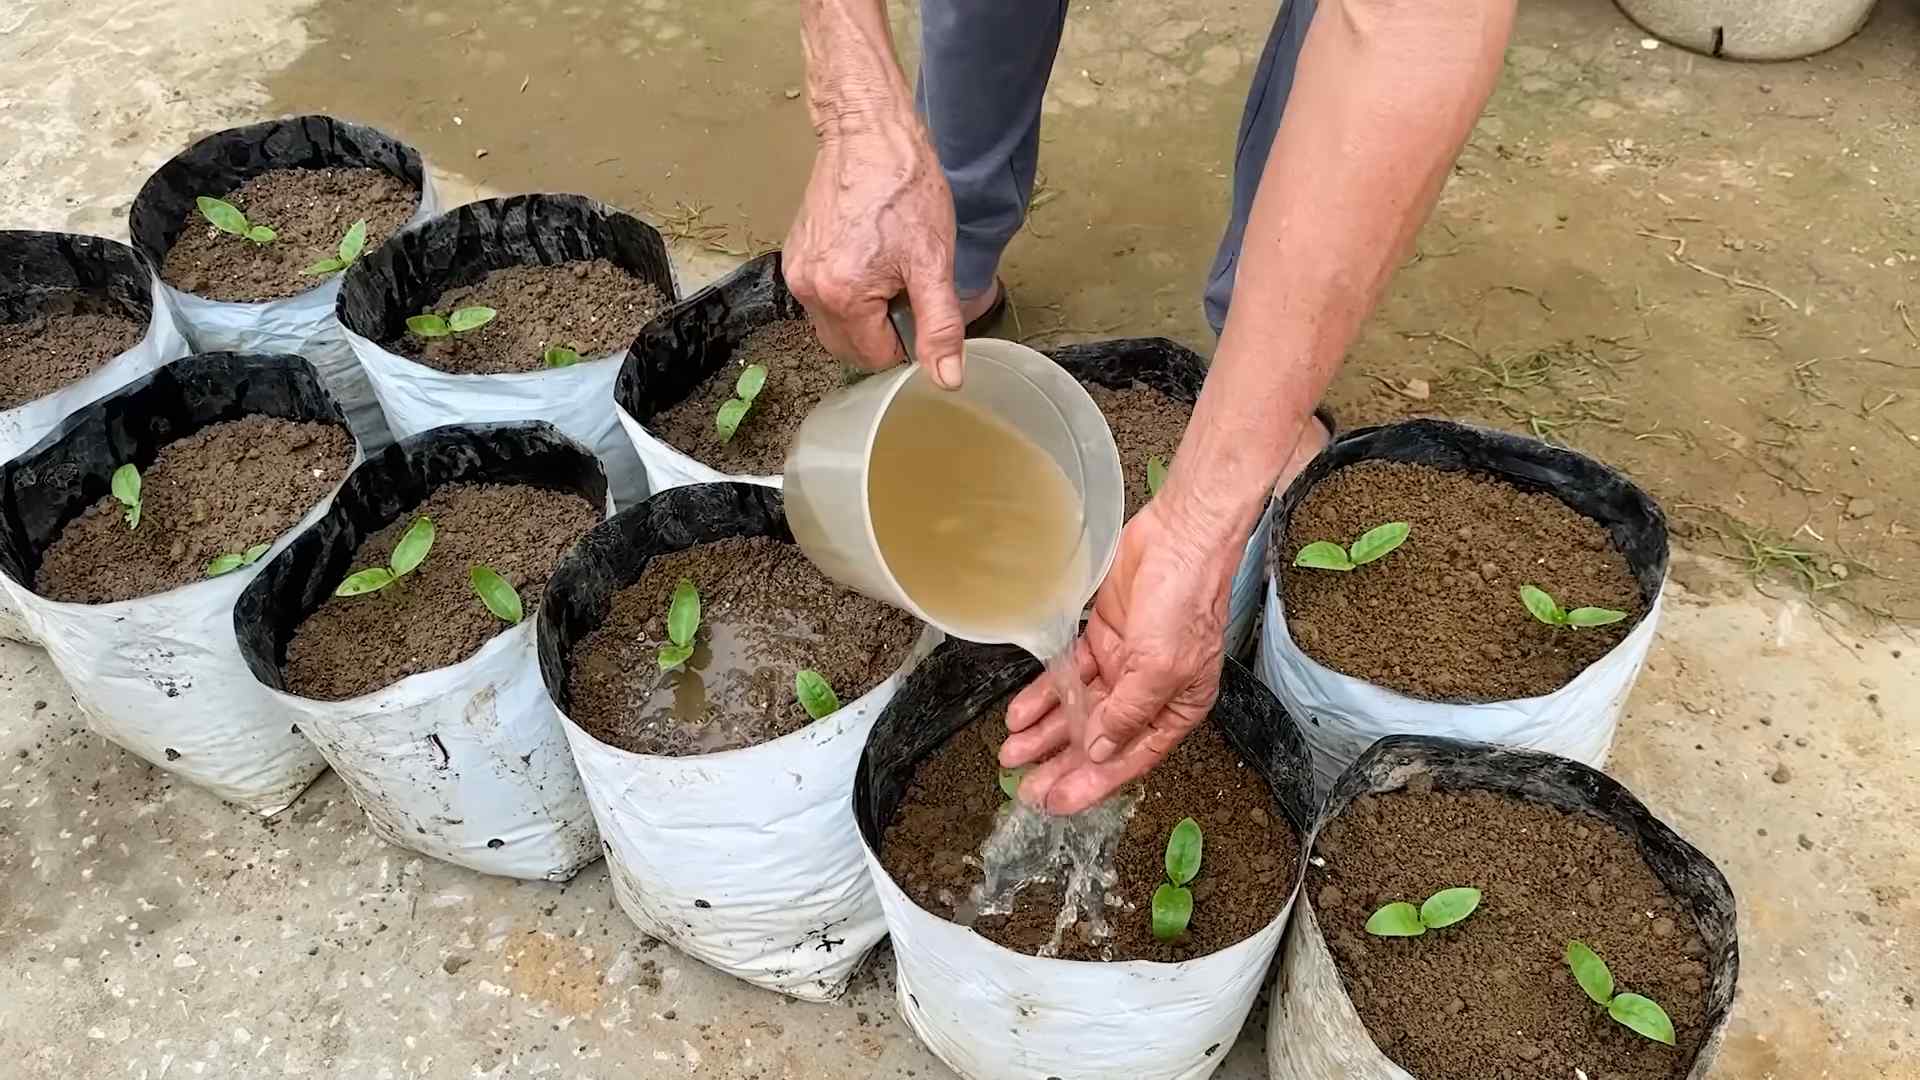
2. Plant the Seeds: Plant the yardlong bean seeds directly into the soil, about 1 inch deep and 4-6 inches apart, along the base of the trellis. I usually plant a few extra seeds to ensure good germination.
3. Water Thoroughly: Water the newly planted seeds thoroughly. Keep the soil consistently moist until the seedlings emerge.
4. Thin the Seedlings (if needed): Once the seedlings have emerged and have a few sets of true leaves, thin them out to about 6-8 inches apart.
5. Guide the Vines: As the bean vines start to grow, gently guide them onto the wire mesh. They’ll eventually start climbing on their own, but a little encouragement at the beginning helps.
Caring for Your Yardlong Beans
Now that your yardlong beans are planted and climbing, here are a few tips to keep them happy and healthy:
* Watering: Yardlong beans need consistent moisture, especially during hot weather. Water deeply whenever the top inch of soil feels dry.
* Fertilizing: Feed your yardlong beans with a balanced fertilizer every few weeks. Look for a fertilizer that’s specifically formulated for vegetables.
* Pest Control: Keep an eye out for common garden pests like aphids and bean beetles. Treat infestations promptly with insecticidal soap or other organic pest control methods.
* Weeding: Keep the area around the trellis free of weeds. Weeds compete with the beans for nutrients and water.
* Harvesting: Yardlong beans are ready to harvest when they’re about 12-18 inches long and still tender. Harvest them regularly to encourage continued production. Don’t let them get too thick and tough.
Troubleshooting
Even with the best planning, sometimes things don’t go exactly as expected. Here are a few common problems you might encounter and how to fix them:
* Poor Germination: If your seeds aren’t germinating, make sure the soil is warm enough (at least 65°F). You can also try soaking the seeds in water for 24 hours before planting to improve germination rates.
* Yellowing Leaves: Yellowing leaves can be a sign of nutrient deficiency. Try fertilizing with a balanced fertilizer. It could also be a sign of overwatering, so make sure your soil is well-draining.
* Lack of Flowers: If your beans aren’t flowering, it could be due to too much nitrogen in the soil. Avoid using fertilizers that are high in nitrogen.
* Pest Infestations: Regularly inspect your plants for pests and treat infestations promptly.
Variations and Customizations
This trellis design is just a starting point. Feel free to customize it to suit your needs and preferences. Here are a few ideas:
* Add a Top: You can add a roof or top to your trellis to provide shade for the
Conclusion
So, there you have it! Mastering the art of growing yardlong beans doesn’t require a green thumb blessed by the gardening gods. It’s about understanding their needs, providing the right support, and being patient. This DIY guide offers a straightforward approach to cultivating these fascinating and delicious legumes right in your own backyard.
Why is this DIY approach a must-try? Because it empowers you to control the entire process, from seed to table. You know exactly what goes into your food, avoiding potentially harmful pesticides and herbicides often used in commercial farming. Plus, there’s an unparalleled satisfaction in harvesting your own bounty, especially when it comes to something as unique and rewarding as yardlong beans. Imagine the conversations sparked when you present a plate of these impressive vegetables, grown with your own two hands!
But the fun doesn’t stop there! Feel free to experiment with different varieties of yardlong beans. Some are more heat-tolerant, while others offer unique flavor profiles. Consider companion planting to maximize your garden’s potential. Marigolds can deter pests, while basil can enhance the flavor of your beans. You can also explore different trellising methods. While a simple A-frame trellis works wonders, you might want to try a teepee structure or even train your yardlong beans along a fence.
And don’t forget about the culinary possibilities! Yardlong beans are incredibly versatile. They can be stir-fried, steamed, grilled, or even added to soups and stews. Their slightly sweet and nutty flavor pairs well with a variety of cuisines. Try them in Asian-inspired dishes, or use them as a substitute for green beans in your favorite recipes. The possibilities are endless!
Ultimately, this DIY yardlong bean growing guide is more than just a set of instructions; it’s an invitation to connect with nature, learn new skills, and enjoy the fruits (or rather, the beans) of your labor. We encourage you to give it a try. Start small, learn as you go, and don’t be afraid to experiment.
We’re confident that you’ll find the experience both rewarding and delicious. And most importantly, we want to hear about your journey! Share your successes, your challenges, and your favorite yardlong bean recipes with us. Let’s build a community of passionate gardeners who are dedicated to growing their own food and sharing their knowledge with others. So, grab your seeds, get your hands dirty, and start growing your own amazing yardlong beans today! We can’t wait to see what you create.
Frequently Asked Questions (FAQ)
What is the best time of year to plant yardlong beans?
Yardlong beans are warm-weather crops, so the best time to plant them is after the last frost, when the soil has warmed to at least 65°F (18°C). This typically falls in late spring or early summer, depending on your climate. In warmer regions with longer growing seasons, you may even be able to plant a second crop in late summer for a fall harvest. Check your local frost dates to determine the optimal planting time for your area.
How much sun do yardlong beans need?
Yardlong beans thrive in full sun, requiring at least 6-8 hours of direct sunlight per day. Insufficient sunlight can lead to weak growth, reduced yields, and increased susceptibility to pests and diseases. Choose a planting location that receives ample sunlight throughout the day. If you live in a particularly hot climate, some afternoon shade may be beneficial to prevent the plants from overheating.
What kind of soil is best for growing yardlong beans?
Yardlong beans prefer well-drained, fertile soil with a slightly acidic to neutral pH (6.0-7.0). Amend heavy clay soil with compost or other organic matter to improve drainage and aeration. Sandy soil can be improved by adding compost to increase its water-holding capacity. Before planting, incorporate a balanced fertilizer into the soil to provide essential nutrients for healthy growth.
How often should I water yardlong beans?
Yardlong beans need consistent moisture, especially during flowering and pod development. Water deeply and regularly, aiming to keep the soil consistently moist but not waterlogged. Avoid overhead watering, as this can promote fungal diseases. A soaker hose or drip irrigation system is ideal for delivering water directly to the roots. Mulching around the plants can help retain moisture and suppress weeds.
What kind of trellis should I use for yardlong beans?
Yardlong beans are vigorous climbers and require a sturdy trellis to support their growth. An A-frame trellis, a teepee structure, or even a fence can work well. The trellis should be at least 6-8 feet tall to accommodate the long vines. Make sure the trellis is strong enough to support the weight of the mature plants and the developing beans. You can also use netting or twine to provide additional support.
How long does it take for yardlong beans to mature?
Yardlong beans typically take 60-80 days to mature after planting. You can start harvesting the beans when they are about 12-18 inches long and still tender. Regular harvesting encourages continued production. Check the plants frequently and harvest the beans before they become too tough or stringy.
What are some common pests and diseases that affect yardlong beans?
Yardlong beans can be susceptible to various pests and diseases, including aphids, bean beetles, spider mites, and fungal diseases like powdery mildew and rust. Regularly inspect your plants for signs of infestation or disease. Use organic pest control methods, such as insecticidal soap or neem oil, to control pests. Ensure good air circulation and avoid overhead watering to prevent fungal diseases. Remove any infected leaves or plants promptly to prevent the spread of disease.
Can I grow yardlong beans in containers?
Yes, you can grow yardlong beans in containers, but you’ll need a large container (at least 12 inches in diameter) with good drainage. Use a high-quality potting mix and provide a sturdy trellis for the vines to climb. Container-grown yardlong beans may require more frequent watering and fertilization than those grown in the ground. Choose a sunny location for your container garden.
How do I save seeds from yardlong beans?
To save seeds from yardlong beans, allow some of the pods to mature fully on the vine until they are dry and brown. Harvest the pods and shell the beans. Spread the beans out on a tray to dry completely for a few weeks. Store the dried beans in an airtight container in a cool, dry place. Properly stored yardlong bean seeds can remain viable for several years.
What are some good companion plants for yardlong beans?
Good companion plants for yardlong beans include marigolds, basil, rosemary, and nasturtiums. Marigolds deter pests, while basil can enhance the flavor of the beans. Rosemary repels bean beetles, and nasturtiums attract aphids away from the bean plants. Avoid planting yardlong beans near onions or garlic, as these can inhibit their growth.

Leave a Comment