
Yardlong Bean Growing Guide: Your Path to a Bountiful Harvest!
Ever dreamt of strolling through your garden, casually snipping beans that are, well, practically as long as your arm? That’s the magic of yardlong beans! These fascinating legumes, also known as asparagus beans or Chinese long beans, are more than just a novelty; they’re a delicious and rewarding addition to any home garden. For centuries, yardlong beans have been a staple in Asian cuisine, gracing dishes with their unique flavor and impressive length. Their cultivation dates back to ancient China, where they were prized for their nutritional value and versatility.
But why should you consider adding them to your garden? In today’s world, where fresh, homegrown produce is increasingly valued, mastering the yardlong bean growing guide is a game-changer. Imagine the satisfaction of serving up a stir-fry featuring beans you nurtured from seed to plate! Plus, these vigorous climbers are incredibly productive, offering a generous harvest from a relatively small space. This DIY guide will equip you with all the knowledge you need to successfully cultivate these incredible beans, even if you’re a beginner gardener. I’m excited to share my tips and tricks to help you avoid common pitfalls and maximize your yield. Let’s get growing!
DIY Yardlong Bean Trellis: From Seed to Spectacular Harvest
Okay, let’s talk yardlong beans! These amazing, ridiculously long beans are not only delicious but also a showstopper in the garden. But to really get the most out of them, you need a good trellis. Forget those flimsy store-bought things; we’re building a sturdy, impressive trellis that will support your beans and look fantastic. I’m going to walk you through the whole process, step-by-step, so even if you’re a beginner, you can totally do this!
Planning Your Trellis: Size and Location
Before we even touch a tool, let’s think about the size and location of your trellis. Yardlong beans are vigorous climbers, so they need plenty of room to grow.
* Height: Aim for at least 8 feet tall. I usually go for 10 feet, just to be safe. You can always trim the beans if they get too tall, but it’s better to have too much space than not enough.
* Width: Consider how many plants you want to grow. Each plant will need about 6-12 inches of space along the trellis.
* Location: Choose a sunny spot in your garden that gets at least 6-8 hours of direct sunlight per day. Make sure the soil is well-draining and fertile. Also, think about the prevailing winds in your area. You want to orient your trellis so that it’s not constantly battered by strong winds.
Materials You’ll Need
Here’s a list of everything you’ll need to build your yardlong bean trellis. Don’t worry, it’s not too complicated!
* Wooden Posts: I recommend using 4×4 pressure-treated lumber for the main posts. These will be the backbone of your trellis, so you want them to be strong and durable. You’ll need at least two posts, but you might want more depending on the width of your trellis. For a 6-foot wide trellis, two posts are usually sufficient. For anything wider, consider adding a center post for extra support.
* Horizontal Supports: You can use 2×4 lumber or even sturdy bamboo poles for the horizontal supports. These will run between the posts and provide a framework for the beans to climb.
* Climbing Material: This is where you have some options! You can use garden twine, chicken wire, plastic netting, or even metal wire. I personally prefer garden twine because it’s biodegradable and easy to work with.
* Concrete Mix: For setting the posts in the ground. This will ensure that your trellis is stable and won’t topple over in strong winds.
* Screws or Nails: For attaching the horizontal supports to the posts. I recommend using exterior-grade screws for a stronger and more durable connection.
* Tools:
* Measuring tape
* Saw (for cutting the lumber)
* Drill (for pre-drilling holes and driving screws)
* Level
* Shovel
* Post hole digger (optional, but makes the job much easier)
* Wheelbarrow or mixing tub (for mixing the concrete)
* Gloves
* Safety glasses
Building the Trellis: Step-by-Step Instructions
Alright, let’s get building! Follow these steps carefully, and you’ll have a fantastic yardlong bean trellis in no time.
Phase 1: Setting the Posts
This is the most important part of the whole process. If your posts aren’t set properly, your trellis will be wobbly and unstable.
1. Mark the Post Locations: Use your measuring tape to mark the locations where you want to place your posts. Make sure the distance between the posts is consistent and that the posts are aligned.
2. Dig the Post Holes: Use your shovel or post hole digger to dig holes for the posts. The holes should be at least 2 feet deep and wide enough to accommodate the posts and some concrete. Remember, the deeper the hole, the more stable your trellis will be.
3. Position the Posts: Place the posts in the holes and use a level to make sure they are plumb (perfectly vertical). You might need to use some temporary braces to hold the posts in place while the concrete sets.
4. Mix the Concrete: Follow the instructions on the concrete mix bag to mix the concrete. Add water gradually until you achieve a thick, but pourable consistency.
5. Pour the Concrete: Pour the concrete into the holes around the posts. Use a shovel or trowel to pack the concrete tightly around the posts.
6. Check for Plumb Again: Double-check that the posts are still plumb after pouring the concrete. Make any necessary adjustments before the concrete starts to set.
7. Let the Concrete Cure: Allow the concrete to cure for at least 24-48 hours before proceeding to the next step. This will give the concrete time to harden and provide a solid foundation for your trellis. I usually wait a full 72 hours just to be extra sure.
Phase 2: Adding the Horizontal Supports
Now that the posts are securely in place, we can add the horizontal supports. These will provide the framework for the beans to climb.
1. Measure and Cut the Horizontal Supports: Measure the distance between the posts and cut the horizontal supports to the appropriate length. Make sure the cuts are clean and straight.
2. Attach the First Horizontal Support: Position the first horizontal support near the bottom of the posts, about 1 foot above the ground. Use your drill to pre-drill holes through the horizontal support and into the posts. Then, drive screws through the holes to attach the support to the posts.
3. Attach the Remaining Horizontal Supports: Repeat the previous step to attach the remaining horizontal supports. Space the supports evenly along the height of the posts, about 1-2 feet apart. The closer the supports, the easier it will be for the beans to climb.
4. Reinforce the Connections (Optional): For extra strength, you can add metal brackets or corner braces to reinforce the connections between the horizontal supports and the posts. This is especially helpful if you live in an area with strong winds.
Phase 3: Adding the Climbing Material
This is the final step! Now we’re going to add the material that the beans will actually climb on.
1. Choose Your Climbing Material: As I mentioned earlier, you have several options for climbing material. I’m going to describe how to use garden twine, but the process is similar for other materials.
2. Attach the Twine: Tie one end of the twine to the bottom horizontal support. Then, run the twine vertically up to the top horizontal support and tie it off. Repeat this process, spacing the twine strands about 6-12 inches apart.
3. Create a Grid Pattern (Optional): For a more robust climbing surface, you can create a grid pattern by running the twine horizontally as well as vertically. This will provide more support for the beans and make it easier for them to climb.
4. Secure the Twine: Make sure the twine is securely attached to the horizontal supports. You can use knots, staples, or even small pieces of wire to keep the twine in place.
Planting Your Yardlong Beans
Now that your trellis is complete, it’s time to plant your yardlong beans!
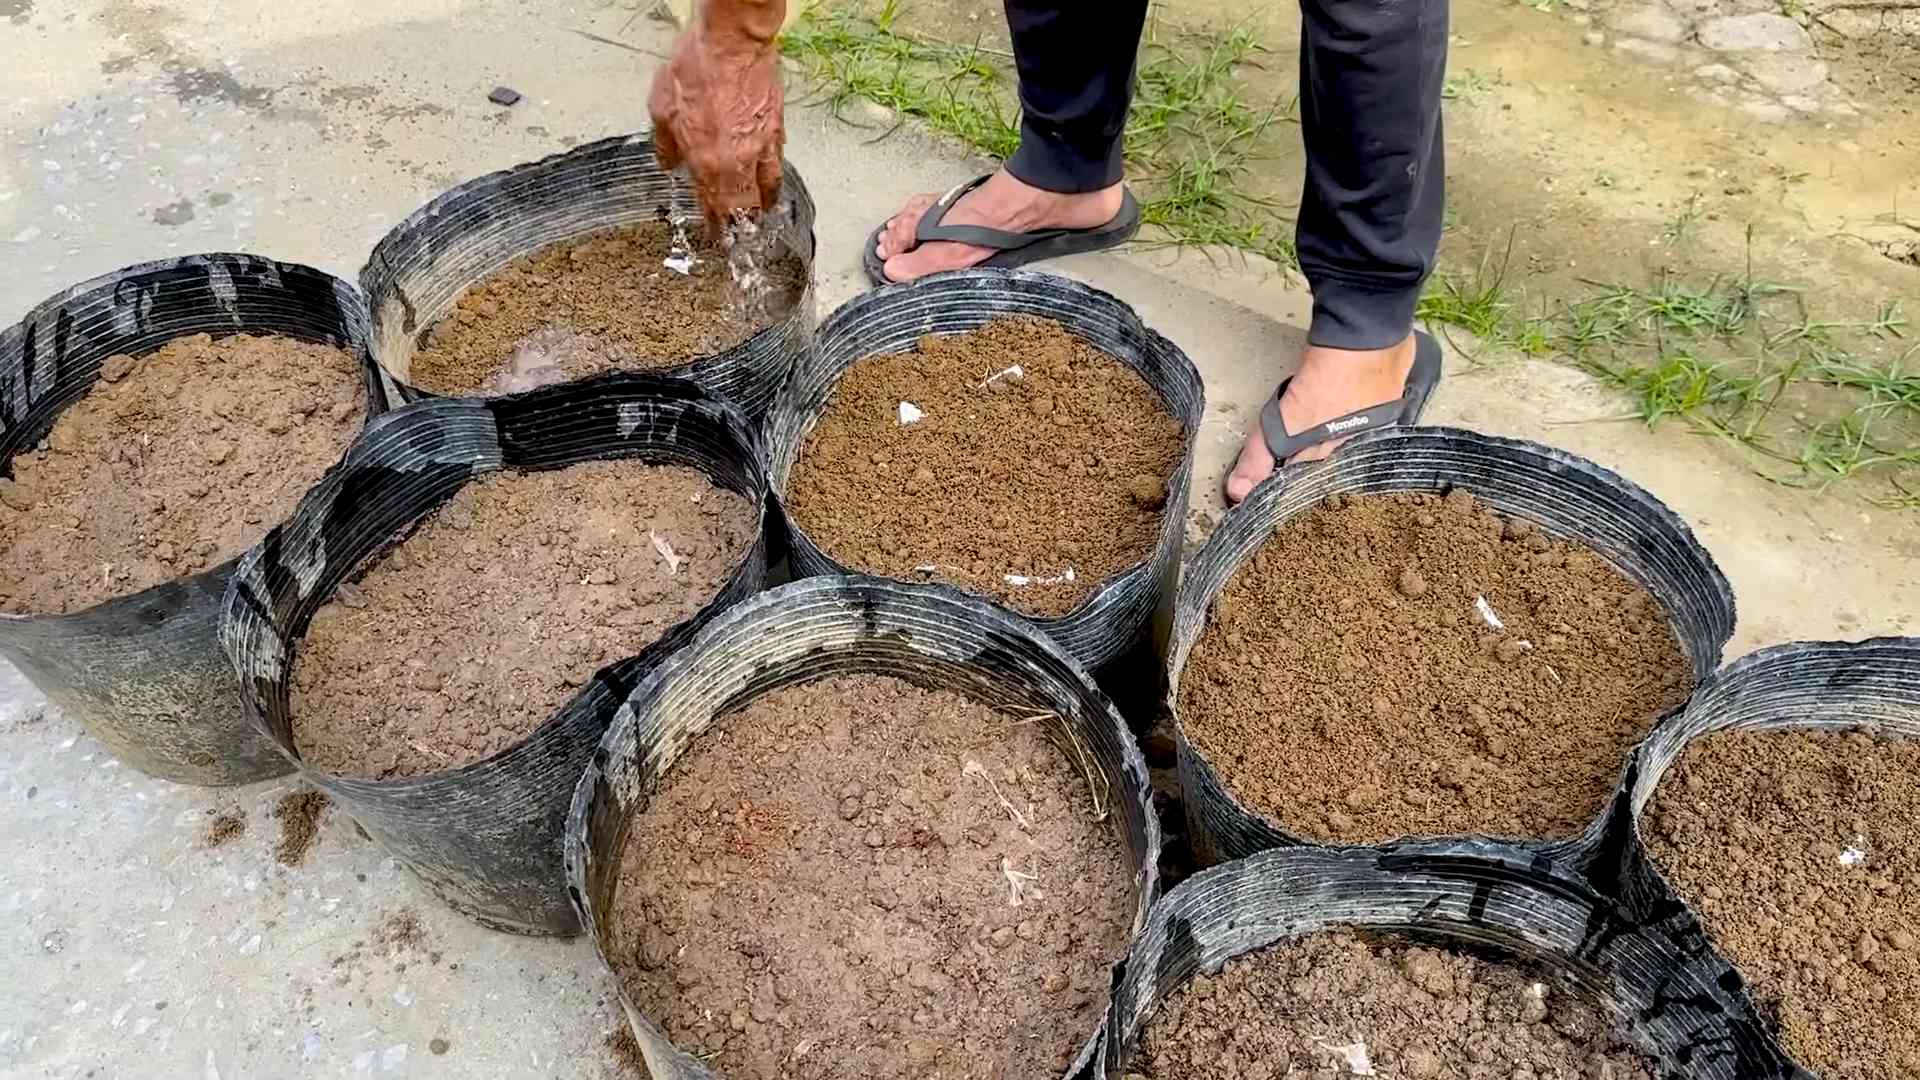
1. Prepare the Soil: Make sure the soil around the base of the trellis is loose and well-draining. You can amend the soil with compost or other organic matter to improve its fertility.
2. Sow the Seeds: Sow the bean seeds directly into the soil, about 1 inch deep and 6-12 inches apart.
3. Water Regularly: Water the seeds regularly to keep the soil moist but not soggy.
4. Provide Support: As the bean seedlings emerge, gently guide them towards the trellis and help them to start climbing. You can use small pieces of twine or plant clips to attach the seedlings to the trellis.
Maintenance and Care
Your yardlong bean trellis is built, your beans are planted, now what? Here are a few tips to keep your beans happy and healthy:
* Watering: Yardlong beans need consistent moisture, especially during hot weather. Water deeply and regularly, especially when the plants are flowering and producing beans.
* Fertilizing: Feed your beans with a balanced fertilizer every few weeks to promote healthy growth and abundant yields.
* Pest Control: Keep an eye out for common bean pests, such as aphids, bean beetles, and spider mites. Treat infestations promptly with insecticidal soap or other organic pest control methods.
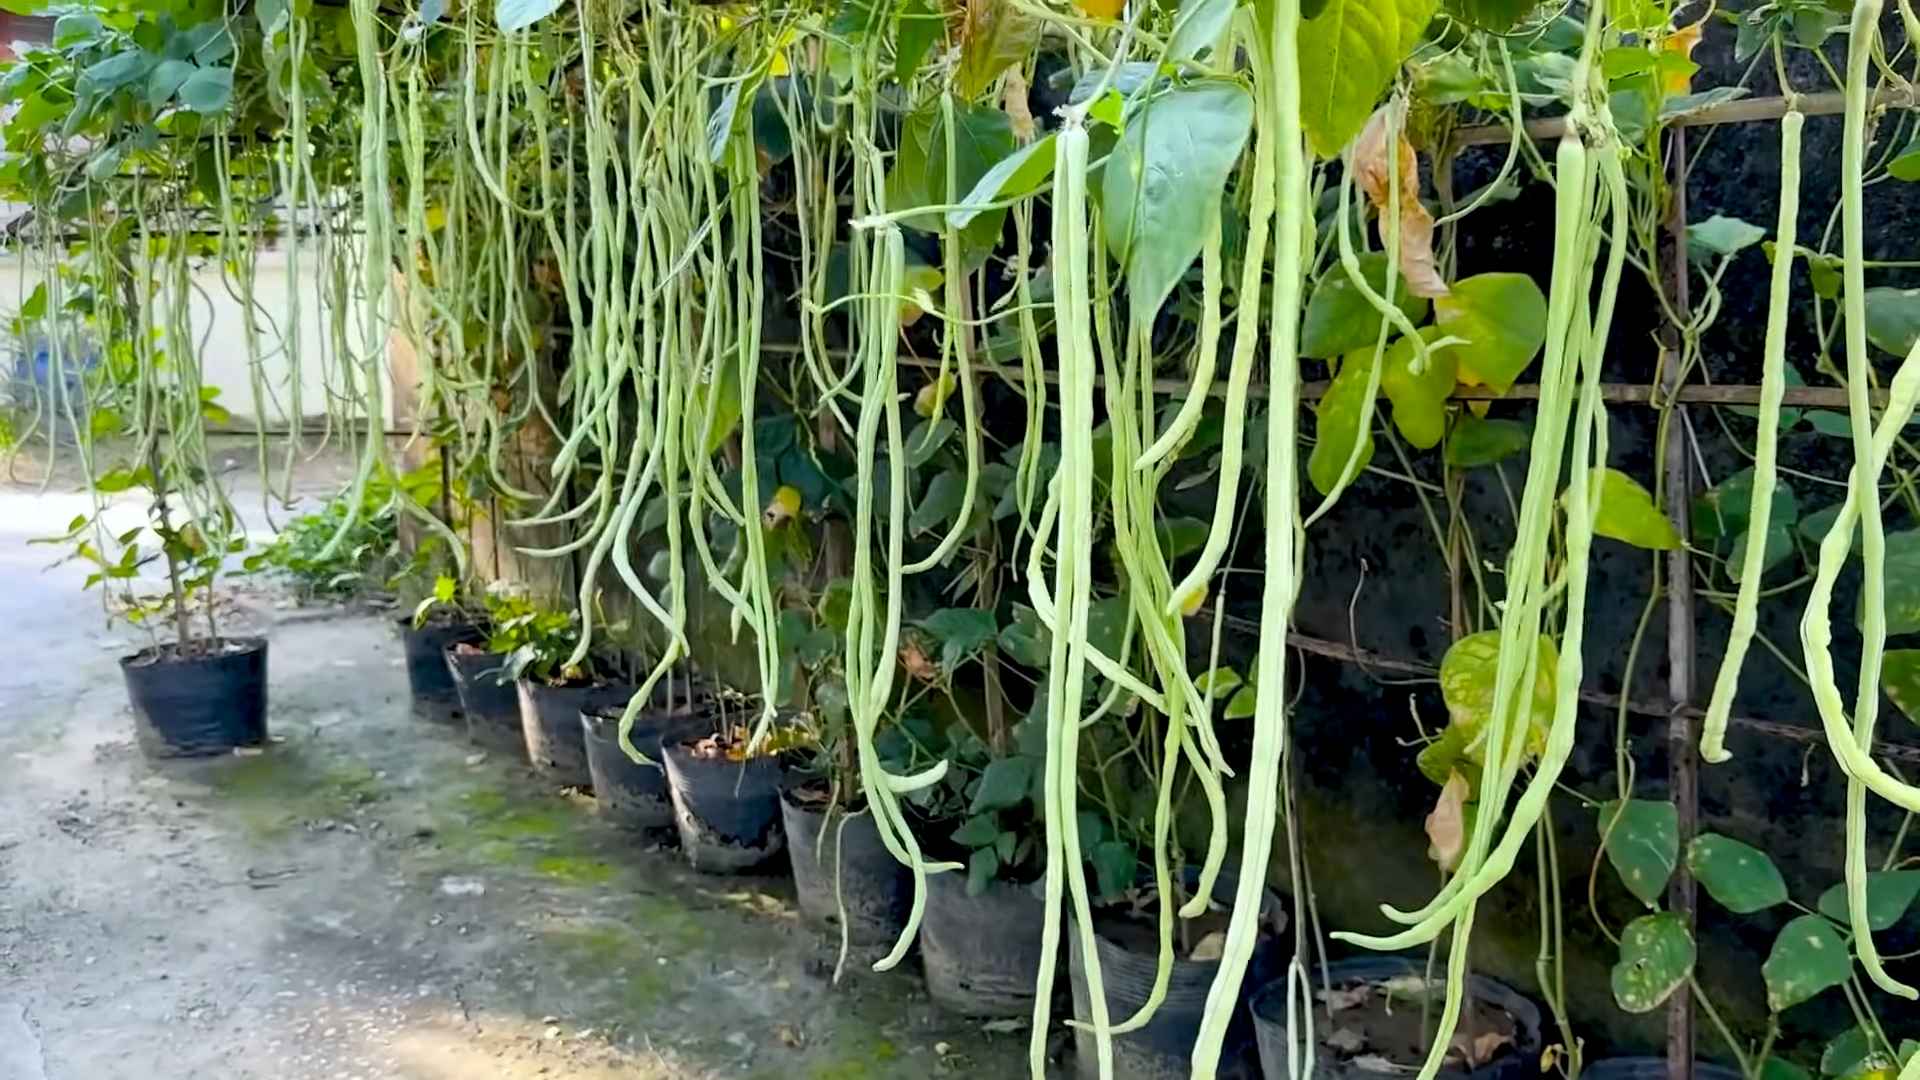
* Harvesting: Harvest the beans when they are about 12-18 inches long and still tender. Pick them regularly to encourage continued production.
* Pruning: You can prune the bean plants to encourage branching and bushier growth. Simply pinch off the tips of the vines to promote side shoots.
Conclusion
So, there you have it! Mastering the art of growing yardlong beans doesn’t require a green thumb of mythical proportions. It’s about understanding their needs, providing the right support, and being patient enough to watch those incredible vines climb and produce. This comprehensive guide has armed you with the knowledge to cultivate a thriving yardlong bean patch, even if you’re a complete beginner.
Why is this DIY approach a must-try? Because store-bought yardlong beans simply can’t compare to the flavor and freshness of homegrown. Imagine the satisfaction of harvesting your own vibrant, crisp beans, knowing exactly where they came from and how they were grown. Plus, you’ll save money, reduce your carbon footprint, and enjoy the therapeutic benefits of gardening. It’s a win-win-win!
But the journey doesn’t end here. Feel free to experiment with different varieties of yardlong beans. Some are known for their exceptional flavor, while others boast impressive length. Try interplanting your beans with companion plants like marigolds or basil to deter pests and attract beneficial insects. Consider succession planting to extend your harvest season, ensuring a continuous supply of fresh beans throughout the summer. You can also explore different trellis designs to find what works best for your space and aesthetic preferences. Perhaps a simple bamboo structure, a repurposed metal gate, or even a living trellis made of sunflowers!
Don’t be afraid to get creative and adapt these techniques to your specific climate and growing conditions. Remember, gardening is a learning process, and every season brings new opportunities for discovery. The key is to observe your plants, listen to their needs, and adjust your approach accordingly.
We’re confident that with a little effort and dedication, you’ll be enjoying a bountiful harvest of delicious, homegrown yardlong beans in no time. So, grab your seeds, prepare your soil, and get ready to embark on this rewarding gardening adventure.
Now, we want to hear from you! Have you tried growing yardlong beans before? What challenges did you face, and what successes did you celebrate? Share your experiences, tips, and photos in the comments below. Let’s create a community of passionate yardlong bean growers and learn from each other. Your insights could be invaluable to someone just starting out. Happy gardening!
Frequently Asked Questions (FAQ)
What are yardlong beans, and why should I grow them?
Yardlong beans, also known as asparagus beans or Chinese long beans, are a type of legume characterized by their exceptionally long pods, often reaching lengths of up to three feet! They offer a unique and delicious flavor, similar to green beans but with a slightly nuttier and more intense taste. Growing them yourself ensures you have access to the freshest, most flavorful beans possible, often surpassing the quality of store-bought varieties. Plus, they are a visually stunning addition to any garden, adding vertical interest and a touch of the exotic. Growing your own also allows you to control the growing process, avoiding harmful pesticides and herbicides.
How much space do yardlong beans need?
Yardlong beans are vigorous climbers and require ample vertical space. Each plant needs at least 6-8 inches of space along the trellis or support structure. The trellis itself should be at least 6-8 feet tall to accommodate their growth. Consider the width of your trellis as well; a wider trellis will allow for more plants to be supported. If planting in rows, space the rows 2-3 feet apart to allow for easy access and air circulation. Remember, good air circulation is crucial for preventing fungal diseases.
What kind of soil is best for yardlong beans?
Yardlong beans thrive in well-drained, fertile soil that is rich in organic matter. Amend your soil with compost or aged manure before planting to improve its structure and nutrient content. The ideal soil pH is between 6.0 and 7.5. If your soil is heavy clay, consider adding sand or perlite to improve drainage. Conduct a soil test to determine the pH and nutrient levels of your soil and amend accordingly. Avoid soils that are consistently waterlogged, as this can lead to root rot.
How often should I water yardlong beans?
Yardlong beans need consistent moisture, especially during hot, dry weather. Water deeply and regularly, aiming to keep the soil consistently moist but not waterlogged. A good rule of thumb is to water when the top inch of soil feels dry to the touch. Mulching around the plants can help retain moisture and suppress weeds. Avoid overhead watering, as this can increase the risk of fungal diseases. Drip irrigation or soaker hoses are excellent options for delivering water directly to the roots.
Do yardlong beans need fertilizer?
While yardlong beans are legumes and can fix nitrogen in the soil, they still benefit from supplemental fertilization. Apply a balanced fertilizer (e.g., 10-10-10) at planting time and again when the plants begin to flower. Avoid over-fertilizing with nitrogen, as this can promote excessive foliage growth at the expense of bean production. You can also use organic fertilizers such as compost tea or fish emulsion. Monitor your plants for signs of nutrient deficiencies, such as yellowing leaves, and adjust your fertilization accordingly.
What are common pests and diseases that affect yardlong beans?
Common pests that can affect yardlong beans include aphids, bean beetles, and spider mites. Regularly inspect your plants for signs of infestation and take action promptly. Insecticidal soap, neem oil, or handpicking can be effective for controlling these pests. Common diseases include fungal diseases such as powdery mildew and bean rust. Ensure good air circulation, avoid overhead watering, and use disease-resistant varieties to minimize the risk of these diseases. If necessary, apply a fungicide according to the manufacturer’s instructions.
When and how should I harvest yardlong beans?
Yardlong beans are typically ready to harvest about 60-80 days after planting. Harvest the beans when they are young and tender, before the seeds inside become too large and the pods become tough. The ideal length for harvesting is usually around 12-18 inches, but this can vary depending on the variety. Use scissors or pruning shears to cut the beans from the vine, being careful not to damage the plant. Harvest regularly to encourage continued production.
Can I save seeds from my yardlong beans?
Yes, you can save seeds from your yardlong beans, but it’s important to note that if you’re growing multiple varieties, cross-pollination can occur, resulting in seeds that may not produce true-to-type plants. To save seeds, allow some of the beans to mature fully on the vine until they are dry and brown. Remove the seeds from the pods and allow them to dry completely before storing them in an airtight container in a cool, dark place. Label the container with the variety and date.
Are there any companion plants that are beneficial for yardlong beans?
Yes, several companion plants can benefit yardlong beans. Marigolds and nasturtiums can help deter pests, while basil can improve the flavor of the beans. Corn can provide support for the vines, and carrots can help improve soil drainage. Avoid planting yardlong beans near onions or garlic, as these can inhibit their growth.
How can I use yardlong beans in cooking?
Yardlong beans are incredibly versatile in the kitchen. They can be steamed, stir-fried, grilled, or added to soups and stews. Their long, slender shape makes them perfect for stir-fries, where they can be cut into shorter lengths. They can also be used in salads or as a side dish. Their unique flavor pairs well with Asian-inspired sauces and spices. Experiment with different recipes and find your favorite way to enjoy these delicious beans!


Leave a Comment