
Water saving tomato growing is not just a trend; it’s a necessity for the modern gardener! Are you tired of watching your precious tomato plants wither under the summer sun, despite your best watering efforts? I know I was! For centuries, gardeners have struggled with the delicate balance of providing enough water without drowning their plants or wasting this precious resource. From ancient irrigation systems to modern drip lines, the quest for efficient watering has always been a top priority.
But what if I told you there’s a way to drastically reduce your water consumption while still enjoying a bountiful harvest of juicy, flavorful tomatoes? This DIY guide is packed with simple, yet effective tricks and hacks that will transform your tomato growing game. We’ll explore everything from clever container techniques to soil amendments that boost water retention.
In a world increasingly concerned about water conservation, mastering water saving tomato growing techniques is not only environmentally responsible but also economically smart. Plus, you’ll have the satisfaction of knowing you’re growing delicious, homegrown tomatoes in a sustainable way. Let’s dive in and discover the secrets to a thriving, water-wise tomato garden!
Wasser sparen beim Tomatenanbau: Ein DIY-Bewässerungssystem
Hallo liebe Gartenfreunde! Ich bin total begeistert davon, wie man mit ein bisschen Kreativität und ein paar einfachen Materialien richtig viel Wasser sparen kann, besonders beim Tomatenanbau. Tomaten sind ja bekanntlich durstig, aber mit diesem DIY-Bewässerungssystem bekommen sie genau das, was sie brauchen, ohne dass wir unnötig Wasser verschwenden. Los geht’s!
Benötigte Materialien
Bevor wir loslegen, hier eine Liste mit allem, was du brauchst:
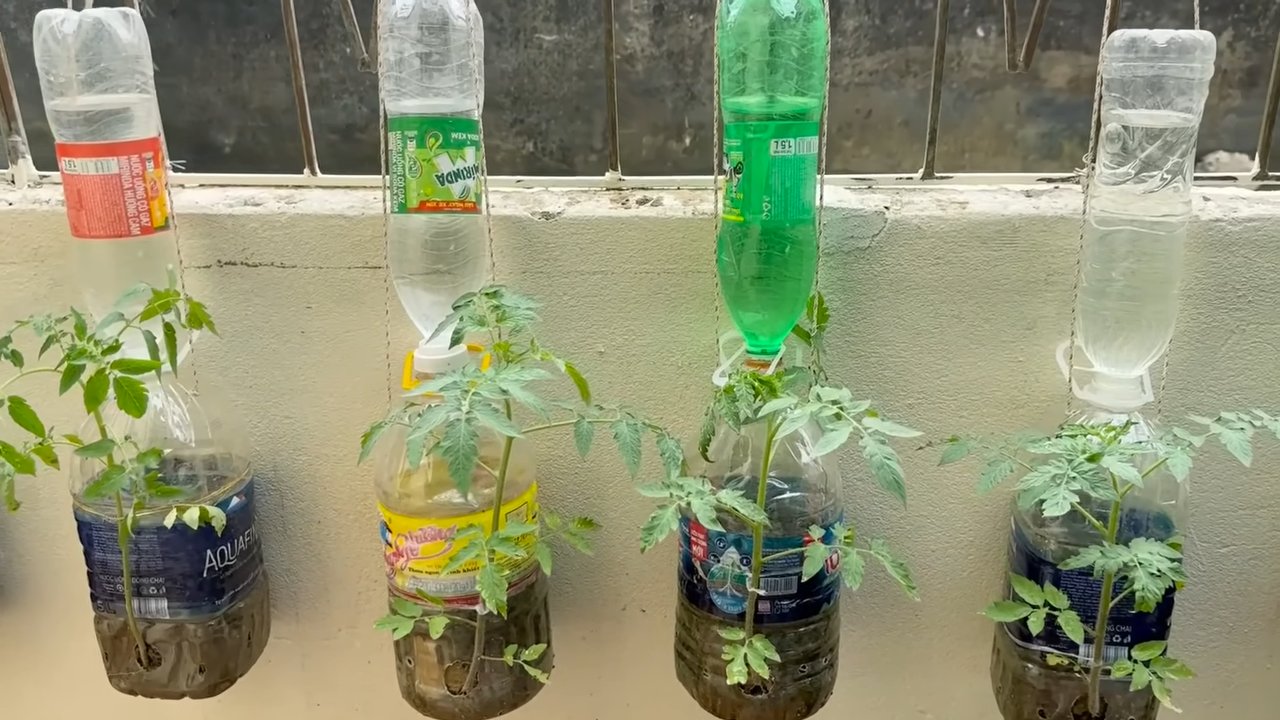
* Leere Plastikflaschen (PET, verschiedene Größen funktionieren, aber 1,5-Liter-Flaschen sind ideal)
* Ein Bohrer oder ein Nagel und Hammer
* Ein Messer oder eine Schere
* Grobkörniger Sand oder Kies
* Gartenvlies oder alte Stoffreste
* Gießkanne oder Schlauch
* Mulch (Stroh, Holzhackschnitzel, Grasschnitt)
* Optional: Klebeband oder Kabelbinder
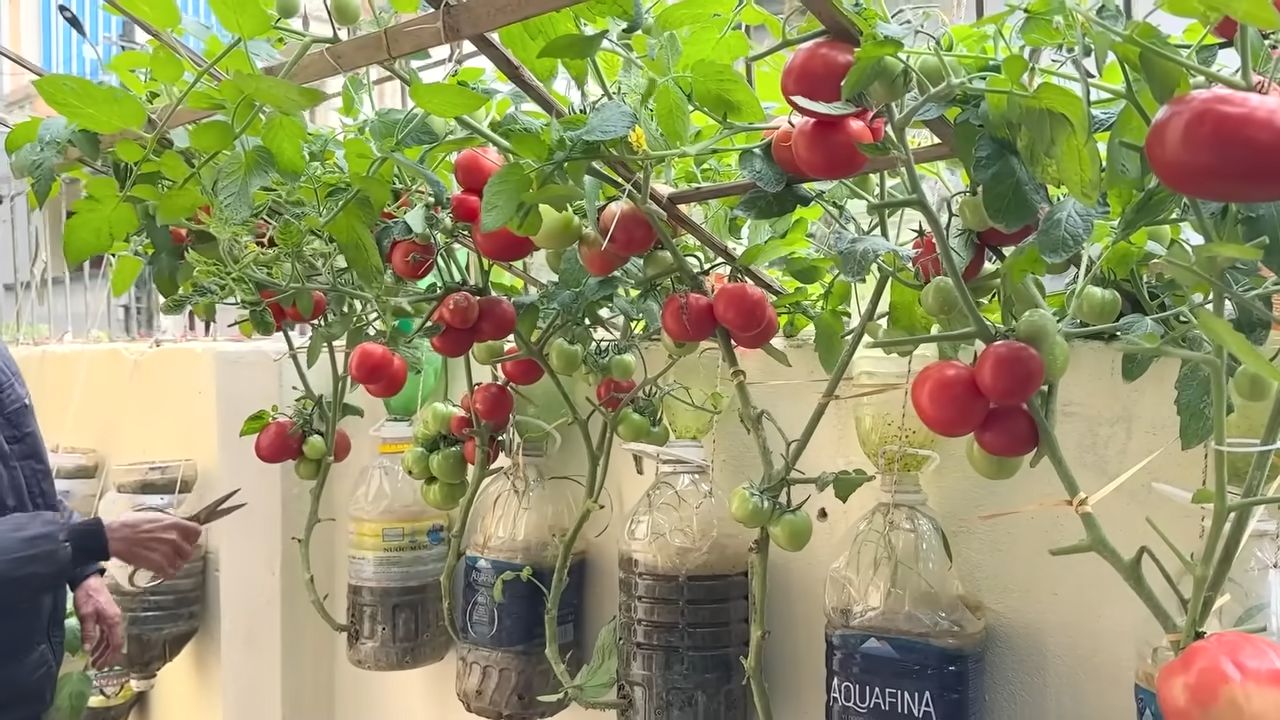
Das Prinzip hinter der wassersparenden Bewässerung
Das System, das wir bauen, basiert auf dem Prinzip der langsamen, gezielten Bewässerung direkt an den Wurzeln der Tomatenpflanzen. Anstatt die Blätter zu gießen, was zu Verdunstung und Pilzkrankheiten führen kann, geben wir das Wasser direkt dorthin, wo es gebraucht wird. Der Sand oder Kies in den Flaschen dient als Filter und sorgt für eine gleichmäßige Wasserabgabe. Das Gartenvlies verhindert, dass die Erde die Löcher verstopft. Und der Mulch hält die Feuchtigkeit im Boden und reduziert die Verdunstung zusätzlich.
Schritt-für-Schritt-Anleitung: Das DIY-Bewässerungssystem bauen
Hier kommt die genaue Anleitung, wie du dein eigenes wassersparendes Bewässerungssystem für deine Tomaten bauen kannst. Keine Sorge, es ist wirklich einfach!
1. Flaschen vorbereiten:
* Zuerst musst du die leeren Plastikflaschen gründlich reinigen. Entferne alle Etiketten und Rückstände.
* Jetzt kommt der Bohrer oder Nagel zum Einsatz. Bohre oder schlage mit dem Hammer mehrere kleine Löcher (ca. 3-5 mm Durchmesser) in den unteren Teil der Flasche, etwa 5-10 cm vom Boden entfernt. Je nach Größe der Flasche und Bodenbeschaffenheit kannst du die Anzahl der Löcher variieren. Ich empfehle, erstmal weniger Löcher zu machen und bei Bedarf später noch welche hinzuzufügen.
* Wichtig: Achte darauf, dass die Löcher nicht zu groß sind, sonst fließt das Wasser zu schnell ab.
2. Filter einsetzen:
* Schneide ein Stück Gartenvlies oder einen alten Stoffrest so zu, dass es den Flaschenhals bedeckt. Das Vlies verhindert, dass Erde in die Flasche gelangt und die Löcher verstopft.
* Befestige das Vlies mit Klebeband oder einem Kabelbinder am Flaschenhals. Es sollte fest sitzen, aber nicht zu eng, damit das Wasser noch gut durchfließen kann.
3. Flaschen befüllen:
* Fülle die Flasche nun mit grobkörnigem Sand oder Kies. Das dient als Filter und sorgt für eine gleichmäßige Wasserabgabe. Fülle die Flasche etwa zu zwei Dritteln.
* Tipp: Wenn du keinen Sand oder Kies hast, kannst du auch kleine Steine oder Tonscherben verwenden.
4. Flaschen eingraben:
* Suche dir einen Platz in der Nähe deiner Tomatenpflanze. Grabe ein Loch, das tief genug ist, um die Flasche bis zum Flaschenhals einzugraben.
* Platziere die Flasche in dem Loch, sodass der Flaschenhals etwa 2-3 cm aus der Erde ragt.
* Fülle das Loch mit Erde auf und drücke sie leicht an.
5. Bewässerungssystem befüllen:
* Gieße nun vorsichtig Wasser in den Flaschenhals. Achte darauf, dass das Wasser langsam einsickert.
* Fülle die Flasche bis zum Rand.
6. Mulchen:
* Bedecke den Boden um die Tomatenpflanze und die eingegrabene Flasche mit Mulch. Das kann Stroh, Holzhackschnitzel oder Grasschnitt sein. Der Mulch hält die Feuchtigkeit im Boden und reduziert die Verdunstung.
* Warum Mulchen so wichtig ist: Mulch wirkt wie eine natürliche Isolierung für den Boden. Er hält den Boden kühl und feucht, was besonders an heißen Tagen wichtig ist. Außerdem unterdrückt er das Wachstum von Unkraut, das den Tomatenpflanzen Nährstoffe und Wasser rauben könnte.
Variationen und Anpassungen
Dieses DIY-Bewässerungssystem ist super flexibel und lässt sich leicht an deine individuellen Bedürfnisse anpassen. Hier sind ein paar Ideen:
* Größere Flaschen für größere Pflanzen: Wenn du besonders große Tomatenpflanzen hast, kannst du auch größere Flaschen verwenden, z.B. 5-Liter-Kanister.
* Mehrere Flaschen pro Pflanze: Bei sehr durstigen Sorten oder in besonders trockenen Regionen kannst du auch mehrere Flaschen pro Pflanze eingraben.
* Tropfschläuche anschließen: Du kannst auch einen Tropfschlauch an den Flaschenhals anschließen, um das Wasser noch gezielter zu verteilen.
* Automatische Bewässerung: Für noch mehr Komfort kannst du eine automatische Bewässerung an den Flaschenhals anschließen. Es gibt verschiedene Systeme, die mit einem Timer oder Feuchtigkeitssensor gesteuert werden.
Pflege und Wartung
Damit dein DIY-Bewässerungssystem optimal funktioniert, solltest du es regelmäßig pflegen und warten:
* Flaschen regelmäßig nachfüllen: Überprüfe regelmäßig den Wasserstand in den Flaschen und fülle sie bei Bedarf nach. Wie oft du nachfüllen musst, hängt von der Größe der Flasche, dem Wetter und dem Wasserbedarf deiner Tomatenpflanzen ab.
* Löcher reinigen: Kontrolliere regelmäßig die Löcher in den Flaschen und reinige sie bei Bedarf mit einer kleinen Bürste oder einem Draht. Verstopfte Löcher können die Wasserabgabe beeinträchtigen.
* Mulch erneuern: Erneuere den Mulch regelmäßig, um seine Wirkung aufrechtzuerhalten.
* Boden beobachten: Achte auf den Zustand des Bodens um die Tomatenpflanzen. Er sollte feucht, aber nicht nass sein.
Vorteile des DIY-Bewässerungssystems
Dieses DIY-Bewässerungssystem bietet viele Vorteile:
* Wassersparen: Du sparst deutlich Wasser, da das Wasser direkt an die Wurzeln gelangt und weniger verdunstet.
* Gesündere Pflanzen: Die gezielte Bewässerung reduziert das Risiko von Pilzkrankheiten, da die Blätter trocken bleiben.
* Weniger Unkraut: Der Mulch unterdrückt das Wachstum von Unkraut.
* Geringe Kosten: Die Materialien sind günstig und oft schon vorhanden.
* Umweltfreundlich: Du recycelst Plastikflaschen und schonst die Umwelt.
* Einfache Installation: Das System ist einfach zu bauen und zu installieren.
Häufige Fehler und wie man sie vermeidet
Auch beim Bau und der Nutzung dieses DIY-Bewässerungssystems können Fehler passieren. Hier sind ein paar häufige Fehler und Tipps, wie du sie vermeidest:
* Zu große Löcher: Wenn die Löcher zu groß sind, fließt das Wasser zu schnell ab und der Boden wird überschwemmt. Mache lieber kleinere Löcher und erweitere sie bei Bedarf.
* Verstopfte Löcher: Erde kann die Löcher verstopfen und die Wasserabgabe beeinträchtigen. Verwende Gartenvlies oder Stoffreste als Filter und reinige die Löcher regelmäßig.
* Zu wenig Wasser: Wenn die Tomatenpflanzen welken, bekommen sie nicht genug Wasser. Fülle die Flaschen öfter nach oder verwende größere Flaschen.
* Zu viel Wasser: Wenn der Boden um die Tomatenpflanzen nass ist, bekommen sie zu viel Wasser. Reduziere die Anzahl der Löcher oder fülle die Flaschen seltener nach.
* Falscher Standort: Platziere die Flaschen in der Nähe der Wurzeln der Tomatenpflanzen, damit das Wasser optimal aufgenommen werden kann.
Fazit
Mit diesem DIY-Bewässerungssystem kannst du ganz einfach Wasser sparen und gleichzeitig gesunde und ertragreiche Tomaten ernten. Es ist eine einfache
Conclusion
So, there you have it! This simple, yet incredibly effective, water-saving tomato growing trick is a game-changer for any gardener, regardless of experience level. We’ve shown you how to drastically reduce your water consumption, promote healthier root systems, and ultimately, yield a more bountiful and delicious tomato harvest.
Think about it: less time spent watering, more time enjoying the fruits (or vegetables!) of your labor. No more guilt about excessive water usage, especially during those dry summer months. This method is not only environmentally conscious, but it also directly benefits your plants, encouraging them to develop deep, strong roots that can withstand drought and produce more flavorful tomatoes.
But the benefits don’t stop there. This water-saving tomato growing technique also helps to minimize the risk of fungal diseases that thrive in overly moist soil. By delivering water directly to the roots, you keep the foliage dry, creating an environment that’s less hospitable to these common tomato plant ailments.
This is more than just a gardening hack; it’s a sustainable solution for growing delicious tomatoes.
Don’t be afraid to experiment with variations! For example, if you’re growing in raised beds, you might consider using a longer length of perforated pipe to distribute water more evenly across the bed. You could also add a layer of mulch around the base of your plants to further conserve moisture and suppress weeds. Consider adding some slow-release fertilizer to the watering pipe to feed the roots directly.
For those of you growing in containers, this method is especially valuable. Container plants tend to dry out much faster than those in the ground, making consistent watering a challenge. This DIY trick provides a steady, reliable source of moisture, ensuring your container tomatoes thrive.
We’re confident that once you try this water-saving tomato growing method, you’ll never go back to traditional watering techniques. It’s efficient, effective, and environmentally friendly – a winning combination for any gardener.
So, grab your drill, some PVC pipe, and get ready to revolutionize your tomato growing experience. We encourage you to give this a try and see the amazing results for yourself. And most importantly, we want to hear about your experiences! Share your photos, tips, and stories in the comments below. Let’s build a community of water-wise tomato growers and help each other cultivate the best possible harvest. Let us know if you have any questions, we are here to help. Happy gardening!
Frequently Asked Questions (FAQ)
What type of PVC pipe should I use?
We recommend using standard PVC pipe, either schedule 40 or schedule 80. Schedule 40 is generally sufficient for most home gardening applications and is more readily available and affordable. The diameter of the pipe depends on the size of your garden and the number of plants you’re watering. A 2-inch or 3-inch diameter pipe is usually a good starting point. Make sure the pipe is food-grade if you are concerned about chemicals leaching into the soil, although this is generally not a significant concern with PVC.
How many holes should I drill in the pipe, and what size should they be?
The number and size of the holes will depend on your soil type and the watering needs of your tomato plants. As a general guideline, start with holes that are about 1/8 inch to 1/4 inch in diameter, spaced approximately 4 to 6 inches apart along the length of the pipe. If you notice that the soil around the pipe is becoming overly saturated, you can reduce the number or size of the holes. Conversely, if the soil is drying out too quickly, you can increase the number or size of the holes. It’s always best to start with fewer holes and gradually increase them as needed.
How often should I water my tomato plants using this method?
The frequency of watering will depend on several factors, including the weather, your soil type, and the size of your plants. As a general rule, water deeply and less frequently, rather than shallowly and more often. Check the soil moisture around the base of your plants before watering. If the top inch or two of soil feels dry to the touch, it’s time to water. When you do water, fill the pipe slowly and allow the water to seep into the soil gradually. Avoid overwatering, as this can lead to root rot and other problems.
Can I use this method for other types of plants besides tomatoes?
Yes, this water-saving technique can be adapted for use with a variety of other plants, particularly those that benefit from deep watering, such as peppers, eggplants, and squash. The key is to adjust the size and spacing of the holes in the pipe to match the watering needs of the specific plant. For plants with shallower root systems, you may need to reduce the number or size of the holes to prevent overwatering.
Will this method attract pests or diseases?
When implemented correctly, this method should actually help to reduce the risk of pests and diseases. By delivering water directly to the roots, you keep the foliage dry, which creates an environment that’s less hospitable to fungal diseases. Additionally, the consistent moisture levels in the soil can help to attract beneficial soil organisms that can help to protect your plants from pests and diseases. However, it’s important to monitor your plants regularly for any signs of problems and take appropriate action if necessary.
Can I use this method in containers?
Absolutely! This method is particularly well-suited for container gardening. Simply cut the PVC pipe to the appropriate length for your container and bury it vertically near the center of the pot. Make sure the bottom of the pipe is closed off to prevent soil from entering. This will provide a consistent and efficient source of water for your container plants.
What if my soil is very sandy or drains very quickly?
If you have sandy soil that drains quickly, you may need to modify the method slightly to prevent water from draining away too rapidly. One option is to line the bottom of the hole with a layer of clay or other water-retentive material before burying the pipe. You can also add organic matter, such as compost or peat moss, to the soil to improve its water-holding capacity. Additionally, you may need to water more frequently to compensate for the rapid drainage.
Is it okay to add fertilizer to the water that I pour into the pipe?
Yes, adding fertilizer to the water is a great way to deliver nutrients directly to the roots of your tomato plants. Use a water-soluble fertilizer and follow the instructions on the label. Be careful not to over-fertilize, as this can damage your plants. It’s best to start with a diluted solution and gradually increase the concentration as needed.
How do I prevent the pipe from getting clogged with soil or debris?
To prevent the pipe from getting clogged, you can cover the top of the pipe with a cap or screen to keep out soil and debris. You can also flush the pipe periodically with water to remove any accumulated sediment. If you notice that the pipe is becoming clogged, you can try using a garden hose to blast water through it to dislodge any blockages.
What are the long-term benefits of using this water-saving method?
The long-term benefits of using this water-saving method are numerous. In addition to conserving water and promoting healthier plant growth, it can also help to improve the overall health and fertility of your soil. By delivering water directly to the roots, you encourage the development of a strong and extensive root system, which can help to improve soil structure and drainage. Additionally, the consistent moisture levels in the soil can help to promote the growth of beneficial soil organisms, which can further enhance soil health and fertility. Over time, this can lead to a more sustainable and productive garden.
Leave a Comment