
Vertical sweet potato growing: Ever dreamt of harvesting a bounty of sweet potatoes without sacrificing your entire backyard? I know I have! Forget sprawling vines taking over your precious garden space. This DIY guide unlocks the secret to growing these delicious and nutritious tubers upwards, maximizing your yield and minimizing the footprint.
Sweet potatoes have a rich history, dating back thousands of years in Central and South America. They were a staple food for many indigenous cultures and eventually spread across the globe, becoming a beloved ingredient in countless cuisines. But traditionally, growing them meant dedicating a large plot of land. Not anymore!
In today’s world, where space is a premium, especially in urban environments, innovative gardening techniques are more crucial than ever. Vertical sweet potato growing offers a fantastic solution for apartment dwellers, balcony gardeners, and anyone looking to make the most of their limited outdoor space. Imagine the satisfaction of harvesting a basketful of homegrown sweet potatoes from a compact vertical garden! This DIY project not only saves space but also adds a unique and visually appealing element to your garden. Plus, it’s a fun and rewarding project that anyone can undertake, regardless of their gardening experience. So, let’s dive in and discover how to grow sweet potatoes vertically and enjoy a delicious harvest!
DIY Vertical Sweet Potato Tower: Grow More in Less Space!
Hey there, fellow gardeners! Are you dreaming of a bountiful sweet potato harvest but short on garden space? Well, I’ve got just the project for you: a DIY vertical sweet potato tower! This ingenious method allows you to grow a surprising amount of sweet potatoes in a small footprint, making it perfect for urban gardens, patios, or even balconies. Plus, it’s a fun and rewarding project that’s sure to impress your friends and neighbors. Let’s get started!
What You’ll Need:
Before we dive in, let’s gather all the necessary materials. This will make the building process much smoother.
* Hardware Cloth (1/2 inch mesh): This will form the structure of our tower. The amount you need will depend on the desired height and diameter of your tower. I recommend at least 4 feet wide by 6 feet long.
* Heavy-Duty Zip Ties: These will be used to secure the hardware cloth together. Get a good supply – you’ll need more than you think!
* Landscape Fabric: This will line the inside of the tower, preventing soil from escaping.
* Potting Soil: A high-quality potting mix is crucial for healthy sweet potato growth. Avoid using garden soil, as it can compact and hinder root development.
* Compost: Adding compost to your potting mix will provide essential nutrients and improve drainage.
* Sweet Potato Slips: These are the sprouts that grow from sweet potatoes and will become your plants. You can purchase them online or at your local garden center. Alternatively, you can sprout your own from a sweet potato (more on that later!).
* Watering Can or Hose: For keeping your sweet potato tower well-watered.
* Gloves: To protect your hands from the hardware cloth and soil.
* Wire Cutters or Tin Snips: For cutting the hardware cloth.
* Measuring Tape: To ensure accurate measurements.
* Optional: Wooden stakes or rebar for added support (especially for taller towers).
Building the Tower: Step-by-Step
Okay, let’s get our hands dirty and build this tower!
1. Cut the Hardware Cloth: Using your wire cutters or tin snips, cut the hardware cloth to the desired size. Remember, I suggested 4 feet wide by 6 feet long, but you can adjust this based on your space and desired tower size. The 4-foot width will become the circumference of your tower.
2. Form the Cylinder: Carefully roll the hardware cloth into a cylinder shape. Overlap the edges by a few inches. This overlap is where we’ll secure the cylinder.
3. Secure the Cylinder: Using your zip ties, attach the overlapping edges of the hardware cloth together. Start at the top and bottom, and then add zip ties every few inches along the seam. Make sure the zip ties are tight and secure. Trim off any excess zip tie length.
4. Line the Tower with Landscape Fabric: Now, we need to line the inside of the hardware cloth cylinder with landscape fabric. This will prevent the soil from washing out. Cut a piece of landscape fabric that’s slightly larger than the inside of the cylinder.
5. Attach the Landscape Fabric: Carefully insert the landscape fabric into the cylinder. Fold the top edge of the fabric over the top of the hardware cloth and secure it with zip ties. Repeat this process along the entire top edge of the cylinder. You can also secure the landscape fabric to the hardware cloth along the sides and bottom, but it’s not strictly necessary.
6. Position the Tower: Choose a sunny location for your sweet potato tower. Sweet potatoes need at least 6-8 hours of sunlight per day. Place the tower in its final location before filling it with soil, as it will become very heavy.
7. Add Support (Optional): If you’re building a tall tower, you might want to add some support to prevent it from tipping over. You can insert wooden stakes or rebar into the ground around the tower and attach them to the hardware cloth with zip ties.
8. Prepare the Soil Mix: In a large container or wheelbarrow, mix your potting soil and compost. I recommend a ratio of about 2 parts potting soil to 1 part compost. This will provide a well-draining and nutrient-rich growing medium for your sweet potatoes.
9. Fill the Tower with Soil: Now, it’s time to fill the tower with your soil mix. Start by adding a few inches of soil to the bottom of the tower.
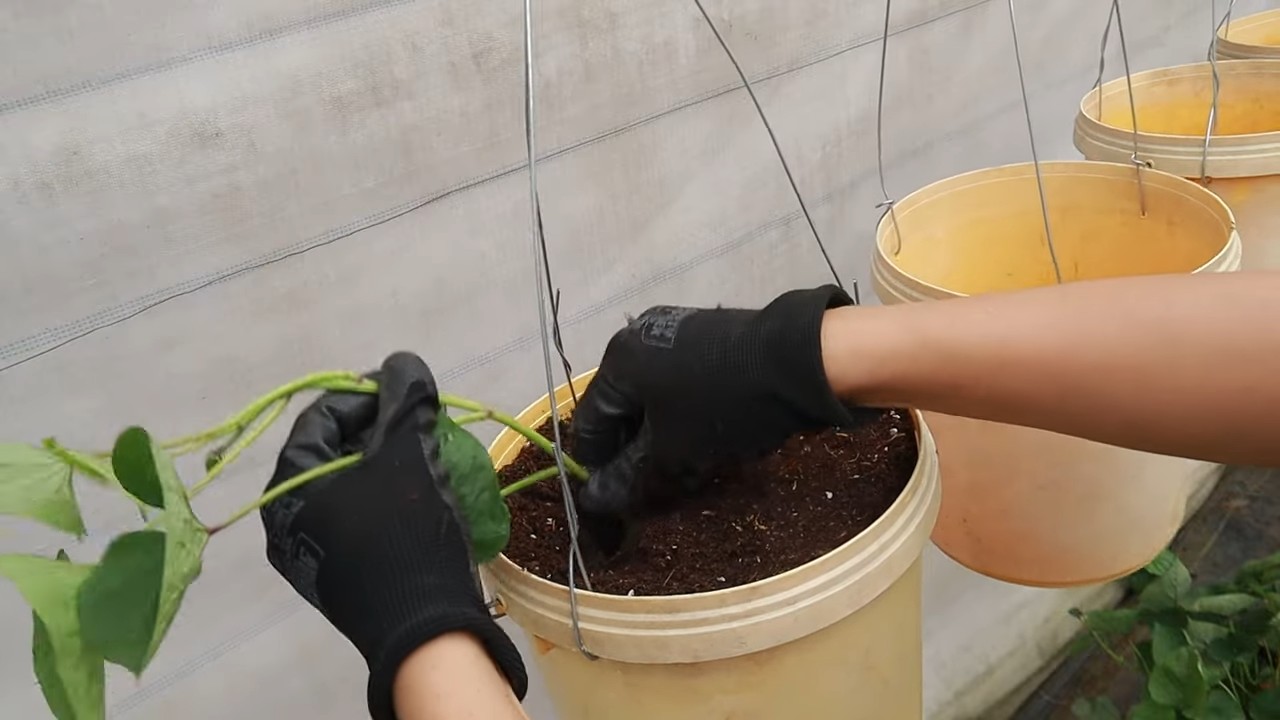
10. Plant the Sweet Potato Slips: This is the fun part! Gently dig small holes in the soil, spacing them about 12-18 inches apart around the tower. Carefully remove the sweet potato slips from their containers and plant them in the holes. Make sure the roots are covered with soil, but leave the leaves exposed.
11. Continue Filling and Planting: Continue adding soil and planting sweet potato slips until the tower is full. You can plant slips all the way up the sides of the tower, creating a lush, green wall.
12. Water Thoroughly: After planting, water the tower thoroughly to settle the soil and hydrate the sweet potato slips.
Sprouting Your Own Sweet Potato Slips (If You Don’t Want to Buy Them)
If you’re feeling adventurous, you can sprout your own sweet potato slips from a sweet potato you bought at the grocery store. Here’s how:
1. Choose a Healthy Sweet Potato: Select a firm, healthy sweet potato that is free from blemishes or soft spots.
2. Suspend the Sweet Potato: There are two main methods for sprouting sweet potatoes:
* Water Method: Insert toothpicks around the middle of the sweet potato and suspend it over a jar or glass filled with water. The bottom half of the sweet potato should be submerged in water.
* Soil Method: Bury the sweet potato halfway in a container filled with moist potting soil.
3. Place in a Warm, Sunny Location: Place the sweet potato in a warm, sunny location.
4. Wait for Sprouts: It will take several weeks for sprouts (slips) to emerge from the sweet potato. Keep the water level consistent (for the water method) and the soil moist (for the soil method).
5. Harvest the Slips: Once the slips are about 6-8 inches long, carefully twist or cut them off the sweet potato.
6. Root the Slips (Optional): You can root the slips in water before planting them in the tower. Place the cut end of the slip in a glass of water and wait for roots to develop. This will give the slips a head start.
7. Plant the Slips: Plant the slips in your sweet potato tower as described above.
Caring for Your Sweet Potato Tower
Now that your sweet potato tower is built and planted, it’s important to provide proper care to ensure a successful harvest.
* Watering: Sweet potatoes need consistent moisture, especially during hot weather. Water the tower regularly, making sure the soil stays moist but not waterlogged. Check the soil moisture by sticking your finger into the soil. If it feels dry, it’s time to water.
* Fertilizing: Sweet potatoes are heavy feeders, so they benefit from regular fertilization. Use a balanced fertilizer or a fertilizer specifically formulated for root vegetables. Follow the instructions on the fertilizer package. I like to use a liquid seaweed fertilizer every few weeks.
* Sunlight: Make sure your sweet potato tower receives at least 6-8 hours of sunlight per day.
* Pest Control: Keep an eye out for pests such as aphids, flea beetles, and sweet potato weevils. If you notice any pests, take action immediately. You can use insecticidal soap, neem oil, or other organic pest control methods.
* Weeding: Remove any weeds that grow in the tower. Weeds can compete with your sweet potatoes for nutrients and water.
* Pruning (Optional): While not essential, you can prune the vines of your sweet potato plants to encourage bushier growth and more sweet potato production. Simply trim back the ends of the vines.
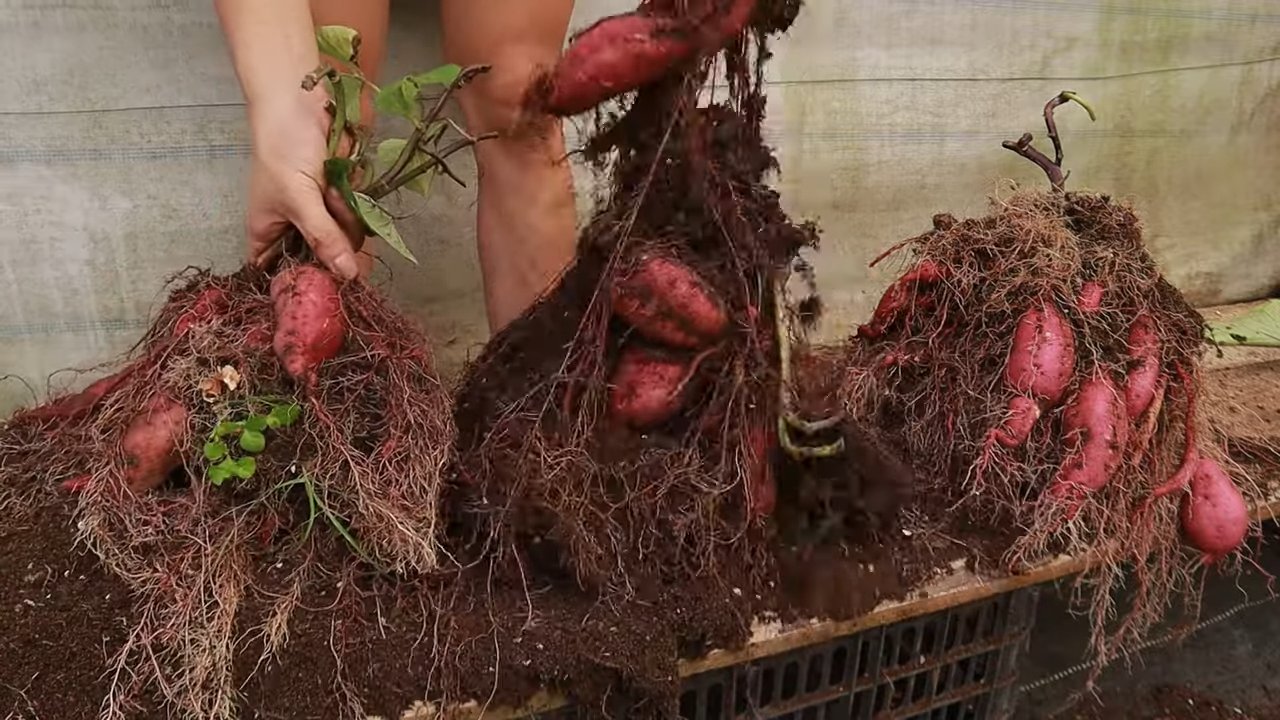
Harvesting Your Sweet Potatoes
The moment we’ve all been waiting for! Sweet potatoes are typically ready to harvest in the fall, about 90-120 days after planting. Here are some signs that your sweet potatoes are ready to harvest:
* The Vines Start to Yellow and Die Back: This is a natural sign that the plant is nearing the end of its life cycle.
* Test Dig: Carefully dig around the base of one of the plants to check the size of the sweet potatoes. If they are a good size and have a smooth skin, they are likely ready to harvest.
To harvest your sweet potatoes, gently loosen the soil around the base of the tower. Then, carefully pull the vines out of the tower, being careful not to damage the sweet potatoes
Conclusion
So, there you have it! Vertical sweet potato growing isn’t just a gardening trend; it’s a game-changer for maximizing yields in limited spaces, creating visually stunning gardens, and enjoying the freshest, most flavorful sweet potatoes imaginable. We’ve explored the ins and outs of this innovative technique, from selecting the right container and soil mix to providing optimal care and harvesting your bountiful crop.
But why is this DIY trick a must-try? Because it empowers you to take control of your food source, even if you only have a balcony or a small patio. It reduces your reliance on store-bought produce, which often travels long distances and loses its freshness along the way. And, perhaps most importantly, it connects you with the natural world in a deeply satisfying way. There’s nothing quite like the pride and joy of harvesting sweet potatoes that you’ve nurtured from start to finish.
Beyond the basic method we’ve outlined, there’s plenty of room for experimentation and personalization. Consider these variations to tailor your vertical sweet potato growing experience to your specific needs and preferences:
* Companion Planting: Enhance your vertical garden by incorporating companion plants like marigolds (to deter pests) or basil (to improve flavor).
* Container Variations: While we’ve focused on grow bags and stacked planters, feel free to explore other options like repurposed tires, wooden pallets, or even creatively designed DIY structures. Just ensure adequate drainage and sufficient space for root development.
* Sweet Potato Varieties: Don’t limit yourself to just one type of sweet potato! Experiment with different varieties like Beauregard, Japanese, or even purple sweet potatoes to discover your favorites. Each variety offers a unique flavor profile and texture.
* Hydroponic Vertical Sweet Potato Growing: For the more adventurous gardener, consider exploring hydroponic systems for vertical sweet potato cultivation. This method eliminates the need for soil and can potentially lead to even faster growth rates.
We wholeheartedly encourage you to give vertical sweet potato growing a try. It’s a rewarding and sustainable way to grow your own food, and it’s surprisingly easy to get started. Don’t be afraid to experiment, learn from your mistakes, and adapt the techniques to suit your unique environment and growing conditions.
And most importantly, we want to hear about your experiences! Share your photos, tips, and challenges in the comments section below. Let’s build a community of vertical sweet potato growers and learn from each other. Together, we can transform small spaces into thriving gardens and enjoy the delicious rewards of our labor. So, grab your supplies, get your hands dirty, and embark on your vertical sweet potato growing adventure today! You won’t regret it.
Frequently Asked Questions (FAQ)
What are the best sweet potato varieties for vertical growing?
While most sweet potato varieties can be grown vertically, some are better suited than others due to their growth habits. Bush-type varieties, which tend to be more compact, are generally preferred over vining varieties, which can become quite sprawling. However, even vining varieties can be successfully grown vertically with proper support and pruning. Some popular choices for vertical sweet potato growing include:
* Beauregard: A classic orange-fleshed variety known for its high yields and excellent flavor. It’s relatively compact and well-suited for containers.
* Georgia Jet: A fast-maturing variety with reddish-orange skin and orange flesh. It’s a good choice for gardeners in cooler climates with shorter growing seasons.
* Centennial: Another popular orange-fleshed variety with a sweet, moist texture. It’s known for its disease resistance and adaptability.
* Japanese Sweet Potato (Kotobuki): A purple-skinned variety with white flesh that turns yellow when cooked. It has a nutty flavor and a drier texture than orange-fleshed varieties.
* Okinawan Sweet Potato: A purple-fleshed variety with a sweet, slightly floral flavor. It’s rich in antioxidants and has a lower glycemic index than many other sweet potato varieties.
Experiment with different varieties to find the ones that thrive best in your local climate and growing conditions.
How much sunlight do vertical sweet potatoes need?
Sweet potatoes are sun-loving plants and require at least 6-8 hours of direct sunlight per day to thrive. Insufficient sunlight can result in stunted growth, reduced yields, and pale, flavorless sweet potatoes. Choose a location for your vertical garden that receives ample sunlight throughout the day. If you live in a particularly hot climate, some afternoon shade may be beneficial to prevent the plants from overheating.
What type of soil mix is best for vertical sweet potato growing?
Sweet potatoes prefer well-draining, fertile soil that is rich in organic matter. A good soil mix for vertical sweet potato growing should consist of:
* Potting Soil: Provides a base for the mix and helps retain moisture.
* Compost: Adds nutrients and improves soil structure.
* Perlite or Vermiculite: Improves drainage and aeration.
A good ratio is typically 2 parts potting soil, 1 part compost, and 1 part perlite or vermiculite. Avoid using heavy garden soil, as it can become compacted in containers and restrict root growth.
How often should I water my vertical sweet potatoes?
Water your vertical sweet potatoes regularly, especially during hot, dry weather. The soil should be kept consistently moist but not waterlogged. Check the soil moisture by sticking your finger about an inch deep into the soil. If it feels dry, it’s time to water. Water deeply, allowing the water to drain out of the bottom of the container. Avoid overhead watering, as it can promote fungal diseases.
Do I need to fertilize my vertical sweet potatoes?
Yes, sweet potatoes benefit from regular fertilization, especially when grown in containers. Use a balanced fertilizer with a ratio of 10-10-10 or 5-10-10. Apply the fertilizer according to the package directions, typically every 2-3 weeks during the growing season. You can also supplement with organic fertilizers like compost tea or fish emulsion.
How do I prevent pests and diseases in my vertical sweet potato garden?
Vertical sweet potato growing can help reduce the risk of pests and diseases compared to growing in the ground, but it’s still important to take preventative measures.
* Choose disease-resistant varieties.
* Provide good air circulation.
* Water properly to avoid overwatering.
* Inspect plants regularly for signs of pests or diseases.
* Use organic pest control methods like insecticidal soap or neem oil.
* Remove any diseased or infested plants immediately.
Common pests that may affect sweet potatoes include aphids, flea beetles, and sweet potato weevils. Common diseases include fungal diseases like leaf spot and root rot.
When and how do I
So, there you have it! Vertical sweet potato growing isn’t just a gardening trend; it’s a game-changer for maximizing yields in limited spaces, creating visually stunning gardens, and enjoying the freshest, most flavorful sweet potatoes imaginable. We’ve explored the ins and outs of this innovative technique, from selecting the right container and soil mix to providing optimal care and harvesting your bountiful crop.
But why is this DIY trick a must-try? Because it empowers you to take control of your food source, even if you only have a balcony or a small patio. It reduces your reliance on store-bought produce, which often travels long distances and loses its freshness along the way. And, perhaps most importantly, it connects you with the natural world in a deeply satisfying way. There’s nothing quite like the pride and joy of harvesting sweet potatoes that you’ve nurtured from start to finish.
Beyond the basic method we’ve outlined, there’s plenty of room for experimentation and personalization. Consider these variations to tailor your vertical sweet potato growing experience to your specific needs and preferences:
* Companion Planting: Enhance your vertical garden by incorporating companion plants like marigolds (to deter pests) or basil (to improve flavor).
* Container Variations: While we’ve focused on grow bags and stacked planters, feel free to explore other options like repurposed tires, wooden pallets, or even creatively designed DIY structures. Just ensure adequate drainage and sufficient space for root development.
* Sweet Potato Varieties: Don’t limit yourself to just one type of sweet potato! Experiment with different varieties like Beauregard, Japanese, or even purple sweet potatoes to discover your favorites. Each variety offers a unique flavor profile and texture.
* Hydroponic Vertical Sweet Potato Growing: For the more adventurous gardener, consider exploring hydroponic systems for vertical sweet potato cultivation. This method eliminates the need for soil and can potentially lead to even faster growth rates.
We wholeheartedly encourage you to give vertical sweet potato growing a try. It’s a rewarding and sustainable way to grow your own food, and it’s surprisingly easy to get started. Don’t be afraid to experiment, learn from your mistakes, and adapt the techniques to suit your unique environment and growing conditions.
And most importantly, we want to hear about your experiences! Share your photos, tips, and challenges in the comments section below. Let’s build a community of vertical sweet potato growers and learn from each other. Together, we can transform small spaces into thriving gardens and enjoy the delicious rewards of our labor. So, grab your supplies, get your hands dirty, and embark on your vertical sweet potato growing adventure today! You won’t regret it.
Frequently Asked Questions (FAQ)
What are the best sweet potato varieties for vertical growing?
While most sweet potato varieties can be grown vertically, some are better suited than others due to their growth habits. Bush-type varieties, which tend to be more compact, are generally preferred over vining varieties, which can become quite sprawling. However, even vining varieties can be successfully grown vertically with proper support and pruning. Some popular choices for vertical sweet potato growing include:
* Beauregard: A classic orange-fleshed variety known for its high yields and excellent flavor. It’s relatively compact and well-suited for containers.
* Georgia Jet: A fast-maturing variety with reddish-orange skin and orange flesh. It’s a good choice for gardeners in cooler climates with shorter growing seasons.
* Centennial: Another popular orange-fleshed variety with a sweet, moist texture. It’s known for its disease resistance and adaptability.
* Japanese Sweet Potato (Kotobuki): A purple-skinned variety with white flesh that turns yellow when cooked. It has a nutty flavor and a drier texture than orange-fleshed varieties.
* Okinawan Sweet Potato: A purple-fleshed variety with a sweet, slightly floral flavor. It’s rich in antioxidants and has a lower glycemic index than many other sweet potato varieties.
Experiment with different varieties to find the ones that thrive best in your local climate and growing conditions.
How much sunlight do vertical sweet potatoes need?
Sweet potatoes are sun-loving plants and require at least 6-8 hours of direct sunlight per day to thrive. Insufficient sunlight can result in stunted growth, reduced yields, and pale, flavorless sweet potatoes. Choose a location for your vertical garden that receives ample sunlight throughout the day. If you live in a particularly hot climate, some afternoon shade may be beneficial to prevent the plants from overheating.
What type of soil mix is best for vertical sweet potato growing?
Sweet potatoes prefer well-draining, fertile soil that is rich in organic matter. A good soil mix for vertical sweet potato growing should consist of:
* Potting Soil: Provides a base for the mix and helps retain moisture.
* Compost: Adds nutrients and improves soil structure.
* Perlite or Vermiculite: Improves drainage and aeration.
A good ratio is typically 2 parts potting soil, 1 part compost, and 1 part perlite or vermiculite. Avoid using heavy garden soil, as it can become compacted in containers and restrict root growth.
How often should I water my vertical sweet potatoes?
Water your vertical sweet potatoes regularly, especially during hot, dry weather. The soil should be kept consistently moist but not waterlogged. Check the soil moisture by sticking your finger about an inch deep into the soil. If it feels dry, it’s time to water. Water deeply, allowing the water to drain out of the bottom of the container. Avoid overhead watering, as it can promote fungal diseases.
Do I need to fertilize my vertical sweet potatoes?
Yes, sweet potatoes benefit from regular fertilization, especially when grown in containers. Use a balanced fertilizer with a ratio of 10-10-10 or 5-10-10. Apply the fertilizer according to the package directions, typically every 2-3 weeks during the growing season. You can also supplement with organic fertilizers like compost tea or fish emulsion.
How do I prevent pests and diseases in my vertical sweet potato garden?
Vertical sweet potato growing can help reduce the risk of pests and diseases compared to growing in the ground, but it’s still important to take preventative measures.
* Choose disease-resistant varieties.
* Provide good air circulation.
* Water properly to avoid overwatering.
* Inspect plants regularly for signs of pests or diseases.
* Use organic pest control methods like insecticidal soap or neem oil.
* Remove any diseased or infested plants immediately.
Common pests that may affect sweet potatoes include aphids, flea beetles, and sweet potato weevils. Common diseases include fungal diseases like leaf spot and root rot.
When and how do I harvest my vertical sweet potatoes?
Sweet potatoes are typically ready to harvest 90-120 days after planting. The leaves will start to turn yellow and the vines will begin to die back. To harvest, carefully dig around the base of the plant and gently lift the sweet potatoes out of the soil. Avoid damaging the sweet potatoes during harvest. Cure the sweet potatoes for 7-10 days in a warm, humid place to allow the skins to harden and the starches to convert to sugars. This will improve their flavor and storage life.
Can I grow sweet potatoes vertically indoors?
While it’s possible to grow sweet potatoes vertically indoors, it requires a significant amount of light. You’ll need to provide supplemental lighting with grow lights to ensure the plants receive enough energy to produce sweet potatoes. The other requirements are the same as growing outdoors, including proper soil, watering, and fertilization.
How do I store my harvested sweet potatoes?
Store cured sweet potatoes in a cool, dark, and dry place with good ventilation. The ideal storage temperature is between 55-60°F (13-16°C). Avoid storing sweet potatoes in the refrigerator, as this can cause them to develop a hard core and lose their flavor. Properly stored sweet potatoes can last for several months.

Leave a Comment