
DIY Grape Growing Tire Pot: Imagine plucking juicy, sun-ripened grapes straight from your own backyard! Sounds dreamy, right? Well, it’s more achievable than you think, even if you’re short on space or have less-than-ideal soil. I’m excited to share a super clever and surprisingly easy DIY project that will have you harvesting your own grapes in no time: a grape-growing tire pot!
The concept of using recycled materials in gardening isn’t new. For generations, resourceful gardeners have found innovative ways to repurpose items, from old boots as planters to salvaged wood for raised beds. This DIY project taps into that same spirit of ingenuity and sustainability. Plus, it adds a unique, rustic charm to your outdoor space.
Why a tire pot, you ask? Well, traditional grape growing can be challenging. Grapes need well-draining soil and plenty of sunlight. A tire pot offers excellent drainage, warms up quickly in the sun, and elevates your grape vine, providing better air circulation. This is especially important in areas with heavy clay soil or limited sunlight. More importantly, it’s a fantastic way to recycle old tires, keeping them out of landfills and giving them a new lease on life. So, if you’re looking for a budget-friendly, eco-conscious, and effective way to grow your own grapes, this DIY grape growing tire pot is the perfect solution. Let’s get started!
DIY Grape Growing Tire Pot: Upcycle and Grow!
Hey there, fellow gardening enthusiasts! I’m super excited to share this fun and eco-friendly project with you: building a grape-growing tire pot! Not only is it a fantastic way to recycle old tires, but it also provides a perfect, raised environment for your grapevines to thrive. Plus, it adds a unique, rustic charm to your garden. Let’s get started!
Materials You’ll Need:
* Old Tires (2-3 depending on desired height)
* Utility Knife or Jigsaw
* Gloves (essential for handling tires)
* Safety Glasses (always protect your eyes!)
* Measuring Tape
* Marker or Chalk
* Drill with Drill Bits (for drainage)
* Landscape Fabric or Burlap
* Potting Soil (lots of it!)
* Gravel or Rocks (for drainage layer)
* Grapevine Sapling
* Optional: Paint and Primer (for decorating the tires)
* Optional: Wood Screws (for extra stability)
Tools You’ll Need:
* Utility Knife or Jigsaw
* Drill
* Measuring Tape
* Marker or Chalk
* Gloves
* Safety Glasses
Choosing Your Tires:
Before we dive in, let’s talk tires. You’ll want to choose tires that are in relatively good condition. Avoid tires with exposed steel belts or significant damage. The size of the tires will determine the overall size of your grape pot. I prefer using similar-sized tires for a uniform look, but you can definitely experiment with different sizes for a more eclectic vibe!
Step-by-Step Instructions:
Okay, let’s get our hands dirty!
1. Preparing the Tires: First things first, give those tires a good scrub! Use soap and water to remove any dirt, grime, or debris. This will make them easier to handle and prepare for painting (if you choose to paint them). Let them dry completely before moving on.
2. Cutting the Top Tire (Optional): This step is optional, but I highly recommend it, especially if you’re using multiple tires. Cutting the top tire creates a wider opening for planting and allows for better sunlight penetration.
* Using your measuring tape and marker, draw a circle on the top tire, leaving a border of about 4-6 inches from the outer edge. This will be your cutting line.
* Put on your safety glasses and gloves.
* Carefully use your utility knife or jigsaw to cut along the marked line. A jigsaw will make quicker work of this, but a utility knife can also do the job, just be patient and use a sawing motion.
* Safety Tip: When using a utility knife, make sure the blade is sharp and extend only a small portion of the blade to avoid accidents. When using a jigsaw, wear ear protection as well.
* Once you’ve cut out the center, smooth out any rough edges with sandpaper or a file.
3. Drilling Drainage Holes: Drainage is crucial for healthy grapevines. Excess water can lead to root rot, so we need to ensure proper drainage.
* Flip the bottom tire over.
* Using your drill and a suitable drill bit (around 1/2 inch), drill several drainage holes evenly spaced around the bottom of the tire. I usually drill about 6-8 holes per tire.
* Repeat this process for any other tires you’ll be using as part of the base.
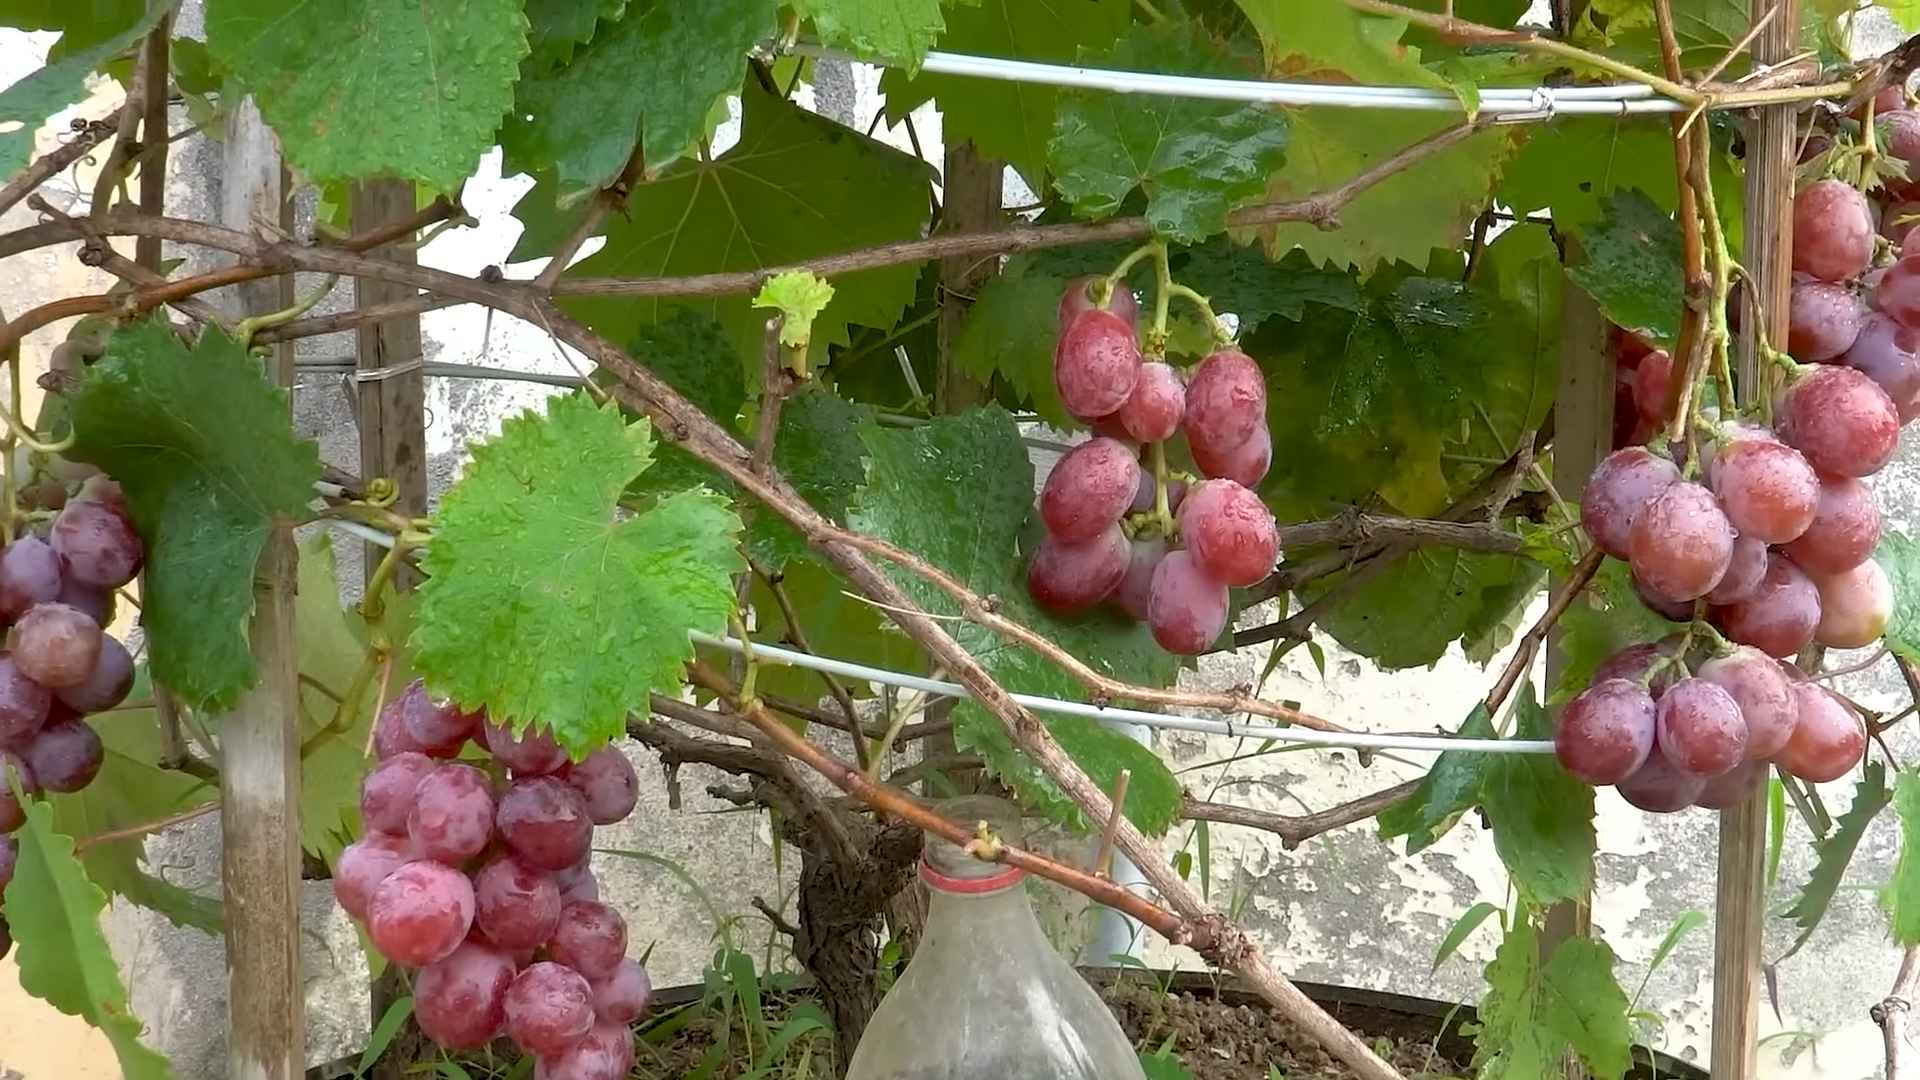
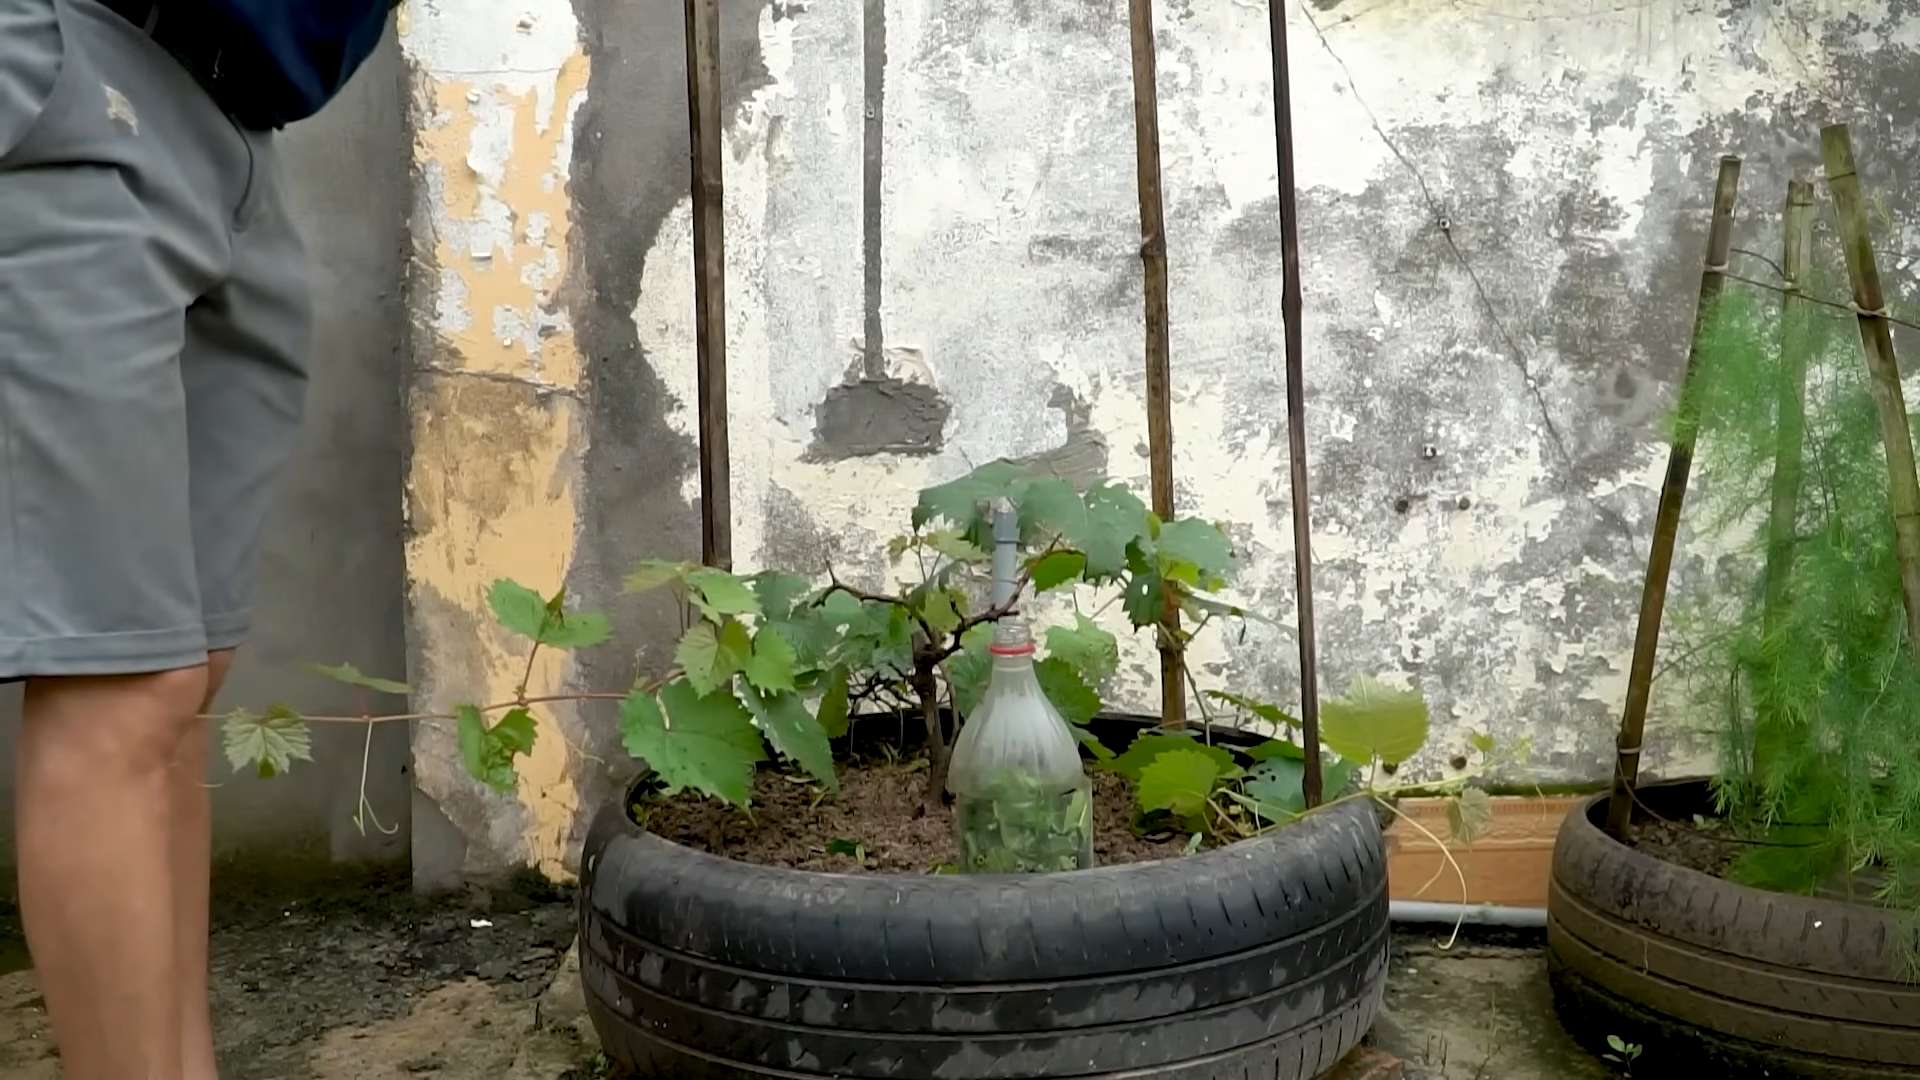
4. Stacking the Tires: Now it’s time to stack the tires! Choose a sunny spot in your garden where your grapevine will receive at least 6-8 hours of sunlight per day.
* Place the first tire on the ground, ensuring it’s level. You might need to add some soil or gravel underneath to level it out.
* Stack the second tire on top of the first, aligning them as best as possible.
* If you’re using a third tire, stack it on top of the second.
* Optional: For added stability, you can use wood screws to secure the tires together. Drill pilot holes through the sidewalls of the tires and then screw them together. This is especially helpful if you live in an area with strong winds.
5. Lining the Tire Pot: To prevent soil from escaping through the drainage holes and to help retain moisture, we’ll line the inside of the tire pot with landscape fabric or burlap.
* Cut a piece of landscape fabric or burlap that’s large enough to line the entire inside of the tire pot, with some overlap at the top.
* Place the fabric inside the tire pot, pressing it against the sides and bottom.
* Fold the excess fabric over the top edge of the tire. You can secure it with staples or glue if desired, but the weight of the soil will usually hold it in place.
6. Creating a Drainage Layer: A drainage layer at the bottom of the pot will further improve drainage and prevent waterlogging.
* Pour a layer of gravel or rocks into the bottom of the tire pot, about 4-6 inches deep. This will create a space for excess water to drain away from the roots.
7. Filling with Potting Soil: Now for the fun part – filling the tire pot with potting soil!
* Use a high-quality potting soil that’s well-draining and rich in nutrients. Avoid using garden soil, as it can become compacted and doesn’t drain as well in containers.
* Fill the tire pot with potting soil, leaving a few inches of space at the top.
8. Planting Your Grapevine: Time to introduce your grapevine to its new home!
* Carefully remove the grapevine sapling from its container. Gently loosen the roots with your fingers.
* Dig a hole in the center of the potting soil that’s large enough to accommodate the root ball of the grapevine.
* Place the grapevine in the hole, ensuring that the top of the root ball is level with the surrounding soil.
* Backfill the hole with potting soil, gently firming it around the roots.
* Water the grapevine thoroughly after planting.
9. Adding Support (Important!): Grapevines need support to grow properly. You can use a trellis, stake, or even a nearby fence.
* Install a trellis or stake near the grapevine.
* Gently tie the grapevine to the support using soft twine or plant ties. As the grapevine grows, continue to train it to climb the support.
10. Decorating Your Tire Pot (Optional): This is where you can get creative and personalize your tire pot!
* If you want to paint the tires, start by applying a coat of primer. This will help the paint adhere better and prevent it from peeling.
* Once the primer is dry, paint the tires with your desired color. You can use spray paint or brush-on paint.
* Consider adding stencils, designs, or even mosaic tiles to create a unique and eye-catching planter.
* Let the paint dry completely before adding any plants.
Caring for Your Grapevine:
Once your grapevine is planted, it’s important to provide it with proper care to ensure its health and productivity.
* Watering: Water your grapevine regularly, especially during dry periods. Grapevines need consistent moisture, but avoid overwatering, which can lead to root rot. Check the soil moisture by sticking your finger into the soil. If the top inch or two feels dry, it’s time to water.
* Fertilizing: Fertilize your grapevine in the spring with a balanced fertilizer. Follow the instructions on the fertilizer package. You can also add compost to the soil to provide additional nutrients.
* Pruning: Pruning is essential for grapevines. It helps to control their growth, improve air circulation, and increase fruit production. Prune your grapevine in late winter or early spring, before new growth begins. There are different pruning methods depending on the type of grapevine you have, so do some research to determine the best method for your variety.
* Pest and Disease Control: Monitor your grapevine for pests and diseases. Common pests include aphids, spider mites, and Japanese beetles. Common diseases include powdery mildew and black rot. Treat any infestations or diseases promptly with appropriate insecticides or fungicides.
* Sunlight: As mentioned earlier, grapevines need at least 6-8 hours of sunlight per day. Make sure your tire pot is located in a sunny spot in your garden.
Troubleshooting:
* Yellowing Leaves: Yellowing leaves can be a sign of overwatering, nutrient deficiency, or pest infestation. Check the soil moisture and adjust your watering schedule accordingly. Fertilize your grapevine with a balanced fertilizer. Inspect the leaves for pests and treat them if necessary.
* Lack of Fruit: Lack of fruit can be caused by improper pruning, insufficient sunlight, or poor pollination. Make sure you’re pruning your
Conclusion
So, there you have it! Transforming old tires into functional and attractive grape-growing pots is not just a clever upcycling project; it’s a game-changer for any gardener, regardless of space constraints. We’ve walked you through the simple steps, highlighting the benefits of this innovative approach. From improved drainage and temperature regulation to the sheer satisfaction of giving discarded materials a new lease on life, the advantages are undeniable. This DIY grape growing tire pot method offers a sustainable and cost-effective way to cultivate your own delicious grapes, right in your backyard, patio, or even balcony.
But the beauty of this project lies in its adaptability. Feel free to experiment with different tire sizes to accommodate various grape varieties. Consider painting the tires in vibrant colors to add a touch of personality to your garden. You could even create a tiered system by stacking multiple tire pots, creating a visually stunning and space-efficient grape-growing tower. For added support, especially as your grapevines mature, incorporate a trellis system directly into the tire pot. This can be as simple as bamboo stakes or as elaborate as a custom-built wooden frame.
Don’t be afraid to get creative with your soil mixture, too. While we recommended a well-draining blend of topsoil, compost, and perlite, you can tailor it to the specific needs of your chosen grape variety. Adding a slow-release fertilizer at planting time will provide your vines with a steady supply of nutrients throughout the growing season. Remember to research the specific requirements of your grape variety to ensure optimal growth and fruit production.
The key takeaway here is that this DIY grape growing tire pot project is more than just a recipe; it’s an invitation to connect with nature, embrace sustainability, and enjoy the fruits (literally!) of your labor. It’s a chance to transform discarded materials into something beautiful and productive, all while nurturing your own delicious grapes.
We are confident that you’ll find this project both rewarding and enjoyable. So, gather your supplies, roll up your sleeves, and get ready to embark on your grape-growing adventure. We encourage you to try this DIY grape growing tire pot method and share your experiences with us! Post photos of your creations, share your tips and tricks, and let us know how this project has transformed your gardening experience. We can’t wait to see what you create! Happy growing!
Frequently Asked Questions (FAQs)
What are the benefits of using tire pots for growing grapes?
Using tire pots for growing grapes offers several advantages. Firstly, they provide excellent drainage, preventing waterlogging and root rot, which are common problems for grapevines. The black rubber absorbs heat, warming the soil and promoting faster growth, especially in cooler climates. Tire pots are also durable and long-lasting, providing a stable and contained environment for your grapevines. Furthermore, upcycling old tires is an environmentally friendly way to repurpose waste materials. Finally, they are relatively inexpensive compared to purchasing traditional planters.
Are there any potential risks associated with using tires for gardening?
While tire pots offer many benefits, there are some potential concerns to consider. Some people worry about the leaching of chemicals from the rubber into the soil. However, studies have shown that the amount of chemicals released is minimal and generally not harmful to plants or humans. To minimize any potential risk, you can line the inside of the tire with a plastic liner or landscape fabric. Also, ensure you are using tires that are free from any visible signs of oil or chemical contamination. Using older, more weathered tires can also reduce the risk of leaching.
What type of soil is best for growing grapes in tire pots?
Grapes thrive in well-draining soil that is rich in organic matter. A good mix would be equal parts topsoil, compost, and perlite or coarse sand. The topsoil provides structure, the compost adds nutrients and improves water retention, and the perlite or sand ensures adequate drainage. You can also add a slow-release fertilizer to provide a steady supply of nutrients throughout the growing season. It’s essential to test the soil pH and amend it if necessary to ensure it’s within the optimal range for grapes (typically between 6.0 and 7.0).
How often should I water my grapevines in tire pots?
Watering frequency depends on several factors, including the climate, the type of soil, and the size of the tire pot. Generally, you should water your grapevines deeply whenever the top inch of soil feels dry to the touch. Avoid overwatering, as this can lead to root rot. During hot, dry weather, you may need to water more frequently. Using a moisture meter can help you determine the moisture level of the soil and avoid over or under-watering. Mulching around the base of the grapevine can also help retain moisture and reduce the need for frequent watering.
How do I prune grapevines grown in tire pots?
Pruning is essential for maintaining the health and productivity of your grapevines. The best time to prune is during the dormant season, typically in late winter or early spring before new growth begins. Remove any dead, damaged, or diseased wood. Also, prune to maintain the desired shape and size of the vine. The specific pruning method will depend on the grape variety and the training system you are using. Research the recommended pruning techniques for your specific grape variety to ensure optimal fruit production.
Can I grow different varieties of grapes in tire pots?
Yes, you can grow different varieties of grapes in tire pots. However, it’s important to choose varieties that are well-suited to your climate and growing conditions. Consider factors such as cold hardiness, disease resistance, and ripening time. Also, ensure that the tire pot is large enough to accommodate the mature size of the grapevine. If you are growing multiple varieties, provide adequate spacing between the tire pots to allow for proper air circulation and sunlight exposure.
How do I protect my grapevines from pests and diseases?
Regularly inspect your grapevines for signs of pests and diseases. Common grape pests include aphids, Japanese beetles, and grape phylloxera. Common diseases include powdery mildew, downy mildew, and black rot. If you detect any problems, take action promptly to prevent them from spreading. You can use organic pest control methods, such as insecticidal soap or neem oil, to control pests. For diseases, ensure good air circulation and sunlight exposure to reduce humidity. You can also use fungicides if necessary, but always follow the instructions carefully.
How do I overwinter grapevines grown in tire pots in cold climates?
In cold climates, grapevines grown in tire pots may need protection during the winter. One option is to move the tire pots to a sheltered location, such as a garage or shed. If you cannot move the pots, you can wrap the vines with burlap or blankets to protect them from the cold. Mulching around the base of the vine can also help insulate the roots. In extremely cold climates, you may need to bury the vines underground to protect them from freezing temperatures.
How long does it take for grapevines to produce fruit when grown in tire pots?
Grapevines typically take 2-3 years to begin producing fruit. The first year is focused on establishing the root system and developing the vine’s structure. In the second year, you may see some flowers, but it’s best to remove them to encourage further vegetative growth. In the third year, you should start to see a significant amount of fruit production. The amount of fruit will increase as the vine matures. Proper pruning, fertilization, and watering are essential for maximizing fruit production.
Can I use any size of tire for this project?
While you can technically use various tire sizes, larger tires are generally better for growing grapes. Larger tires provide more space for the roots to grow and allow for better drainage. Passenger car tires are a good starting point, but truck or tractor tires can also be used for larger grape varieties. Consider the mature size of the grapevine when choosing the tire size. Also, ensure that the tire is clean and free from any sharp edges or debris that could damage the roots.
Leave a Comment