
Rooftop Okra Gardening: Imagine stepping onto your rooftop and harvesting fresh, vibrant okra, ready to be transformed into a delicious meal. Sounds like a dream, right? Well, it doesn’t have to be! This DIY guide will unlock the secrets to successfully growing okra right on your rooftop, even if you’re a complete beginner. Forget those bland, store-bought vegetables – we’re talking about homegrown goodness bursting with flavor!
Okra, also known as “lady’s fingers,” has a rich history, originating in Africa and making its way across continents. It’s been a staple in Southern cuisine for generations, and now, you can bring that tradition to your own home, no matter where you live. But why rooftop okra gardening? Well, space is often a premium, especially in urban environments. Rooftops offer an untapped resource, providing ample sunlight and a unique growing space. Plus, there’s something incredibly satisfying about cultivating your own food in an unexpected place.
This DIY article is packed with practical tips and tricks to help you overcome common challenges and maximize your okra yield. From choosing the right containers and soil to understanding watering needs and pest control, we’ll cover everything you need to know. So, ditch the grocery store okra and get ready to embark on a rewarding journey of rooftop okra gardening. Let’s get growing!
Rooftop Okra Gardening: A Beginner’s Guide to Growing Your Own!
Hey there, fellow gardening enthusiasts! Ever thought about turning your rooftop into a vibrant, okra-producing paradise? Well, let me tell you, it’s totally doable, and I’m here to guide you through every step of the way. Growing okra on your rooftop is not only a rewarding experience but also a fantastic way to utilize unused space, enjoy fresh produce, and add a touch of green to your urban landscape. So, grab your gardening gloves, and let’s get started!
Planning Your Rooftop Okra Garden
Before we dive into the nitty-gritty, let’s plan our rooftop garden. This is crucial for success!
* Assess Your Rooftop: First things first, check the weight-bearing capacity of your roof. Okra plants, especially when mature and laden with pods, can get quite heavy, especially when the soil is wet. Consult a structural engineer if you have any doubts. Safety first!
* Sunlight is Key: Okra thrives in full sun, needing at least 6-8 hours of direct sunlight per day. Observe your rooftop throughout the day to determine the sunniest spots.
* Water Access: Easy access to water is essential. Lugging heavy watering cans up and down can get tiring quickly. Consider installing an outdoor faucet or using a long hose.
* Wind Protection: Rooftops can be windy. Strong winds can damage young okra plants. Consider using windbreaks like trellises, fences, or even strategically placed larger plants.
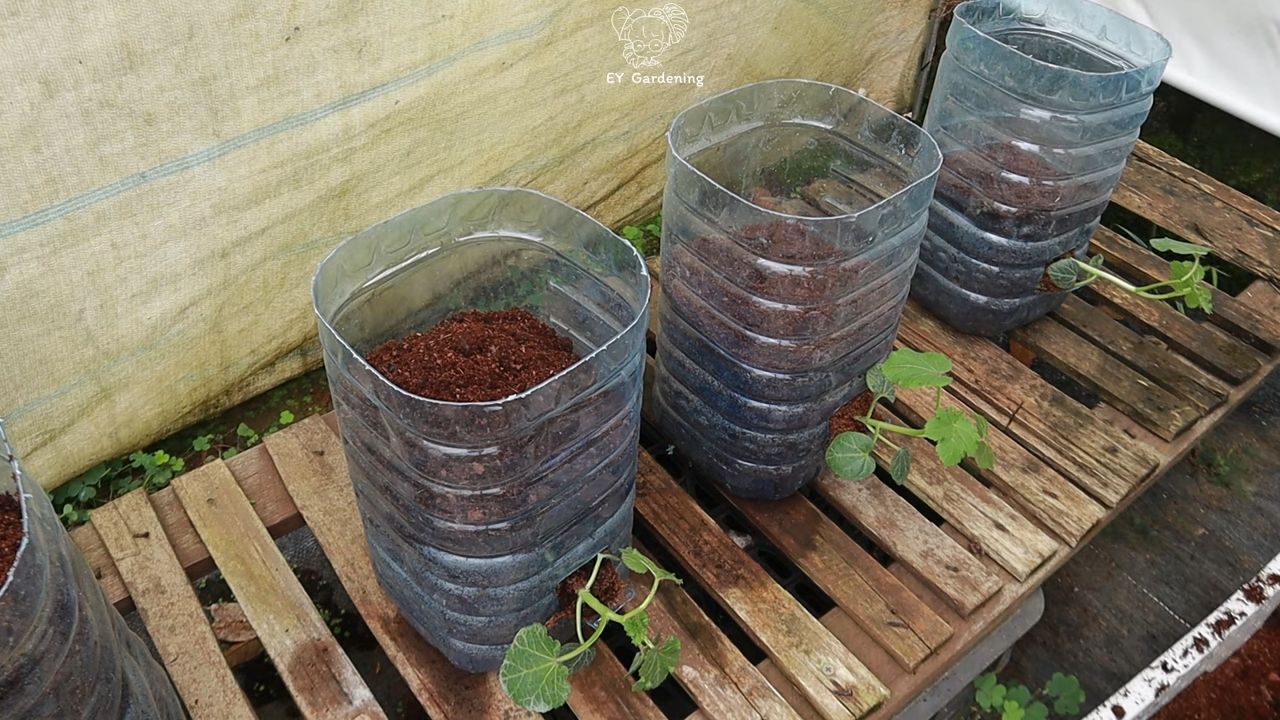
* Container Selection: Choose containers that are at least 12-18 inches deep and wide. Okra has a long taproot, so adequate depth is crucial. Fabric pots, plastic containers, or even repurposed containers like large buckets can work well. Just make sure they have drainage holes!
* Soil Matters: Use a well-draining potting mix specifically designed for containers. Avoid using garden soil, as it can become compacted in containers. I personally love using a mix of compost, peat moss, and perlite.
* Variety Selection: Choose okra varieties that are suitable for container gardening. Dwarf varieties like ‘Baby Bubba’ or ‘Cajun Jewel’ are excellent choices. They tend to be more compact and manageable in containers.
Gathering Your Supplies
Now that we have a plan, let’s gather all the necessary supplies. This will make the planting process much smoother.
* Okra seeds (choose your preferred variety)
* Large containers (at least 12-18 inches deep and wide)
* Well-draining potting mix
* Watering can or hose
* Gardening gloves
* Trowel or small shovel
* Fertilizer (balanced, slow-release fertilizer or liquid fertilizer)
* Mulch (optional, but helps retain moisture)
* Stakes or cages (for support, especially for taller varieties)
* Windbreak materials (if needed)
Planting Your Okra Seeds
Alright, let’s get our hands dirty and plant those okra seeds!
1. Prepare Your Containers: Fill your containers with the well-draining potting mix, leaving about an inch or two of space at the top.
2. Sow the Seeds: Sow the okra seeds about ½ inch deep and 2-3 inches apart. I usually plant a few seeds per container and thin them out later to the strongest seedling.
3. Water Gently: Water the soil gently until it’s thoroughly moist but not waterlogged.
4. Find a Sunny Spot: Place the containers in a sunny location on your rooftop.
5. Keep it Warm: Okra loves warmth. If the weather is still cool, you can cover the containers with plastic wrap to create a mini-greenhouse effect. Remove the plastic wrap once the seedlings emerge.
6. Germination Time: Okra seeds typically germinate in 7-14 days, depending on the temperature. Be patient!
Caring for Your Okra Plants
Once your okra seedlings emerge, it’s time to provide them with the care they need to thrive.
1. Watering: Water your okra plants regularly, especially during hot and dry weather. Check the soil moisture by sticking your finger into the soil. If the top inch feels dry, it’s time to water. Avoid overwatering, as this can lead to root rot.
2. Fertilizing: Feed your okra plants with a balanced, slow-release fertilizer or a liquid fertilizer every 2-3 weeks. Follow the instructions on the fertilizer package. I like to use a fertilizer that’s high in phosphorus and potassium to promote flowering and pod production.
3. Thinning: Once the seedlings are a few inches tall, thin them out to one plant per container. Choose the strongest seedling and gently remove the others.
4. Weeding: Keep the containers free of weeds. Weeds compete with your okra plants for nutrients and water.
5. Mulching: Apply a layer of mulch around the base of the plants to help retain moisture, suppress weeds, and regulate soil temperature.
6. Staking or Caging: As your okra plants grow taller, they may need support. Use stakes or cages to prevent them from falling over, especially during windy conditions.
7. Pest Control: Keep an eye out for pests like aphids, spider mites, and okra worms. If you notice any pests, treat them with an organic insecticide like neem oil or insecticidal soap.
8. Pruning: Prune away any yellowing or dead leaves to improve air circulation and prevent disease.
Harvesting Your Okra
The moment we’ve all been waiting for – harvesting your homegrown okra!
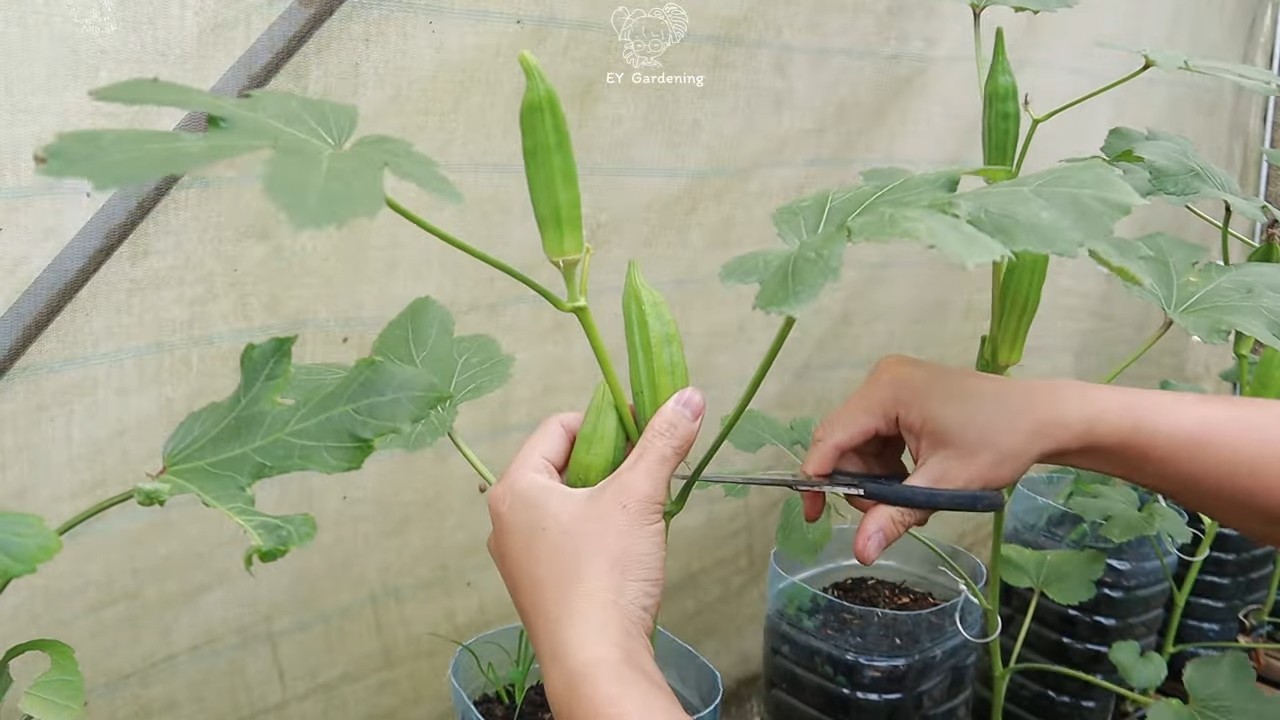
1. Timing is Key: Okra pods are best harvested when they are young and tender, typically 2-4 inches long. Overripe okra pods can become tough and fibrous.
2. Harvest Regularly: Harvest your okra pods every 1-2 days. Regular harvesting encourages the plant to produce more pods.
3. Use a Sharp Knife or Pruning Shears: Use a sharp knife or pruning shears to cut the okra pods from the plant. Be careful not to damage the plant.
4. Wear Gloves: Okra plants have tiny spines that can irritate the skin. Wear gloves when harvesting to protect your hands.
5. Enjoy Your Harvest: Enjoy your fresh, homegrown okra in your favorite recipes! Okra is delicious fried, grilled, stewed, or added to soups and gumbos.
Troubleshooting Common Problems
Even with the best care, you might encounter some challenges along the way. Here are some common problems and how to address them:
* Yellowing Leaves: Yellowing leaves can be caused by overwatering, underwatering, nutrient deficiencies, or pests. Check the soil moisture, fertilize your plants, and inspect them for pests.
* Lack of Pod Production: Lack of pod production can be caused by insufficient sunlight, poor pollination, or nutrient deficiencies. Make sure your plants are getting enough sunlight, hand-pollinate the flowers if necessary, and fertilize your plants with a fertilizer that’s high in phosphorus and potassium.
* Pest Infestations: Pests can damage your okra plants and reduce your yield. Inspect your plants regularly for pests and treat them with an organic insecticide if necessary.
* Root Rot: Root rot is caused by overwatering and poor drainage. Make sure your containers have drainage holes and avoid overwatering.
Extending the Growing Season
If you live in an area with a short growing season, you can extend the season by starting your okra seeds indoors 6-8 weeks before the last expected frost. Transplant the seedlings outdoors once the weather has warmed up. You can also use row covers or cold frames to protect your plants from frost.
Enjoying the Fruits (or Pods!) of Your Labor
Growing okra on your rooftop is a rewarding experience that allows you to enjoy fresh, homegrown produce while utilizing unused space. With a little planning and care, you can create a thriving okra garden on your rooftop. So, get out there, get your hands dirty, and enjoy the fruits (or pods!) of your labor! Happy gardening!
Conclusion
So, there you have it! Transforming your rooftop into a thriving okra garden is not just a whimsical dream, but a tangible reality within your reach. We’ve explored the essential steps, from selecting the right containers and soil to nurturing your okra plants through their growth cycle. But why should you embark on this rooftop gardening adventure?
Firstly, growing your own okra offers unparalleled freshness and flavor. Imagine plucking plump, vibrant okra pods just moments before adding them to your favorite gumbo or stir-fry. The taste difference compared to store-bought okra is simply remarkable. Secondly, rooftop gardening is an incredibly rewarding experience. Witnessing the transformation from tiny seeds to flourishing plants, all under your care, is deeply satisfying. It connects you to nature in a unique and personal way, especially in urban environments where green spaces can be scarce.
Furthermore, cultivating your own okra is a sustainable and eco-friendly practice. You’re reducing your reliance on commercially grown produce, which often involves long-distance transportation and potentially harmful pesticides. By embracing rooftop gardening, you’re contributing to a greener, healthier planet.
But the benefits don’t stop there! Rooftop okra gardening can also be a fantastic way to beautify your living space. The lush green foliage and vibrant yellow flowers of okra plants can transform a drab rooftop into a stunning oasis. It’s a visual delight that adds character and charm to your home.
Now, let’s talk about variations and suggestions. While we’ve focused on the core principles of rooftop okra gardening, there’s plenty of room for experimentation and personalization. Consider these ideas:
* Companion Planting: Enhance your okra garden by planting companion plants like basil, marigolds, or peppers. These plants can deter pests, attract beneficial insects, and even improve the flavor of your okra.
* Vertical Gardening: If space is limited, explore vertical gardening techniques. Use trellises or climbing structures to train your okra plants upwards, maximizing your growing area.
* Container Variations: Experiment with different types of containers, such as fabric pots, self-watering planters, or even repurposed containers like old tires or buckets. Just ensure they have adequate drainage.
* Okra Varieties: Don’t limit yourself to just one type of okra. Explore different varieties like Clemson Spineless, Burgundy, or Emerald. Each variety offers unique characteristics in terms of size, color, and flavor.
Ultimately, the key to successful rooftop okra gardening is to be patient, observant, and adaptable. Pay close attention to your plants’ needs, adjust your watering and fertilizing schedule as necessary, and don’t be afraid to experiment.
We wholeheartedly encourage you to give this DIY trick a try. It’s a fun, rewarding, and sustainable way to grow your own fresh produce, beautify your living space, and connect with nature. And most importantly, it allows you to enjoy the delicious and nutritious benefits of homegrown okra.
So, grab your seeds, prepare your containers, and get ready to embark on your rooftop okra gardening adventure. We’re confident that you’ll be amazed by the results. And once you’ve harvested your first crop, we’d love to hear about your experience. Share your photos, tips, and stories with us in the comments below. Let’s build a community of rooftop okra gardeners and inspire others to embrace this wonderful DIY project. Happy gardening!
Frequently Asked Questions (FAQ)
What are the best okra varieties for rooftop gardening?
Choosing the right okra variety is crucial for success in a rooftop garden. Compact varieties that don’t grow too tall are generally preferred. Clemson Spineless is a popular choice due to its manageable size and high yield. Burgundy okra is another excellent option, offering beautiful red pods and a slightly sweeter flavor. Emerald okra is known for its smooth, spineless pods and disease resistance. Consider your local climate and growing conditions when selecting a variety. Research which varieties thrive in your area and choose those that are well-suited for container gardening. Seed catalogs and local nurseries can provide valuable information and recommendations.
How much sunlight does okra need when grown on a rooftop?
Okra is a sun-loving plant and requires at least 6-8 hours of direct sunlight per day to thrive. Rooftops typically offer ample sunlight, but it’s essential to assess the amount of sunlight your specific rooftop receives. Observe your rooftop throughout the day to identify areas that receive the most sunlight. If your rooftop doesn’t receive enough direct sunlight, consider using grow lights to supplement the natural light. Position the grow lights close to the plants and adjust their height as the plants grow. Remember that adequate sunlight is crucial for okra to produce abundant and flavorful pods.
What type of soil is best for growing okra in containers?
The ideal soil for container-grown okra is a well-draining, nutrient-rich potting mix. Avoid using garden soil, as it can be too heavy and compact for containers. A good potting mix should contain a blend of peat moss, perlite, and vermiculite. Peat moss helps retain moisture, while perlite and vermiculite improve drainage and aeration. You can also amend your potting mix with compost or aged manure to provide additional nutrients. Ensure that the soil pH is slightly acidic to neutral, around 6.0 to 7.0. Regularly test the soil pH and adjust it as needed using lime or sulfur.
How often should I water my okra plants on the rooftop?
Watering frequency depends on several factors, including the weather, the size of the container, and the type of soil. Generally, okra plants need to be watered deeply and regularly, especially during hot and dry periods. Check the soil moisture level regularly by sticking your finger into the soil. If the top inch of soil feels dry, it’s time to water. Water thoroughly until water drains out of the bottom of the container. Avoid overwatering, as this can lead to root rot. Consider using a drip irrigation system or a soaker hose to provide consistent and efficient watering.
How do I fertilize my rooftop okra plants?
Okra plants are heavy feeders and require regular fertilization to produce abundant pods. Start by incorporating a slow-release fertilizer into the potting mix at planting time. This will provide a steady supply of nutrients for the first few weeks. After that, supplement with a liquid fertilizer every 2-3 weeks. Choose a fertilizer that is high in phosphorus and potassium, as these nutrients are essential for flowering and fruiting. Avoid over-fertilizing, as this can lead to excessive foliage growth and reduced pod production. Follow the instructions on the fertilizer label carefully.
How do I protect my okra plants from pests and diseases on the rooftop?
Rooftop gardens can be susceptible to various pests and diseases. Regularly inspect your okra plants for signs of infestation or disease. Common pests that attack okra include aphids, spider mites, and flea beetles. Control these pests by spraying the plants with insecticidal soap or neem oil. Diseases that can affect okra include powdery mildew and root rot. Prevent these diseases by providing good air circulation, avoiding overwatering, and using disease-resistant varieties. Consider using organic pest control methods to minimize the use of harmful chemicals.
When and how do I harvest okra from my rooftop garden?
Okra pods are typically ready for harvest 50-60 days after planting. Harvest the pods when they are young and tender, typically 2-4 inches long. Use a sharp knife or pruning shears to cut the pods from the plant. Harvest regularly, every 1-2 days, to encourage continued production. Overripe pods become tough and fibrous. Wear gloves when harvesting okra, as the pods can be prickly. Store harvested okra in the refrigerator for up to a week.
Can I grow okra in containers during the winter?
Okra is a warm-season crop and does not tolerate frost. In regions with mild winters, you may be able to extend the growing season by providing protection from frost. Cover the plants with blankets or plastic sheeting when frost is predicted. In colder climates, it’s best to grow okra indoors during the winter using grow lights. You can also start seeds indoors in late winter and transplant them outdoors in the spring after the last frost.
What are some creative ways to use my homegrown okra?
Homegrown okra is incredibly versatile and can be used in a variety of dishes. It’s a staple ingredient in Southern cuisine, often used in gumbo, jambalaya, and fried okra. You can also add okra to soups, stews, and stir-fries. Okra can be grilled, roasted, or pickled. The possibilities are endless! Experiment with different recipes and find your favorite ways to enjoy your homegrown okra. Don’t forget to share your culinary creations with friends and family!


Leave a Comment