
Rooftop Kale Growing Tips: Imagine stepping onto your rooftop and harvesting fresh, vibrant kale, ready to be transformed into a delicious and healthy meal. Sounds idyllic, right? Well, it’s more achievable than you might think! For centuries, urban dwellers have sought ways to cultivate their own food, from window boxes overflowing with herbs to community gardens bursting with life. This DIY guide taps into that rich history, bringing the joy of gardening to even the most space-constrained environments.
But why kale, and why on your roof? In today’s world, where access to fresh, organic produce can be limited or expensive, growing your own food is not just a hobby; it’s a way to take control of your health and well-being. Kale, a nutritional powerhouse packed with vitamins and antioxidants, is surprisingly easy to grow, even for beginners. And your rooftop, often an underutilized space, can become a thriving urban oasis. I’m going to show you some simple yet effective rooftop kale growing tips that will have you enjoying homegrown goodness in no time.
This article will provide you with the essential knowledge and practical advice you need to successfully cultivate kale on your rooftop, regardless of your experience level. Forget complicated gardening jargon and expensive equipment; we’re focusing on simple, DIY solutions that are both budget-friendly and environmentally conscious. Let’s transform your rooftop into a flourishing kale garden!
Dein eigener Dachgarten: Kale Anbau leicht gemacht!
Hallo liebe Gartenfreunde! Habt ihr auch das Gefühl, dass ihr mehr Grün in eurem Leben braucht, aber keinen Garten habt? Keine Sorge, ich zeige euch, wie ihr euren eigenen kleinen Kale-Garten auf dem Dach anlegen könnt! Es ist einfacher als ihr denkt und bringt frischen, gesunden Grünkohl direkt vor eure Haustür. Lasst uns loslegen!
Warum Kale auf dem Dach anbauen?
Bevor wir ins Detail gehen, lasst mich euch kurz erklären, warum Kale (Grünkohl) eine fantastische Wahl für den Dachgarten ist:
* Platzsparend: Kale wächst relativ kompakt und kann gut in Containern oder Hochbeeten angebaut werden.
* Robust: Kale ist sehr widerstandsfähig gegen Kälte und Schädlinge, was ihn zu einer pflegeleichten Pflanze macht.
* Gesund: Kale ist ein echtes Superfood, reich an Vitaminen, Mineralien und Antioxidantien.
* Erntezeit: Kale kann über einen langen Zeitraum geerntet werden, oft bis in den Winter hinein.
* Ästhetisch: Mit seinen krausen Blättern ist Kale auch optisch ein Hingucker auf dem Dach.
Was du brauchst: Die Materialliste
Bevor wir mit dem Anbau beginnen, brauchen wir natürlich das richtige Equipment. Hier ist eine Liste der Dinge, die du benötigst:
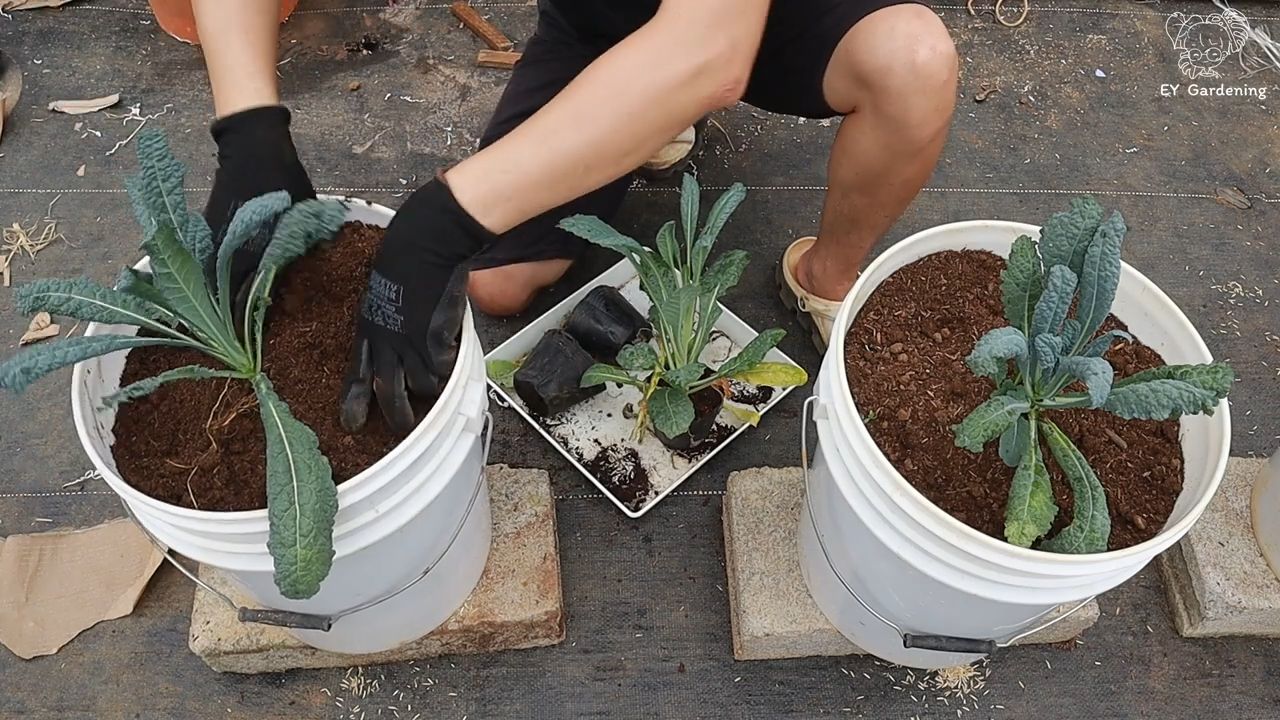
* Container oder Hochbeete: Wähle Behälter mit guter Drainage und ausreichend Platz für die Wurzeln (mindestens 30 cm tief).
* Hochwertige Pflanzerde: Verwende eine gut durchlässige, nährstoffreiche Erde. Spezielle Gemüseerde ist ideal.
* Kale-Samen oder Jungpflanzen: Du kannst Kale entweder aus Samen ziehen oder Jungpflanzen kaufen.
* Gießkanne oder Gartenschlauch: Für die regelmäßige Bewässerung.
* Organischer Dünger: Um die Pflanzen mit ausreichend Nährstoffen zu versorgen.
* Gartenschere oder Messer: Für die Ernte.
* Handschuhe: Um deine Hände sauber zu halten.
* Optional: Schneckenzaun oder Kupferband, um die Pflanzen vor Schnecken zu schützen.
* Optional: Rankhilfe, wenn du Sorten anbaust, die etwas höher wachsen.
Die Vorbereitung: Der Grundstein für deinen Kale-Garten
Bevor wir die Samen in die Erde bringen, müssen wir einige Vorbereitungen treffen.
1. Dach prüfen: Stelle sicher, dass dein Dach für den Anbau geeignet ist. Achte auf die Tragfähigkeit und die Abdichtung. Im Zweifelsfall solltest du einen Fachmann konsultieren.
2. Standort wählen: Kale benötigt mindestens 6 Stunden Sonnenlicht pro Tag. Wähle einen sonnigen Standort auf deinem Dach.
3. Container vorbereiten: Reinige die Container gründlich und stelle sicher, dass sie über gute Drainagelöcher verfügen. Lege eventuell eine Schicht Kies oder Tonscherben auf den Boden, um die Drainage zu verbessern.
4. Erde einfüllen: Fülle die Container mit der Pflanzerde. Lasse etwa 5 cm Platz bis zum Rand.
5. Erde anfeuchten: Befeuchte die Erde gründlich, bevor du die Samen oder Jungpflanzen einsetzt.
Aussaat oder Jungpflanzen: Der Start deines Kale-Gartens
Du hast zwei Möglichkeiten, deinen Kale-Garten zu starten: mit Samen oder mit Jungpflanzen. Beide Methoden haben ihre Vor- und Nachteile.
Aussaat von Kale-Samen
* Vorteile: Günstiger, größere Sortenvielfalt, du kannst den gesamten Lebenszyklus der Pflanze miterleben.
* Nachteile: Braucht mehr Zeit und Geduld, höhere Ausfallrate.
1. Aussaatzeitpunkt: Kale kann ab März im Haus vorgezogen werden oder ab April/Mai direkt ins Freie gesät werden.
2. Aussaattiefe: Säe die Samen etwa 1 cm tief in die Erde.
3. Abstand: Halte einen Abstand von etwa 5 cm zwischen den Samen ein.
4. Gießen: Gieße die Erde vorsichtig an und halte sie feucht.
5. Keimung: Die Keimung dauert in der Regel 5-10 Tage.
6. Pikieren: Wenn die Sämlinge groß genug sind (etwa 5 cm hoch), kannst du sie in größere Töpfe pikieren oder direkt in die Container auf dem Dach umpflanzen. Achte dabei auf einen Abstand von etwa 30-40 cm zwischen den Pflanzen.
Pflanzen von Kale-Jungpflanzen
* Vorteile: Schneller, einfacher, höhere Erfolgsrate.
* Nachteile: Teurer, geringere Sortenvielfalt.
1. Pflanzzeitpunkt: Kale-Jungpflanzen können ab April/Mai ins Freie gepflanzt werden, sobald keine Frostgefahr mehr besteht.
2. Pflanzloch: Grabe ein Loch, das etwas größer ist als der Wurzelballen der Jungpflanze.
3. Einsetzen: Setze die Jungpflanze vorsichtig in das Loch und fülle es mit Erde auf.
4. Andrücken: Drücke die Erde leicht an.
5. Gießen: Gieße die Pflanze gründlich an.
6. Abstand: Achte auf einen Abstand von etwa 30-40 cm zwischen den Pflanzen.
Die Pflege: Damit dein Kale prächtig gedeiht
Nachdem du die Samen gesät oder die Jungpflanzen gepflanzt hast, ist es wichtig, die Pflanzen gut zu pflegen, damit sie prächtig gedeihen.
1. Bewässerung: Kale benötigt regelmäßige Bewässerung, besonders in trockenen Perioden. Achte darauf, dass die Erde immer leicht feucht ist, aber nicht nass. Vermeide Staunässe.
2. Düngung: Dünge die Pflanzen regelmäßig mit einem organischen Dünger. Beginne etwa 2-3 Wochen nach dem Pflanzen. Befolge die Anweisungen auf der Düngerpackung.
3. Unkraut entfernen: Entferne regelmäßig Unkraut, das in den Containern wächst. Unkraut konkurriert mit dem Kale um Nährstoffe und Wasser.
4. Schädlinge bekämpfen: Kale ist relativ widerstandsfähig gegen Schädlinge, aber manchmal können Blattläuse oder Schnecken auftreten. Bekämpfe Schädlinge mit natürlichen Mitteln, wie z.B. Neemöl oder Schneckenkorn.
5. Verwelkte Blätter entfernen: Entferne regelmäßig verwelkte oder gelbe Blätter, um die Gesundheit der Pflanze zu fördern.
Die Ernte: Der Lohn deiner Mühe
Nach etwa 6-8 Wochen kannst du mit der Ernte beginnen.
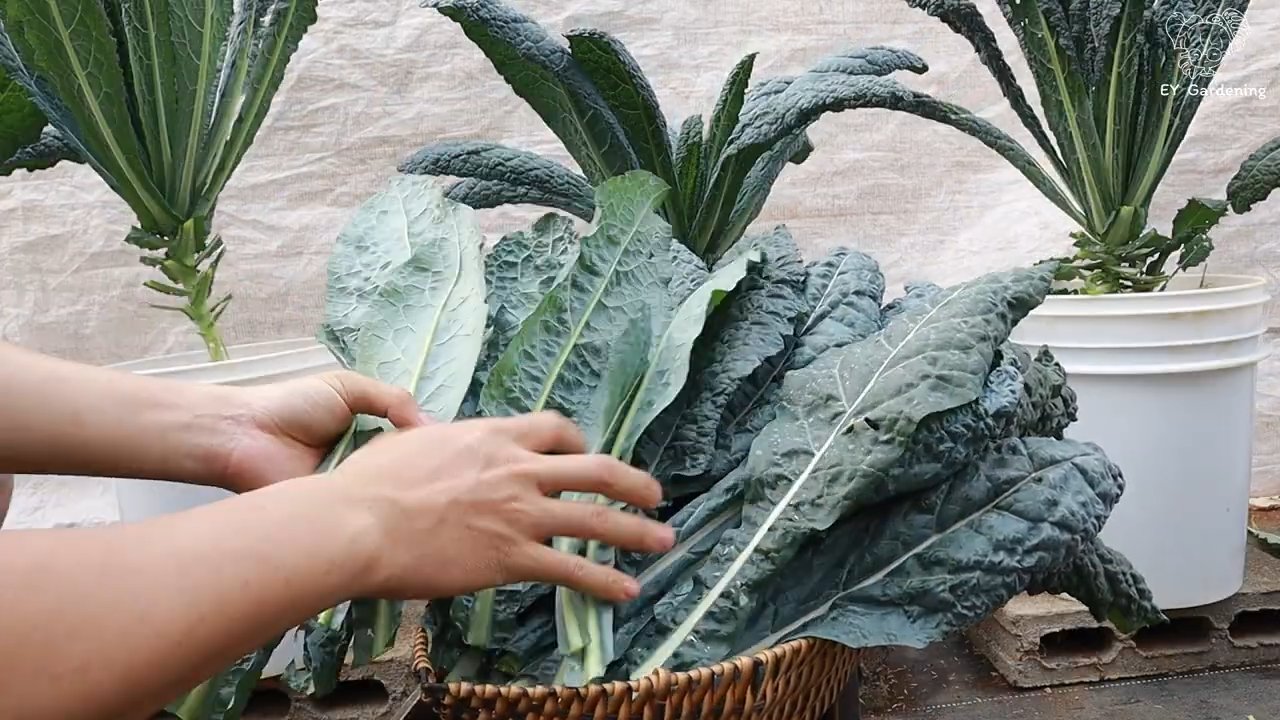
1. Erntezeitpunkt: Ernte die äußeren Blätter, sobald sie groß genug sind (etwa 15-20 cm lang). Die inneren Blätter können weiterwachsen.
2. Erntetechnik: Schneide die Blätter mit einer Gartenschere oder einem Messer ab. Achte darauf, die Pflanze nicht zu beschädigen.
3. Regelmäßige Ernte: Ernte die Blätter regelmäßig, um die Produktion neuer Blätter anzuregen.
4. Lagerung: Kale kann im Kühlschrank etwa 1 Woche gelagert werden. Am besten wickelst du die Blätter in ein feuchtes Tuch.
Sortenempfehlungen: Welcher Kale ist der Richtige für dich?
Es gibt viele verschiedene Kale-Sorten, die sich in Geschmack, Aussehen und Wuchsform unterscheiden. Hier sind einige meiner Favoriten:
* ‘Nero di Toscana’ (Palmkohl): Dunkelgrüne, lange Blätter, die an Palmen erinnern. Sehr dekorativ und robust.
* ‘Red Russian’: Rötlich-grüne, gefiederte Blätter. Mild im Geschmack und sehr winterhart.
* ‘Lacinato’ (Cavolo Nero): Dunkelgrüne, gekrauste Blätter. Intensiver Geschmack und gut für Suppen und Eintöpfe.
* ‘Dwarf Blue Curled Vates’: Kompakte, blaugrüne, stark gekrauste Blätter. Ideal für den Anbau in Containern.
* ‘Redbor’: Dunkelrote, stark gekrauste Blätter. Sehr dekorativ und
Conclusion
So, there you have it! Transforming your rooftop into a thriving kale garden is not only achievable but also incredibly rewarding. We’ve explored the key considerations, from selecting the right containers and soil to mastering watering techniques and pest control. But why is this DIY rooftop kale growing endeavor a must-try?
Firstly, imagine stepping onto your rooftop and harvesting fresh, vibrant kale leaves just moments before adding them to your salad, smoothie, or stir-fry. The taste and nutritional value of homegrown produce are simply unmatched. You’ll be enjoying kale that’s bursting with flavor and packed with vitamins and minerals, far superior to anything you can find at the grocery store.
Secondly, rooftop gardening is an excellent way to maximize space, especially if you live in an urban environment with limited yard space. It allows you to connect with nature, even in the heart of the city, and create a beautiful, green oasis above the hustle and bustle. Plus, it’s a fantastic way to reduce your carbon footprint by growing your own food locally.
Thirdly, growing your own kale is incredibly satisfying. There’s something truly special about nurturing a plant from seed to harvest and witnessing the fruits (or in this case, the leaves) of your labor. It’s a therapeutic and rewarding experience that can bring joy and a sense of accomplishment to your life.
Variations and Suggestions:
Don’t be afraid to experiment with different varieties of kale. Curly kale, Tuscan kale (also known as Lacinato or dinosaur kale), and Red Russian kale all offer unique flavors and textures. Try planting a mix of varieties to add diversity to your harvest.
Consider companion planting to enhance the growth and health of your kale. Marigolds can help deter pests, while herbs like rosemary and thyme can attract beneficial insects.
If you live in a particularly windy area, consider using windbreaks to protect your kale plants. You can use trellises, fences, or even strategically placed shrubs to shield your plants from strong winds.
For those in colder climates, extend your growing season by using cold frames or row covers to protect your kale from frost and freezing temperatures. You can also grow kale indoors under grow lights during the winter months.
Finally, don’t forget to compost your kitchen scraps and yard waste to create nutrient-rich soil for your kale plants. Composting is a sustainable and environmentally friendly way to improve the health of your garden.
We wholeheartedly encourage you to embark on this exciting journey of rooftop kale growing. It’s a rewarding experience that will provide you with fresh, healthy produce, a beautiful green space, and a deeper connection to nature.
So, grab your seeds, pots, and soil, and get ready to transform your rooftop into a kale-filled paradise! We’re confident that you’ll be amazed by the results.
We’d love to hear about your experiences! Share your rooftop kale growing stories, tips, and photos with us in the comments below. Let’s create a community of rooftop gardeners and inspire others to embrace the joys of growing their own food. Happy gardening!
FAQ
What are the best kale varieties for rooftop gardening?
The best kale varieties for rooftop gardening are those that are relatively compact and can tolerate container growing. Some excellent choices include:
* Dwarf Blue Curled Vates: This variety is known for its compact size and frilly, blue-green leaves. It’s a great option for smaller containers and is very cold-hardy.
* Red Russian Kale: This variety has flat, oak-leaf shaped leaves with reddish-purple stems. It’s known for its mild, slightly sweet flavor and is also very cold-hardy.
* Lacinato Kale (Dinosaur Kale): This variety has long, dark green, heavily textured leaves. It’s known for its earthy flavor and is a good choice for cooking.
* Redbor Kale: This variety is prized for its ornamental value, with deeply fringed, purple leaves. It’s also edible and has a slightly sweet flavor.
* Premier Kale: A hybrid variety known for its disease resistance and high yields. It produces large, dark green leaves.
Consider the size of your containers and the amount of sunlight your rooftop receives when choosing your kale varieties.
How much sunlight does rooftop kale need?
Kale thrives in full sun, which means at least 6 hours of direct sunlight per day. However, it can also tolerate partial shade, especially in hotter climates. If your rooftop receives less than 6 hours of sunlight, your kale plants may not grow as vigorously, and the leaves may be smaller.
If you’re growing kale in a particularly sunny location, be sure to provide adequate water to prevent the plants from drying out. You may also want to consider using shade cloth during the hottest part of the day to protect the leaves from scorching.
What type of soil is best for rooftop kale?
Kale prefers well-draining, fertile soil with a pH between 6.0 and 7.5. A good potting mix for rooftop kale should contain a blend of:
* Compost: Provides nutrients and improves soil structure.
* Peat moss or coco coir: Helps retain moisture.
* Perlite or vermiculite: Improves drainage and aeration.
Avoid using garden soil in containers, as it can become compacted and poorly drained. You can also amend your potting mix with slow-release fertilizer to provide your kale plants with a steady supply of nutrients.
How often should I water my rooftop kale?
Water your rooftop kale regularly, especially during hot, dry weather. The frequency of watering will depend on the size of your containers, the type of soil you’re using, and the weather conditions.
Check the soil moisture regularly by sticking your finger into the soil. If the top inch of soil feels dry, it’s time to water. Water deeply, until water drains out of the bottom of the container.
Avoid overwatering, as this can lead to root rot. Also, avoid watering the leaves of the kale plants, as this can promote fungal diseases. Water at the base of the plants instead.
What are some common pests and diseases that affect rooftop kale, and how can I control them?
Some common pests that can affect rooftop kale include aphids, cabbage worms, flea beetles, and slugs. Common diseases include powdery mildew, downy mildew, and black rot.
Here are some tips for controlling pests and diseases on your rooftop kale:
* Inspect your plants regularly: Look for signs of pests or diseases, such as holes in the leaves, discoloration, or white powdery spots.
* Handpick pests: Remove pests by hand and drop them into a bucket of soapy water.
* Use insecticidal soap or neem oil: These are effective organic treatments for many common pests.
* Cover your plants with row covers: This can help prevent pests from reaching your kale plants.
* Ensure good air circulation: This can help prevent fungal diseases.
* Remove infected leaves: If you see signs of disease, remove the affected leaves and dispose of them properly.
* Use organic fungicides: If necessary, use an organic fungicide to control fungal diseases.
Can I grow kale on my rooftop in the winter?
Yes, you can grow kale on your rooftop in the winter, especially in milder climates. Kale is a cold-hardy vegetable that can tolerate frost and freezing temperatures.
To protect your kale plants from the cold, you can use cold frames, row covers, or mulch. You can also grow kale indoors under grow lights during the winter months.
How do I harvest rooftop kale?
Harvest kale leaves as needed, starting with the outer leaves. Simply snap or cut the leaves off at the base of the plant. Avoid harvesting more than one-third of the leaves at a time, as this can stress the plant.
Kale leaves are most tender and flavorful when they are young. You can harvest kale leaves at any stage of growth, but the older leaves may be tougher and more bitter.
After harvesting, wash the kale leaves thoroughly and store them in the refrigerator for up to a week.
How can I encourage more kale growth?
To encourage more kale growth, make sure your plants are getting enough sunlight, water, and nutrients. Fertilize your kale plants regularly with a balanced fertilizer or compost tea.
You can also prune your kale plants to encourage bushier growth. Simply pinch off the growing tips of the plants to promote branching.
Finally, be sure to harvest your kale leaves regularly. This will encourage the plant to produce more leaves.

Leave a Comment