
Regrow Enoki Mushrooms at Home? Absolutely! Imagine having a continuous supply of these delicate, flavorful fungi right at your fingertips. Forget those pricey grocery store runs – with a few simple steps, you can cultivate your own Enoki mushrooms and enjoy their unique taste and texture whenever you please.
Mushrooms, in general, have a rich history, particularly in Asian cultures where they’ve been prized for centuries for both their culinary and medicinal properties. Enoki mushrooms, with their long, slender stems and tiny caps, are no exception. They’ve been a staple in Asian cuisine for generations, adding a delightful crunch and subtle sweetness to soups, stir-fries, and salads.
But why should you bother learning to regrow Enoki mushrooms at home? Well, for starters, it’s incredibly rewarding! There’s something truly special about nurturing your own food from start to finish. Plus, it’s a fantastic way to reduce your grocery bill and minimize your environmental impact. Let’s be honest, who wouldn’t want to save a little money and be more sustainable? I know I do! More importantly, you’ll have access to fresher, more flavorful Enoki mushrooms than you can typically find in stores. So, let’s dive in and discover the secrets to successfully regrowing these delicious mushrooms in the comfort of your own home!
Regrowing Enoki Mushrooms at Home: A Fun and Frugal Project!
Hey there, fellow mushroom enthusiasts! Ever bought a package of those delicate, long-stemmed Enoki mushrooms and felt bad tossing the base? Well, I’m here to tell you that you don’t have to! You can actually regrow Enoki mushrooms right at home. It’s a surprisingly simple and rewarding process, and I’m going to walk you through every step. Get ready to impress your friends with your mushroom-growing prowess!
What You’ll Need
Before we dive in, let’s gather our supplies. This is a pretty low-cost project, which is always a plus!
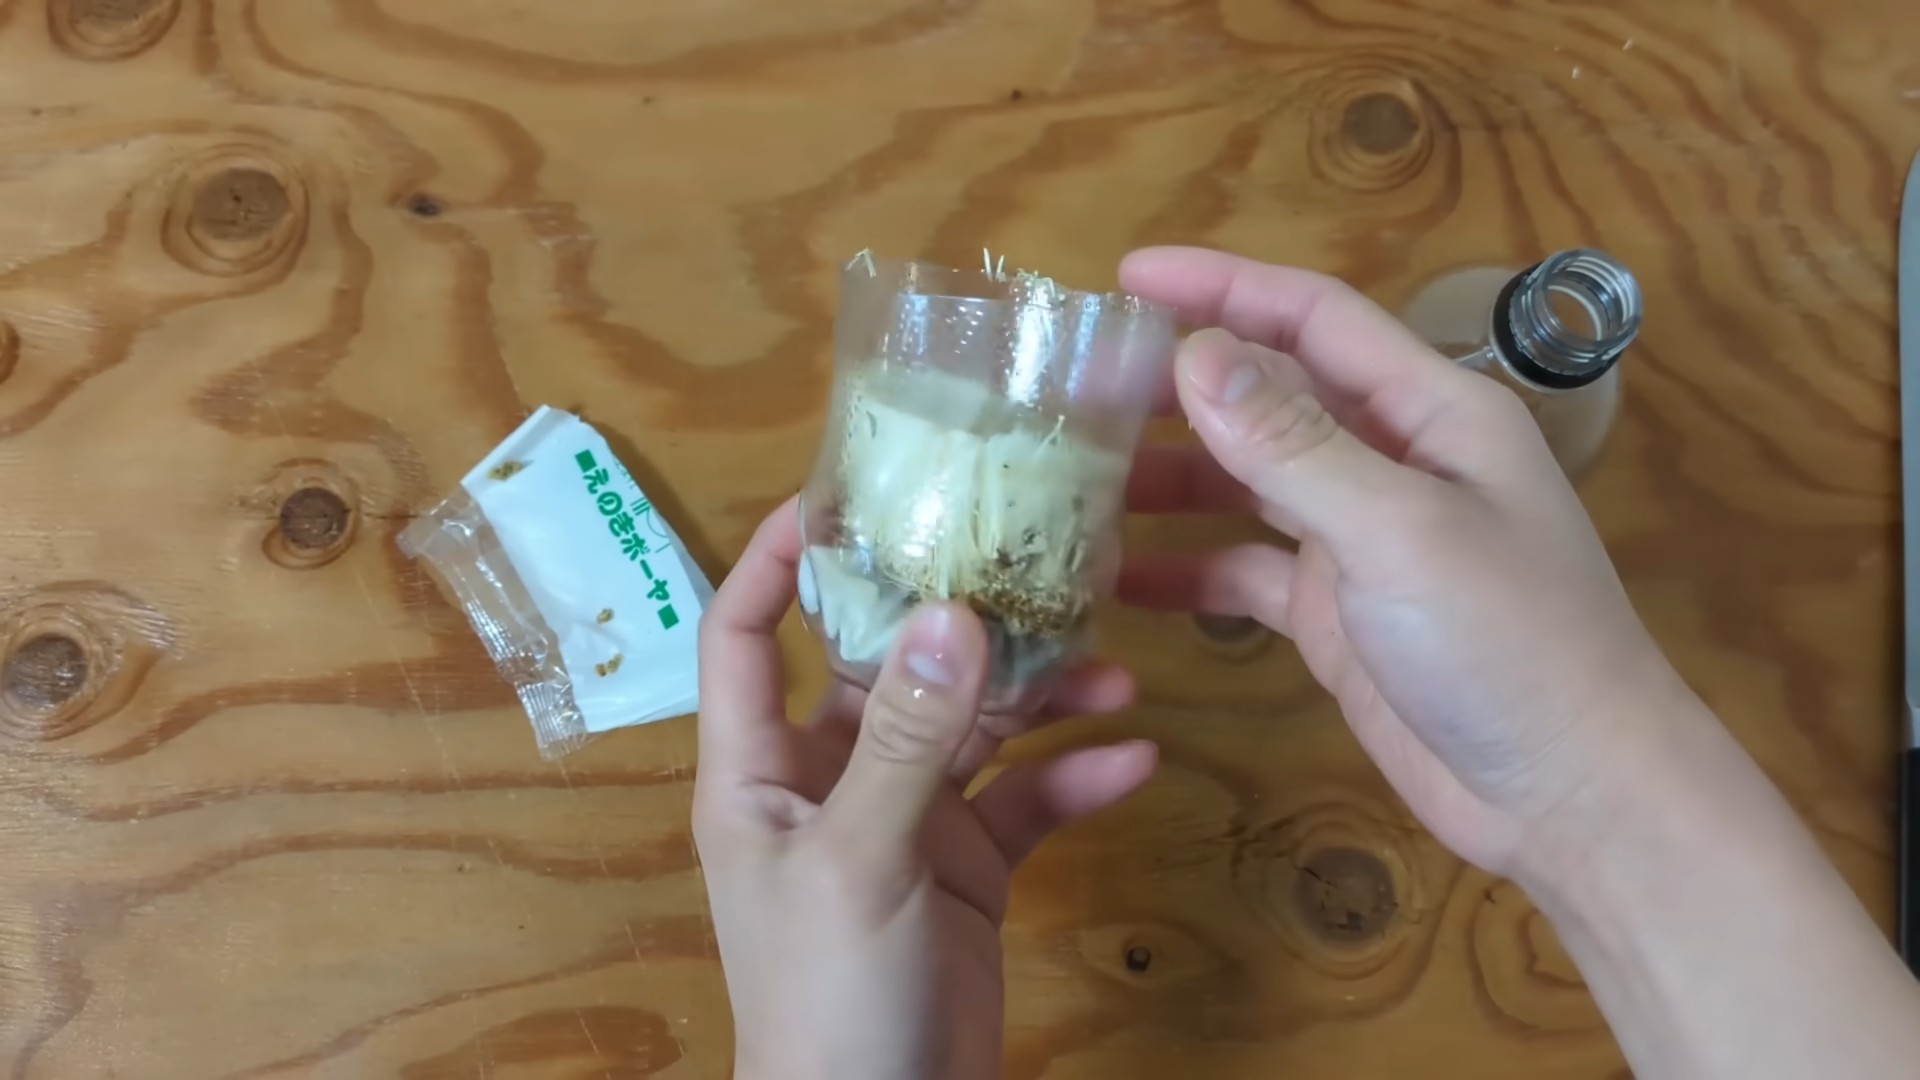
* Enoki Mushroom Stumps: The base of a store-bought package of Enoki mushrooms. Make sure they look healthy and aren’t slimy or moldy.
* Cardboard: Plain, corrugated cardboard. Avoid anything with heavy printing or glossy coatings.
* Coffee Grounds: Used coffee grounds are perfect! They provide nutrients for the mushrooms.
* Spray Bottle: For misting and keeping things moist.
* Sterile Container: A plastic container with a lid, a glass jar, or even a resealable plastic bag will work. Make sure it’s clean!
* Hydrogen Peroxide (3%): Optional, but helpful for sterilizing.
* Rubbing Alcohol (70% or higher): For sanitizing surfaces.
* Gloves: Optional, but recommended for maintaining sterility.
Understanding the Process
The basic idea is to provide the Enoki mushroom stumps with a suitable environment to continue growing. We’ll be creating a humid, nutrient-rich environment that mimics their natural habitat. The cardboard and coffee grounds act as the substrate, providing both structure and food for the mycelium (the vegetative part of the fungus).
Step-by-Step Instructions
Alright, let’s get our hands dirty (or, preferably, gloved!). Here’s how to regrow your own Enoki mushrooms:
Phase 1: Preparing the Substrate
1. Clean Everything: Sterility is key to preventing unwanted mold growth. Wipe down your work surface with rubbing alcohol. If you’re using a plastic container, wash it thoroughly with soap and water, then rinse with a diluted hydrogen peroxide solution (1 part hydrogen peroxide to 9 parts water). Let it air dry completely.
2. Prepare the Cardboard: Tear the cardboard into small pieces, about 1-2 inches square. You want enough to fill your container about halfway.
3. Pasteurize the Cardboard: This step helps to kill off any competing organisms that might be lurking in the cardboard. There are a few ways to do this:
* Microwave Method: Place the cardboard pieces in a microwave-safe bowl, add enough water to completely submerge them, and microwave on high for 2-3 minutes, or until the water is boiling. Let it cool slightly before handling.
* Boiling Water Method: Place the cardboard pieces in a pot and cover them with boiling water. Let them soak for about 30 minutes.
4. Drain and Cool the Cardboard: Carefully drain the water from the cardboard. Squeeze out any excess water – you want it to be damp, not soaking wet. Let it cool down enough to handle comfortably.
5. Prepare the Coffee Grounds: If your coffee grounds are still hot, let them cool down to room temperature. You don’t need to pasteurize them, as they’ve already been heated during the brewing process.
Phase 2: Assembling the Growing Medium
1. Layer the Container: In your sterile container, create a layer of damp cardboard at the bottom.
2. Add Coffee Grounds: Sprinkle a thin layer of used coffee grounds over the cardboard.
3. Repeat Layers: Continue layering cardboard and coffee grounds, alternating between the two, until you’ve used up all your materials. The top layer should be cardboard.
4. Moisten the Substrate: Use your spray bottle to lightly mist the entire substrate. You want it to be evenly moist, but not soggy.
Phase 3: Introducing the Enoki Stumps
1. Prepare the Stumps: Gently clean the Enoki mushroom stumps. Remove any loose debris or discolored parts.
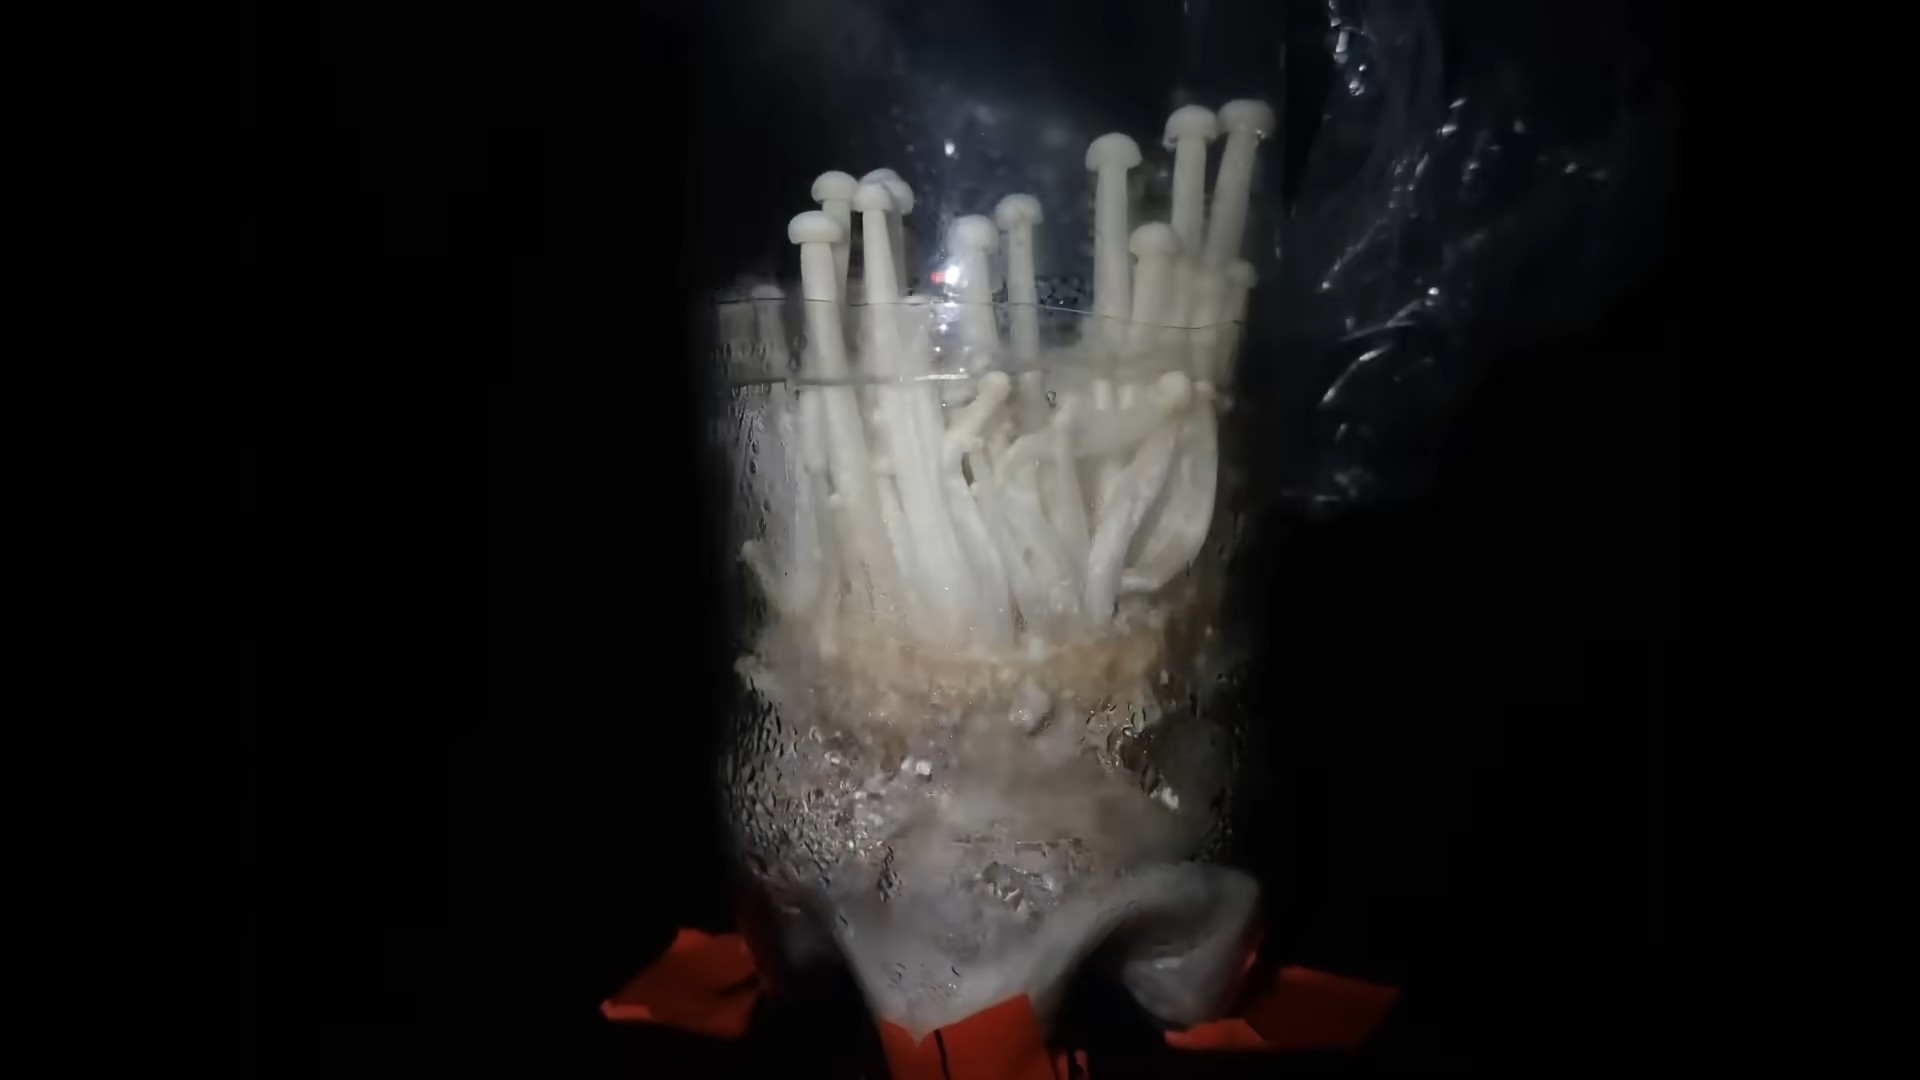
2. Place the Stumps: Nestle the Enoki mushroom stumps into the top layer of cardboard, spacing them evenly apart. You want the cut ends of the stems to be in contact with the damp cardboard.
3. Mist the Stumps: Lightly mist the Enoki mushroom stumps with water.
Phase 4: Incubation and Growth
1. Seal the Container: Cover the container with its lid or seal the plastic bag. If using a lid, you can poke a few small holes for ventilation, but this isn’t strictly necessary.
2. Find a Suitable Location: Place the container in a cool, dark, and humid location. A basement, closet, or even the refrigerator (yes, the refrigerator!) can work well. Enoki mushrooms prefer temperatures between 45-65°F (7-18°C).
3. Maintain Humidity: Check the container regularly (every few days) and mist the substrate if it appears to be drying out. You want to maintain a consistently humid environment.
4. Observe and Wait: Be patient! It can take several weeks for the mycelium to start growing. You should start to see white, fuzzy growth (the mycelium) spreading from the Enoki mushroom stumps onto the cardboard.
5. Introduce Light (Optional): Once the mycelium has colonized a significant portion of the substrate, you can introduce a small amount of indirect light. This can encourage the mushrooms to fruit (form the actual mushrooms). However, Enoki mushrooms can also fruit in the dark, so this step is optional.
Phase 5: Harvesting Your Enoki Mushrooms
1. Monitor Growth: Keep an eye on your mushrooms as they grow. They’ll start as small pins and gradually elongate.
2. Harvest Time: Harvest your Enoki mushrooms when they reach your desired size. Typically, they’re harvested when the stems are several inches long and the caps are still small and tight.
3. Harvest Carefully: Use a clean knife or scissors to cut the mushrooms at the base of the stems, close to the substrate.
4. Enjoy Your Harvest! Rinse your freshly harvested Enoki mushrooms and use them in your favorite recipes. They’re delicious in soups, stir-fries, and salads.
Troubleshooting
* Mold Growth: If you see any green, blue, or black mold growing in your container, it’s a sign of contamination. Unfortunately, you’ll likely have to discard the entire batch. Sterilizing everything thoroughly in the beginning is the best way to prevent this.
* Slow Growth: If you’re not seeing any growth after several weeks, make sure the substrate is moist enough and the temperature is within the ideal range.
* Mushrooms Not Fruiting: If the mycelium has colonized the substrate but the mushrooms aren’t fruiting, try introducing a small amount of indirect light or slightly lowering the temperature.
Tips for Success
* Sterility is Your Friend: I can’t stress this enough! The cleaner you are, the better your chances of success.
* Don’t Overwater: Soggy substrate is a breeding ground for mold. Keep it moist, but not wet.
* Be Patient: Mushroom growing takes time. Don’t get discouraged if you don’t see results immediately.
* Experiment: Try different types of cardboard or coffee grounds to see what works best for you.
* Document Your Progress: Take pictures along the way so you can track your progress and learn from your mistakes.
Why This Works
Enoki mushrooms, like all fungi, reproduce through spores. The mycelium is the vegetative part of the fungus, and it’s what you’re encouraging to grow when you provide the right conditions. The cardboard and coffee grounds provide the nutrients and structure that the mycelium needs to thrive. The cool, dark, and humid environment mimics the natural conditions where Enoki mushrooms grow in the wild. By providing these conditions, you’re essentially giving the Enoki mushroom stumps a second chance at life!
Final Thoughts
Regrowing Enoki mushrooms at home is a fun and educational project that can be enjoyed by people of all ages. It’s a great way to reduce food waste, learn about the fascinating world of fungi, and enjoy fresh, delicious mushrooms. So, give it a try! I’m confident that you’ll be amazed at what you can accomplish. Happy growing!
Conclusion
So, there you have it! Regrowing Enoki mushrooms at home isn’t just a fun experiment; it’s a rewarding way to reduce food waste, connect with nature, and enjoy a continuous supply of these delicate and delicious fungi. Forget those expensive grocery store runs – with a little patience and this simple DIY trick, you can cultivate your own batch of Enoki mushrooms right in your kitchen.
Why is this a must-try? Because it’s sustainable, cost-effective, and surprisingly easy. Imagine the satisfaction of harvesting your own mushrooms, knowing you’ve given food scraps a new lease on life. Plus, the process itself is incredibly educational, offering a fascinating glimpse into the world of fungi and their life cycle.
But the fun doesn’t stop there! Feel free to experiment with different growing mediums. While coffee grounds are a fantastic option, you could also try using shredded cardboard or even a mixture of sawdust and bran. Observe how the mushrooms react to different environments and adjust your technique accordingly. Another variation to consider is the temperature. While Enoki mushrooms prefer cooler temperatures, you can try slightly warmer conditions to see if it affects their growth rate or appearance. Just remember to keep a close eye on them and adjust as needed.
Don’t be afraid to get creative with your Enoki mushroom creations in the kitchen, too. These delicate mushrooms are incredibly versatile. Add them to soups, stir-fries, salads, or even use them as a garnish for your favorite dishes. Their mild, slightly sweet flavor and crunchy texture will elevate any meal.
We wholeheartedly encourage you to give this DIY trick a try. It’s a fantastic project for individuals, families, and anyone interested in sustainable living. And most importantly, don’t forget to share your experience! We’d love to hear about your successes, challenges, and any variations you’ve tried. Post pictures of your homegrown Enoki mushrooms on social media and tag us. Let’s build a community of mushroom enthusiasts and inspire others to embrace the joy of regrowing their own food. This simple act of regrowing Enoki mushrooms can make a real difference, one delicious bite at a time.
Frequently Asked Questions (FAQ)
What exactly are Enoki mushrooms, and why should I bother regrowing them?
Enoki mushrooms, also known as golden needle mushrooms, are long, thin, white mushrooms with a mild, slightly sweet flavor and a crisp texture. They are commonly used in Asian cuisine, particularly in soups, stir-fries, and salads. Regrowing them is beneficial because it reduces food waste, saves money on groceries, and provides a sustainable source of fresh mushrooms. Plus, it’s a fun and educational project!
What are the best conditions for regrowing Enoki mushrooms?
Enoki mushrooms thrive in cool, humid environments. The ideal temperature range is between 45-65°F (7-18°C). They also require darkness during the initial colonization phase. Once the mushrooms start to fruit, they need indirect light. Maintaining high humidity is crucial, so consider using a humidity dome or misting the growing medium regularly.
Can I use any type of coffee grounds for this project?
Yes, you can use any type of coffee grounds, whether they are from drip coffee, espresso, or French press. However, make sure the coffee grounds are clean and free from any mold or contaminants. Used coffee grounds are ideal because they have already been sterilized during the brewing process.
How long does it take to regrow Enoki mushrooms?
The time it takes to regrow Enoki mushrooms can vary depending on the conditions, but generally, it takes about 2-3 weeks for the mycelium to colonize the coffee grounds. After that, it takes another 1-2 weeks for the mushrooms to fruit and be ready for harvest. Be patient and monitor the progress regularly.
What if I don’t have coffee grounds? Are there any alternatives?
Yes, there are several alternatives to coffee grounds. You can use shredded cardboard, sawdust, straw, or a mixture of these materials. Make sure the materials are clean and free from any contaminants. You may need to sterilize these materials before using them to prevent mold growth.
How do I know when the Enoki mushrooms are ready to harvest?
Enoki mushrooms are ready to harvest when they have reached a desired length and the caps are still small and tightly closed. You can harvest them by gently twisting or cutting them off at the base. Avoid pulling them out, as this can damage the mycelium and prevent future flushes.
Can I get multiple harvests from the same batch of coffee grounds?
Yes, you can usually get multiple harvests from the same batch of coffee grounds. After harvesting the first flush of mushrooms, continue to maintain the humidity and temperature. You may need to add a little bit of water to the coffee grounds to keep them moist. You can typically get 2-3 flushes of mushrooms before the coffee grounds are depleted of nutrients.
What if I see mold growing on the coffee grounds?
If you see mold growing on the coffee grounds, it’s important to remove it immediately to prevent it from spreading. You can try scraping off the moldy areas and spraying the remaining coffee grounds with a diluted hydrogen peroxide solution. However, if the mold is extensive, it’s best to discard the entire batch and start over with fresh coffee grounds.
Are there any potential health risks associated with regrowing Enoki mushrooms at home?
While regrowing Enoki mushrooms at home is generally safe, it’s important to take precautions to prevent contamination. Always use clean materials and maintain a clean growing environment. Avoid consuming any mushrooms that look or smell unusual. If you have any concerns, consult with a healthcare professional.
My Enoki mushrooms are growing but they are not white, why?
The color of your Enoki mushrooms can be affected by light exposure. If they are exposed to too much light, they may turn brown or yellow. Try to keep them in a dark or dimly lit area during the fruiting stage to encourage the growth of white mushrooms. Temperature and humidity can also play a role, so ensure you are maintaining optimal conditions.
How do I store harvested Enoki mushrooms?
Store harvested Enoki mushrooms in the refrigerator in a paper bag or a container lined with paper towels. They will typically last for about a week. Avoid storing them in plastic bags, as this can cause them to become slimy.
Can I eat the entire Enoki mushroom, including the base?
Yes, you can eat the entire Enoki mushroom, including the base. However, the base may be a bit tougher than the rest of the mushroom. You can trim it off if you prefer.
What are some creative ways to use my homegrown Enoki mushrooms?
Enoki mushrooms are incredibly versatile and can be used in a variety of dishes. Add them to soups, stir-fries, salads, omelets, or even use them as a garnish for your favorite dishes. They can also be pickled or used to make mushroom tea. Get creative and experiment with different recipes to find your favorite ways to enjoy them.

Leave a Comment