
Recycled bottle sugarcane growing: Sounds like something out of a futuristic farm, right? Well, it’s surprisingly simple and a fantastic way to bring a touch of the tropics to your home, no matter where you live! I’m so excited to share this DIY trick with you because it’s not only eco-friendly but also incredibly rewarding. Imagine harvesting your own sugarcane – the possibilities are endless, from adding a natural sweetener to your tea to impressing your friends with your gardening prowess!
Sugarcane has a rich history, deeply intertwined with cultures around the globe. Originating in Southeast Asia, it spread across continents, becoming a vital crop and a symbol of sweetness and prosperity. While traditionally grown in vast fields, this method makes recycled bottle sugarcane growing accessible to everyone, even those with limited space.
Let’s be honest, who wouldn’t want to reduce waste and grow something delicious at the same time? This DIY project is perfect for urban dwellers, apartment gardeners, or anyone looking for a fun and sustainable way to connect with nature. Plus, it’s a great conversation starter! So, grab those empty bottles, and let’s get started on this exciting journey of growing your own sweet treat. I promise, you’ll be amazed at how easy and fulfilling it is!

Grow Sugarcane Indoors Using Recycled Bottles: A Sweet DIY Project!
Hey there, fellow plant enthusiasts! Ever thought about growing your own sugarcane? It might sound like a tropical dream, but trust me, it’s totally doable, even if you don’t live in a sunny, sugarcane-friendly climate. And the best part? We’re going to do it using recycled bottles! This is a fantastic way to give those plastic bottles a new life and enjoy the satisfaction of growing your own sweet treat. So, grab your supplies, and let’s get started!
What You’ll Need:
Before we dive in, let’s gather everything we need. This will make the whole process smoother and more enjoyable.
* Sugarcane Stalks: You can usually find these at Asian grocery stores or online. Look for healthy stalks with visible nodes (the little bumps where roots will sprout).
* Recycled Plastic Bottles: The size depends on how much sugarcane you want to grow. 2-liter bottles work great, but smaller ones can work too. Make sure they’re clean!
* Potting Soil: A well-draining potting mix is essential. You can also mix regular potting soil with perlite or vermiculite for better drainage.
* Sharp Knife or Scissors: For cutting the sugarcane stalks and the plastic bottles. Be careful!
* Water: For watering the sugarcane.
* Optional: Rooting Hormone: This can help speed up the rooting process, but it’s not strictly necessary.
* Optional: Fertilizer: A balanced liquid fertilizer can help your sugarcane thrive once it starts growing.
Preparing the Sugarcane Stalks
Okay, so you’ve got your sugarcane stalks. Now, we need to get them ready for planting. This is a crucial step, so pay close attention!
1. Cutting the Stalks: Using your sharp knife or scissors, cut the sugarcane stalks into sections, each containing at least two nodes. I usually aim for sections that are about 4-6 inches long. The nodes are where the roots and new shoots will emerge, so make sure each section has at least two.
2. Preparing the Cuttings: Now, this is where the rooting hormone comes in handy (if you’re using it). Dip the cut ends of each sugarcane section into the rooting hormone powder or liquid. This will encourage root growth. If you’re not using rooting hormone, that’s perfectly fine too! Just make sure the cut ends are clean.
3. Callusing (Optional but Recommended): This step isn’t absolutely necessary, but it can help prevent rot. Place the sugarcane cuttings in a dry, shaded area for a day or two. This allows the cut ends to callus over, forming a protective layer.
Preparing the Recycled Bottles
Now, let’s turn those plastic bottles into mini sugarcane planters!
1. Cleaning the Bottles: Make sure your bottles are thoroughly cleaned. Remove any labels and wash them with soap and water. Rinse them well to remove any soap residue.
2. Cutting the Bottles: There are a couple of ways you can cut the bottles, depending on your preference.
* Option 1: Vertical Cut: Cut the bottle lengthwise, creating two halves. This gives you two separate planters.
* Option 2: Top Cut: Cut off the top portion of the bottle (the neck). You can invert the top portion into the bottom to create a self-watering system (more on that later!).
3. Drainage Holes: This is super important! Sugarcane needs well-draining soil, so make sure to create drainage holes in the bottom of each bottle. You can use a knife, scissors, or even a hot nail to poke a few holes.
Planting the Sugarcane
Alright, we’re finally ready to plant! This is the exciting part where we bring everything together.
1. Filling the Bottles with Soil: Fill the prepared bottles with your potting mix. Leave about an inch of space at the top.
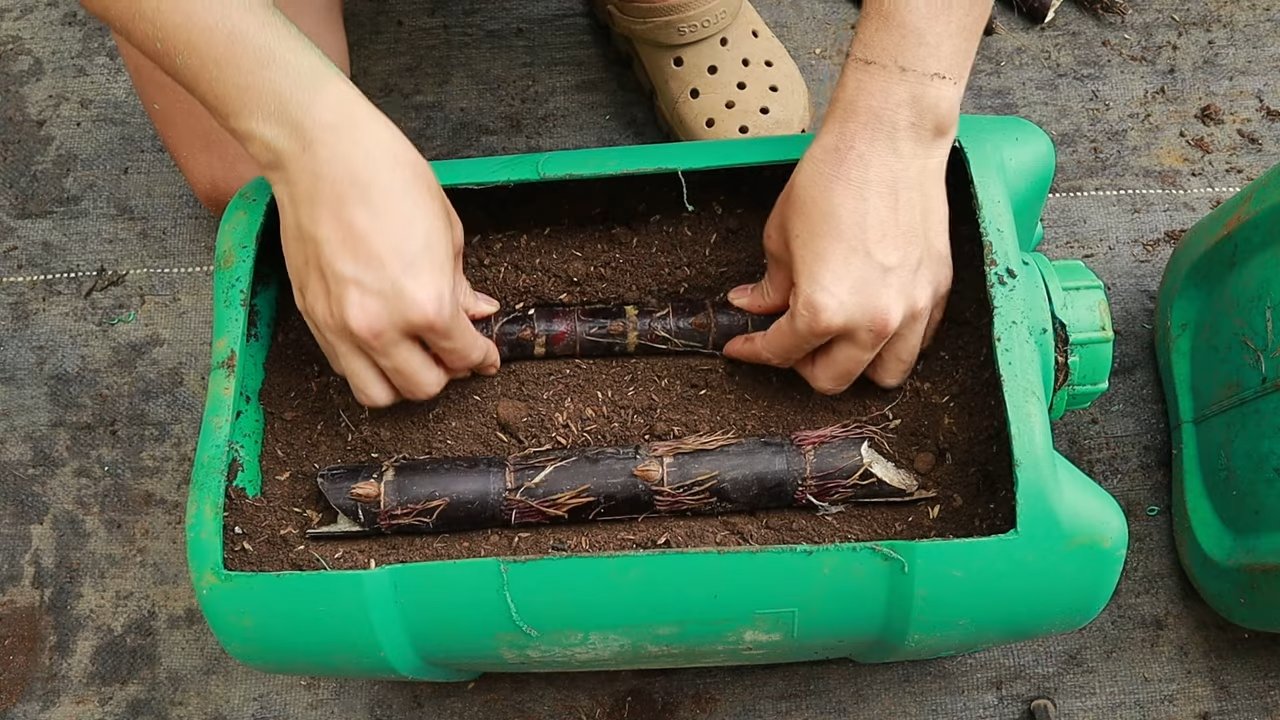
2. Planting the Cuttings: Lay the sugarcane cuttings horizontally on top of the soil. Make sure the nodes are facing upwards or sideways.
3. Covering the Cuttings: Gently cover the sugarcane cuttings with a thin layer of soil, about half an inch thick. Don’t bury them too deep!
4. Watering: Water the soil thoroughly until it’s moist but not soggy. You want the soil to be evenly damp.
Creating a Self-Watering System (Optional)
If you chose to cut the bottles using the “Top Cut” method, you can create a simple self-watering system.
1. Inverting the Top: Invert the top portion of the bottle (the neck) into the bottom portion.
2. Adding Water: Fill the bottom portion of the bottle with water. The soil will absorb water from the bottom as needed.
3. Monitoring the Water Level: Keep an eye on the water level in the bottom portion of the bottle and refill it as needed.
Caring for Your Sugarcane
Now that your sugarcane is planted, it’s time to provide it with the care it needs to thrive.
1. Location: Sugarcane loves sunlight! Place your bottles in a sunny location where they’ll receive at least 6-8 hours of direct sunlight per day. A south-facing window is ideal.
2. Watering: Keep the soil consistently moist, but not waterlogged. Water when the top inch of soil feels dry to the touch. If you’re using the self-watering system, just make sure the bottom reservoir is always filled with water.
3. Humidity: Sugarcane prefers humid conditions. If your home is dry, you can increase humidity by misting the plants regularly or placing a tray of water near them.
4. Fertilizing: Once your sugarcane starts growing, you can fertilize it every 2-4 weeks with a balanced liquid fertilizer. Follow the instructions on the fertilizer label.
5. Pest Control: Keep an eye out for pests like aphids or spider mites. If you spot any, treat them with insecticidal soap or neem oil.
Patience is Key!
Growing sugarcane from cuttings takes time and patience. Don’t be discouraged if you don’t see results immediately. It can take several weeks or even months for the cuttings to root and start growing. Just keep providing them with the right conditions, and eventually, you’ll see those little shoots emerge!
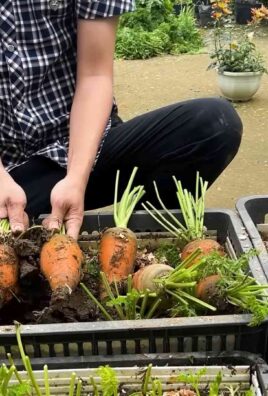
Harvesting Your Sugarcane
After several months of growth, your sugarcane will be ready to harvest. The stalks will be thick and juicy.
1. Harvest Time: The best time to harvest sugarcane is when the stalks are mature and the sugar content is high. This is usually in the fall or winter.
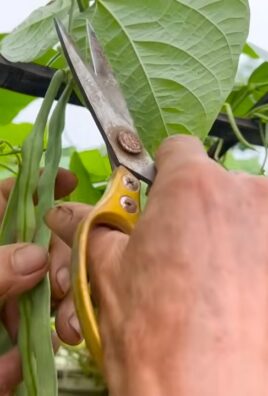
2. Cutting the Stalks: Use a sharp knife or saw to cut the sugarcane stalks at the base.
3. Enjoying Your Harvest: You can chew on the sugarcane stalks to extract the sweet juice, or you can use them to make sugarcane juice or other delicious treats.
Troubleshooting
Even with the best care, you might encounter some challenges along the way. Here are a few common problems and how to address them:
* Cuttings Not Rooting: If your cuttings aren’t rooting, make sure they’re getting enough warmth and moisture. You can also try using a rooting hormone to encourage root growth.
* Yellowing Leaves: Yellowing leaves can be a sign of overwatering or underwatering. Adjust your watering schedule accordingly. It could also be a nutrient deficiency, so try fertilizing your plants.
* Pests: Keep an eye out for pests and treat them promptly with insecticidal soap or neem oil.
Final Thoughts
Growing sugarcane indoors using recycled bottles is a fun and rewarding project. It’s a great way to recycle, learn about plants, and enjoy the sweet taste of homegrown sugarcane. So, give it a try, and let me know how it goes! Happy growing!
Conclusion
So, there you have it! Transforming a simple recycled bottle into a thriving sugarcane planter is not just a fun project; it’s a sustainable and rewarding way to bring a touch of the tropics to your home. We’ve explored how easy it is to repurpose something destined for the landfill into a vessel for growing your own sweet stalks. This DIY trick is a must-try for several compelling reasons.
First and foremost, it’s incredibly eco-friendly. By giving plastic bottles a new life, you’re actively reducing waste and contributing to a more sustainable lifestyle. Secondly, it’s a fantastic way to learn about plant propagation and cultivation. Watching your sugarcane sprout and grow from a simple cutting is an incredibly satisfying experience. Thirdly, it’s cost-effective. You’re essentially creating a planter for free, using materials you likely already have on hand. And finally, it’s a conversation starter! Your unique sugarcane planter will undoubtedly pique the interest of your guests and provide a great opportunity to share your passion for gardening and sustainability.
But the fun doesn’t stop there! Feel free to experiment with different varieties of sugarcane. Some varieties are better suited for container gardening than others, so do a little research to find the perfect fit for your climate and space. You can also get creative with the aesthetics of your planter. Paint the bottle, decorate it with twine or fabric, or even create a miniature trellis for your sugarcane to climb. Consider grouping several bottle planters together to create a mini sugarcane forest on your balcony or patio.
For those who want to take it a step further, you can even explore different growing mediums. While we’ve recommended a standard potting mix, you could also experiment with coco coir, perlite, or even a hydroponic setup. Just be sure to adjust your watering and fertilization accordingly.
Don’t be afraid to experiment with different sizes of bottles as well. Larger bottles will provide more room for the roots to grow, while smaller bottles might be better suited for starting cuttings. Remember to always ensure proper drainage, regardless of the bottle size you choose.
We encourage you to embrace this DIY project and experience the joy of growing your own sugarcane. It’s a simple, sustainable, and rewarding way to connect with nature and add a touch of sweetness to your life.
Now, it’s your turn! Grab a recycled bottle, some sugarcane cuttings, and get ready to embark on this exciting gardening adventure. We’re confident that you’ll be amazed by the results. And most importantly, don’t forget to share your experience with us! We’d love to see your creations and hear about your successes (and any challenges you might encounter). Share your photos and stories on social media using #RecycledSugarcane or tag us in your posts. Let’s inspire others to embrace sustainable gardening practices and transform waste into something beautiful and productive. Happy growing!
Frequently Asked Questions
What kind of sugarcane should I use?
The best type of sugarcane for growing in a recycled bottle is a variety that is known to be relatively compact and adaptable to container gardening. Look for varieties that are specifically bred for smaller spaces or those that are known to be less aggressive growers. Some common and readily available varieties that work well include dwarf sugarcane or ornamental sugarcane. These varieties tend to be more manageable in a confined space and still provide the aesthetic appeal of traditional sugarcane. Local nurseries or agricultural extension offices can provide specific recommendations based on your region’s climate and growing conditions. Remember to research the specific needs of the variety you choose to ensure optimal growth.
How often should I water my sugarcane in a bottle?
Watering frequency depends on several factors, including the size of the bottle, the type of potting mix you’re using, the climate, and the stage of growth of the sugarcane. As a general rule, you should water your sugarcane when the top inch of soil feels dry to the touch. During the warmer months, this might mean watering every day or every other day. In cooler months, you can reduce the watering frequency. It’s crucial to avoid overwatering, as this can lead to root rot. Ensure that the bottle has adequate drainage holes to prevent water from accumulating at the bottom. A good way to check if your sugarcane needs water is to lift the bottle; if it feels light, it’s likely time to water. When you do water, water thoroughly until water drains out of the bottom of the bottle.
What kind of fertilizer should I use for sugarcane?
Sugarcane is a relatively heavy feeder, so it benefits from regular fertilization. A balanced fertilizer with an NPK ratio (nitrogen, phosphorus, potassium) of 10-10-10 or 14-14-14 is a good starting point. You can use either a slow-release granular fertilizer or a liquid fertilizer. If using a granular fertilizer, follow the instructions on the package and apply it every few months. If using a liquid fertilizer, dilute it according to the instructions and apply it every two to four weeks during the growing season (spring and summer). Avoid fertilizing during the dormant season (fall and winter). Organic options like compost tea or diluted fish emulsion can also be used as fertilizers. Always err on the side of caution when fertilizing, as over-fertilizing can damage the plant.
How much sunlight does sugarcane need?
Sugarcane thrives in full sun, meaning it needs at least 6-8 hours of direct sunlight per day. If you’re growing your sugarcane indoors, place it near a south-facing window where it can receive ample sunlight. If you don’t have enough natural light, you can supplement with a grow light. Insufficient sunlight can lead to weak growth, pale leaves, and reduced sugar production. If you’re moving your sugarcane outdoors after starting it indoors, gradually acclimate it to the sun to prevent sunburn.
How do I prevent pests and diseases?
Regularly inspect your sugarcane for signs of pests or diseases. Common pests that can affect sugarcane include aphids, spider mites, and mealybugs. You can control these pests by spraying the plant with insecticidal soap or neem oil. Ensure good air circulation around the plant to prevent fungal diseases. If you notice any signs of disease, such as spots on the leaves or wilting, remove the affected leaves and treat the plant with a fungicide. Proper watering and fertilization can also help to prevent pests and diseases by keeping the plant healthy and strong. Avoid overcrowding your plants, as this can create a favorable environment for pests and diseases to spread.
Can I actually harvest sugar from sugarcane grown in a bottle?
While it’s possible to extract sugar from sugarcane grown in a bottle, the yield will likely be small. The primary purpose of growing sugarcane in a recycled bottle is more for ornamental and educational purposes than for commercial sugar production. The amount of sugar produced will depend on factors such as the variety of sugarcane, the growing conditions, and the size of the bottle. However, you can still enjoy the experience of chewing on a small piece of the stalk to taste the sweetness.
How long does it take for sugarcane to grow in a bottle?
The time it takes for sugarcane to grow in a bottle depends on several factors, including the variety of sugarcane, the climate, and the growing conditions. Generally, you can expect to see new growth within a few weeks of planting the cutting. It can take several months to a year for the sugarcane to reach a mature size. Be patient and provide the plant with the proper care, and you’ll be rewarded with a beautiful and thriving sugarcane plant.
What do I do with the sugarcane during the winter?
If you live in a region with cold winters, you’ll need to protect your sugarcane from frost and freezing temperatures. If the sugarcane is in a portable bottle, you can bring it indoors and place it in a sunny location. Reduce watering during the winter months, as the plant will be dormant. If you can’t bring the sugarcane indoors, you can protect it by wrapping the bottle with burlap or blankets. You can also mulch around the base of the plant to insulate the roots. In warmer climates, sugarcane can often survive outdoors during the winter with minimal protection.

Leave a Comment