
Recycle old umbrellas ideas – ever find yourself staring at a pile of broken umbrellas, feeling guilty about tossing them in the trash? I know I have! It feels wasteful, doesn’t it? But what if I told you those discarded umbrellas could be transformed into something beautiful and useful for your home and garden?
For centuries, resourceful individuals have found creative ways to repurpose everyday items. Think about the “make do and mend” mentality of past generations – a testament to ingenuity and sustainability. While umbrellas themselves are a relatively modern invention, the spirit of resourcefulness is timeless. Today, with a growing awareness of environmental issues, finding ways to recycle old umbrellas ideas is more relevant than ever.
Why should you bother with these DIY tricks? Well, for starters, it’s a fantastic way to reduce waste and contribute to a greener lifestyle. But beyond that, it’s incredibly rewarding to create something unique and personalized. Imagine turning a tattered umbrella into a vibrant garden decoration, a stylish shopping bag, or even a protective cover for your delicate plants. These projects are not only fun and budget-friendly, but they also add a touch of personality to your home and garden. So, let’s dive into some inspiring and practical ways to give those old umbrellas a new lease on life!
Upcycling Old Umbrellas: From Rainy Day Blues to DIY Delights
Hey there, fellow DIY enthusiasts! Got a graveyard of broken umbrellas lurking in your closet? Don’t toss them just yet! I’m here to show you how to transform those sad, discarded rain shields into some seriously cool and useful items. We’re talking about breathing new life into something destined for the landfill and creating unique pieces that’ll have everyone asking, “Where did you get that?!”
This guide is packed with ideas and detailed instructions to help you upcycle your old umbrellas. Let’s get started!
Idea 1: Stylish Shopping Bags
One of my favorite ways to repurpose umbrella fabric is by turning it into durable and waterproof shopping bags. They’re perfect for grocery runs, trips to the farmers market, or even carrying your gym gear. Plus, you’ll be reducing your plastic bag consumption – win-win!
Materials You’ll Need:
* Old umbrella (preferably one with a fun pattern)
* Scissors
* Seam ripper
* Sewing machine (or needle and thread if you prefer hand-sewing)
* Pins
* Measuring tape or ruler
* Fabric for lining (optional, but recommended for added durability)
* Handles (you can use old belts, webbing, or even create your own from the umbrella fabric)
Step-by-Step Instructions:
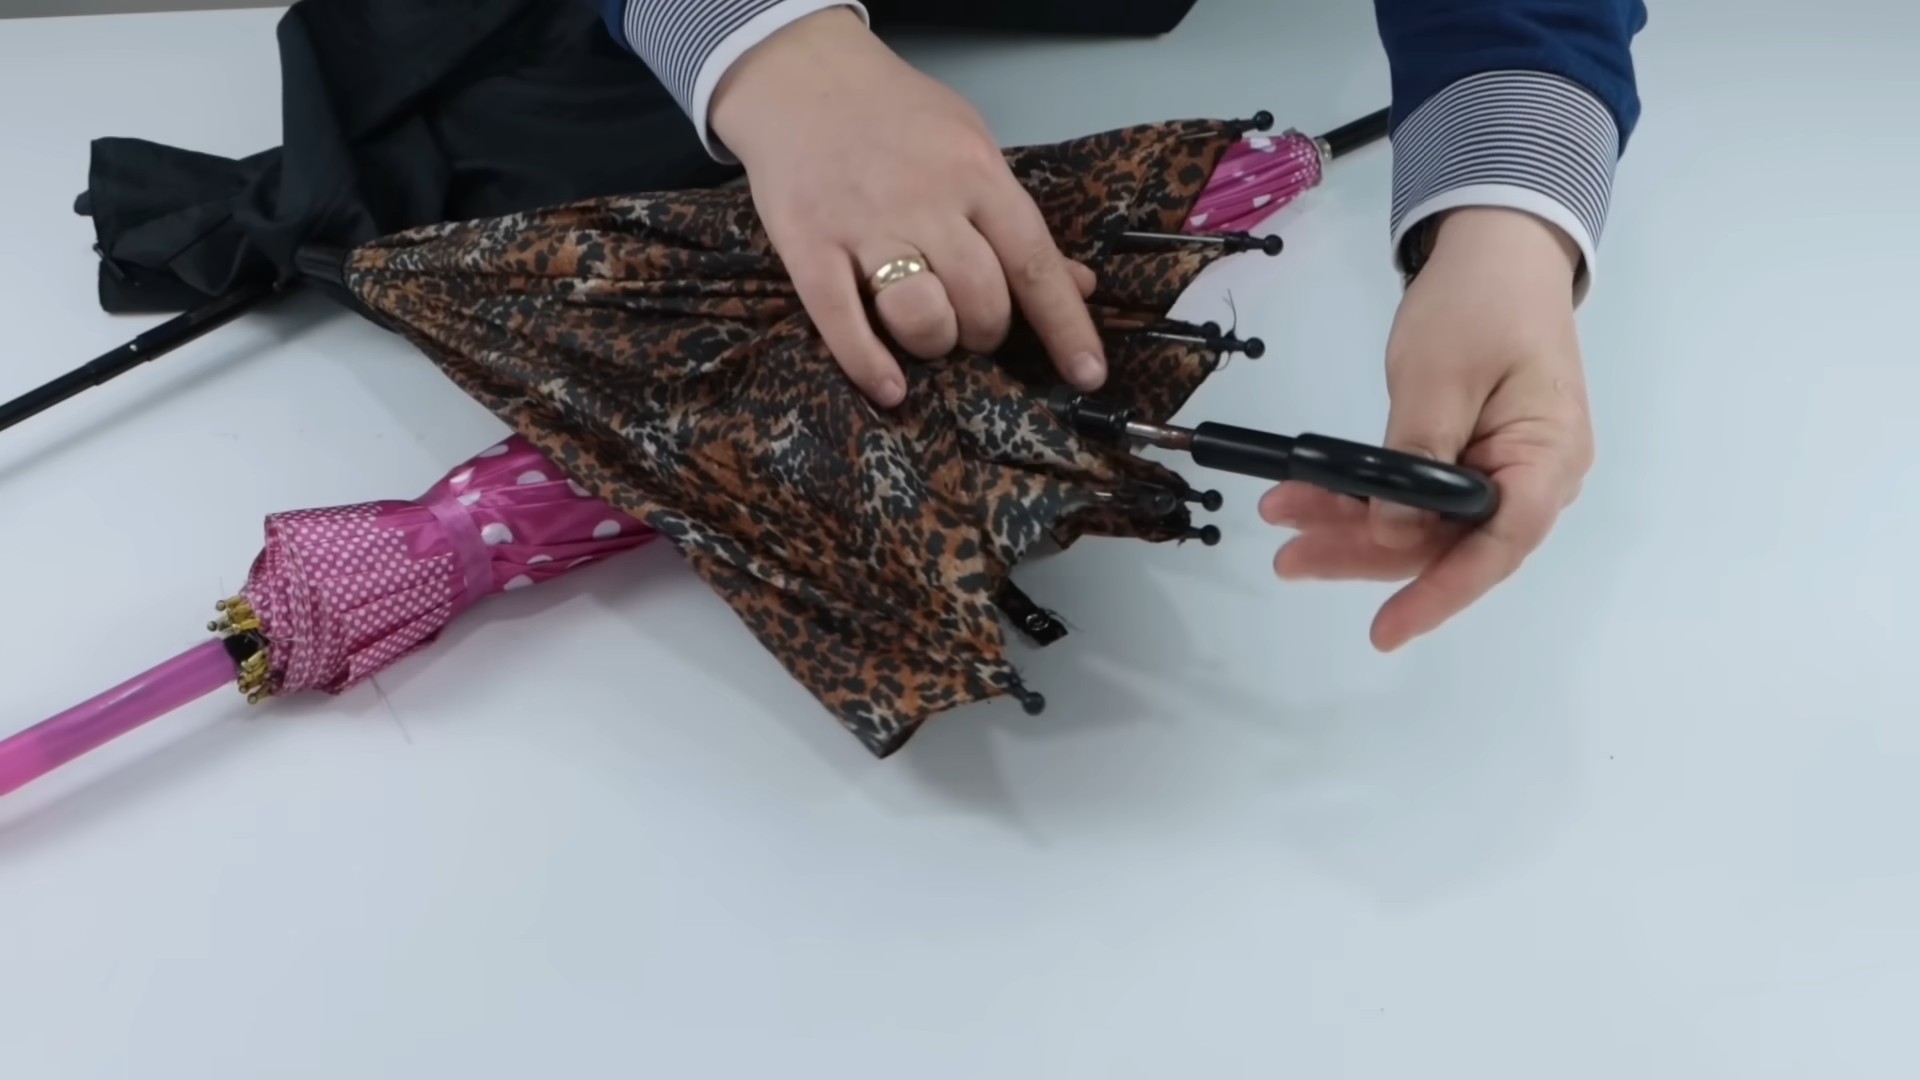
1. Disassemble the Umbrella: Carefully use your seam ripper to detach the umbrella fabric from the frame. This can be a bit tedious, but take your time to avoid tearing the fabric. Remove all the metal tips and any other hardware.
2. Prepare the Fabric: Once the fabric is detached, give it a good wash to remove any dirt or mildew. Iron it smooth to make it easier to work with.
3. Cut Out the Bag Pieces: Decide on the size of your shopping bag. I usually aim for something around 15 inches wide and 18 inches tall. Cut out two rectangular pieces of umbrella fabric for the main body of the bag. If you’re using lining, cut out two identical pieces from your chosen lining fabric.
4. Sew the Main Body: With right sides facing, pin the two umbrella fabric pieces together along the sides and bottom. Sew along these three edges, leaving a ½-inch seam allowance. Backstitch at the beginning and end of each seam to secure the stitches.
5. Create the Boxed Corners (Optional): To give your bag a flat bottom, you can create boxed corners. Flatten one of the bottom corners so that the side seam aligns with the bottom seam, forming a triangle. Measure and mark a line across the triangle, perpendicular to the seams. Sew along this line. Repeat on the other corner. Trim off the excess fabric, leaving about ½ inch beyond the seam.
6. Sew the Lining (If Using): Repeat steps 4 and 5 with the lining fabric. However, leave a 4-5 inch opening along the bottom seam of the lining. This opening will be used to turn the bag right side out later.
7. Attach the Lining to the Outer Bag: Place the outer bag inside the lining, with right sides facing. Align the top edges of the bag and lining, and pin them together. Sew around the top edge, using a ½-inch seam allowance.
8. Turn the Bag Right Side Out: Reach through the opening in the lining and pull the entire bag through. This will turn the bag right side out.
9. Close the Lining Opening: Fold the edges of the opening in the lining inwards and pin them together. Sew along the opening to close it. You can either use a sewing machine or hand-stitch it closed.
10. Attach the Handles: Decide on the length of your handles. I usually go for around 24 inches. If you’re using old belts or webbing, simply cut them to the desired length. If you’re creating your own handles from the umbrella fabric, cut two strips of fabric that are twice the desired width of the handle plus seam allowance. Fold the strips in half lengthwise, with right sides facing, and sew along the long edge. Turn the tubes right side out and press them flat.
11. Secure the Handles: Pin the handles to the top of the bag, spacing them evenly. Sew the handles securely to the bag, reinforcing the stitches for extra durability. I like to sew a square with an “X” inside for added strength.
Idea 2: Waterproof Picnic Blanket
Umbrella fabric is naturally waterproof, making it perfect for creating a picnic blanket that can withstand damp grass or unexpected spills. This is a great way to salvage a large umbrella with a vibrant pattern.
Materials You’ll Need:
* Old umbrella (the larger, the better)
* Scissors
* Seam ripper
* Sewing machine (or needle and thread)
* Pins
* Fleece or other soft fabric for the backing
* Measuring tape or ruler
Step-by-Step Instructions:
1. Disassemble the Umbrella: Just like with the shopping bag, carefully detach the umbrella fabric from the frame using a seam ripper. Remove all the metal tips and hardware.
2. Prepare the Fabric: Wash and iron the umbrella fabric to remove any dirt and wrinkles.
3. Cut the Blanket Backing: Lay the umbrella fabric flat and measure its dimensions. Cut a piece of fleece or other soft fabric to the same size.
4. Pin the Fabrics Together: Place the umbrella fabric and the fleece fabric with right sides facing. Pin them together around all the edges.
5. Sew the Blanket: Sew around the perimeter of the blanket, leaving a 10-12 inch opening along one side. Use a ½-inch seam allowance.
6. Turn the Blanket Right Side Out: Reach through the opening and pull the blanket right side out.
7. Close the Opening: Fold the edges of the opening inwards and pin them together. Sew along the opening to close it. You can use a sewing machine or hand-stitch it closed.
8. Topstitch (Optional): For a more polished look, you can topstitch around the perimeter of the blanket, about ¼ inch from the edge. This will also help to secure the edges and prevent them from fraying.
Idea 3: Chic Rain Hats
Turn your old umbrella into a stylish and functional rain hat! This is a fun project that allows you to get creative with the shape and design of your hat.
Materials You’ll Need:
* Old umbrella
* Scissors
* Seam ripper
* Sewing machine (or needle and thread)
* Pins
* Measuring tape or ruler
* Paper for creating a pattern
* Elastic (optional, for a snug fit)
Step-by-Step Instructions:
1. Disassemble the Umbrella: Detach the umbrella fabric from the frame using a seam ripper. Remove all hardware.
2. Prepare the Fabric: Wash and iron the fabric.
3. Create a Pattern: This is where you can get creative! You can find hat patterns online, or you can create your own. To create your own pattern, measure the circumference of your head. Draw a circle on paper with a diameter that is slightly larger than your head circumference. This will be the crown of the hat. You can then add a brim to the pattern, making it as wide or narrow as you like.
4. Cut Out the Fabric Pieces: Place your pattern pieces on the umbrella fabric and cut them out, adding a ½-inch seam allowance around each piece.
5. Sew the Crown: If your crown pattern consists of multiple pieces, sew them together to form a circle.
6. Attach the Brim: Pin the brim to the crown, with right sides facing. Sew around the edge, using a ½-inch seam allowance.
7. Add Elastic (Optional): To create a snug fit, you can add elastic to the inside of the hat. Measure the circumference of the inside of the hat. Cut a piece of elastic that is slightly shorter than this measurement. Sew the ends of the elastic together to form a loop. Pin the elastic to the inside of the hat, stretching it slightly as you sew it in place.
8. Finishing Touches: Turn up the edge of the brim and sew it in place for a more finished look. You can also add decorative embellishments, such as ribbons or buttons.
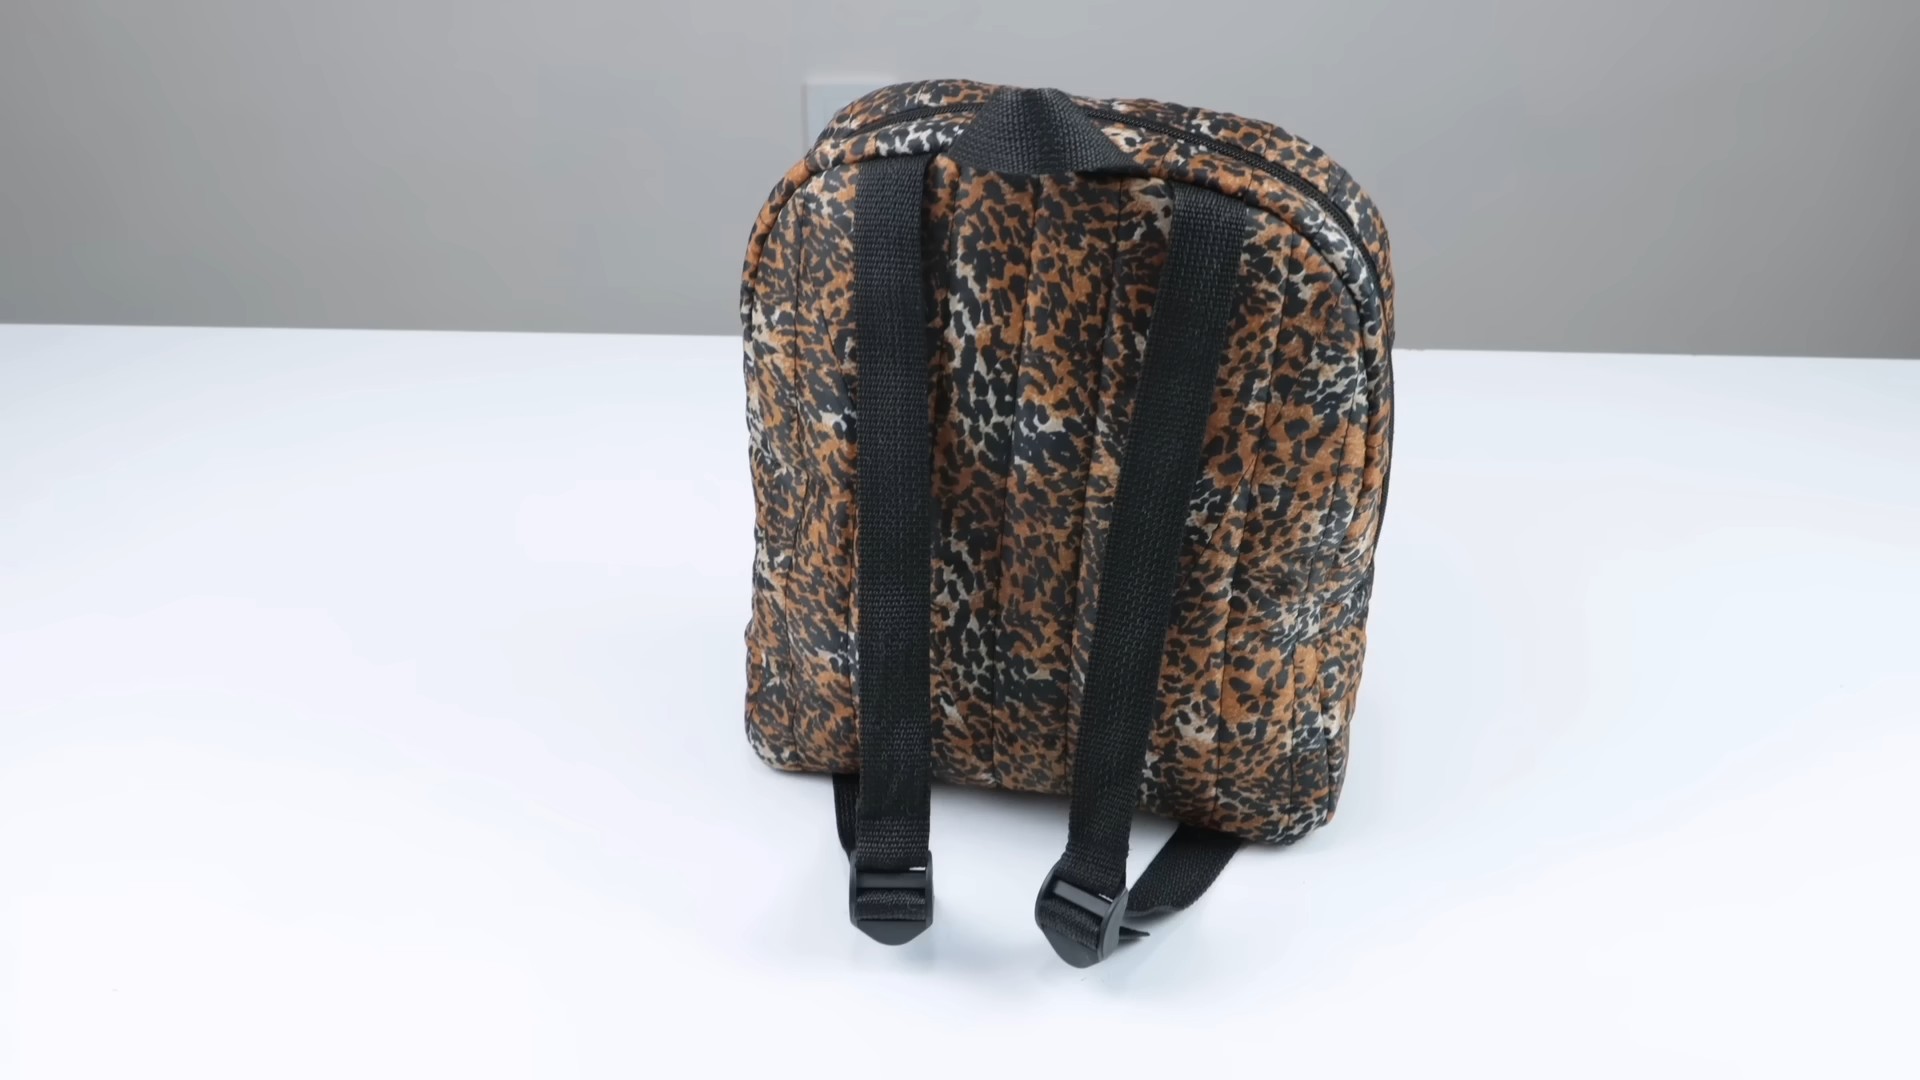
Idea 4: Protective Device Sleeves
Protect your laptop, tablet, or e-reader with a custom-made sleeve crafted from waterproof umbrella fabric. This is a practical and stylish way to keep your devices safe from spills and light rain.
Materials You’ll Need:
* Old umbrella
* Scissors
* Seam ripper
* Sewing machine (or needle and thread)
* Pins
* Measuring tape or ruler
* Fleece or other soft fabric for lining
* Button or Velcro closure
Step-by-Step Instructions:
Conclusion
So, there you have it! Transforming your old, forgotten umbrellas into something beautiful and functional is not only incredibly rewarding but also a fantastic way to embrace sustainability. We’ve explored a range of creative possibilities, from stylish tote bags and protective garden covers to unique wall art and even whimsical children’s toys. The beauty of this DIY project lies in its adaptability. You’re not just following a set of instructions; you’re unleashing your inner artist and problem-solver.
Why is this DIY umbrella recycling trick a must-try? Because it’s more than just crafting; it’s about giving new life to something destined for the landfill. It’s about reducing waste, saving money, and creating something truly unique that reflects your personality and style. Plus, the satisfaction of knowing you’ve repurposed a discarded item into a useful and attractive object is simply unmatched.
Consider these variations to further personalize your projects:
* **Mix and Match Fabrics:** Don’t limit yourself to just the umbrella fabric. Incorporate scraps of other materials like denim, canvas, or even old clothing to add texture and visual interest.
* **Embellishments Galore:** Buttons, beads, ribbons, and embroidery can elevate your creations from simple to stunning. Let your imagination run wild!
* **Themed Projects:** Tailor your projects to specific holidays or events. Imagine a Halloween-themed tote bag made from a black and orange umbrella, or festive Christmas ornaments crafted from a red and green one.
* **Upcycled Umbrella Frames:** Don’t discard the umbrella frame! These can be repurposed into trellises for climbing plants, unique lighting fixtures, or even sculptural art pieces.
We genuinely believe that anyone can master these DIY techniques with a little patience and creativity. The key is to start with a simple project, like a small pouch or a garden cover, and gradually work your way up to more complex designs. Don’t be afraid to experiment, make mistakes, and learn from them. That’s all part of the fun!
We are incredibly excited to see what you create! So, grab that old umbrella lurking in your closet, gather your crafting supplies, and get ready to embark on a journey of upcycling and self-expression. We encourage you to try these DIY umbrella recycling ideas and share your experiences with us. Post photos of your finished projects on social media using #UpcycledUmbrellaCreations or tag us directly. We can’t wait to see your ingenuity and creativity shine! Let’s work together to make the world a little greener, one repurposed umbrella at a time. Remember, even the smallest act of recycling can make a big difference.
Frequently Asked Questions (FAQ)
What types of umbrellas are best for recycling projects?
Almost any type of umbrella can be used for recycling projects, but some are better suited than others. Look for umbrellas with durable, waterproof fabric, as this will ensure that your finished projects are long-lasting and functional. Golf umbrellas, with their large surface area, are ideal for larger projects like tote bags or garden covers. Smaller, compact umbrellas are perfect for smaller items like pouches, wallets, or even decorative ornaments. Avoid using umbrellas with heavily damaged frames, as these can be difficult to work with and may pose a safety hazard. However, even umbrellas with broken frames can be salvaged for their fabric.
How do I safely remove the fabric from the umbrella frame?
Removing the fabric from the umbrella frame is a crucial first step in any recycling project. Start by carefully cutting the fabric away from the frame at the points where it’s attached. Use a seam ripper or small scissors to avoid damaging the fabric. Be mindful of any sharp edges on the frame, and wear gloves if necessary. Once you’ve detached the fabric, gently pull it away from the frame. If the fabric is particularly stubborn, you may need to use pliers to loosen the attachments. Remember to dispose of the frame responsibly, either by recycling it or repurposing it for another project.
What tools and materials do I need for these DIY projects?
The tools and materials you’ll need will vary depending on the specific project you’re undertaking, but some essentials include:
* **Scissors:** A good pair of sharp scissors is essential for cutting the umbrella fabric.
* **Seam Ripper:** This tool is invaluable for removing seams and detaching the fabric from the frame.
* **Sewing Machine (Optional):** While many projects can be done by hand, a sewing machine will make the process faster and easier, especially for larger projects.
* **Needle and Thread:** For hand-sewing projects, choose a strong thread that matches the color of the umbrella fabric.
* **Pins:** Pins are essential for holding fabric pieces together before sewing.
* **Measuring Tape or Ruler:** Accurate measurements are crucial for ensuring that your projects turn out as intended.
* **Cutting Mat:** A cutting mat will protect your work surface and make it easier to cut fabric accurately.
* **Rotary Cutter (Optional):** A rotary cutter can be used to quickly and easily cut fabric, especially for straight lines.
* **Embellishments:** Buttons, beads, ribbons, and other embellishments can be used to add a personal touch to your projects.
How do I clean the umbrella fabric before using it?
Cleaning the umbrella fabric before using it is important to remove any dirt, dust, or mildew that may have accumulated over time. You can typically hand-wash the fabric with mild soap and water. Avoid using harsh detergents or bleach, as these can damage the fabric. Rinse the fabric thoroughly and allow it to air dry completely before using it for your projects. For stubborn stains, you may need to pre-treat the fabric with a stain remover. If the umbrella fabric is heavily soiled or mildewed, it may be best to discard it and use a different umbrella.
Are there any safety precautions I should take when working with old umbrellas?
Yes, there are several safety precautions you should take when working with old umbrellas:
* **Wear Gloves:** Protect your hands from sharp edges on the frame by wearing gloves.
* **Use Caution with Sharp Tools:** Be careful when using scissors, seam rippers, and other sharp tools.
* **Work in a Well-Ventilated Area:** If you’re using any adhesives or sealants, work in a well-ventilated area to avoid inhaling harmful fumes.
* **Supervise Children:** Keep children away from sharp tools and small parts.
* **Dispose of Waste Properly:** Dispose of any waste materials, such as fabric scraps and broken frame pieces, responsibly.
What if I don’t have any sewing skills? Can I still do these projects?
Absolutely! Many of these DIY projects can be completed without any sewing skills. For example, you can create a no-sew garden cover by simply cutting the umbrella fabric to the desired size and securing it with grommets or clips. You can also create wall art by framing pieces of the umbrella fabric. There are also numerous tutorials available online that demonstrate no-sew techniques for creating pouches, bags, and other items from recycled umbrella fabric. Don’t be intimidated by the thought of sewing; start with a simple project and gradually work your way up to more complex designs as your confidence grows.
Where can I find inspiration for my DIY umbrella recycling projects?
There are countless sources of inspiration for DIY umbrella recycling projects. Online platforms like Pinterest, Instagram, and YouTube are treasure troves of ideas and tutorials. You can also find inspiration in magazines, books, and even your own surroundings. Pay attention to the colors, patterns, and textures that you find appealing, and think about how you can incorporate them into your projects. Don’t be afraid to experiment and try new things. The most important thing is to have fun and let your creativity shine!

Leave a Comment