
Mushroom growing at home bucket – ever dreamt of harvesting your own delicious, gourmet mushrooms right from your kitchen? I know I have! Forget those expensive grocery store prices and the mystery of where your fungi friends came from. This DIY guide will unlock the secrets to cultivating a thriving mushroom patch in a simple, space-saving bucket.
For centuries, mushroom cultivation has been revered in various cultures, from ancient Chinese medicinal practices to European culinary traditions. The ability to coax these fascinating organisms from humble substrates was once considered almost magical. Now, with readily available resources and a little know-how, we can all participate in this rewarding process.
Why should you try this mushroom growing at home bucket method? Well, imagine the satisfaction of serving up a pasta dish featuring mushrooms you nurtured yourself. Beyond the culinary delights, growing your own mushrooms is an incredibly sustainable practice, reducing your carbon footprint and connecting you with the natural world. Plus, it’s a fantastic way to recycle organic waste! This DIY project is perfect for beginners, requiring minimal space and investment. So, let’s dive in and transform a simple bucket into a bountiful mushroom farm!
Grow Your Own Gourmet Mushrooms: A Beginner’s Guide to Bucket Cultivation
Hey there, fellow fungi fanatics! Ever dreamed of harvesting your own delicious mushrooms right in your home? Well, dream no more! I’m going to walk you through a super rewarding DIY project: growing mushrooms in a bucket. It’s easier than you think, and the taste of homegrown mushrooms is simply unbeatable. This guide focuses on oyster mushrooms, as they are relatively easy to grow for beginners and thrive in this method.
What You’ll Need: The Mushroom Growing Arsenal
Before we dive in, let’s gather our supplies. This is crucial for a smooth and successful mushroom-growing adventure.
* A 5-Gallon Bucket: A clean, food-grade bucket is essential. Make sure it’s thoroughly washed and sanitized.
* Oyster Mushroom Spawn: This is the “seed” of your mushrooms. You can find it online or at specialty gardening stores. Look for a reputable supplier. I recommend starting with a plug spawn or grain spawn.
* Substrate: This is the food source for your mushrooms. Straw is a fantastic and readily available option. You can also use hardwood sawdust, but straw is generally easier for beginners.
* Lime (Hydrated Lime or Garden Lime): This helps pasteurize the straw and create a more favorable environment for the mushrooms.
* Large Pot or Container: For pasteurizing the straw.
* Drill with a 1/4-inch Drill Bit: To create ventilation holes in the bucket.
* Spray Bottle: For misting the mushrooms.
* Gloves: To maintain cleanliness and prevent contamination.
* Face Mask: To avoid inhaling dust during the pasteurization process.
* Thermometer: To monitor the temperature of the straw during pasteurization (optional, but recommended).
Phase 1: Preparing the Substrate – Straw Pasteurization
This is arguably the most important step. We need to eliminate competing organisms that could hinder mushroom growth. Think of it as clearing the playing field for your fungi friends.
1. Chop the Straw: Cut the straw into smaller pieces, about 2-3 inches long. This makes it easier to pack into the bucket and allows the mushroom mycelium to colonize it more effectively. I usually use garden shears for this.
2. Lime Treatment: In your large pot or container, add enough water to completely submerge the chopped straw. Add the lime to the water. The amount of lime depends on the type you’re using. For hydrated lime, use about 1 tablespoon per gallon of water. For garden lime, use about 1/4 cup per gallon of water. Stir well to dissolve the lime.
3. Soak the Straw: Add the chopped straw to the lime water. Make sure all the straw is submerged. You might need to weigh it down with a brick or a heavy object.
4. Pasteurization: There are two main methods for pasteurizing straw:
* Hot Water Pasteurization: Heat the water with the straw to 160-180°F (71-82°C) and maintain that temperature for 60-90 minutes. Use a thermometer to monitor the temperature. This method is more effective but requires more attention.
* Cold Water Pasteurization (Lime Soak): This is a simpler method. Simply let the straw soak in the lime water for 12-24 hours. This method relies on the high pH of the lime water to kill off competing organisms.
I personally prefer the hot water method when I have the time, as I find it yields better results. However, the cold water method is perfectly acceptable, especially for beginners.
5. Drain the Straw: After pasteurization, drain the straw thoroughly. You want it to be moist but not dripping wet. I usually let it sit in a colander or on a clean surface for a few hours. The ideal moisture content is around 65-70%. You can test this by squeezing a handful of straw; it should feel damp, and only a few drops of water should come out.
Phase 2: Inoculating the Bucket – Layering Spawn and Substrate
Now comes the fun part – introducing the mushroom spawn to the prepared substrate! This is where the magic begins.
1. Drill Ventilation Holes: Drill 1/4-inch holes around the sides of the bucket, spaced about 4-6 inches apart. These holes will provide ventilation for the mushrooms and allow them to fruit. I usually drill them in a staggered pattern.
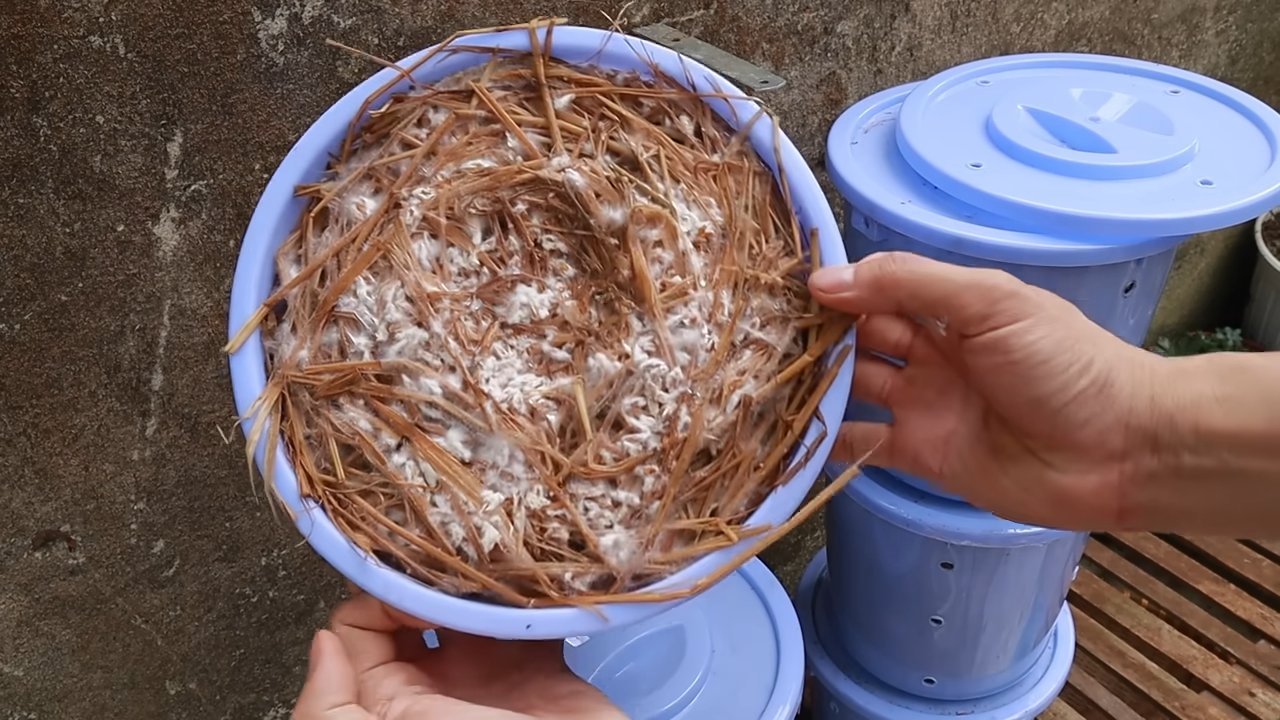
2. Layering: Start by placing a 2-3 inch layer of pasteurized straw at the bottom of the bucket.
3. Add Spawn: Sprinkle a generous layer of oyster mushroom spawn over the straw. Aim for about 1/2 inch to 1 inch of spawn per layer.
4. Repeat: Continue layering straw and spawn, alternating between the two, until the bucket is almost full. Leave about 2-3 inches of space at the top.
5. Final Layer: Finish with a final layer of straw on top.
6. Lightly Pack: Gently press down on the straw to compact it slightly. Don’t pack it too tightly, as this can restrict airflow.
Phase 3: Incubation – Waiting for the Magic to Happen
This is the patience-testing phase. The mushroom mycelium needs time to colonize the straw.
1. Find a Suitable Location: Place the inoculated bucket in a dark, humid, and well-ventilated location. A basement, closet, or spare room works well. The ideal temperature for oyster mushroom colonization is between 65-75°F (18-24°C).
2. Maintain Humidity: Keep the humidity high by misting the inside of the bucket with water every day or every other day. You can also place a plastic bag loosely over the bucket to trap moisture, but make sure to leave some openings for ventilation.
3. Monitor Colonization: Check the bucket regularly for signs of colonization. You should start to see white, fuzzy mycelium spreading throughout the straw. This process usually takes 2-4 weeks.
4. Patience is Key: Resist the urge to disturb the bucket during this phase. Let the mycelium do its work!
Phase 4: Fruiting – Harvesting Your Bounty
This is the most rewarding part! Get ready to harvest your own delicious mushrooms.
1. Introduce Light: Once the straw is fully colonized (it will appear almost entirely white), it’s time to introduce light. Move the bucket to a location with indirect sunlight or provide artificial light for 12-16 hours a day.
2. Maintain Humidity and Ventilation: Continue to mist the bucket regularly to maintain high humidity. Ensure good ventilation to prevent the buildup of carbon dioxide.
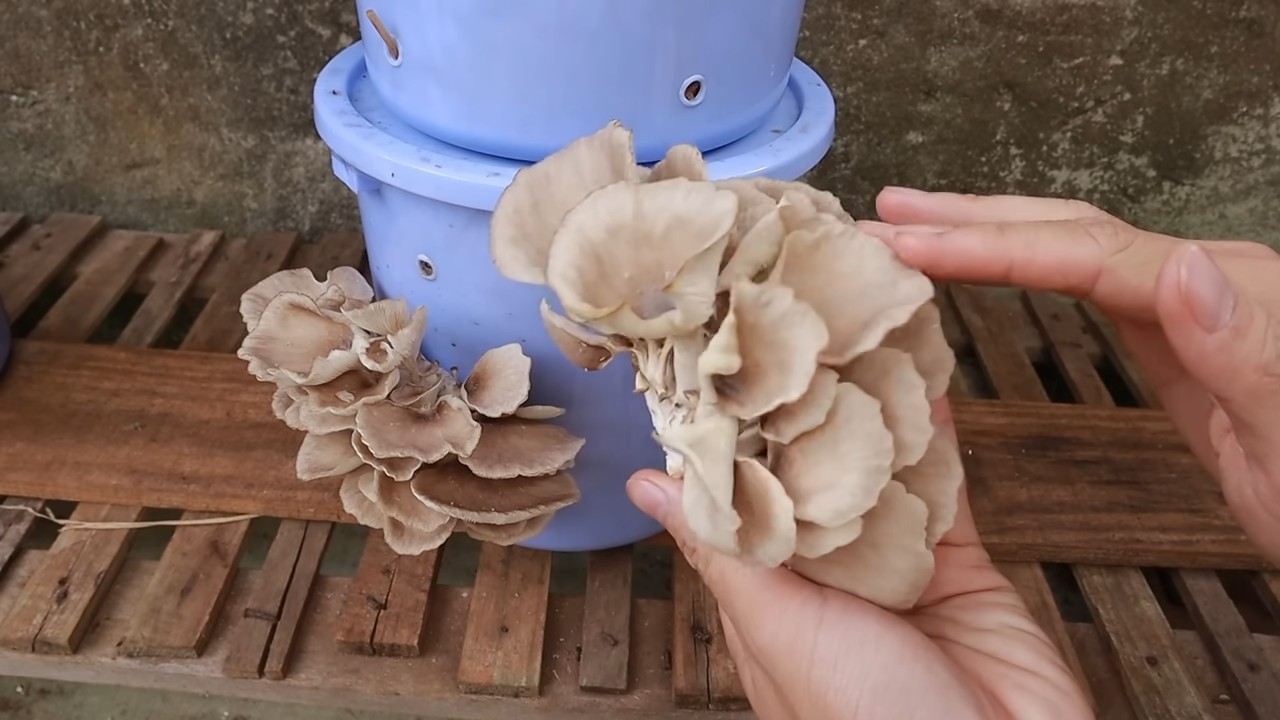
3. Watch for Pinheads: Small mushroom “pinheads” will start to form around the ventilation holes. These will rapidly grow into mature mushrooms.
4. Harvest Time: Harvest the mushrooms when the caps are fully developed but before they start to drop spores. The edges of the caps will start to curl upwards slightly.
5. Harvesting Technique: Gently twist and pull the mushrooms from the bucket. Avoid cutting them, as this can leave behind stubs that can rot.
6. Enjoy Your Harvest: Cook and enjoy your freshly harvested oyster mushrooms! They’re delicious sautéed, grilled, or added to soups and stews.
Phase 5: Subsequent Flushes – Keeping the Harvest Coming
The good news is, you can get multiple flushes of mushrooms from the same bucket!
1. Rest Period: After harvesting a flush, give the bucket a rest period of about 1-2 weeks. During this time, continue to maintain humidity and ventilation.
2. Repeat Fruiting Conditions: After the rest period, repeat the fruiting conditions (introduce light, maintain humidity and ventilation) to encourage another flush of mushrooms.
3. Nutrient Depletion: Over time, the substrate will become depleted of nutrients, and the mushroom production will decrease. You can try adding some coffee grounds or other organic matter to the bucket to replenish the nutrients.
4. Composting: Eventually, the substrate will be exhausted. At this point, you can compost the spent substrate and use it to enrich your garden soil.
Troubleshooting: Common Issues and Solutions
Even with the best preparation, you might encounter some challenges along the way. Here are some common issues and how to address them:
* Contamination: Green or black mold indicates contamination. Unfortunately, there’s not much you can do at this point. Discard the contaminated substrate to prevent the spread of mold. Prevention is key – ensure thorough pasteurization and maintain cleanliness.
* Slow Colonization: This could be due to low temperatures, insufficient humidity, or poor spawn quality. Ensure the temperature is within the optimal range, increase humidity, and use fresh, high-quality spawn.
* Small Mushrooms
Conclusion
So, there you have it! Transforming a simple bucket into a thriving mushroom farm is not only surprisingly easy but also incredibly rewarding. We’ve walked you through the process of creating your own at-home mushroom growing bucket, and hopefully, you’re now brimming with excitement to embark on this fascinating journey.
Why is this DIY trick a must-try? Because it puts you in control of your food source, offering fresh, delicious, and organically grown mushrooms right at your fingertips. Imagine the satisfaction of harvesting your own gourmet mushrooms, knowing exactly where they came from and what went into growing them. Forget those expensive, often less-than-fresh mushrooms from the grocery store. With your own mushroom growing bucket, you’ll have a constant supply of these culinary delights.
Beyond the convenience and cost savings, growing mushrooms at home is an incredibly educational and engaging experience. It’s a fantastic way to connect with nature, learn about the fascinating world of fungi, and even get the kids involved in a fun and educational project. Plus, it’s a sustainable practice that reduces your carbon footprint by minimizing transportation and packaging.
But the benefits don’t stop there. The spent substrate from your mushroom growing bucket is an excellent soil amendment for your garden. It’s rich in nutrients and beneficial microbes that will help your plants thrive. So, you’re not just growing mushrooms; you’re also creating a valuable resource for your garden.
Now, let’s talk about variations. While we’ve focused on a simple bucket method, the possibilities are endless. You can experiment with different types of mushrooms, such as oyster mushrooms, shiitake mushrooms, or even lion’s mane mushrooms. Each variety has its own unique flavor and texture, so you can tailor your mushroom farm to your personal preferences.
You can also experiment with different substrates. While straw and coffee grounds are common choices, you can also use wood chips, sawdust, or even cardboard. Just be sure to sterilize your substrate properly to prevent contamination.
Another variation is to use different types of containers. While a bucket is a convenient and readily available option, you can also use plastic tubs, grow bags, or even repurposed containers. Just make sure your container has adequate drainage and ventilation.
We encourage you to get creative and experiment with different techniques and materials. The beauty of DIY is that you can customize it to your own needs and preferences.
Ready to take the plunge and create your own mushroom growing bucket? We’re confident that you’ll be amazed by the results. It’s a simple, affordable, and rewarding project that will bring you fresh, delicious mushrooms for months to come.
Don’t be afraid to get your hands dirty and embrace the learning process. There will be challenges along the way, but the rewards are well worth the effort. And remember, we’re here to support you every step of the way.
We’d love to hear about your experiences with growing mushrooms at home. Share your photos, tips, and tricks in the comments below. Let’s create a community of mushroom enthusiasts and learn from each other.
So, what are you waiting for? Grab a bucket, some substrate, and some mushroom spawn, and get ready to embark on a fascinating and delicious adventure. Happy growing! Remember, successful mushroom growing at home is within your reach!
Frequently Asked Questions (FAQ)
What type of mushrooms are best for growing in a bucket?
Oyster mushrooms are generally considered the easiest and most forgiving type of mushroom to grow in a bucket, especially for beginners. They are fast-growing, produce abundant yields, and are relatively resistant to contamination. Other good options include shiitake mushrooms (though they require a longer incubation period and hardwood substrate) and lion’s mane mushrooms (which offer a unique flavor and texture). Ultimately, the best type of mushroom for you will depend on your personal preferences and the resources available to you. Research the specific requirements of each variety before making your choice.
How do I sterilize the substrate to prevent contamination?
Sterilizing the substrate is crucial for preventing mold and other contaminants from outcompeting your mushroom spawn. There are several methods you can use, depending on the type of substrate and the equipment you have available. For straw, a common method is to pasteurize it by soaking it in hot water (around 160-180°F) for 1-2 hours. This kills off most of the harmful microorganisms without completely sterilizing the straw, which can actually benefit the mushroom growth. For wood chips or sawdust, you can use a pressure cooker to sterilize the substrate. Place the substrate in autoclavable bags or jars, and pressure cook at 15 PSI for 90 minutes. Allow the substrate to cool completely before inoculating it with mushroom spawn. Coffee grounds are often already pasteurized during the brewing process, but you can further sterilize them by microwaving them for a few minutes or baking them in the oven at a low temperature.
How much mushroom spawn do I need for a bucket?
The amount of mushroom spawn you need will depend on the size of your bucket and the type of mushroom you’re growing. A general rule of thumb is to use about 5-10% spawn by weight of the substrate. For example, if you have 10 pounds of substrate, you’ll need about 0.5-1 pound of spawn. It’s always better to err on the side of using more spawn rather than less, as this will help the mushrooms colonize the substrate more quickly and reduce the risk of contamination.
How long does it take for mushrooms to grow in a bucket?
The time it takes for mushrooms to grow in a bucket will vary depending on the type of mushroom, the temperature, and the humidity. Oyster mushrooms typically start to fruit within 2-3 weeks of inoculation, while shiitake mushrooms can take several months. Maintaining optimal growing conditions is crucial for maximizing yields and reducing the time to harvest. Keep the substrate moist but not waterlogged, and provide adequate ventilation to prevent the buildup of carbon dioxide.
What if I see mold growing in my mushroom bucket?
If you see mold growing in your mushroom bucket, it’s important to take action immediately to prevent it from spreading. In some cases, you may be able to remove the affected area with a spoon or knife. However, if the mold is widespread, it’s best to discard the entire bucket to avoid contaminating other areas. To prevent mold growth, ensure that your substrate is properly sterilized, maintain good ventilation, and avoid overwatering.
How often should I water my mushroom bucket?
The frequency of watering will depend on the humidity and temperature of your growing environment. The goal is to keep the substrate moist but not waterlogged. Check the moisture level of the substrate regularly by squeezing a handful of it. If water drips out, it’s too wet. If it feels dry to the touch, it needs to be watered. You can use a spray bottle to mist the surface of the substrate with water as needed. Avoid spraying the mushrooms directly, as this can cause them to rot.
Can I reuse the substrate after harvesting mushrooms?
Yes, you can reuse the substrate after harvesting mushrooms, but it will likely produce fewer mushrooms than the first flush. The spent substrate is also an excellent soil amendment for your garden. It’s rich in nutrients and beneficial microbes that will help your plants thrive. You can add it directly to your garden beds or compost it for later use.
Where is the best place to put my mushroom growing bucket?
The best place to put your mushroom growing bucket is in a cool, dark, and humid environment. A basement, garage, or closet are all good options. Avoid placing the bucket in direct sunlight, as this can dry out the substrate and inhibit mushroom growth. The ideal temperature for growing most mushrooms is between 60-75°F.
How do I know when the mushrooms are ready to harvest?
The mushrooms are ready to harvest when the caps have fully expanded and the edges are starting to curl upwards. You can harvest them by gently twisting them off the substrate. Avoid pulling them off, as this can damage the mycelium and reduce future yields.
Is mushroom growing at home safe?
Yes, mushroom growing at home is generally safe, as long as you follow proper hygiene practices and only grow edible varieties. It’s important to wash your hands thoroughly before and after handling the substrate and mushrooms. Avoid eating any mushrooms that you are not 100% certain are edible. If you are unsure, consult with a mycologist or experienced mushroom grower.
Leave a Comment