
Sack gardening peanut harvest – sounds intriguing, right? I’m so excited to share this incredibly rewarding and surprisingly simple DIY project with you! Forget sprawling fields; we’re talking about growing delicious, homegrown peanuts right in a sack, even if you only have a small balcony or patio.
The idea of growing peanuts in containers isn’t new. In fact, container gardening, in general, has been practiced for centuries, with evidence suggesting its use in ancient Egypt and Rome. But the beauty of sack gardening is its accessibility and efficiency. It’s a modern twist on an age-old practice, making fresh produce available to everyone, regardless of their living situation.
Why should you try this? Well, for starters, imagine the satisfaction of harvesting your own peanuts! Beyond that, it’s a fantastic way to connect with nature, learn about the growing process, and enjoy fresh, healthy snacks. Plus, let’s be honest, store-bought peanuts just don’t compare to the flavor of freshly harvested, homegrown ones. This sack gardening peanut harvest method is also a great solution for those with poor soil conditions or limited space. So, are you ready to ditch the store-bought peanuts and embark on this fun and rewarding gardening adventure with me? Let’s get started!
DIY Sack Gardening: Harvesting a Bountiful Peanut Crop
Okay, peanut lovers, gather ’round! I’m going to walk you through the surprisingly simple and rewarding process of growing peanuts in a sack. Yes, you read that right – a sack! This method is perfect if you’re short on space, have poor soil, or just want to try something a little different. Plus, the peanut harvest is always a fun and exciting event. Let’s get started!
What You’ll Need
Before we dive in, let’s make sure you have everything you need. This is crucial for a smooth and successful peanut-growing adventure.
* A Large, Sturdy Sack: Think burlap, heavy-duty plastic (like a feed sack), or even a strong reusable shopping bag. The bigger, the better – aim for at least 20 gallons. This gives the peanut plants plenty of room to spread their roots and produce those delicious nuts.
* Peanut Seeds: You can use raw, unsalted peanuts from the grocery store (Valencia or Virginia types work best). Make sure they are *raw* – roasted peanuts won’t sprout! I usually soak mine overnight to give them a head start.
* Potting Mix: A good quality potting mix is essential. Avoid using garden soil, as it can be too heavy and compact. A mix that drains well is key to preventing root rot.
* Compost: Compost adds nutrients and improves soil structure. Mix it in with your potting mix for an extra boost.
* Water: Obviously! You’ll need to water your peanut plants regularly, especially during hot weather.
* Optional:
* Perlite or Vermiculite: These help improve drainage and aeration.
* Slow-Release Fertilizer: Provides a steady supply of nutrients throughout the growing season.
* Trowel or Shovel: For mixing soil and planting seeds.
* Gloves: To keep your hands clean.
Preparing Your Sack Garden
This is where we set the stage for peanut-growing success. A little prep work goes a long way!
1. Choose Your Location: Peanuts need at least 6-8 hours of direct sunlight per day. Pick a sunny spot on your patio, balcony, or in your yard. Make sure the location is easily accessible for watering.
2. Prepare the Sack: If you’re using a burlap sack, you might want to line it with a plastic bag (poke holes in the bottom for drainage) to prevent the soil from drying out too quickly. For plastic sacks, ensure there are drainage holes at the bottom. I usually make several holes, about an inch in diameter, spaced a few inches apart.
3. Mix Your Soil: In a large container or on a tarp, combine your potting mix and compost. A good ratio is about 2 parts potting mix to 1 part compost. If you’re using perlite or vermiculite, add it in now. I usually add about a cup or two per sack. Mix everything thoroughly until it’s well combined.
4. Fill the Sack: Fill your sack with the soil mixture, leaving about 4-6 inches of space at the top. This will prevent soil from spilling out when you water.
Planting Your Peanut Seeds
Now for the fun part – planting those peanut seeds!
1. Soak the Seeds (Optional): As I mentioned earlier, soaking the peanut seeds overnight can help speed up germination. Just place them in a bowl of water and let them sit for 12-24 hours.
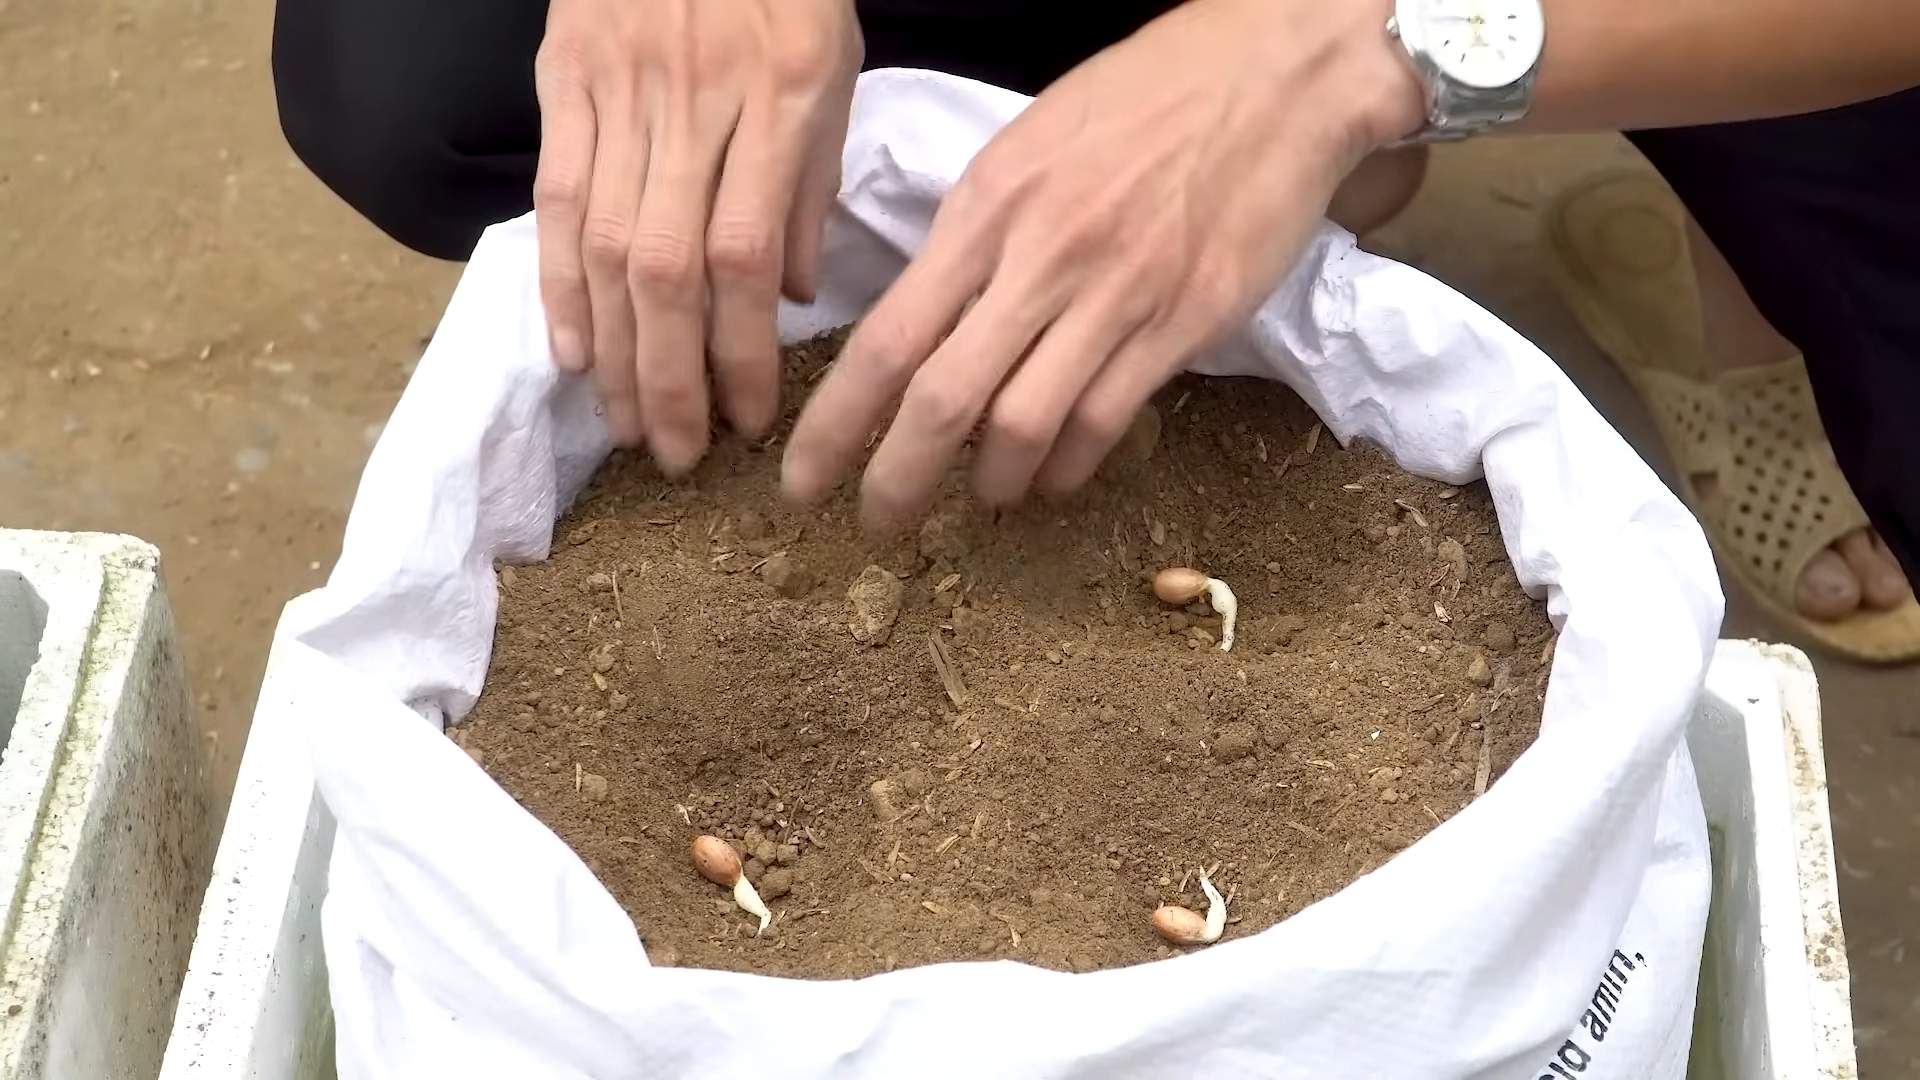
2. Planting Depth: Make small holes in the soil, about 1-2 inches deep. Space the holes about 6-8 inches apart. I usually plant 3-4 seeds per sack, depending on the size of the sack.
3. Place the Seeds: Drop one peanut seed into each hole.
4. Cover the Seeds: Gently cover the seeds with soil.
5. Water Thoroughly: Water the sack gently but thoroughly until the soil is moist but not soggy.
Caring for Your Peanut Plants
This is where patience comes in. Peanut plants take about 120-150 days to mature, so you’ll need to provide them with consistent care throughout the growing season.
1. Watering: Water your peanut plants regularly, especially during hot, dry weather. The soil should be consistently moist, but not waterlogged. I usually check the soil moisture level by sticking my finger into the soil. If the top inch feels dry, it’s time to water.
2. Fertilizing: Peanuts are legumes, which means they can fix nitrogen from the air. However, they still benefit from occasional fertilization. Use a balanced fertilizer (like 10-10-10) every few weeks, following the instructions on the package. If you used a slow-release fertilizer when planting, you may not need to fertilize as often.
3. Weeding: Keep the sack free of weeds. Weeds compete with your peanut plants for nutrients and water.
4. Hilling: As your peanut plants grow, you’ll notice small yellow flowers appearing. After the flowers fade, “pegs” (small stems) will grow down from the plant into the soil. These pegs are where the peanuts will develop. To encourage peanut production, gently hill the soil around the base of the plants, covering the pegs with soil. This helps protect the developing peanuts and keeps them moist. I usually do this every few weeks.
5. Pest Control: Keep an eye out for pests like aphids, spider mites, and caterpillars. If you notice any pests, you can try spraying them with insecticidal soap or neem oil.
Harvesting Your Peanuts
The moment we’ve all been waiting for – harvest time!
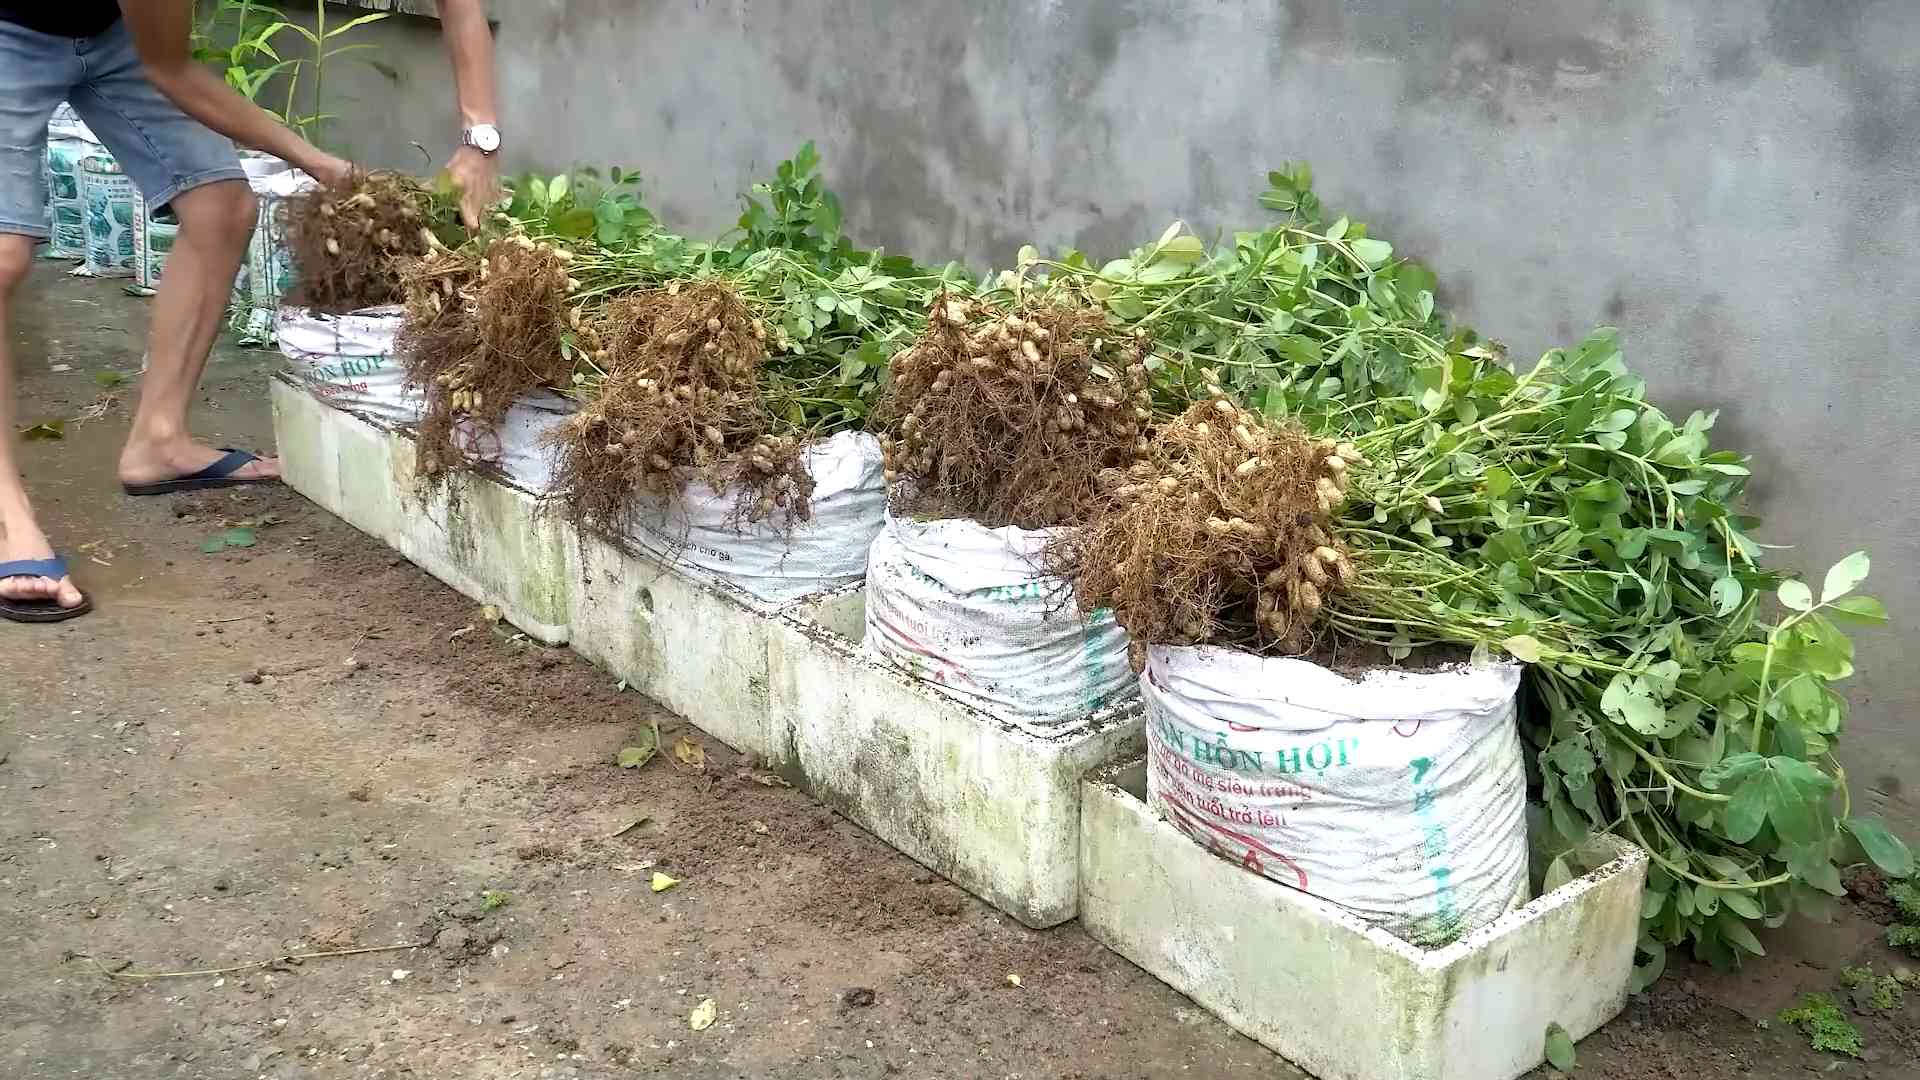
1. When to Harvest: The best time to harvest peanuts is when the foliage starts to turn yellow and brown. This usually happens in the late summer or early fall, about 120-150 days after planting. You can also dig up a few plants to check the peanuts. If the peanuts are plump and the shells are well-formed, it’s time to harvest.
2. Harvesting: The easiest way to harvest peanuts from a sack garden is to simply dump the sack out onto a tarp or large sheet. Then, carefully separate the peanuts from the soil and roots.
3. Cleaning: Wash the peanuts thoroughly with water to remove any dirt or debris.
4. Curing: Curing is essential for developing the flavor and preventing mold. Spread the peanuts out in a single layer on a screen or tray in a well-ventilated area. Allow them to dry for 1-2 weeks, or until the shells are brittle and the kernels rattle inside. I usually cure mine in my garage.
5. Storing: Once the peanuts are cured, you can store them in an airtight container in a cool, dry place. They should last for several months.
Troubleshooting
Even with the best planning, things can sometimes go wrong. Here are a few common problems and how to fix them:
* Poor Germination: If your peanut seeds don’t sprout, it could be due to several factors:
* Old Seeds: Make sure your seeds are fresh.
* Improper Planting Depth: Plant the seeds at the correct depth (1-2 inches).
* Dry Soil: Keep the soil consistently moist.
* Cold Temperatures: Peanuts need warm temperatures to germinate.
* Yellowing Leaves: Yellowing leaves can be a sign of nutrient deficiency or overwatering.
* Nutrient Deficiency: Fertilize your plants with a balanced fertilizer.
* Overwatering: Allow the soil to dry out slightly between waterings.
* Lack of Peanuts: If your plants are growing well but not producing peanuts, it could be due to:
* Insufficient Sunlight: Make sure your plants are getting enough sunlight (6-8 hours per day).
* Poor Soil: Use a good quality potting mix and compost.
* Lack of Hilling: Hill the soil around the base of the plants to encourage peanut production.
* Pests: Keep an eye out for pests and treat them promptly.
Enjoying Your Harvest
Congratulations! You’ve successfully grown peanuts in a sack garden. Now it’s time to enjoy the fruits (or nuts!) of your labor. You can roast them, boil them, or eat them raw. They’re also great in salads, stir-fries, and desserts.
I hope this guide has been helpful. Happy gardening!
Conclusion
So, there you have it! Transforming a simple sack into a thriving peanut patch is not only incredibly rewarding but also surprisingly easy. This DIY sack gardening peanut harvest method offers a fantastic solution for those with limited space, allowing you to enjoy the satisfaction of growing your own delicious peanuts, even on a small balcony or patio. Forget the sprawling garden beds; this method brings the farm to you!
The beauty of sack gardening lies in its adaptability. Feel free to experiment with different sack sizes to accommodate varying peanut varieties. For instance, if you’re growing a bushier type of peanut, a wider sack might be more suitable. You can also explore different soil mixtures. While the recommended blend works wonders, adding a bit of compost or aged manure can further enrich the soil and boost your peanut yield. Consider adding a layer of mulch on top of the soil to help retain moisture and suppress weeds.
Beyond the basic method, there are several exciting variations you can try. Consider companion planting! Marigolds, for example, are known to deter nematodes, which can be a common peanut pest. Planting a few marigolds around the base of your sack can provide natural pest control. You could also try intercropping with herbs like basil or oregano, which can help repel other unwanted insects and add a fragrant touch to your peanut garden.
Another variation involves the type of sack you use. While burlap sacks are a popular choice due to their breathability, you can also use heavy-duty plastic bags with drainage holes. Just be sure to choose a dark-colored bag to help retain heat and promote root growth. You can even recycle old feed sacks or potato sacks, giving them a new lease on life while contributing to a more sustainable gardening practice.
The real magic happens when you finally get to harvest your homegrown peanuts. The taste of freshly dug peanuts is unlike anything you’ll find in a store. The flavor is richer, the texture is creamier, and the satisfaction of knowing you grew them yourself is simply unparalleled. Imagine roasting your own peanuts, making homemade peanut butter, or simply enjoying them as a healthy and delicious snack.
This DIY sack gardening peanut harvest technique is more than just a gardening project; it’s an experience. It’s a chance to connect with nature, learn about the growing process, and enjoy the fruits (or rather, nuts!) of your labor. It’s also a fantastic way to teach children about where their food comes from and encourage them to get involved in gardening.
We wholeheartedly encourage you to give this DIY sack gardening peanut harvest a try. It’s a fun, affordable, and rewarding project that will bring you joy and delicious peanuts for months to come. Don’t be afraid to experiment, adapt the method to your specific needs and preferences, and most importantly, have fun!
Once you’ve harvested your first batch of homegrown peanuts, we’d love to hear about your experience. Share your photos, tips, and stories with us in the comments section below. Let’s create a community of sack gardening enthusiasts and inspire others to discover the joys of growing their own peanuts. Happy gardening!
Frequently Asked Questions (FAQ)
What type of peanuts are best for sack gardening?
The best peanut varieties for sack gardening are typically those that are more compact and bush-like in their growth habit. Virginia peanuts, while delicious, tend to spread out more, making them less ideal for container gardening. Spanish peanuts and Valencia peanuts are generally better choices due to their smaller size and earlier maturity. However, don’t be afraid to experiment with different varieties to see what works best in your specific climate and growing conditions. Always check the seed packet for information on plant size and growing requirements.
How often should I water my peanut plants in a sack?
Watering frequency depends on several factors, including the weather, the type of soil you’re using, and the size of your sack. Generally, you should water your peanut plants whenever the top inch of soil feels dry to the touch. During hot, dry weather, you may need to water them daily, while during cooler, wetter periods, you can reduce the frequency. Be careful not to overwater, as this can lead to root rot. Ensure your sack has adequate drainage to prevent waterlogging. A good rule of thumb is to water deeply until you see water draining from the bottom of the sack.
What kind of soil should I use for sack gardening peanuts?
Peanuts thrive in well-draining, sandy loam soil. A good mix would be equal parts of garden soil, compost, and sand. The garden soil provides essential nutrients, the compost improves drainage and adds organic matter, and the sand helps to prevent the soil from becoming compacted. Avoid using heavy clay soil, as it can hinder root development and peanut formation. You can also purchase a pre-made potting mix specifically designed for vegetables, which often contains the ideal balance of nutrients and drainage.
How much sunlight do peanut plants need?
Peanut plants need at least 6-8 hours of direct sunlight per day to thrive. Choose a location for your sack garden that receives plenty of sunlight throughout the day. If you live in a particularly hot climate, you may want to provide some afternoon shade to prevent the plants from overheating. Insufficient sunlight can lead to stunted growth and reduced peanut production.
When is the best time to plant peanuts in a sack?
The best time to plant peanuts is after the last frost, when the soil has warmed up to at least 65 degrees Fahrenheit. Peanuts are warm-season crops and will not germinate well in cold soil. In most regions, this is typically in late spring or early summer. You can start peanut seeds indoors a few weeks before the last frost to get a head start, but be sure to harden them off gradually before transplanting them into the sack.
How do I know when my peanuts are ready to harvest?
Determining the right time to harvest peanuts is crucial for optimal flavor and yield. The most reliable indicator is the maturity of the peanut pods. About 120-150 days after planting, start checking the pods. Dig up a sample plant and examine the pods. The inside of the shell should be dark brown and the kernels should be plump and well-formed. If the pods are still white or light-colored, they are not yet ready to harvest. Another sign is yellowing leaves.
What are some common pests and diseases that affect peanut plants?
Peanut plants can be susceptible to various pests and diseases, including aphids, spider mites, nematodes, and fungal diseases like leaf spot. Regularly inspect your plants for signs of infestation or disease. You can control aphids and spider mites with insecticidal soap or neem oil. Nematodes can be a more challenging problem, but you can try incorporating beneficial nematodes into the soil or planting marigolds as a companion plant. To prevent fungal diseases, ensure good air circulation around your plants and avoid overwatering.
Can I reuse the soil from my peanut sack garden?
Yes, you can reuse the soil from your peanut sack garden, but it’s important to replenish the nutrients that have been depleted during the growing season. After harvesting your peanuts, remove any remaining plant debris and amend the soil with compost, aged manure, or a slow-release fertilizer. You may also want to test the soil pH and adjust it if necessary. Adding a cover crop like clover or buckwheat can also help to improve soil health and fertility.
How do I cure and store my harvested peanuts?
After harvesting your peanuts, it’s important to cure them properly to prevent mold growth and ensure long-term storage. Gently shake off any excess soil and spread the peanuts out in a single layer on a screen or wire rack in a well-ventilated area. Allow them to dry for several weeks, or until the shells are completely dry and brittle. Once cured, you can store the peanuts in a cool, dry place in airtight containers. You can also freeze them for longer storage.
Is sack gardening peanut harvest organic?
Sack gardening can absolutely be organic! By using organic soil amendments, avoiding synthetic pesticides and fertilizers, and practicing good gardening techniques, you can grow peanuts organically in your sack garden. Look for certified organic seeds and soil amendments to ensure that you’re adhering to organic gardening principles.
Leave a Comment