
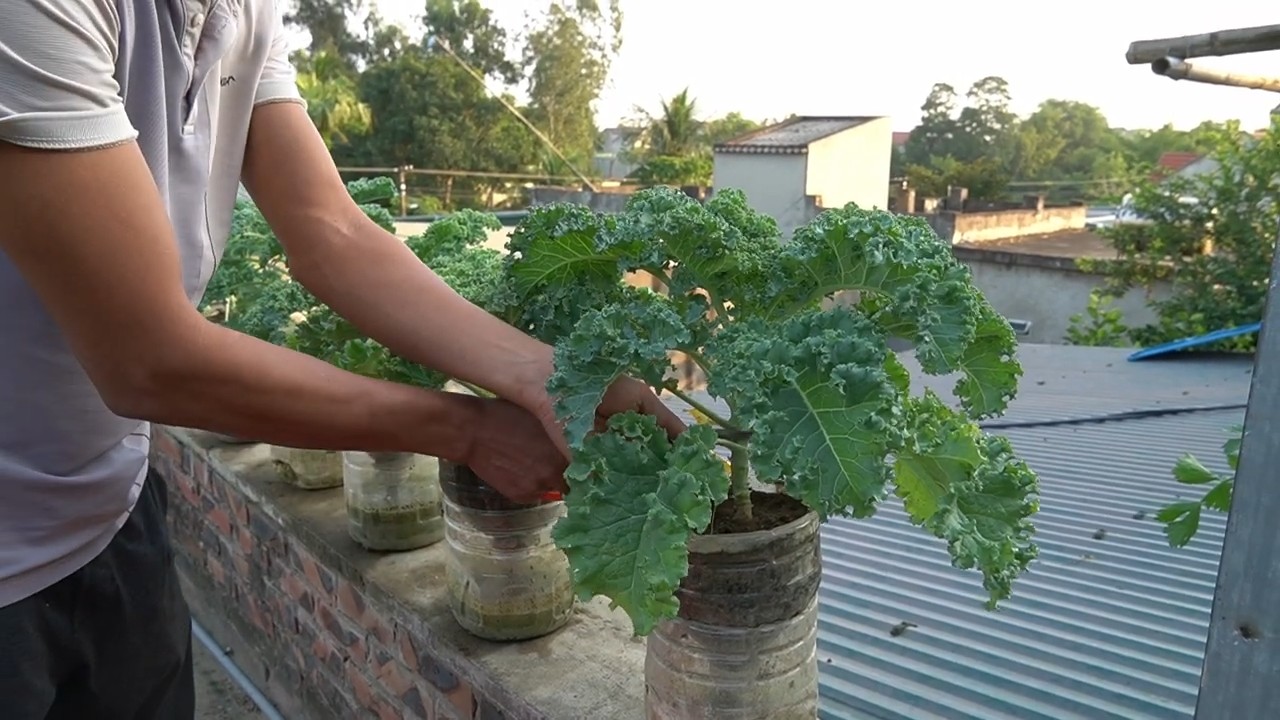
Kale harvest plastic bottle – sounds a bit odd, right? But trust me, this simple trick can revolutionize your home gardening experience! I’m always on the lookout for clever ways to make gardening easier and more sustainable, and this one is a game-changer, especially when it comes to maximizing your kale harvest.
For centuries, humans have cultivated kale, a nutritional powerhouse, in their home gardens. From its humble beginnings as a wild cabbage relative to its current status as a superfood staple, kale has nourished generations. But let’s be honest, sometimes harvesting those leafy greens can be a bit of a chore. That’s where our DIY hack comes in!
Are you tired of struggling to cleanly harvest your kale, leaving behind ragged stems and potentially damaging the plant? Do you want to extend your harvest season and get the most out of your precious kale plants? I know I was! That’s why I’m so excited to share this incredibly simple and effective method using something you probably already have lying around: a plastic bottle. This kale harvest plastic bottle trick not only makes harvesting easier and cleaner but also helps promote continued growth, ensuring a bountiful supply of fresh, healthy kale for your table. Let’s dive in and discover how to transform a simple plastic bottle into your new favorite gardening tool!
Verwandle eine Plastikflasche in einen Mini-Gewächshaus-Erntekäfig für deinen Grünkohl!
Hey Leute! Habt ihr auch manchmal das Problem, dass eure Grünkohlpflanzen im Garten von kleinen Schädlingen belagert werden oder einfach nicht so richtig in die Gänge kommen? Ich kenne das nur zu gut! Deshalb habe ich mir eine super einfache und kostengünstige Lösung überlegt: Einen Mini-Gewächshaus-Erntekäfig aus einer alten Plastikflasche! Das schützt nicht nur eure Pflanzen, sondern sorgt auch für ein besseres Mikroklima und eine frühere Ernte. Und das Beste: Es ist super einfach nachzumachen!
Was du brauchst:
* Eine leere, saubere Plastikflasche (am besten eine große Wasser- oder Saftflasche)
* Ein scharfes Messer oder eine Schere
* Ein Stift oder Marker
* Eventuell: Klebeband (optional, für zusätzliche Stabilität)
* Eventuell: Etiketten oder ein wasserfester Stift zum Beschriften
Schritt-für-Schritt-Anleitung:
1. Vorbereitung der Flasche: Zuerst müsst ihr die Plastikflasche gründlich reinigen. Entfernt alle Etiketten und spült sie mit warmem Wasser und Spülmittel aus. Lasst sie anschließend gut trocknen. Das ist wichtig, damit keine Rückstände die Pflanze beeinträchtigen.
2. Den Boden abschneiden: Jetzt kommt der wichtigste Schritt: Wir schneiden den Boden der Flasche ab. Nehmt euch euren Stift oder Marker und zeichnet eine Linie um die Flasche, etwa 5-10 cm vom Boden entfernt. Achtet darauf, dass die Linie möglichst gerade ist. Dann nehmt ihr euer scharfes Messer oder die Schere und schneidet entlang der Linie. Seid dabei vorsichtig, damit ihr euch nicht verletzt! Ich empfehle, das Messer leicht anzuwärmen, dann gleitet es besser durch das Plastik.
3. Den Deckel entfernen (optional): Ihr könnt den Deckel der Flasche entweder dranlassen oder entfernen. Wenn ihr ihn dranlasst, könnt ihr ihn zum Belüften leicht öffnen oder schließen. Wenn ihr ihn entfernt, habt ihr eine bessere Luftzirkulation. Ich persönlich lasse ihn meistens dran und öffne ihn nur bei Bedarf.
4. Die Kanten glätten (optional): Die Schnittkanten können manchmal etwas scharf sein. Um Verletzungen zu vermeiden und die Flasche stabiler zu machen, könnt ihr die Kanten mit Klebeband umwickeln. Das ist aber kein Muss.
5. Den Erntekäfig platzieren: Jetzt kommt der spaßige Teil! Stülpt den vorbereiteten Erntekäfig vorsichtig über eure Grünkohlpflanze. Achtet darauf, dass die Pflanze genügend Platz hat und nicht eingequetscht wird. Drückt den Käfig leicht in die Erde, damit er stabil steht.
6. Belüftung (wichtig!): Grünkohl braucht Luft! An warmen Tagen solltet ihr den Deckel der Flasche öffnen oder den Käfig sogar ganz entfernen, um eine Überhitzung zu vermeiden. Ich mache das meistens am Vormittag und setze den Käfig am Abend wieder auf.
7. Beschriftung (optional): Wenn ihr mehrere Grünkohlsorten habt oder einfach nur den Überblick behalten wollt, könnt ihr die Flaschen mit Etiketten oder einem wasserfesten Stift beschriften. So wisst ihr immer, welche Pflanze sich in welchem Käfig befindet.
Zusätzliche Tipps und Tricks für den perfekten Grünkohl-Erntekäfig
* Materialauswahl: Nicht jede Plastikflasche ist gleich gut geeignet. Achtet darauf, dass die Flasche transparent ist, damit genügend Licht an die Pflanze gelangt. Dunkle oder gefärbte Flaschen sind weniger geeignet. Außerdem sollte die Flasche stabil sein, damit sie nicht gleich umkippt.
* Größe der Flasche: Die Größe der Flasche hängt von der Größe eurer Grünkohlpflanze ab. Für kleine Pflanzen reichen kleinere Flaschen, für größere Pflanzen braucht ihr größere Flaschen. Ich habe gute Erfahrungen mit 1,5-Liter-Flaschen gemacht.
* Befestigung: Wenn der Erntekäfig nicht stabil genug steht, könnt ihr ihn mit kleinen Heringen oder Steinen fixieren. So verhindert ihr, dass er bei Wind umfällt.
* Schutz vor Schnecken: Schnecken lieben Grünkohl! Um eure Pflanzen vor ihnen zu schützen, könnt ihr einen Schneckenkragen um den Erntekäfig legen.
* Bewässerung: Achtet darauf, dass eure Grünkohlpflanzen auch unter dem Erntekäfig ausreichend bewässert werden. Gießt sie am besten direkt an die Wurzeln.
* Reinigung: Reinigt die Erntekäfige regelmäßig, um Schimmelbildung zu vermeiden. Einfach mit Wasser und Spülmittel ausspülen.
* Wiederverwendung: Die Erntekäfige sind wiederverwendbar! Ihr könnt sie jedes Jahr aufs Neue für eure Grünkohlpflanzen verwenden.
Warum dieser DIY-Erntekäfig so genial ist
* Schutz vor Schädlingen: Der Erntekäfig schützt eure Grünkohlpflanzen vor Schädlingen wie Kohlweißlingen, Erdflöhen und Schnecken. So könnt ihr auf chemische Schädlingsbekämpfungsmittel verzichten.
* Verbessertes Mikroklima: Der Erntekäfig sorgt für ein wärmeres und feuchteres Mikroklima, was das Wachstum der Pflanzen fördert.
* Frühere Ernte: Durch das verbesserte Mikroklima könnt ihr eure Grünkohlpflanzen früher ernten.
* Kostengünstig und umweltfreundlich: Der Erntekäfig ist super günstig, da ihr einfach alte Plastikflaschen wiederverwendet. Das ist gut für euren Geldbeutel und für die Umwelt!
* Einfach nachzumachen: Der Erntekäfig ist super einfach nachzumachen, auch wenn ihr keine handwerklichen Vorkenntnisse habt.
Weitere Ideen für die Verwendung von Plastikflaschen im Garten
* Bewässerungssystem: Ihr könnt Plastikflaschen in ein einfaches Bewässerungssystem umwandeln, indem ihr Löcher in den Deckel bohrt und die Flasche verkehrt herum in die Erde steckt.
* Pflanzgefäße: Ihr könnt Plastikflaschen als Pflanzgefäße verwenden, indem ihr sie halbiert und mit Erde befüllt.
* Vogeltränke: Ihr könnt Plastikflaschen in eine Vogeltränke umwandeln, indem ihr sie mit Wasser befüllt und aufhängt.
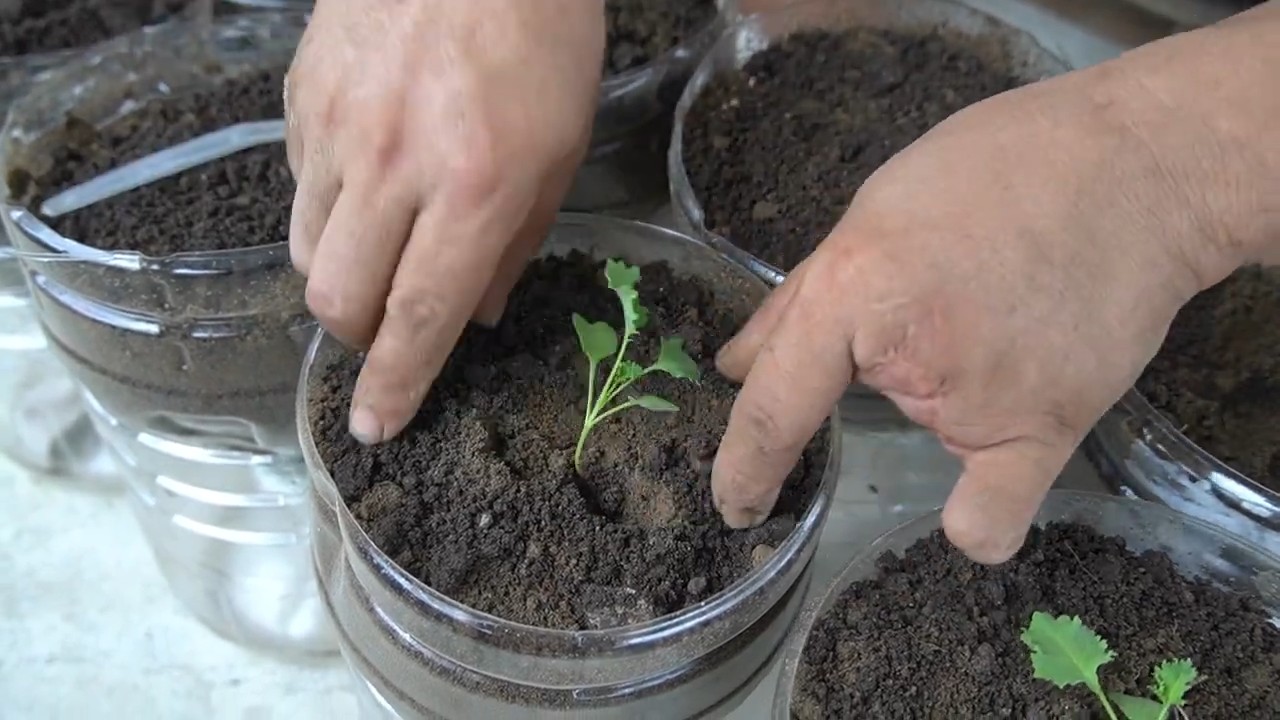
* Samenanzucht: Ihr könnt Plastikflaschen für die Samenanzucht verwenden, indem ihr sie halbiert und mit Anzuchterde befüllt.
Ich hoffe, diese Anleitung hilft euch dabei, eure Grünkohlpflanzen erfolgreich anzubauen! Probiert es einfach mal aus, es lohnt sich! Und vergesst nicht, eure Erfahrungen mit mir zu teilen! Viel Spaß beim Gärtnern!
Conclusion
So, there you have it! Transforming a simple plastic bottle into a highly effective kale harvesting tool is more than just a clever upcycling project; it’s a game-changer for any gardener, big or small. We’ve shown you how easy it is to create this DIY marvel, and hopefully, you’re already picturing yourself effortlessly gliding through your kale patch, gathering a bountiful harvest with minimal effort.
Why is this DIY trick a must-try? Because it addresses several key challenges faced by kale growers. First, it provides a clean, precise cut, minimizing damage to the plant and encouraging continued growth. No more ragged edges or accidentally pulling up entire plants! Second, it’s incredibly efficient. The bottle’s design allows you to quickly and easily strip the leaves from the stem, significantly reducing harvesting time. Think of all the extra time you’ll have to enjoy your freshly harvested kale! Third, it’s sustainable. By repurposing a plastic bottle, you’re contributing to a more environmentally friendly gardening practice. You’re reducing waste and giving a new life to something that would otherwise end up in a landfill.
But the beauty of this DIY project lies in its adaptability. Feel free to experiment with different bottle sizes and shapes to find what works best for your hand and your kale variety. For instance, a wider-mouthed bottle might be ideal for harvesting larger, more mature kale leaves, while a narrower bottle could be perfect for smaller, younger leaves. You could even try creating multiple harvesting tools with different sized openings to tackle various kale sizes.
Consider adding a comfortable grip to the bottle for extended harvesting sessions. Wrapping the handle area with foam padding or even repurposing an old bicycle grip can make a world of difference. You could also experiment with different cutting edges. While the bottle’s edge is generally sharp enough, you could carefully reinforce it with a thin strip of metal or even a layer of hardened epoxy for added durability.
Don’t limit yourself to just kale! This DIY harvesting tool can also be used for other leafy greens like collard greens, Swiss chard, and even herbs like parsley and cilantro. The key is to adjust the size and shape of the bottle opening to suit the specific plant you’re harvesting.
We are confident that this simple yet effective DIY kale harvesting tool will revolutionize your gardening experience. It’s cost-effective, environmentally friendly, and incredibly efficient. It’s a win-win-win!
Now, it’s your turn. We encourage you to try this DIY trick and experience the joy of effortless kale harvesting for yourself. Don’t be afraid to get creative and personalize your harvesting tool to suit your specific needs and preferences.
Most importantly, we want to hear about your experience! Share your photos, tips, and variations in the comments section below. Let us know what worked well for you, what challenges you encountered, and any improvements you made to the design. Your feedback will help other gardeners discover the benefits of this amazing DIY project and inspire them to create their own kale harvesting tools. Together, we can make gardening more sustainable, efficient, and enjoyable for everyone. Happy harvesting!
FAQ
Frequently Asked Questions About Your DIY Kale Harvesting Tool
Q: What type of plastic bottle is best for making this tool?
A: Ideally, you want to use a sturdy plastic bottle that is relatively rigid. Thicker plastic bottles, like those used for juice or some types of soda, tend to work better than thinner water bottles. The sturdier the plastic, the longer your tool will last and the easier it will be to use. Avoid bottles that are too brittle, as they may crack or break easily. Consider the size of the bottle as well; a bottle that fits comfortably in your hand will be easier to maneuver.
Q: How do I make the cutting edge sharp enough to effectively harvest kale?
A: The plastic itself, when cut cleanly, often provides a surprisingly effective cutting edge. However, if you find that your tool isn’t cutting cleanly, you can try a few things. First, ensure you’re using a sharp pair of scissors or a utility knife to create the initial opening. A clean, precise cut is key. You can also try gently sanding the edge of the opening with fine-grit sandpaper to remove any burrs or imperfections. Be careful not to make the edge too thin, as this could weaken it. As mentioned in the conclusion, you can also reinforce the edge with a thin strip of metal or hardened epoxy for added durability and sharpness.
Q: Is this tool only for harvesting kale, or can it be used for other vegetables?
A: While we’ve focused on kale, this DIY harvesting tool can absolutely be used for other leafy greens and herbs. The key is to adjust the size and shape of the bottle opening to suit the specific plant you’re harvesting. For example, you might need a wider opening for larger collard greens or Swiss chard leaves. For herbs like parsley or cilantro, a smaller, more precise opening might be ideal. Experiment with different bottle sizes and shapes to find what works best for your needs.
Q: How do I clean the kale harvesting tool after use?
A: Cleaning your DIY kale harvesting tool is simple. Just rinse it thoroughly with water after each use to remove any plant debris or soil. You can also use a mild soap and water solution if needed. Be sure to dry the tool completely before storing it to prevent the growth of mold or mildew. If you notice any buildup of sap or residue, you can try soaking the tool in warm water with a bit of vinegar.
Q: How long will this DIY kale harvesting tool last?
A: The lifespan of your DIY kale harvesting tool will depend on several factors, including the type of plastic used, the frequency of use, and how well you care for it. With proper care, a well-made tool can last for several gardening seasons. To extend its lifespan, avoid using it on overly tough or woody stems, and store it in a dry place when not in use. If you notice any cracks or damage, it’s best to replace the tool to prevent injury.
Q: Can I use this tool to harvest kale in all weather conditions?
A: While this tool can be used in most weather conditions, it’s best to avoid using it in extremely wet or muddy conditions. The plastic can become slippery when wet, making it difficult to grip and control. Additionally, harvesting kale when it’s wet can increase the risk of spreading diseases. If you must harvest in wet conditions, be sure to wear gloves and take extra care to avoid slipping.
Q: What if I don’t have a garden? Can I still use this tool?
A: Even if you don’t have a garden, you can still use this tool! It’s perfect for harvesting kale from community gardens, farmers markets, or even from friends and neighbors who have an abundance of kale. It’s also a great tool to bring along when foraging for wild greens (be sure to properly identify any wild plants before harvesting them).
Q: I’m not very handy. Is this DIY project really easy enough for me?
A: Absolutely! This is one of the simplest DIY projects you’ll ever undertake. All you need is a plastic bottle, a pair of scissors or a utility knife, and a few minutes of your time. There’s no need for any special skills or tools. Just follow the instructions provided, and you’ll have your own kale harvesting tool in no time. Don’t be afraid to experiment and personalize the design to suit your needs.
Q: What are the benefits of harvesting kale with a tool versus by hand?
A: Harvesting kale with a tool like this offers several advantages over harvesting by hand. First, it provides a cleaner, more precise cut, minimizing damage to the plant and encouraging continued growth. Second, it’s more efficient, allowing you to quickly and easily strip the leaves from the stem. Third, it can help to protect your hands from thorns, dirt, and other irritants. Finally, it can be especially helpful for people with arthritis or other hand problems, as it reduces the amount of gripping and pulling required.

Leave a Comment