
Kale harvest extension – that’s the secret weapon every home gardener needs in their arsenal! Let’s be honest, there’s nothing quite as satisfying as harvesting your own fresh, leafy greens. But what if I told you that you could stretch that kale bounty far beyond the typical growing season? Imagine enjoying delicious, homegrown kale well into the cooler months, long after your neighbor’s gardens have gone dormant.
For centuries, resourceful gardeners have been developing clever techniques to coax more from their crops. From ancient Roman hothouses to the ingenious cold frames of Victorian England, the desire to extend the harvest is deeply rooted in our agricultural history. These methods weren’t just about having fresh food; they were about food security and self-sufficiency.
In today’s world, the need for sustainable and affordable food sources is more pressing than ever. That’s where these DIY tricks come in. Learning how to achieve a kale harvest extension isn’t just a fun project; it’s a practical skill that empowers you to reduce your grocery bills, minimize your environmental impact, and enjoy the unparalleled flavor of homegrown produce. Plus, who doesn’t love a little DIY project that yields such delicious results? So, let’s dive in and discover the secrets to keeping your kale thriving!

Extending Your Kale Harvest: A DIY Guide to Winter Greens
Hey fellow gardeners! Are you bummed that the days are getting shorter and your kale plants are starting to look a little…sad? Don’t despair! With a little DIY ingenuity, you can extend your kale harvest well into the winter months. I’m going to walk you through a few simple and effective methods to keep those leafy greens coming, even when the snow starts to fly.
Understanding Kale’s Cold Tolerance
Before we dive into the DIY projects, let’s talk a little about kale itself. Kale is surprisingly cold-hardy. Many varieties can withstand temperatures down to the low 20s Fahrenheit, and some even lower! The key is to protect them from the harshest elements: wind, heavy snow, and extreme temperature fluctuations. The methods I’m going to share focus on providing that protection.
Method 1: Simple Row Covers for Frost Protection
This is the easiest and most cost-effective way to extend your kale harvest. Row covers are lightweight fabrics that you drape over your plants to provide a layer of insulation.
Materials You’ll Need:
* Row Cover Fabric: You can find this at most garden centers or online. Look for lightweight, breathable fabric specifically designed for row covers.
* Support Hoops (optional): These help keep the fabric off your plants and create a little more space. You can use wire hoops, PVC pipes, or even sturdy branches.
* Anchoring Materials: Rocks, bricks, sandbags, or garden staples to secure the edges of the fabric.
Step-by-Step Instructions:
1. Prepare Your Kale Bed: Make sure your kale plants are relatively clean and free of any dead or decaying leaves. This will help prevent disease from spreading under the row cover. Give them a good watering before covering them.
2. Install Support Hoops (optional): If you’re using hoops, space them evenly along the row of kale plants. Push them firmly into the ground. The height of the hoops will depend on the size of your kale plants. You want to make sure the fabric won’t be directly touching the leaves.
3. Drape the Row Cover: Carefully drape the row cover fabric over the hoops (or directly over the plants if you’re not using hoops). Make sure the fabric covers the entire row of kale.
4. Secure the Edges: This is crucial! Use your chosen anchoring materials (rocks, bricks, sandbags, or garden staples) to secure the edges of the fabric to the ground. You want to create a tight seal to trap warmth and prevent wind from getting underneath. Pay special attention to the ends of the row.
5. Monitor Your Plants: On sunny days, you might need to lift the row cover for a few hours to prevent overheating. Check the plants regularly for any signs of disease or pests. Water as needed, lifting the cover to do so.
Method 2: Cold Frames for Enhanced Protection
Cold frames are mini-greenhouses that provide a more substantial level of protection than row covers. They trap solar heat during the day and release it slowly at night, keeping the plants warmer.
Materials You’ll Need:
* Lumber: Untreated lumber is best. You’ll need enough to build a rectangular frame around your kale plants. The size will depend on the size of your kale bed.
* Clear Covering: Old windows, clear plastic sheeting, or polycarbonate panels. This will be the “roof” of your cold frame.
* Hinges (optional): If you’re using windows, hinges will allow you to easily open and close the cold frame for ventilation.
* Screws or Nails: For assembling the frame.
* Drill or Hammer: For assembling the frame.
* Measuring Tape: To ensure accurate cuts.
* Saw: To cut the lumber.
Building Your Cold Frame:
1. Measure and Cut the Lumber: Measure the area you want to cover with your cold frame. Cut the lumber to the appropriate lengths to create a rectangular frame. I usually make mine about 12-18 inches high in the back and sloping down to 6-12 inches in the front. This slope allows for better sunlight capture.
2. Assemble the Frame: Use screws or nails to assemble the lumber into a rectangular frame. Make sure the corners are square.
3. Attach the Clear Covering: If you’re using old windows, attach hinges to the top of the frame and the window. This will allow you to open and close the cold frame for ventilation. If you’re using plastic sheeting or polycarbonate panels, you can staple or screw them directly to the frame. Make sure the covering is taut and secure.
4. Position the Cold Frame: Place the cold frame over your kale plants. Make sure the frame is sitting securely on the ground.
5. Ventilation: Ventilation is crucial to prevent overheating and humidity buildup. On sunny days, prop open the lid of the cold frame to allow for airflow. Close it again in the evening to trap warmth.
6. Monitor Temperature: Use a thermometer inside the cold frame to monitor the temperature. You want to keep the temperature above freezing but below 80°F.
7. Watering: Water your kale plants as needed, lifting the lid of the cold frame to do so.
Method 3: Mini Hoop Houses for Maximum Protection
Mini hoop houses are similar to row covers, but they use sturdier hoops and a heavier-duty plastic covering, providing even greater protection from the elements.
Materials You’ll Need:
* PVC Pipes: For the hoops. 1/2-inch or 3/4-inch PVC pipe works well.
* Rebar Stakes: To anchor the hoops into the ground.
* Clear Plastic Sheeting: Heavy-duty 6-mil plastic sheeting is ideal.
* Clamps or Duct Tape: To secure the plastic to the hoops.
* Scissors or Utility Knife: To cut the plastic.
* Measuring Tape: To measure the PVC pipes and plastic.
Building Your Mini Hoop House:
1. Measure and Cut the PVC Pipes: Measure the length of your kale bed. Cut the PVC pipes into lengths that will create hoops that are tall enough to clear your kale plants. I usually make mine about 3-4 feet tall.
2. Install the Rebar Stakes: Drive the rebar stakes into the ground along the sides of your kale bed, spacing them about 2-3 feet apart. Leave about 6-8 inches of the rebar sticking out of the ground.
3. Insert the PVC Pipes: Bend the PVC pipes into hoops and insert the ends over the rebar stakes. This will create a series of hoops over your kale plants.
4. Drape the Plastic Sheeting: Drape the plastic sheeting over the hoops. Make sure the plastic covers the entire length of the hoop house.
5. Secure the Plastic: Use clamps or duct tape to secure the plastic to the hoops. Make sure the plastic is taut and secure.
6. Ventilation: You’ll need to provide ventilation to prevent overheating and humidity buildup. You can do this by rolling up the sides of the plastic sheeting on sunny days. Secure the rolled-up plastic with clamps or rope.
7. Anchoring: To prevent the hoop house from blowing away in strong winds, secure the ends of the plastic sheeting to the ground with rocks, bricks, or sandbags.
General Tips for Winter Kale Care
No matter which method you choose, here are a few general tips to keep your kale happy and healthy throughout the winter:
* Watering: Water your kale plants as needed, but be careful not to overwater. Overwatering can lead to root rot, especially in cold weather. Water in the morning so the leaves have time to dry before nightfall.
* Fertilizing: Kale is a heavy feeder. Give your plants a boost of fertilizer in the fall to help them through the winter. A balanced organic fertilizer is a good choice.
* Pest Control: Keep an eye out for pests, such as aphids and cabbage worms. Handpick them off the plants or use an organic insecticide if necessary.
* Harvesting: Harvest your kale regularly to encourage new growth. Pick the outer leaves first, leaving the inner leaves to continue growing.
* Snow Removal: If you get heavy snow, brush it off the row covers, cold frame, or mini hoop house to prevent them from collapsing.
Choosing the Right Method for You
The best method for extending your kale harvest will depend on your climate, your budget, and your level of DIY skill. Row covers are the easiest and most affordable option, while cold frames and mini hoop houses provide more substantial protection. Experiment with different methods to see what works best for you.
Remember to have fun with it! Gardening is all about learning and experimenting. Don’t be afraid to try new things
Conclusion
So, there you have it! Extending your kale harvest doesn’t require a green thumb of mythical proportions or a degree in botany. It’s about understanding the plant’s needs, providing a little TLC, and employing a few simple, yet effective, techniques. This DIY approach to maximizing your kale yield is more than just a gardening hack; it’s a pathway to fresher, more nutritious meals, a deeper connection with your food source, and a significant reduction in your grocery bill.
Why is this a must-try? Because fresh, homegrown kale is simply superior. The flavor is more vibrant, the texture is crisper, and the nutritional value is at its peak. Store-bought kale, while convenient, often pales in comparison, having lost some of its vitality during transportation and storage. By extending your harvest, you’re ensuring a consistent supply of this superfood right outside your door.
Beyond the basic methods outlined, there’s room for experimentation and personalization. Consider these variations to further optimize your kale harvest extension:
* **Succession Planting with Different Varieties:** Plant different kale varieties with varying maturity dates. This ensures a staggered harvest throughout the growing season. Some varieties are also more cold-hardy than others, extending your harvest into the colder months. Try planting Red Russian kale for its cold tolerance alongside Dwarf Blue Curled kale for its compact size.
* **Row Covers and Cold Frames:** For those living in colder climates, row covers or cold frames can provide an extra layer of protection against frost and freezing temperatures. These simple structures can significantly extend your harvest well into the winter.
* **Companion Planting:** Strategically plant companion plants alongside your kale to deter pests and improve soil health. Marigolds, for example, are known to repel many common garden pests.
* **Soil Amendments:** Regularly amend your soil with compost or other organic matter to provide your kale plants with the nutrients they need to thrive. Healthy soil is the foundation of a bountiful harvest.
* Experiment with different mulching techniques. Mulching helps retain moisture, suppress weeds, and regulate soil temperature. Try using straw, wood chips, or even shredded leaves as mulch around your kale plants.
Don’t be afraid to experiment and adapt these techniques to your specific climate and growing conditions. Gardening is a learning process, and every season brings new opportunities to refine your skills.
We wholeheartedly encourage you to try these DIY methods for extending your kale harvest. The rewards are well worth the effort. Imagine the satisfaction of harvesting fresh, vibrant kale from your own garden, even as the weather turns colder. Think of the delicious and nutritious meals you can create with your homegrown bounty.
But most importantly, we want to hear about your experience! Share your successes, your challenges, and any tips or tricks you’ve discovered along the way. Connect with fellow gardeners online, share photos of your kale harvests, and let’s learn from each other. Together, we can cultivate a community of thriving kale growers and enjoy the many benefits of this amazing superfood. So, get out there, get your hands dirty, and start extending your kale harvest today!
Frequently Asked Questions (FAQ)
What is the best time to start extending my kale harvest?
The ideal time to start thinking about extending your kale harvest depends on your climate and the specific techniques you plan to use. Generally, you should begin planning and implementing strategies several weeks before the first expected frost. For example, if you live in an area with mild winters, you might start succession planting in late summer or early fall to ensure a continuous supply of kale throughout the winter months. If you live in a colder climate, you’ll want to start protecting your kale plants with row covers or cold frames well before the first frost arrives. Monitoring weather forecasts and paying attention to the specific needs of your kale variety will help you determine the optimal timing for your harvest extension efforts.
How do I know if my kale is ready to harvest?
Kale is typically ready to harvest when the leaves are about the size of your hand. The exact size will vary depending on the variety, but generally, you want to harvest the outer leaves while leaving the inner leaves to continue growing. The leaves should be firm and vibrant in color. Avoid harvesting leaves that are yellowed, damaged, or infested with pests. To harvest, simply cut the outer leaves near the base of the plant, being careful not to damage the central stem. This will allow the plant to continue producing new leaves.
What are the most common pests that affect kale, and how can I control them?
Kale is susceptible to a variety of pests, including aphids, cabbage worms, flea beetles, and slugs. Aphids are small, soft-bodied insects that suck sap from the leaves, causing them to curl and yellow. Cabbage worms are the larvae of cabbage white butterflies and can quickly defoliate kale plants. Flea beetles are tiny, jumping beetles that create small holes in the leaves. Slugs are slimy, nocturnal creatures that feed on kale leaves, leaving behind irregular holes.
To control these pests, you can use a variety of methods, including:
* **Handpicking:** Regularly inspect your kale plants and handpick any pests you find.
* **Insecticidal Soap:** Spray your kale plants with insecticidal soap to control aphids and other soft-bodied insects.
* **Bacillus thuringiensis (Bt):** Apply Bt to your kale plants to control cabbage worms. Bt is a naturally occurring bacterium that is toxic to cabbage worms but harmless to humans and other beneficial insects.
* **Diatomaceous Earth (DE):** Sprinkle DE around your kale plants to control flea beetles and slugs. DE is a naturally occurring powder made from fossilized diatoms that is abrasive to insects and slugs.
* **Row Covers:** Cover your kale plants with row covers to prevent pests from reaching them.
* **Companion Planting:** Plant companion plants, such as marigolds or nasturtiums, to deter pests.
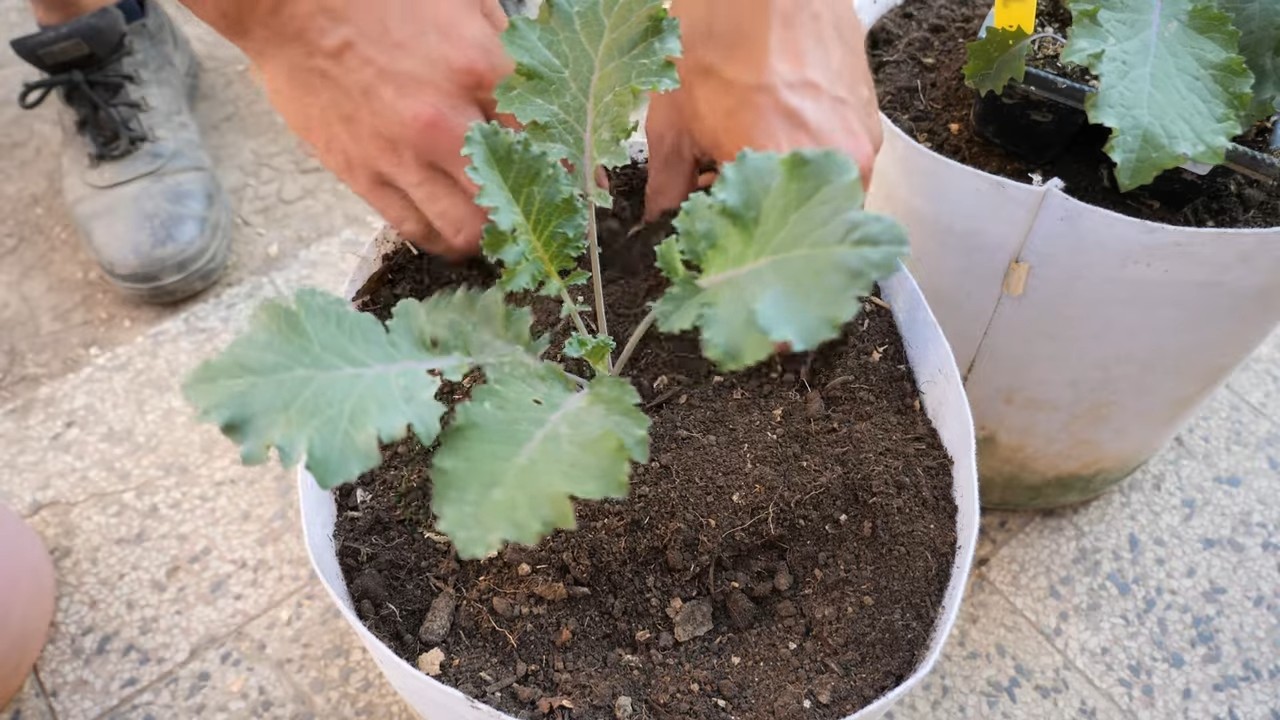
Can I extend my kale harvest in containers?
Yes, you can definitely extend your kale harvest in containers. In fact, growing kale in containers can offer several advantages, such as better control over soil conditions and the ability to move plants to sheltered locations during harsh weather. Choose a large container with good drainage and fill it with a high-quality potting mix. Water regularly and fertilize as needed. When the weather turns cold, you can move your containers to a greenhouse, garage, or other protected area to extend your harvest.
How do I store kale after harvesting it?
To store kale after harvesting, wash the leaves thoroughly and dry them completely. You can use a salad spinner or pat them dry with a clean towel. Store the dried kale leaves in a plastic bag or container in the refrigerator. Kale will typically last for about a week in the refrigerator. For longer storage, you can blanch the kale leaves for a few minutes and then freeze them. Frozen kale can last for several months.
What are some creative ways to use my extended kale harvest?
The possibilities are endless! Beyond the usual salads and smoothies, consider these creative uses for your extended kale harvest:
* **Kale Chips:** Toss kale leaves with olive oil and seasonings, then bake until crispy.
* **Kale Pesto:** Blend kale with nuts, garlic, Parmesan cheese, and olive oil to make a delicious pesto.
* **Kale Soup:** Add kale to your favorite soup recipes for a boost of nutrients.
* **Kale Frittata:** Incorporate kale into a frittata or quiche for a healthy and flavorful breakfast or brunch.
* **Kale Smoothies:** Blend kale with fruits, vegetables, and yogurt for a nutritious and refreshing smoothie.
* Kale and White Bean Stew: A hearty and healthy stew perfect for colder months.
* Sautéed Kale with Garlic and Lemon: A simple and flavorful side dish.
Don’t be afraid to experiment and find new ways to enjoy your homegrown kale!
Leave a Comment