
Hanging sweet potato planting: Imagine vibrant green vines cascading from a basket on your porch, not just adding beauty, but also promising a delicious harvest! For centuries, cultures around the globe have cultivated sweet potatoes, valuing them for their nutritional richness and versatility. From the indigenous peoples of South America, where they originated, to the far reaches of Asia and Africa, sweet potatoes have been a staple food. But did you know you can grow them in a unique and space-saving way?
I’m excited to share a simple yet rewarding DIY project that will transform your gardening experience. Whether you have a sprawling backyard or a tiny balcony, hanging sweet potato planting is the perfect solution. This method not only maximizes space but also adds a touch of rustic charm to your home.
In this article, I’ll guide you through the process of creating your own hanging sweet potato garden. We’ll cover everything from selecting the right materials to nurturing your plants for a bountiful yield. Forget store-bought sweet potatoes – imagine the satisfaction of harvesting your own, knowing exactly where they came from and how they were grown. Let’s get started and bring a touch of homegrown goodness to your life!
DIY Hänge-Süßkartoffelpflanzung: Ein Leitfaden für üppige grüne Ranken und vielleicht sogar ein paar Knollen!
Ich liebe Süßkartoffeln! Nicht nur zum Essen, sondern auch als Zierpflanzen. Ihre herzförmigen Blätter und die langen, kaskadenartigen Ranken sind einfach wunderschön. Und das Beste daran? Man kann sie ganz einfach in hängenden Körben ziehen! Hier zeige ich dir, wie du deine eigenen hängenden Süßkartoffelpflanzen kreierst – ein Projekt, das sowohl Spaß macht als auch optisch ansprechend ist.
Was du brauchst:
* Eine oder mehrere Süßkartoffeln (Bio ist am besten, da sie weniger wahrscheinlich mit Wachstumsinhibitoren behandelt wurden)
* Einen hängenden Korb (aus Kokosfaser, Draht oder Kunststoff – was immer dir gefällt)
* Blumenerde (gut durchlässig)
* Zahnstocher oder Schaschlikspieße
* Ein Gefäß mit Wasser (ein Glas oder eine Schüssel)
* Optional: Flüssigdünger für Zimmerpflanzen
Die Vorbereitung: Süßkartoffeln zum Sprießen bringen
Der erste Schritt ist der wichtigste: Wir müssen die Süßkartoffeln dazu bringen, Wurzeln und Triebe zu bilden. Keine Sorge, das ist einfacher als es klingt!
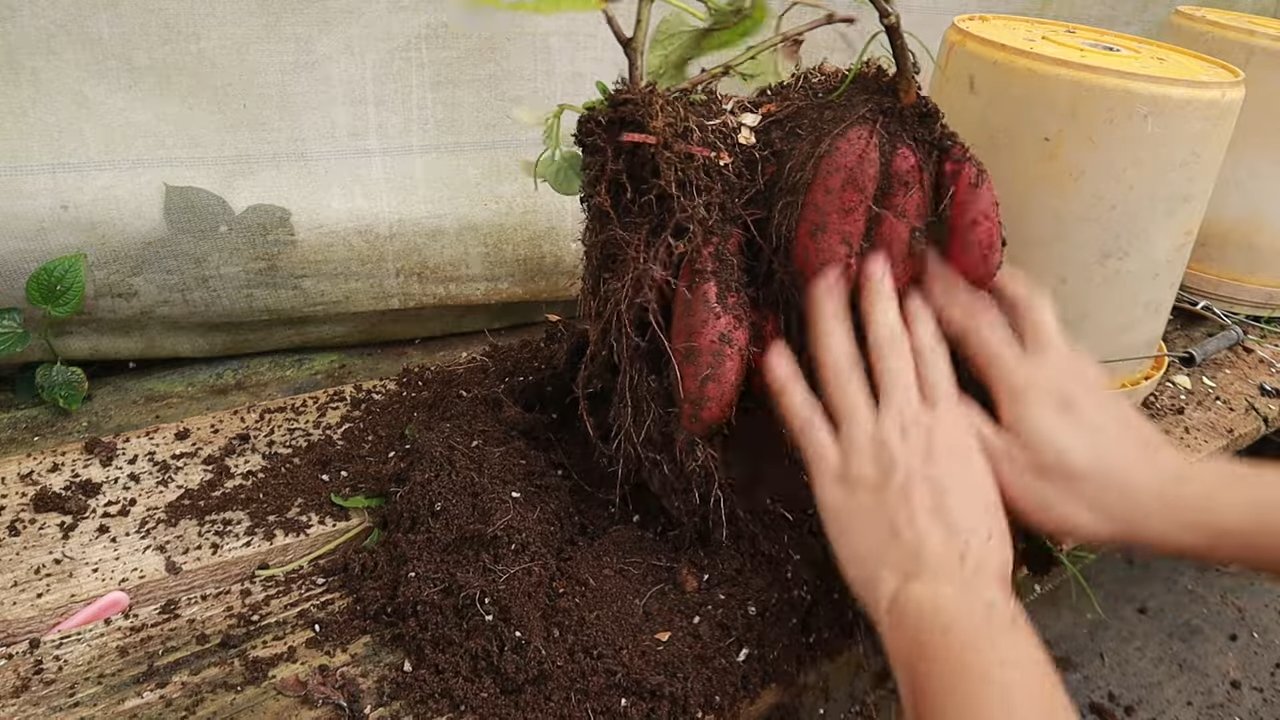
1. Süßkartoffeln auswählen: Wähle feste, gesunde Süßkartoffeln ohne weiche Stellen oder Beschädigungen. Je größer die Süßkartoffel, desto mehr Ranken kannst du erwarten. Verschiedene Sorten haben auch unterschiedliche Blattfarben – von hellgrün bis fast lila!
2. Zahnstocher anbringen: Stecke 3-4 Zahnstocher oder Schaschlikspieße gleichmäßig um die Mitte der Süßkartoffel. Sie dienen als Stütze, damit die Süßkartoffel nicht ganz ins Wasser fällt.
3. Ins Wasser stellen: Fülle ein Glas oder eine Schüssel mit Wasser. Platziere die Süßkartoffel so auf dem Glasrand, dass das untere Drittel bis zur Hälfte im Wasser ist. Achte darauf, dass die Zahnstocher die Süßkartoffel sicher halten.
4. Der richtige Standort: Stelle das Glas mit der Süßkartoffel an einen warmen, hellen Ort, aber nicht in direktes Sonnenlicht. Ein Fensterbrett ist ideal.
5. Geduld ist gefragt: Jetzt heißt es warten! Wechsle das Wasser alle paar Tage, um es sauber zu halten und das Wachstum zu fördern. Nach etwa 2-4 Wochen (manchmal auch länger, je nach Sorte und Bedingungen) solltest du erste Wurzeln und Triebe sehen. Die Triebe wachsen aus den “Augen” der Süßkartoffel.
6. Wachstum beobachten: Beobachte die Süßkartoffel genau. Wenn die Triebe etwa 5-7 cm lang sind, kannst du sie vorsichtig abbrechen oder abschneiden. Diese Triebe nennt man “Slips”.
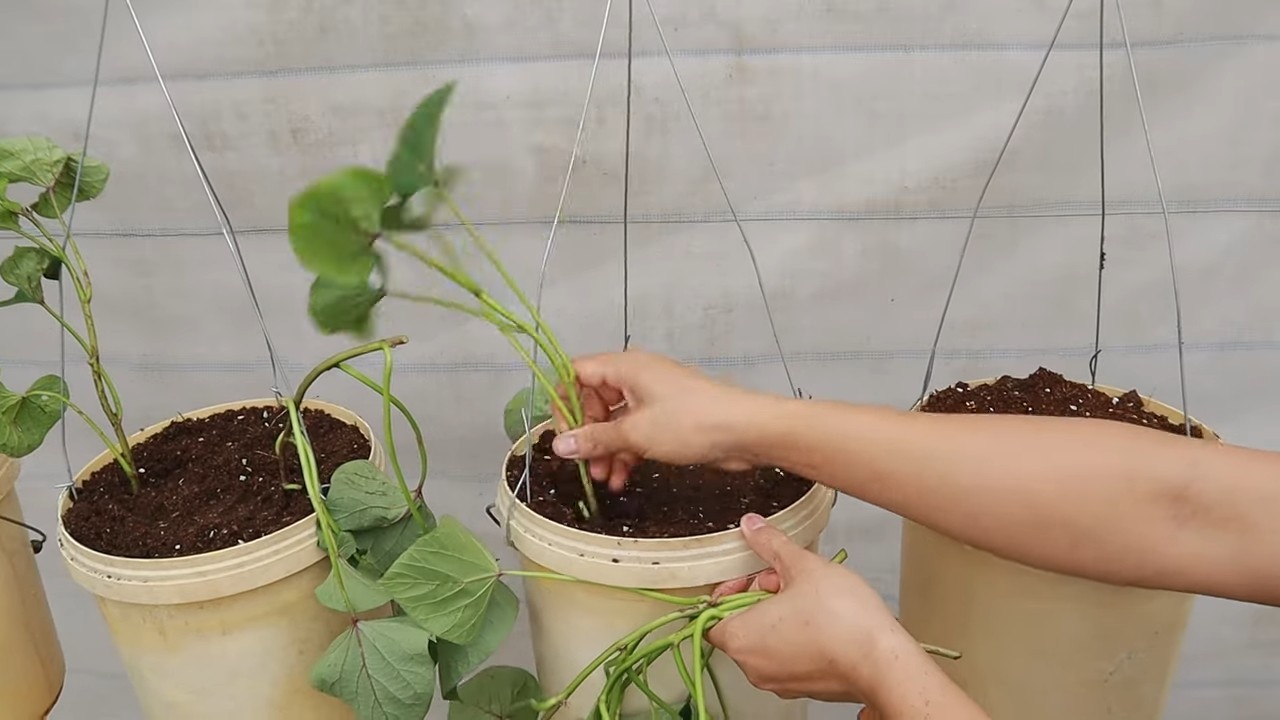
Die Bepflanzung: Ab in den hängenden Korb!
Sobald deine Süßkartoffel-Slips Wurzeln haben, können wir sie in den hängenden Korb pflanzen.
1. Slips bewurzeln (optional, aber empfohlen): Du kannst die Slips direkt in die Erde pflanzen, aber die Erfolgsquote ist höher, wenn du sie vorher bewurzelst. Stelle die Slips einfach in ein Glas Wasser und warte, bis sich kleine Wurzeln bilden. Das dauert in der Regel ein paar Tage bis eine Woche.
2. Hängenden Korb vorbereiten: Fülle den hängenden Korb mit Blumenerde. Achte darauf, dass die Erde gut durchlässig ist, damit sich keine Staunässe bildet.
3. Pflanzlöcher graben: Grabe kleine Löcher in die Erde, groß genug für die Wurzeln der Slips.
4. Slips einsetzen: Setze die Slips vorsichtig in die Löcher ein und bedecke die Wurzeln mit Erde. Drücke die Erde leicht an.
5. Gießen: Gieße die frisch gepflanzten Slips gründlich. Die Erde sollte feucht, aber nicht nass sein.
6. Standort wählen: Hänge den Korb an einen hellen Ort mit indirektem Sonnenlicht. Süßkartoffeln lieben die Sonne, aber zu viel direkte Sonne kann die Blätter verbrennen.
7. Regelmäßige Pflege:
* Gießen: Gieße regelmäßig, besonders während der heißen Sommermonate. Die Erde sollte immer leicht feucht sein.
* Düngen: Dünge die Pflanzen alle paar Wochen mit einem Flüssigdünger für Zimmerpflanzen. Befolge die Anweisungen auf der Verpackung.
* Schneiden: Schneide lange Ranken zurück, um die Pflanze buschiger zu machen und das Wachstum neuer Triebe zu fördern. Du kannst die abgeschnittenen Ranken auch in Wasser stellen, um neue Pflanzen zu ziehen!
* Schädlinge: Achte auf Schädlinge wie Blattläuse oder Spinnmilben. Bei Befall kannst du die Pflanzen mit einem milden Insektizid behandeln oder die Schädlinge einfach mit einem feuchten Tuch abwischen.
Optionale Schritte für noch mehr Erfolg:
* Verschiedene Sorten kombinieren: Pflanze verschiedene Süßkartoffelsorten in denselben Korb, um eine interessante Farbvielfalt zu erzielen.
* Begleitpflanzen: Du kannst auch andere Pflanzen wie Petunien oder Lobelien in den Korb pflanzen, um ihn noch attraktiver zu gestalten. Achte aber darauf, dass die Begleitpflanzen ähnliche Ansprüche an Licht und Wasser haben wie die Süßkartoffeln.
* Knollenbildung fördern: Obwohl die hängende Süßkartoffelpflanzung hauptsächlich als Zierpflanze dient, kannst du versuchen, die Knollenbildung zu fördern. Verwende dazu einen Dünger mit hohem Phosphoranteil und sorge für ausreichend Sonnenlicht. Allerdings ist die Knollenernte in einem hängenden Korb eher unwahrscheinlich.
Häufige Probleme und Lösungen:
* Gelbe Blätter: Gelbe Blätter können ein Zeichen für Überwässerung oder Nährstoffmangel sein. Überprüfe die Feuchtigkeit der Erde und dünge die Pflanzen gegebenenfalls.
* Braune Blätter: Braune Blätter können durch zu viel direkte Sonne oder zu wenig Wasser verursacht werden. Stelle den Korb an einen schattigeren Ort und gieße die Pflanzen regelmäßig.
* Kein Wachstum: Wenn die Pflanzen nicht wachsen, kann das an zu wenig Licht, zu wenig Nährstoffen oder zu kalten Temperaturen liegen. Stelle den Korb an einen helleren Ort, dünge die Pflanzen und achte darauf, dass die Temperatur nicht unter 15 Grad Celsius fällt.
* Schädlinge: Blattläuse und Spinnmilben sind häufige Schädlinge an Süßkartoffelpflanzen. Behandle die Pflanzen mit einem milden Insektizid oder wische die Schädlinge einfach mit einem feuchten Tuch ab.
Zusätzliche Tipps:
* Die richtige Erde: Verwende eine gut durchlässige Blumenerde, die reich an organischen Stoffen ist. Du kannst auch etwas Kompost oder Wurmhumus in die Erde mischen, um das Wachstum zu fördern.
* Der richtige Korb: Wähle einen hängenden Korb, der groß genug ist, um das Wurzelwachstum der Süßkartoffeln zu ermöglichen. Ein Korb mit einem Durchmesser von mindestens 30 cm ist ideal.
* Die richtige Zeit: Beginne mit der Anzucht der Süßkartoffeln im Frühjahr, damit die Pflanzen genügend Zeit haben, um während der warmen Sommermonate zu wachsen.
* Überwinterung: In kälteren Klimazonen kannst du die Süßkartoffelpflanzen im Herbst ins Haus holen und sie als Zimmerpflanzen überwintern. Schneide die Ranken zurück und stelle den Korb an einen hellen Ort. Gieße die Pflanzen sparsam. Im Frühjahr kannst du die Pflanzen wieder ins Freie stellen.
Fazit:
Eine hängende Süßkartoffelpflanzung ist ein wunderschönes und relativ pflegeleichtes Projekt, das deinem Zuhause oder Garten einen Hauch von Grün verleiht. Mit ein wenig Geduld und Sorgfalt kannst du dich an üppigen Ranken und vielleicht sogar an ein paar leckeren Knollen erfreuen! Viel Spaß beim Gärtnern!
Conclusion
So, there you have it! Transforming a humble sweet potato into a stunning, cascading hanging plant is not only incredibly rewarding but also surprisingly simple. This DIY project is a must-try for several compelling reasons. First, it’s an economical way to add greenery and visual interest to your home, especially if you’re working with a limited budget. Forget expensive hanging baskets from the garden center; with a single sweet potato, some water, and a little patience, you can create a living masterpiece.
Second, it’s a fantastic conversation starter. Imagine the delight of your guests when they learn that the beautiful foliage gracing your patio or balcony originated from a simple root vegetable. It’s a unique and unexpected touch that showcases your creativity and resourcefulness.
Third, and perhaps most importantly, growing a hanging sweet potato plant is a deeply satisfying experience. Watching the roots sprout and the vines unfurl is a testament to the power of nature and a reminder of the beauty that can be found in the simplest things. It’s a project that connects you to the natural world, even if you live in an urban environment.
But the fun doesn’t stop there! Feel free to experiment with different varieties of sweet potatoes. Purple sweet potatoes, for example, will produce vines with a slightly different hue, adding even more visual interest to your display. You can also try adding a few drops of liquid fertilizer to the water every few weeks to encourage even more vigorous growth. Consider using decorative containers or jars to further enhance the aesthetic appeal of your hanging sweet potato plant.
Don’t be afraid to get creative and personalize your project to suit your own style and preferences. You could even try training the vines to grow in a particular direction or shape, creating a truly unique living sculpture.
We wholeheartedly encourage you to give this DIY trick a try. It’s a fun, affordable, and rewarding way to add a touch of green to your life. And once you’ve created your own hanging sweet potato plant, we’d love to hear about your experience! Share your photos and stories with us in the comments below. Let’s inspire each other to embrace the beauty and simplicity of DIY gardening. We are confident that you will find this method of hanging sweet potato planting to be both enjoyable and visually appealing. Happy growing!
Frequently Asked Questions (FAQ)
1. What kind of sweet potato should I use?
You can use any variety of sweet potato for this project. However, organic sweet potatoes are often recommended as they are less likely to have been treated with growth inhibitors. Experiment with different colors and varieties to see which one you prefer. Beauregard, Jewel, and Japanese sweet potatoes are all popular choices. Keep in mind that the color of the sweet potato flesh doesn’t necessarily dictate the color of the vines, but it can sometimes influence it.
2. How long does it take for the sweet potato to sprout?
Sprouting time can vary depending on factors such as temperature, humidity, and the specific sweet potato variety. Generally, you can expect to see sprouts within 2-4 weeks. Be patient and ensure the bottom half of the sweet potato remains submerged in water. If you don’t see any signs of growth after a month, you might want to try a different sweet potato.
3. What kind of container should I use?
Any container that can hold water and support the sweet potato will work. Glass jars, vases, and even plastic containers are suitable. The size of the container should be appropriate for the size of the sweet potato; you want to ensure that the bottom half of the sweet potato is submerged in water without the entire potato being submerged. Clear containers are ideal as they allow you to monitor the water level and root growth.
4. How often should I change the water?
Change the water every 3-5 days to prevent algae growth and keep the water fresh. Stagnant water can lead to rot and hinder the growth of your sweet potato plant. When changing the water, gently rinse the sweet potato to remove any accumulated slime or debris.
5. Where should I place my hanging sweet potato plant?
Place your hanging sweet potato plant in a location that receives bright, indirect sunlight. Direct sunlight can scorch the leaves. A spot near a window or on a covered patio is ideal. Avoid placing it in a drafty area or near a heat source.
6. How do I care for the vines once they start growing?
Once the vines start growing, you can gently train them to grow in the direction you desire. You can also prune them to encourage bushier growth. If the vines become too long, you can trim them back without harming the plant. Regularly check the leaves for any signs of pests or diseases.
7. Can I plant the sweet potato in soil after it sprouts?
Yes, you can plant the sweet potato in soil once it has developed a good root system and several healthy vines. Choose a well-draining potting mix and a pot that is large enough to accommodate the growing roots. When transplanting, be careful not to damage the roots. Water thoroughly after planting and continue to provide bright, indirect sunlight.
8. Will my hanging sweet potato plant produce sweet potatoes?
While it is possible for a hanging sweet potato plant to produce sweet potatoes, it is unlikely, especially if it is grown indoors. The primary purpose of this project is to enjoy the ornamental foliage. If you want to grow sweet potatoes for harvesting, you will need to plant them in a garden bed or large container with ample space for the roots to develop.
9. What if my sweet potato starts to rot?
If your sweet potato starts to rot, it is likely due to stagnant water or poor air circulation. Remove the rotting portion of the sweet potato and change the water more frequently. Ensure that the container is clean and that the sweet potato is not sitting in standing water. If the rot persists, it is best to start with a fresh sweet potato.
10. Can I use tap water?
While tap water is generally safe to use, it may contain chlorine or other chemicals that can be harmful to plants. It is best to use filtered water or let tap water sit out for 24 hours to allow the chlorine to dissipate. Rainwater is also an excellent option.
11. My sweet potato is growing mold. What should I do?
Mold growth indicates excessive moisture and poor air circulation. Gently wipe off the mold with a clean cloth and change the water more frequently. Ensure that the sweet potato is not sitting in standing water and that the container is well-ventilated. If the mold persists, consider using a different container or a fresh sweet potato.
12. Can I add fertilizer to the water?
Yes, you can add a few drops of liquid fertilizer to the water every few weeks to encourage more vigorous growth. Use a balanced fertilizer diluted to half strength. Avoid over-fertilizing, as this can damage the plant.
13. Is hanging sweet potato planting safe for pets?
Sweet potato vines are generally considered non-toxic to pets. However, it’s always best to prevent pets from chewing on the vines, as ingestion can cause mild digestive upset. Place the hanging plant in a location that is out of reach of pets.
14. How long will my hanging sweet potato plant last?
With proper care, a hanging sweet potato plant can last for several months or even a year. However, it is important to note that it is not a permanent plant. Eventually, the sweet potato will begin to decompose, and the plant will need to be replaced.
15. Can I propagate new plants from the vines?
Yes, you can propagate new plants from the vines by taking cuttings and rooting them in water or soil. Cut a section of vine that is several inches long and remove the lower leaves. Place the cutting in water or moist soil and wait for roots to develop. Once the roots have formed, you can transplant the cutting into a pot.

Leave a Comment