
Hanging Container Mint Garden: Imagine stepping onto your balcony or into your garden and being greeted by the refreshing aroma of fresh mint. Sounds delightful, right? Well, you don’t need acres of land to make that dream a reality! This DIY guide will show you how to create your very own thriving Hanging Container Mint Garden, even if you’re short on space or a complete beginner.
Mint has been cherished for centuries, not just for its invigorating scent and flavor, but also for its medicinal properties. From ancient Egyptians using it in religious ceremonies to Romans flavoring their sauces and wines, mint has a rich and fascinating history. Today, it’s a staple in everything from teas and cocktails to desserts and savory dishes.
But let’s be honest, buying fresh mint from the store can be expensive, and it often wilts before you even get a chance to use it all. That’s where this DIY trick comes in! Creating a Hanging Container Mint Garden is not only a cost-effective solution, but it’s also incredibly rewarding. You’ll have a constant supply of fresh mint right at your fingertips, ready to elevate your culinary creations and refresh your senses. Plus, it adds a touch of greenery and charm to any space. So, let’s get started and transform your space into a minty paradise!
DIY Hanging Container Mint Garden: Fresh Herbs at Your Fingertips!
Hey there, fellow plant enthusiasts! I’m super excited to share this project with you – creating your very own hanging container mint garden. Not only is it a fantastic way to add some greenery to your space, but you’ll also have a constant supply of fresh mint for mojitos, teas, and all sorts of culinary adventures. Plus, containing mint is crucial because it’s notorious for spreading like wildfire! This project is perfect for balconies, patios, or even small indoor spaces with good sunlight. Let’s get started!
What You’ll Need:
Before we dive in, let’s gather all the necessary materials. Trust me, having everything ready beforehand will make the process so much smoother.
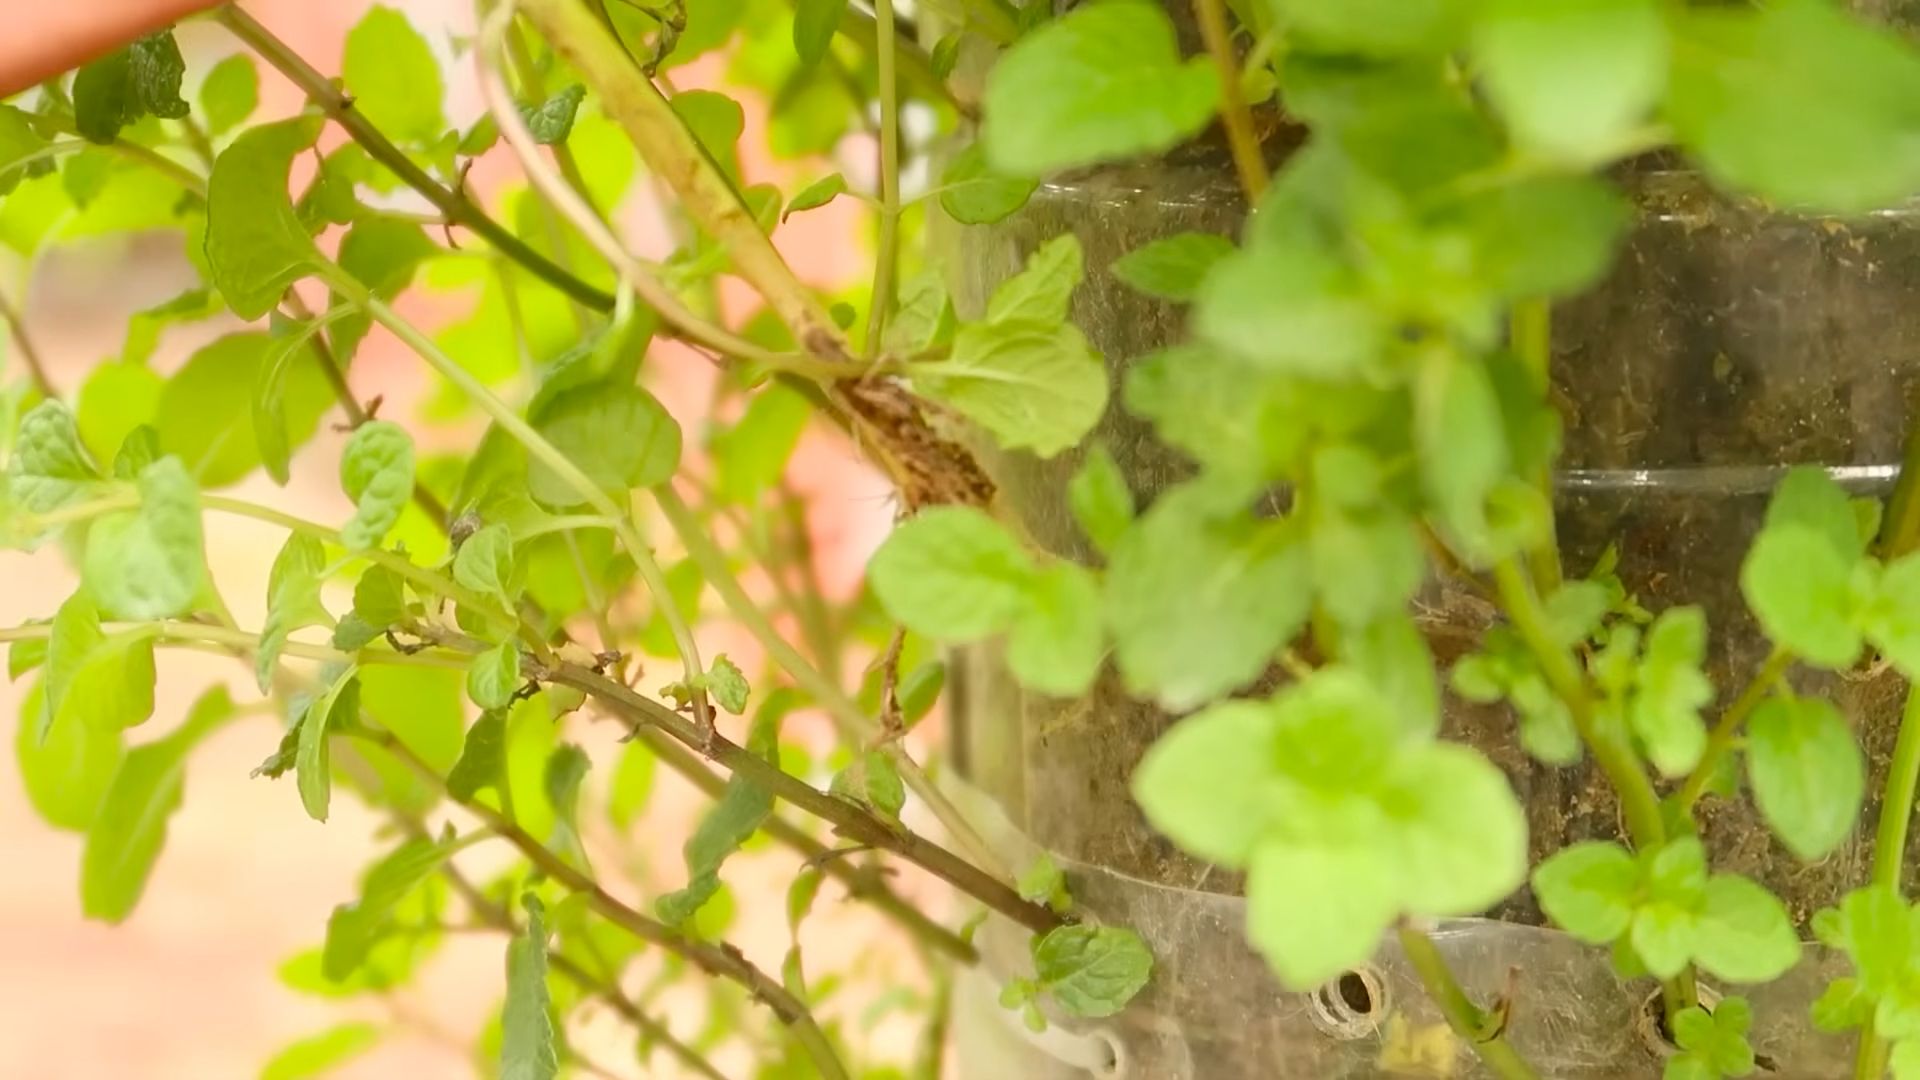
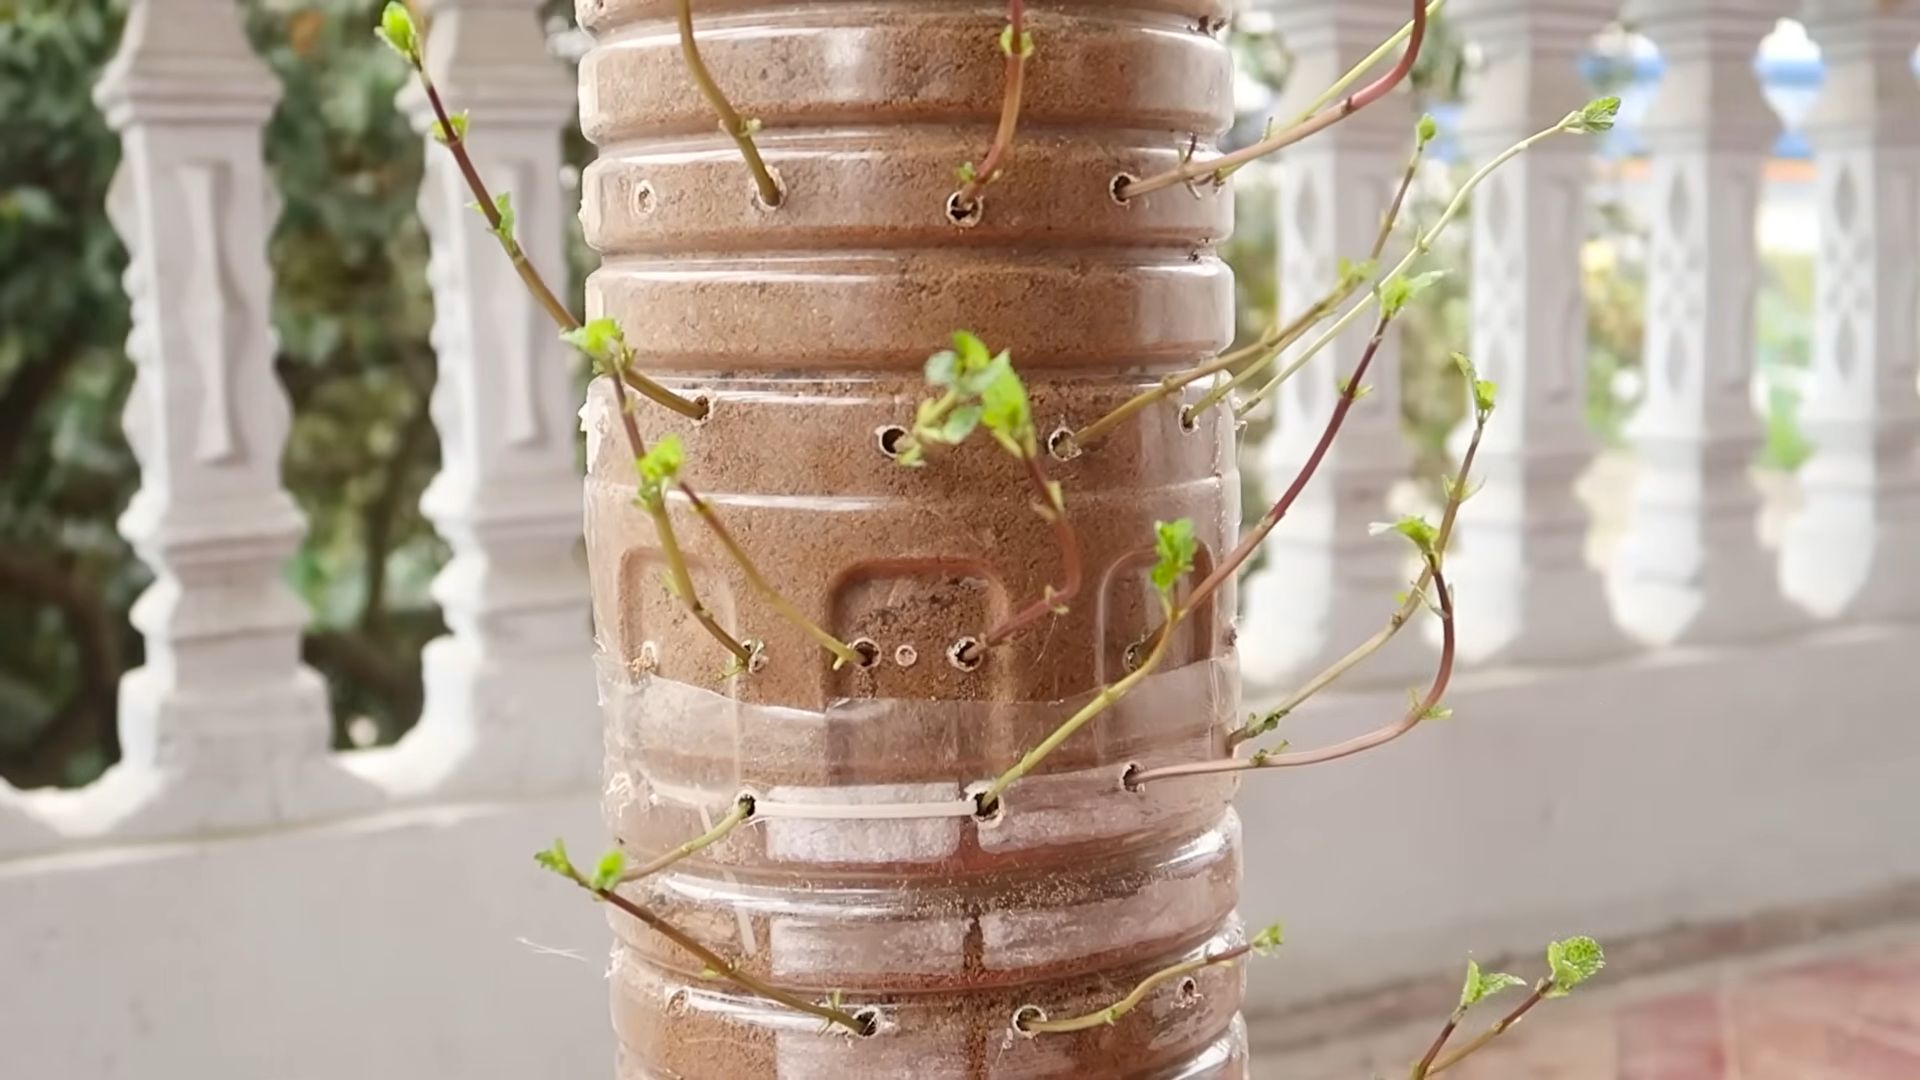
* Containers: I recommend using hanging baskets or pots with drainage holes. You can find these at most garden centers or even repurpose old buckets or containers. Just make sure they’re clean and have drainage! I’m using three 10-inch hanging baskets for this project.
* Potting Soil: Use a good quality potting mix that drains well. Avoid using garden soil, as it can compact and not provide adequate drainage for container gardening.
* Mint Plants: You can purchase mint seedlings from a nursery or propagate your own from cuttings. I’m using a mix of peppermint, spearmint, and chocolate mint for variety!
* Hanging Hardware: This will depend on where you plan to hang your garden. You might need hooks, chains, S-hooks, or a sturdy plant hanger. Make sure the hardware is strong enough to support the weight of the filled containers.
* Optional: Slow-Release Fertilizer: Adding slow-release fertilizer to your potting mix will provide your mint plants with a steady supply of nutrients.
* Optional: Landscape Fabric or Coffee Filters: To line the bottom of the containers and prevent soil from washing out.
* Watering Can or Hose: For watering your mint plants.
* Gloves: To protect your hands from the soil.
* Trowel or Small Shovel: For transferring the mint plants into the containers.
Preparing Your Containers:
This step is crucial for ensuring proper drainage and preventing soil loss.
1. Clean Your Containers: If you’re using recycled containers, make sure to thoroughly clean them with soap and water to remove any dirt or debris.
2. Line the Bottom (Optional): To prevent soil from washing out through the drainage holes, line the bottom of each container with landscape fabric or a coffee filter. This will help retain moisture and nutrients while still allowing excess water to drain. Cut the fabric or filter to fit the bottom of the container, leaving a little extra to fold up the sides.
3. Add Potting Soil: Fill each container about two-thirds full with potting soil. Gently pat down the soil to remove any air pockets.
Planting Your Mint:
Now for the fun part – planting your mint!
1. Remove Mint Plants from Their Containers: Gently squeeze the sides of the nursery pots to loosen the root ball. Carefully remove the mint plants from their containers, being careful not to damage the roots.
2. Loosen the Root Ball: Gently loosen the root ball of each mint plant with your fingers. This will encourage the roots to spread out and establish themselves in the new container. If the roots are tightly bound, you can gently tease them apart.
3. Plant the Mint: Place each mint plant in the center of a container, making sure the top of the root ball is level with the surrounding soil. Add more potting soil around the plant, filling the container to about an inch below the rim. Gently pat down the soil to secure the plant. I usually plant one type of mint per container to avoid them competing too much.
4. Water Thoroughly: Water the newly planted mint thoroughly, until water drains out of the drainage holes. This will help settle the soil and hydrate the roots.
5. Add Slow-Release Fertilizer (Optional): If you’re using slow-release fertilizer, sprinkle it evenly over the surface of the soil according to the package instructions. Gently mix it into the top layer of soil.
Hanging Your Mint Garden:
Time to find the perfect spot for your new mint garden!
1. Choose a Location: Select a location that receives at least 4-6 hours of sunlight per day. Mint thrives in sunny locations, but it can also tolerate partial shade. Make sure the location is easily accessible for watering and harvesting.
2. Install Hanging Hardware: Install the necessary hanging hardware, such as hooks, chains, or S-hooks, in your chosen location. Make sure the hardware is securely attached and can support the weight of the filled containers.
3. Hang Your Containers: Carefully hang the containers from the hardware. Make sure the containers are evenly spaced and not overcrowded.
4. Adjust as Needed: Once the containers are hung, step back and assess the overall appearance. Adjust the height or position of the containers as needed to create a visually appealing arrangement.
Caring for Your Hanging Mint Garden:
Maintaining your mint garden is easy, but consistent care is key.
1. Watering: Water your mint plants regularly, especially during hot, dry weather. Check the soil moisture by sticking your finger into the soil. If the top inch of soil feels dry, it’s time to water. Water thoroughly, until water drains out of the drainage holes. Avoid overwatering, as this can lead to root rot.
2. Fertilizing: If you didn’t add slow-release fertilizer, fertilize your mint plants every 2-4 weeks with a balanced liquid fertilizer. Follow the package instructions for dilution rates.
3. Pruning: Prune your mint plants regularly to encourage bushier growth and prevent them from becoming leggy. Pinch off the tips of the stems to promote branching. You can also harvest leaves as needed for culinary use. Don’t be afraid to prune heavily – mint is very resilient!
4. Pest Control: Keep an eye out for pests such as aphids, spider mites, and whiteflies. If you notice any pests, treat them with an insecticidal soap or neem oil.
5. Overwintering: In colder climates, you may need to overwinter your mint plants indoors. Bring the containers inside before the first frost and place them in a sunny location. Water sparingly during the winter months. Alternatively, you can take cuttings from your mint plants and root them indoors to start new plants in the spring.
6. Repotting: Mint is a vigorous grower and may need to be repotted every year or two. When the roots become crowded, transplant the mint into a larger container with fresh potting soil.
Troubleshooting:
Even with the best care, you might encounter some challenges. Here are a few common issues and how to address them:
* Yellowing Leaves: This could be a sign of overwatering, underwatering, or nutrient deficiency. Check the soil moisture and adjust your watering schedule accordingly. If the soil is consistently wet, allow it to dry out slightly before watering again. If the soil is dry, water thoroughly. If you suspect a nutrient deficiency, fertilize your mint plants with a balanced liquid fertilizer.
* Leggy Growth: This is usually caused by insufficient sunlight. Move your mint plants to a sunnier location or supplement with artificial light. Prune the leggy stems to encourage bushier growth.
* Pest Infestation: Inspect your mint plants regularly for pests. If you notice any pests, treat them with an insecticidal soap or neem oil. You can also try hand-picking the pests off the plants.
* Root Rot: This is caused by overwatering and poor drainage. Make sure your containers have drainage holes and avoid overwatering. If you suspect root rot, repot the mint plants into fresh potting soil and trim away any rotten roots.
Harvesting Your Mint:
The best part of having a mint garden is enjoying the fresh herbs!
1. Harvesting Leaves: You can harvest mint leaves at any time, but they are most flavorful before the plant flowers. Simply pinch off the leaves or cut the stems with scissors.
2. Drying Mint: To dry mint, hang the stems upside down in a cool, dry place until the leaves are brittle. You can also dry mint in a dehydrator or oven. Once the leaves are dry, crumble them and store them in an airtight container.
3. Using Fresh Mint: Fresh mint can be used in a variety of culinary applications, such as teas, cocktails, salads, and desserts. It can also be used to flavor sauces, marinades, and dressings.
Choosing Your Mint Varieties:
One of the best things about growing mint is the sheer variety available! Here are a few of my favorites:
* Peppermint: Classic and refreshing, perfect for teas and desserts.
* Spearmint: Milder than peppermint, great for mojitos and savory dishes.
* Chocolate Mint: A unique flavor with hints of chocolate, delicious
Conclusion
So, there you have it! Creating your own hanging container mint garden isn’t just a fun weekend project; it’s a gateway to fresher, more flavorful meals, delightful aromas, and a touch of green serenity right outside your door. We’ve walked you through the simple steps, highlighting the ease and affordability of this DIY endeavor. Forget those sad, wilted bunches of mint from the grocery store – imagine snipping vibrant, fragrant leaves whenever inspiration strikes.
This isn’t just about saving money; it’s about connecting with your food, understanding where it comes from, and enjoying the satisfaction of nurturing something beautiful and useful. Plus, a hanging container mint garden is a fantastic solution for small spaces, balconies, or anyone looking to add a touch of vertical greenery to their lives.
But the beauty of this project lies in its adaptability. Feel free to experiment with different container sizes and materials. Upcycle old buckets, repurpose plastic bottles, or invest in charming terracotta pots – the choice is yours! Consider adding companion plants like marigolds or nasturtiums to deter pests and add a splash of color. You could even create a themed garden, combining different varieties of mint like peppermint, spearmint, and chocolate mint for a truly unique sensory experience.
Don’t be afraid to get creative with your hanging system, too. Macrame hangers, sturdy chains, or even repurposed belts can add a personal touch to your garden. Just ensure your chosen method is strong enough to support the weight of the container and soil, especially after watering.
The possibilities are endless, and the rewards are plentiful. A thriving hanging container mint garden is more than just a source of fresh herbs; it’s a conversation starter, a stress reliever, and a testament to your green thumb.
We wholeheartedly encourage you to give this DIY trick a try. It’s a simple, rewarding project that will bring joy and flavor to your life. And once you’ve created your own hanging oasis, we’d love to hear about your experience! Share your photos, tips, and variations in the comments below. Let’s inspire each other to cultivate a greener, more flavorful world, one hanging mint garden at a time. We are confident that you will find this hanging container mint garden to be a rewarding experience.
Frequently Asked Questions (FAQ)
What kind of mint is best for a hanging container garden?
While all mint varieties can technically be grown in hanging containers, some are better suited than others. Spearmint and peppermint are popular choices due to their robust growth and versatility in culinary applications. However, consider your personal preferences and the space you have available. Chocolate mint, with its unique flavor profile, can also be a delightful addition. Remember that mint spreads aggressively, so it’s crucial to keep it contained within the pot to prevent it from taking over your entire garden. Avoid planting mint directly in the ground unless you have a designated area for it to spread.
How much sunlight does a hanging container mint garden need?
Mint thrives in partial shade to full sun. Ideally, aim for at least 4-6 hours of sunlight per day. However, in hotter climates, providing some afternoon shade can prevent the leaves from scorching. Observe your mint plants closely and adjust their location as needed. If the leaves appear pale or leggy, they may not be getting enough sunlight. Conversely, if the leaves are wilting or turning brown, they may be getting too much direct sun.
What kind of soil should I use for my hanging container mint garden?
Use a well-draining potting mix specifically formulated for containers. Avoid using garden soil, as it can become compacted and prevent proper drainage. A good potting mix will retain moisture while allowing excess water to escape, preventing root rot. You can also amend the potting mix with compost or other organic matter to provide additional nutrients.
How often should I water my hanging container mint garden?
Water your mint regularly, especially during hot, dry weather. The soil should be consistently moist but not waterlogged. Check the soil moisture by sticking your finger about an inch into the soil. If it feels dry, it’s time to water. Hanging containers tend to dry out more quickly than in-ground gardens, so be prepared to water more frequently. During cooler months, you can reduce the watering frequency.
How do I fertilize my hanging container mint garden?
Mint is a relatively low-maintenance plant, but it will benefit from occasional fertilization. Use a balanced liquid fertilizer diluted to half strength every 2-4 weeks during the growing season. Avoid over-fertilizing, as this can lead to leggy growth and a less intense flavor. Alternatively, you can amend the soil with compost or other organic matter to provide a slow-release source of nutrients.
How do I harvest mint from my hanging container garden?
Harvest mint leaves as needed throughout the growing season. Simply snip off the stems just above a leaf node. This will encourage the plant to branch out and produce more leaves. Avoid removing more than one-third of the plant at a time, as this can stress the plant. Regular harvesting will also help to prevent the plant from flowering, which can diminish the flavor of the leaves.
How do I prevent pests and diseases in my hanging container mint garden?
Mint is generally resistant to pests and diseases, but it can occasionally be affected by aphids, spider mites, or powdery mildew. To prevent these problems, ensure good air circulation around the plants and avoid overwatering. Inspect your plants regularly for any signs of pests or diseases. If you notice any problems, treat them promptly with an appropriate organic insecticide or fungicide.
Can I overwinter my hanging container mint garden?
In colder climates, mint can be overwintered indoors. Before the first frost, bring your hanging container indoors and place it in a sunny location. Water sparingly and avoid fertilizing during the winter months. Alternatively, you can take cuttings from your mint plant and root them indoors to start new plants for the following spring.
How do I propagate mint from cuttings?
Propagating mint from cuttings is a simple and effective way to create new plants. Simply snip off a 4-6 inch stem from a healthy mint plant, remove the lower leaves, and place the stem in a glass of water. Change the water every few days. Within a few weeks, roots will begin to form. Once the roots are about an inch long, you can transplant the cutting into a pot filled with well-draining potting mix.
What are some creative ways to use mint from my hanging container garden?
Mint is a versatile herb that can be used in a variety of culinary and non-culinary applications. Use fresh mint leaves to flavor beverages like iced tea, lemonade, and mojitos. Add mint to salads, soups, and sauces for a refreshing twist. Use mint to make homemade mint sauce or jelly. You can also use mint to create homemade beauty products like facial scrubs and toners. The possibilities are endless!


Leave a Comment