
Growing wheatgrass with water might sound like something only health gurus and juice bar owners do, but trust me, it’s a surprisingly simple and rewarding DIY project you can tackle right in your own home! Forget expensive supplements and store-bought juices – I’m going to show you how to cultivate your own vibrant, nutrient-packed wheatgrass using just water and a few basic supplies.
Wheatgrass has a fascinating history, dating back to ancient Egypt and Mesopotamia, where it was revered for its health-boosting properties. While its popularity has ebbed and flowed throughout the centuries, it’s experienced a major resurgence in recent years, thanks to its impressive concentration of vitamins, minerals, and antioxidants. But why spend a fortune buying pre-grown wheatgrass or juice when you can easily create your own mini-farm at home?
In today’s fast-paced world, we’re all looking for ways to improve our health and well-being without breaking the bank. Growing wheatgrass with water offers a cost-effective and convenient solution. It’s a fantastic way to add a boost of nutrients to your diet, and it’s also incredibly satisfying to watch those little green blades sprout and thrive. Plus, it’s a great project for anyone looking to connect with nature, even if you only have a small apartment. So, are you ready to ditch the expensive health food stores and embark on your own wheatgrass-growing adventure? Let’s get started!
Weizengras selber ziehen: Ein einfacher DIY-Leitfaden
Hallo zusammen! Ich liebe es, frische, gesunde Zutaten in meine Ernährung einzubauen, und Weizengras ist da ganz vorne mit dabei. Es ist super einfach, es zu Hause anzubauen, und ich zeige euch jetzt, wie es geht. Keine Angst, es ist wirklich kinderleicht!
Was du brauchst:
* Weizensamen: Achte darauf, dass es sich um Weizensamen zum Anpflanzen handelt, nicht um Weizen für den Verzehr. Du findest sie in Bioläden, Gartencentern oder online.
* Anzuchtschale oder Behälter: Eine flache Schale mit Drainagelöchern ist ideal. Du kannst aber auch einen alten Joghurtbecher oder eine Plastikschale verwenden, solange du Löcher hineinmachst.
* Anzuchterde oder Erde: Normale Blumenerde geht auch, aber Anzuchterde ist oft steriler und leichter.
* Wasser: Am besten gefiltert oder abgestandenes Leitungswasser.
* Sprühflasche: Zum Befeuchten der Samen.
* Dunkler Ort: Ein Schrank, eine Schublade oder ein abgedeckter Bereich.
* Heller Ort: Ein Fensterbrett oder unter einer Pflanzenlampe.
Vorbereitung der Samen: Das A und O
Die Vorbereitung der Samen ist entscheidend für den Erfolg. Durch das Einweichen werden sie aktiviert und keimen schneller.
1. Samen einweichen: Gib die Weizensamen in eine Schüssel und bedecke sie mit reichlich Wasser. Lass sie 8-12 Stunden einweichen. Ich mache das meistens über Nacht. Du wirst sehen, dass sie aufquellen.
2. Samen abspülen: Nach dem Einweichen spülst du die Samen gründlich mit frischem Wasser ab. Das entfernt eventuelle Keime und verhindert Schimmelbildung.
Aussaat und Keimung: Der Start ins Grüne
Jetzt geht’s ans Eingemachte! Wir säen die Samen aus und sorgen für optimale Bedingungen zum Keimen.
1. Schale vorbereiten: Fülle deine Anzuchtschale mit einer Schicht Anzuchterde oder Erde. Drücke die Erde leicht an, aber nicht zu fest. Sie sollte locker und luftig sein.
2. Samen aussäen: Verteile die eingeweichten und abgespülten Weizensamen gleichmäßig auf der Erde. Sie sollten dicht an dicht liegen, aber nicht übereinander.
3. Befeuchten: Besprühe die Samen und die Erde gründlich mit Wasser aus der Sprühflasche. Die Erde sollte feucht, aber nicht nass sein.
4. Abdecken: Decke die Schale mit einem Deckel, einer Plastikfolie oder einem feuchten Tuch ab. Das sorgt für eine hohe Luftfeuchtigkeit, die die Keimung fördert.
5. Dunkel lagern: Stelle die abgedeckte Schale an einen dunklen Ort. Das ist wichtig, damit die Samen keimen. Kontrolliere die Samen täglich und besprühe sie bei Bedarf mit Wasser, um sie feucht zu halten.
Die Wachstumsphase: Licht und Liebe
Sobald die Samen gekeimt sind, brauchen sie Licht zum Wachsen.
1. Lichtexposition: Nach 2-3 Tagen, wenn die Samen gekeimt sind und kleine grüne Sprossen zeigen, kannst du die Abdeckung entfernen und die Schale an einen hellen Ort stellen. Ein Fensterbrett mit indirektem Sonnenlicht ist ideal. Vermeide direkte Mittagssonne, da sie die zarten Sprossen verbrennen kann.
2. Bewässerung: Besprühe das Weizengras weiterhin täglich mit Wasser, um die Erde feucht zu halten. Achte darauf, dass das Wasser gut abfließen kann, um Staunässe zu vermeiden.
3. Drehen: Drehe die Schale regelmäßig, damit das Weizengras gleichmäßig wächst.
Ernte und Genuss: Die Belohnung
Nach etwa einer Woche ist dein Weizengras erntereif.
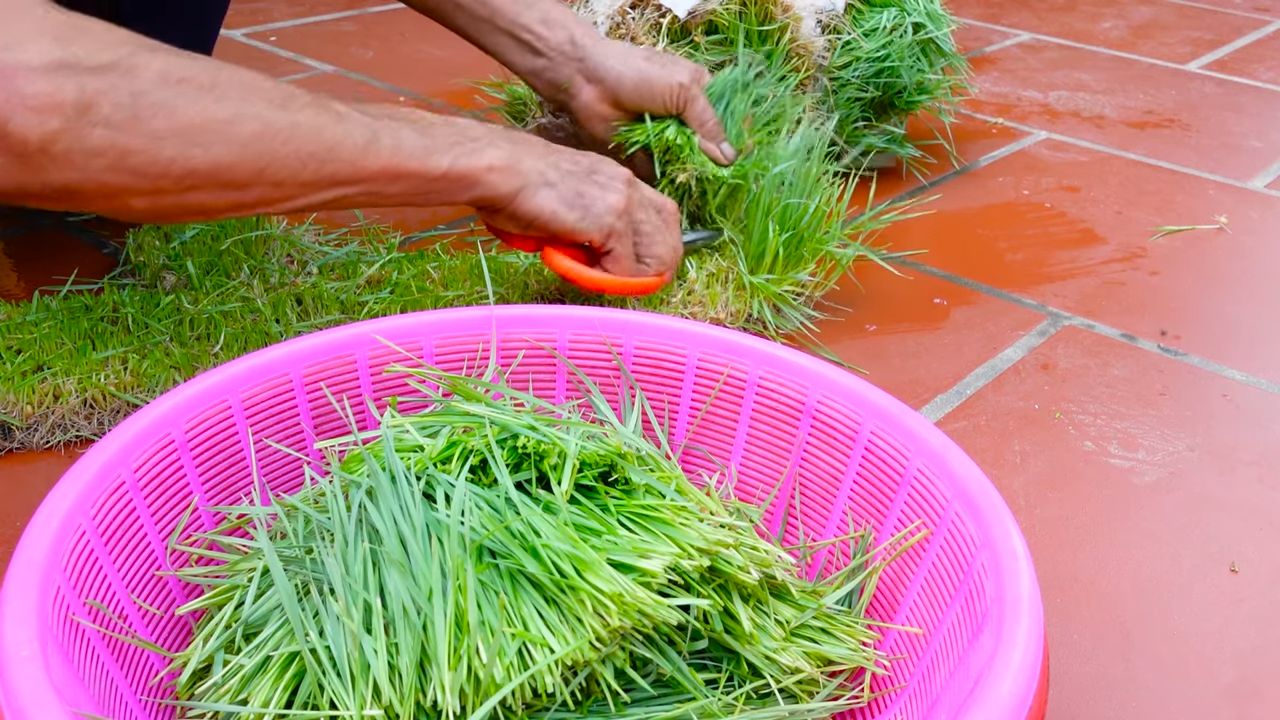
1. Erntezeitpunkt: Das Weizengras ist erntereif, wenn es etwa 10-15 cm hoch ist. Es sollte saftig grün und kräftig sein.
2. Ernten: Schneide das Weizengras mit einer Schere oder einem Messer knapp über der Erde ab.
3. Verwendung: Du kannst das Weizengras sofort verwenden oder es im Kühlschrank aufbewahren. Am besten ist es, es innerhalb von ein paar Tagen zu verbrauchen.
Wie du Weizengras verwendest:
* Weizengrassaft: Das ist die häufigste Art, Weizengras zu konsumieren. Du brauchst dafür einen Entsafter, der speziell für Gräser geeignet ist.
* Smoothies: Gib eine Handvoll Weizengras in deinen Smoothie. Es verleiht ihm eine extra Portion Nährstoffe.
* Salate: Schneide das Weizengras klein und gib es in deinen Salat.
* Als Dekoration: Verwende Weizengras als essbare Dekoration für deine Gerichte.
Tipps und Tricks für erfolgreiches Weizengras:
* Hygiene: Achte auf Sauberkeit, um Schimmelbildung zu vermeiden. Spüle die Samen gründlich ab und verwende saubere Behälter.
* Belüftung: Sorge für eine gute Belüftung, um Schimmelbildung zu verhindern.
* Nicht zu viel Wasser: Vermeide Staunässe, da dies zu Schimmelbildung führen kann.
* Regelmäßige Ernte: Ernte das Weizengras regelmäßig, um ein Überwachsen zu verhindern.
* Mehrere Schalen: Säe mehrere Schalen Weizengras zeitversetzt aus, um kontinuierlich frisches Weizengras zu haben.
Häufige Probleme und Lösungen:
* Schimmelbildung: Wenn sich Schimmel bildet, entferne die betroffenen Stellen und sorge für eine bessere Belüftung.
* Langsames Wachstum: Wenn das Weizengras langsam wächst, stelle es an einen helleren Ort und dünge es bei Bedarf mit einem organischen Dünger.
* Vergilbung: Wenn das Weizengras vergilbt, kann es an Wassermangel oder Nährstoffmangel liegen. Gieße es regelmäßig und dünge es bei Bedarf.
Warum Weizengras so gesund ist:
Weizengras ist ein wahres Superfood! Es ist reich an Vitaminen, Mineralstoffen, Enzymen und Antioxidantien. Es soll entgiftend wirken, das Immunsystem stärken und die Energie steigern. Ich persönlich fühle mich viel fitter und vitaler, seit ich regelmäßig Weizengras konsumiere.
Fazit:
Weizengras selber zu ziehen ist wirklich einfach und macht Spaß. Es ist eine tolle Möglichkeit, frische, gesunde Zutaten in deine Ernährung einzubauen und deinen Körper mit wichtigen Nährstoffen zu versorgen. Probiere es aus und lass mich wissen, wie es dir gefällt! Viel Erfolg!

Conclusion
So, there you have it! Growing your own wheatgrass with just water is not only surprisingly simple, but also an incredibly rewarding experience. Forget expensive juice bar visits and pre-packaged greens that have lost their vitality. With this straightforward method, you can cultivate a vibrant, nutrient-rich crop of fresh wheatgrass right in your own home, ready to be juiced, blended into smoothies, or even enjoyed as a healthy snack for your pets.
Why is this DIY trick a must-try? Because it puts you in control. You know exactly what’s going into your wheatgrass – pure water and sunshine. No hidden chemicals, no questionable growing practices, just wholesome goodness. Plus, the satisfaction of nurturing something from seed to sprout is a unique and fulfilling experience. It’s a fantastic way to connect with nature, even in the middle of a bustling city.
But the benefits don’t stop there. Freshly grown wheatgrass is packed with vitamins, minerals, and antioxidants, offering a powerful boost to your overall health and well-being. It’s a natural detoxifier, energizer, and immune system supporter, all rolled into one potent little plant. And let’s not forget the cost savings! Growing your own wheatgrass is significantly cheaper than buying it pre-grown or juiced.
Looking for variations? Absolutely! Experiment with different types of wheatgrass seeds to find your favorite flavor profile. You can also try adding a small amount of organic fertilizer to the water after the initial sprouting phase to further enhance growth. Consider using different containers, from shallow trays to repurposed plastic containers, to find what works best for your space and needs. You can even get creative with your setup, using grow lights to supplement natural sunlight during the darker months.
Ready to embark on your wheatgrass growing adventure? We encourage you to give this simple DIY trick a try. It’s easy, affordable, and incredibly beneficial. Once you’ve harvested your first batch of vibrant green goodness, be sure to share your experience with us! We’d love to hear your tips, tricks, and favorite ways to use your homegrown wheatgrass. Post photos of your growing setup, share your favorite wheatgrass recipes, and let us know how this DIY project has impacted your health and well-being. Let’s create a community of wheatgrass enthusiasts, sharing our knowledge and inspiring others to embrace the power of homegrown nutrition. This method of growing wheatgrass with water is a game changer.
Now, let’s address some frequently asked questions to ensure your success:
Frequently Asked Questions (FAQ)
What type of wheatgrass seeds should I use?
The most common type of wheatgrass seed is hard red winter wheat. It’s readily available online and at most health food stores. Look for organic, untreated seeds to ensure the purest and healthiest wheatgrass. Avoid seeds that are labeled for animal feed, as they may not be suitable for human consumption. Spelt wheat is another option, offering a slightly sweeter flavor. Experiment to find the variety you prefer.
How much wheatgrass seed should I use?
A good rule of thumb is to use about 1/4 to 1/2 cup of wheatgrass seeds per 10×10 inch tray. You want to create a dense, even layer of seeds without overcrowding them. Overcrowding can lead to mold growth and stunted growth. Adjust the amount of seed based on the size of your container.
How often should I water the wheatgrass?
During the initial soaking and sprouting phase (the first 2-3 days), keep the seeds consistently moist. You can achieve this by misting them several times a day or covering them with a damp cloth. Once the seeds have sprouted and you’ve transferred them to the growing tray, water them once or twice a day, ensuring the soil is consistently damp but not waterlogged. Overwatering can lead to mold, while underwatering can cause the wheatgrass to dry out and wilt.
How much sunlight does wheatgrass need?
Wheatgrass thrives in bright, indirect sunlight. Avoid placing it in direct sunlight, especially during the hottest part of the day, as this can scorch the delicate leaves. A windowsill that receives morning sun or a spot near a bright window is ideal. If you don’t have access to sufficient natural light, you can supplement with grow lights.
How long does it take for wheatgrass to grow?
From soaking the seeds to harvesting the wheatgrass, the entire process typically takes about 7-10 days. The wheatgrass is ready to harvest when it reaches a height of about 4-6 inches and has developed a vibrant green color.
How do I harvest wheatgrass?
Use sharp scissors or a knife to cut the wheatgrass about an inch above the soil line. This allows for a second harvest, although the second growth may not be as robust as the first. Harvest only what you need at a time to ensure maximum freshness.
How do I store harvested wheatgrass?
Wrap the harvested wheatgrass in a damp paper towel and store it in a sealed plastic bag in the refrigerator. It will stay fresh for about a week. For longer storage, you can freeze the wheatgrass juice in ice cube trays.
What if I see mold growing on my wheatgrass?
Mold is a common problem when growing wheatgrass, especially in humid environments. To prevent mold, ensure good air circulation around the wheatgrass. Avoid overcrowding the seeds and water properly. If you see mold, remove the affected areas immediately. You can also try spraying the wheatgrass with a diluted solution of hydrogen peroxide and water (1 part hydrogen peroxide to 10 parts water).
Can I reuse the soil after harvesting wheatgrass?
It’s generally not recommended to reuse the soil after harvesting wheatgrass, as it may contain mold spores and depleted nutrients. It’s best to start with fresh soil for each batch of wheatgrass.
Is wheatgrass safe for pets?
Yes, wheatgrass is generally safe and even beneficial for pets, especially cats and dogs. It can help with digestion and provide essential vitamins and minerals. However, introduce it gradually and in small amounts to avoid digestive upset.
Can I grow wheatgrass outdoors?
Yes, you can grow wheatgrass outdoors, but it’s important to protect it from extreme temperatures and direct sunlight. Choose a shady spot with well-draining soil. Be aware that outdoor wheatgrass may be more susceptible to pests and diseases.
What are the benefits of drinking wheatgrass juice?
Wheatgrass juice is a powerhouse of nutrients, including vitamins, minerals, antioxidants, and enzymes. It’s believed to have numerous health benefits, such as boosting energy levels, detoxifying the body, strengthening the immune system, and improving digestion. However, it’s important to note that scientific evidence supporting all of these claims is limited.
How much wheatgrass juice should I drink?
Start with a small amount of wheatgrass juice, such as 1-2 ounces, and gradually increase the amount as your body adjusts. Some people may experience mild side effects, such as nausea or diarrhea, when they first start drinking wheatgrass juice. It’s best to drink wheatgrass juice on an empty stomach for optimal absorption.
Can I blend wheatgrass into smoothies?
Yes, blending wheatgrass into smoothies is a great way to incorporate it into your diet. The strong flavor of wheatgrass can be masked by other ingredients, such as fruits, vegetables, and yogurt.
What if my wheatgrass doesn’t grow?
If your wheatgrass doesn’t grow, there could be several reasons. Make sure you’re using viable seeds, providing adequate moisture and sunlight, and maintaining good air circulation. Check for signs of mold or pests. If you’re still having trouble, try starting with a smaller batch of seeds to troubleshoot the problem.
Leave a Comment