
Growing Water Spinach Easy? Absolutely! And I’m here to tell you it’s more achievable than you might think. Forget those complicated gardening guides – we’re diving into a simple, rewarding DIY project that will have you harvesting fresh, delicious greens in no time.
Water spinach, also known as Ong Choy or Kang Kong, isn’t just a tasty addition to stir-fries and soups; it boasts a rich history, particularly in Southeast Asian cuisine. For centuries, it’s been a staple, providing essential nutrients and a vibrant flavor. But you don’t need to travel to Asia to enjoy this versatile vegetable.
Why should you try this DIY trick? Well, for starters, growing water spinach easy means you have access to fresh, organic produce right at your fingertips. No more questionable supermarket greens! Plus, it’s incredibly fast-growing, offering a quick return on your gardening efforts. Imagine the satisfaction of harvesting your own homegrown water spinach and whipping up a delicious, healthy meal. This guide will provide you with simple, step-by-step instructions, ensuring even the most novice gardener can succeed. Let’s get started and unlock the secrets to cultivating this amazing plant!

Growing Water Spinach (Ong Choy) at Home: A Beginner’s Guide
Hey there, fellow gardening enthusiasts! Ever wanted to grow your own fresh, delicious water spinach (also known as Ong Choy)? It’s surprisingly easy, even if you don’t have a huge garden. I’m going to walk you through everything you need to know to cultivate this amazing vegetable right at home. Get ready for some homegrown goodness!
What You’ll Need
Before we dive in, let’s gather our supplies. This is a pretty low-fuss project, so the list is short and sweet:
* Water Spinach Seeds or Cuttings: You can find these online or at Asian grocery stores. Seeds are readily available, but cuttings can give you a head start.
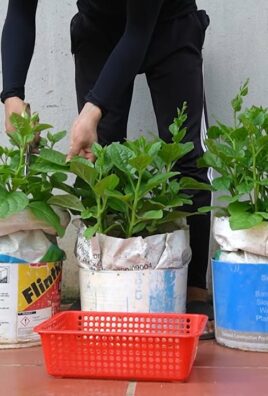
* A Container: A large bucket, tub, or even a kiddie pool will work. Aim for something at least 12 inches deep.
* Potting Soil: A good quality potting mix is essential for healthy growth.
* Water: Tap water is fine, but letting it sit out for a day or two to dechlorinate is even better.
* Sunlight: Water spinach loves sunshine! Aim for at least 6 hours of direct sunlight per day.
* Optional: Fertilizer (a balanced liquid fertilizer works great)
Choosing Your Growing Method: Seeds vs. Cuttings
You have two main options for starting your water spinach: seeds or cuttings. Both are effective, but they have slightly different pros and cons.
* Seeds:
* Pros: Readily available, often cheaper, and you get to experience the whole growing process from start to finish.
* Cons: Takes longer to germinate and establish compared to cuttings.
* Cuttings:
* Pros: Faster growth, you can harvest sooner, and it’s a great way to propagate from existing plants.
* Cons: Might be harder to find, and you need a source plant to get them from.
I’ll cover both methods in detail below.
Growing Water Spinach from Seeds: A Step-by-Step Guide
This is my preferred method, as I love watching the tiny seeds sprout and grow into lush, edible greens.
1. Soaking the Seeds: To kickstart germination, soak your water spinach seeds in warm water for 12-24 hours. This helps soften the seed coat and encourages sprouting. I usually put them in a small bowl and leave them on the counter overnight.
2. Preparing the Container: Fill your container with potting soil, leaving about 2-3 inches of space at the top. Water the soil thoroughly until it’s evenly moist but not soggy. You want it damp, not swimming.
3. Sowing the Seeds: Scatter the soaked seeds evenly over the surface of the soil. Don’t overcrowd them; give them some space to grow. Gently press the seeds into the soil, covering them with a thin layer (about ¼ inch) of soil.
4. Watering and Germination: Gently water the surface of the soil again, being careful not to dislodge the seeds. Keep the soil consistently moist during the germination period. You can cover the container with a clear plastic bag or plastic wrap to create a humid environment, which will speed up germination. Just make sure to poke a few holes for ventilation.
5. Providing Sunlight: Place the container in a sunny location where it will receive at least 6 hours of direct sunlight per day. If you don’t have enough natural sunlight, you can supplement with a grow light.
6. Germination Time: Water spinach seeds typically germinate in 5-10 days. Once the seedlings emerge, remove the plastic covering (if you used one).
7. Thinning the Seedlings: Once the seedlings have developed a few sets of true leaves, thin them out, keeping the strongest and healthiest plants. Aim for a spacing of about 4-6 inches between plants. This gives them enough room to grow and prevents overcrowding.
8. Watering Regularly: Water spinach loves water, so keep the soil consistently moist. Check the soil moisture daily and water whenever the top inch feels dry.
9. Fertilizing (Optional): To encourage vigorous growth, you can fertilize your water spinach every 2-3 weeks with a balanced liquid fertilizer. Follow the instructions on the fertilizer package. I usually dilute the fertilizer to half strength to avoid burning the plants.
Growing Water Spinach from Cuttings: A Faster Route
If you have access to water spinach cuttings, this method is a quicker way to get started.
1. Obtaining Cuttings: Ask a friend or neighbor who grows water spinach for some cuttings, or purchase them online. Look for healthy stems that are about 6-8 inches long.
2. Preparing the Cuttings: Remove the leaves from the bottom 2-3 inches of the cuttings. This will encourage root development.
3. Rooting the Cuttings: You have two options for rooting the cuttings:
* Water Rooting: Place the cuttings in a jar or glass of water, making sure that the bottom 2-3 inches of the stems are submerged. Change the water every 1-2 days to keep it fresh. Roots should start to appear in about a week.
* Direct Planting: You can also plant the cuttings directly into the prepared container of potting soil. Make sure the soil is moist and keep it consistently watered.
4. Planting the Rooted Cuttings (if water rooting): Once the cuttings have developed a good root system (about 1-2 inches long), gently transplant them into the prepared container of potting soil. Space them about 4-6 inches apart.
5. Watering and Sunlight: Water the newly planted cuttings thoroughly and place the container in a sunny location. Keep the soil consistently moist.
6. Fertilizing (Optional): As with seeds, you can fertilize the cuttings every 2-3 weeks with a balanced liquid fertilizer to promote growth.
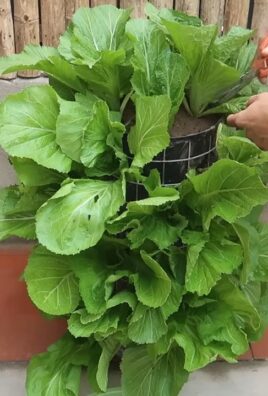
Maintaining Your Water Spinach
Once your water spinach is established, it’s relatively low-maintenance. Here are a few tips to keep it thriving:
* Watering: Consistent moisture is key. Don’t let the soil dry out completely.
* Sunlight: Ensure your plants get at least 6 hours of direct sunlight per day.
* Fertilizing: Fertilize regularly, especially if you’re harvesting frequently.
* Pest Control: Water spinach is generally pest-resistant, but keep an eye out for aphids or other common garden pests. If you spot any, you can usually wash them off with a strong stream of water or use an insecticidal soap.
* Weeding: Remove any weeds that pop up in the container to prevent them from competing with your water spinach for nutrients and water.
Harvesting Your Water Spinach
The best part! You can start harvesting your water spinach about 4-6 weeks after planting from seeds, or sooner if you started from cuttings.
1. Harvesting Technique: Use scissors or a sharp knife to cut the stems about 4-6 inches from the top. This encourages the plant to produce new shoots from the cut stems, resulting in a continuous harvest.
2. Harvesting Frequency: You can harvest your water spinach every 1-2 weeks, depending on how quickly it grows.
3. Storage: Freshly harvested water spinach is best used immediately. However, you can store it in the refrigerator for a few days. Wrap it in a damp paper towel and place it in a plastic bag.
Troubleshooting
Even with the best care, you might encounter a few challenges. Here are some common issues and how to address them:
* Yellowing Leaves: This could be a sign of overwatering, underwatering, or nutrient deficiency. Check the soil moisture and adjust your watering accordingly. If the soil is consistently moist, you might be overwatering. If it’s dry, you need to water more frequently. You can also try fertilizing with a balanced liquid fertilizer.
* Slow Growth: This could be due to insufficient sunlight, poor soil, or lack of nutrients. Make sure your plants are getting enough sunlight and consider fertilizing them. You might also want to amend the soil with compost or other organic matter.
* Pests: As mentioned earlier, water spinach is generally pest-resistant, but keep an eye out for aphids or other common garden pests. Wash them off with water or use an insecticidal soap.
Enjoying Your Homegrown Water Spinach
Now that you’ve successfully grown your own water spinach, it’s time to enjoy the fruits (or rather, vegetables) of your labor! Water spinach is a versatile vegetable that can be used in a variety of dishes. Here are a few ideas:
* Stir-fries: Water spinach is a classic ingredient in stir-fries. It pairs well with garlic, ginger, and soy sauce.
* Soups:

Conclusion
So, there you have it! Growing water spinach, also known as kangkong or ong choy, at home is not only surprisingly easy but also incredibly rewarding. Forget those wilted, overpriced bunches at the grocery store. With this simple DIY trick, you can have a constant supply of fresh, crisp, and delicious water spinach right at your fingertips.
Why is this a must-try? Because it’s faster, fresher, and frankly, more fun than you might think. Imagine the satisfaction of harvesting your own greens, knowing exactly where they came from and what went into growing them. Plus, the vibrant green color and slightly nutty flavor of homegrown water spinach are simply unmatched.
But the best part? This method is incredibly adaptable. Want to grow it indoors? No problem! A sunny windowsill or a grow light will do the trick. Prefer a larger harvest? Scale up your container size and plant more seeds. You can even experiment with different varieties of water spinach to find your favorite flavor profile. Consider trying the ‘Chinese Morning Glory’ variety for a slightly sweeter taste or the ‘White Stem’ variety for a more tender texture.
Don’t be afraid to get creative! You can also add companion plants like basil or mint around the edges of your container to deter pests and add a pleasant aroma to your growing area. Another variation is to use a hydroponic system for even faster growth and higher yields. While soil-based methods are perfectly effective, hydroponics can provide a nutrient-rich environment that accelerates the growth process.
We’ve covered the basics, but the real magic happens when you put this knowledge into practice. The key to successful water spinach cultivation lies in consistent moisture and plenty of sunlight. Remember to keep the soil consistently damp, but not waterlogged, and provide at least six hours of direct sunlight per day.
Now, it’s your turn! We wholeheartedly encourage you to try this DIY trick for growing water spinach at home. It’s a simple, sustainable, and incredibly satisfying way to add fresh, healthy greens to your diet. And once you’ve experienced the joy of harvesting your own water spinach, we’re confident you’ll be hooked.
Don’t keep your success a secret! We’d love to hear about your experience growing water spinach. Share your tips, tricks, and photos in the comments below. Let’s build a community of home gardeners and spread the joy of fresh, homegrown food. Happy growing!
Frequently Asked Questions (FAQ)
What exactly is water spinach, and what does it taste like?
Water spinach (Ipomoea aquatica), also known as kangkong, ong choy, or swamp cabbage, is a semi-aquatic leafy green vegetable commonly used in Asian cuisine. It has long, hollow stems and arrow-shaped leaves. The taste is often described as mild, slightly nutty, and subtly sweet, similar to spinach but with a more refreshing and crisp texture. It’s incredibly versatile and can be stir-fried, steamed, boiled, or added to soups and salads.
How long does it take to grow water spinach from seed?
One of the great things about water spinach is its rapid growth rate. Under optimal conditions, you can expect to harvest your first crop in as little as 4-6 weeks from planting the seeds. The exact time will depend on factors such as temperature, sunlight, and nutrient availability. Soaking the seeds overnight before planting can also help speed up germination.
What kind of soil is best for growing water spinach?
Water spinach thrives in rich, well-draining soil that retains moisture. A good mix would be equal parts of potting soil, compost, and perlite or vermiculite. The compost provides essential nutrients, while the perlite or vermiculite improves drainage and aeration. The ideal pH level for water spinach is between 6.0 and 7.0.
How much sunlight does water spinach need?
Water spinach is a sun-loving plant and requires at least 6 hours of direct sunlight per day to thrive. If you’re growing it indoors, place it near a sunny window or use a grow light to supplement natural light. Insufficient sunlight can lead to leggy growth and reduced yields.
How often should I water my water spinach?
Consistent moisture is crucial for growing water spinach. The soil should be kept consistently damp, but not waterlogged. Water deeply whenever the top inch of soil feels dry to the touch. During hot weather, you may need to water more frequently. Consider using a self-watering container or adding mulch to help retain moisture.
What are some common pests and diseases that affect water spinach?
While relatively pest-resistant, water spinach can occasionally be affected by aphids, spider mites, and whiteflies. These pests can be controlled with insecticidal soap or neem oil. Fungal diseases like powdery mildew can also occur, especially in humid conditions. Ensure good air circulation and avoid overhead watering to prevent fungal problems.
Can I grow water spinach in water only (hydroponically)?
Yes, water spinach can be grown hydroponically. This method involves growing the plants in nutrient-rich water without soil. Hydroponic systems can provide faster growth and higher yields compared to soil-based methods. You can use a simple DIY hydroponic setup or purchase a commercially available system.
How do I harvest water spinach?
Harvesting water spinach is easy. Simply cut the stems about 4-6 inches above the soil line. The plant will then regrow, allowing for multiple harvests. You can harvest regularly, as needed, to encourage continuous growth. It’s best to harvest in the morning when the leaves are at their freshest.
Can I eat the entire water spinach plant?
Yes, you can eat the entire water spinach plant, including the leaves and stems. However, the stems can become tougher as the plant matures, so it’s best to harvest them when they are young and tender.
Is water spinach nutritious?
Absolutely! Water spinach is a nutritional powerhouse. It’s packed with vitamins A and C, iron, calcium, and fiber. It’s also a good source of antioxidants, which can help protect against cell damage. Adding water spinach to your diet is a great way to boost your overall health and well-being.
Can I grow water spinach in colder climates?
Water spinach is a tropical plant and thrives in warm temperatures. It’s best grown in USDA hardiness zones 9-11. In colder climates, you can still grow water spinach indoors or in a greenhouse, providing you can maintain a temperature of at least 65°F (18°C).
How do I store harvested water spinach?
To store harvested water spinach, wrap it in a damp paper towel and place it in a plastic bag in the refrigerator. It will stay fresh for up to 3-4 days. Avoid washing it before storing, as this can promote spoilage.
What are some popular ways to cook water spinach?
Water spinach is incredibly versatile and can be used in a variety of dishes. Some popular ways to cook it include stir-frying with garlic and chili, steaming and serving with a dipping sauce, adding it to soups and stews, or using it in salads. It pairs well with Asian flavors like soy sauce, oyster sauce, and ginger.
Can I save seeds from my water spinach plant for future planting?
Yes, you can save seeds from your water spinach plant. Allow some of the plants to mature fully and produce flowers. Once the flowers dry and form seed pods, collect the pods and allow them to dry completely. Then, extract the seeds and store them in a cool, dry place until you’re ready to plant them.
Is growing water spinach legal everywhere?
While water spinach is a popular vegetable in many parts of the world, it is considered an invasive species in some areas of the United States. Before growing water spinach, it’s essential to check with your local agricultural extension office to ensure that it is legal to grow in your area. In some states, it may be prohibited or require a permit.

Leave a Comment