
Growing tomatoes at home can feel like a daunting task, right? But what if I told you that with a few clever tricks and DIY hacks, you could be harvesting juicy, sun-ripened tomatoes right from your own backyard, even if you think you have a black thumb? Forget those bland, store-bought tomatoes – imagine the taste of a homegrown tomato bursting with flavor in your summer salads or homemade sauces!
The history of cultivating tomatoes is fascinating, dating back to the Aztecs and Incas. They weren’t always the beloved fruit (yes, fruit!) we know today; in fact, they were initially feared in Europe! But now, tomatoes are a staple in cuisines worldwide, and there’s nothing quite like the satisfaction of growing your own.
Why do you need these DIY tricks? Well, let’s face it, growing tomatoes at home isn’t always straightforward. Pests, diseases, and nutrient deficiencies can all sabotage your efforts. But fear not! This article is packed with simple, effective DIY solutions that will help you overcome these challenges and achieve a bountiful harvest. I’m going to share my favorite tips and tricks that I’ve learned over the years, so you can enjoy the freshest, most delicious tomatoes imaginable. Get ready to transform your garden into a tomato paradise!
Tomatenanbau im eigenen Garten: Ein umfassender DIY-Leitfaden
Hallo liebe Gartenfreunde! Ich freue mich, euch heute in die wunderbare Welt des Tomatenanbaus einzuführen. Es gibt kaum etwas Befriedigenderes, als eine saftige, sonnengereifte Tomate aus dem eigenen Garten zu ernten. Und glaubt mir, es ist gar nicht so schwer, wie man vielleicht denkt! Mit dieser detaillierten Anleitung zeige ich euch, wie ihr Schritt für Schritt eure eigenen Tomaten erfolgreich anbauen könnt. Los geht’s!
Was ihr für den Tomatenanbau benötigt:
* Tomatensamen oder Jungpflanzen: Die Grundlage für eure Tomatenernte. Wählt Sorten, die euch schmecken und für euer Klima geeignet sind.
* Anzuchterde: Spezielle Erde für die Anzucht, die nährstoffarm und locker ist.
* Anzuchttöpfe oder -schalen: Kleine Behälter für die Aussaat.
* Größere Töpfe oder ein Beet: Für die spätere Auspflanzung der Tomatenpflanzen.
* Tomatenerde: Nährstoffreiche Erde, die speziell auf die Bedürfnisse von Tomaten abgestimmt ist.
* Pflanzstäbe oder Rankgitter: Zur Unterstützung der wachsenden Tomatenpflanzen.
* Gießkanne oder Gartenschlauch: Für die regelmäßige Bewässerung.
* Tomatendünger: Für eine optimale Nährstoffversorgung während der Wachstumsphase.
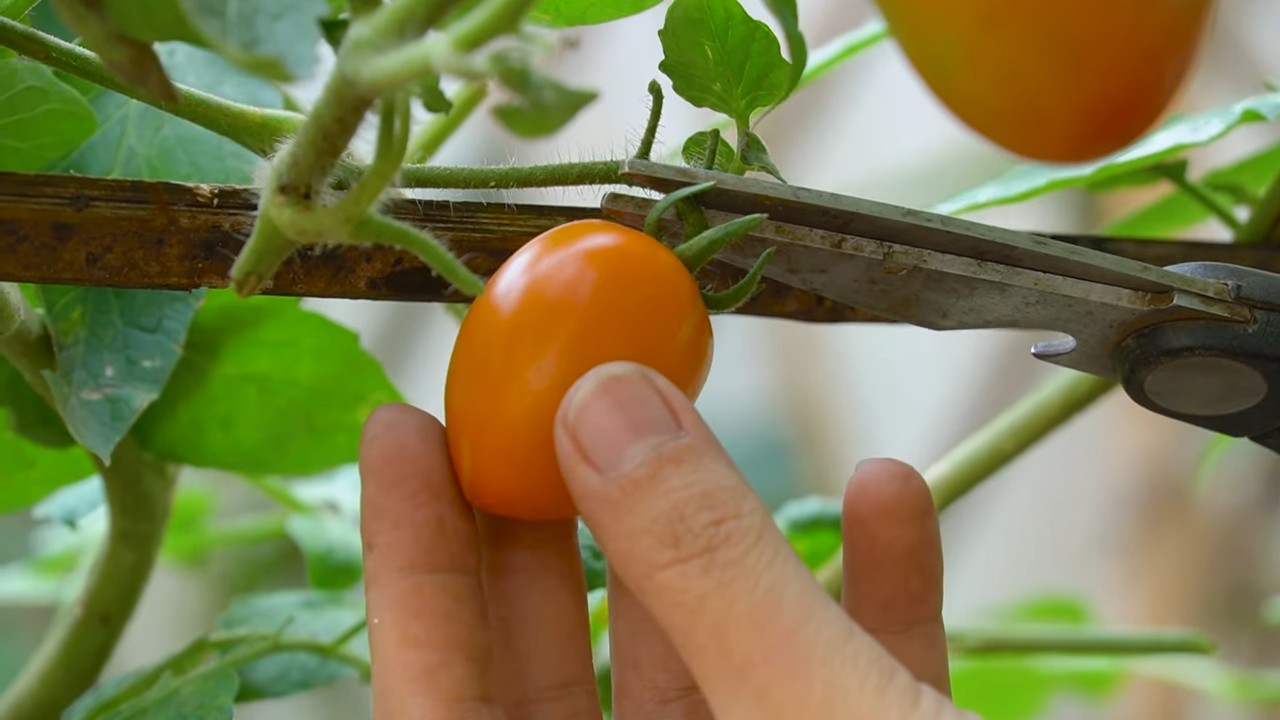
* Gartenschere oder Messer: Zum Ausgeizen der Seitentriebe.
* Geduld und Liebe: Das Wichtigste überhaupt!
Aussaat und Anzucht (ca. 6-8 Wochen vor dem letzten Frost):
1. Vorbereitung der Anzuchtgefäße: Füllt eure Anzuchttöpfe oder -schalen mit Anzuchterde. Drückt die Erde leicht an.
2. Aussaat der Tomatensamen: Legt 2-3 Samen pro Topf etwa 0,5-1 cm tief in die Erde. Bedeckt die Samen leicht mit Erde und befeuchtet sie vorsichtig mit einer Sprühflasche.
3. Der richtige Standort: Stellt die Anzuchtgefäße an einen warmen und hellen Ort. Eine Fensterbank mit Südausrichtung ist ideal. Die optimale Keimtemperatur liegt bei 20-25°C.
4. Feuchtigkeit halten: Haltet die Erde gleichmäßig feucht, aber nicht nass. Vermeidet Staunässe, da dies zu Schimmelbildung führen kann.
5. Keimung abwarten: Nach etwa 7-14 Tagen sollten die ersten Keimlinge erscheinen.
6. Pikieren der Jungpflanzen: Sobald die Keimlinge ihre ersten richtigen Blätter (nach den Keimblättern) entwickelt haben, ist es Zeit zum Pikieren. Das bedeutet, dass ihr die kleinen Pflänzchen vorsichtig in größere Töpfe umpflanzt.
* Füllt die größeren Töpfe mit Tomatenerde.
* Lockert die Erde um die Jungpflanzen vorsichtig mit einem Pikierstab oder einem Löffel.
* Hebt die Jungpflanzen vorsichtig aus der Erde und achtet darauf, die Wurzeln nicht zu beschädigen.
* Setzt die Jungpflanzen in die neuen Töpfe und füllt die Töpfe mit Erde auf. Drückt die Erde leicht an und gießt die Pflanzen vorsichtig an.
7. Weiterpflege der Jungpflanzen: Stellt die pikierten Jungpflanzen wieder an einen hellen und warmen Ort. Gießt sie regelmäßig und düngt sie bei Bedarf mit einem speziellen Tomatendünger.
Vorbereitung des Beetes oder der Töpfe:
1. Auswahl des Standorts: Tomaten lieben die Sonne! Wählt einen sonnigen Standort mit mindestens 6-8 Stunden direkter Sonneneinstrahlung pro Tag.
2. Boden vorbereiten: Lockert den Boden gründlich auf und entfernt Unkraut und Steine. Mischt Kompost oder gut verrotteten Mist unter die Erde, um sie mit Nährstoffen anzureichern.
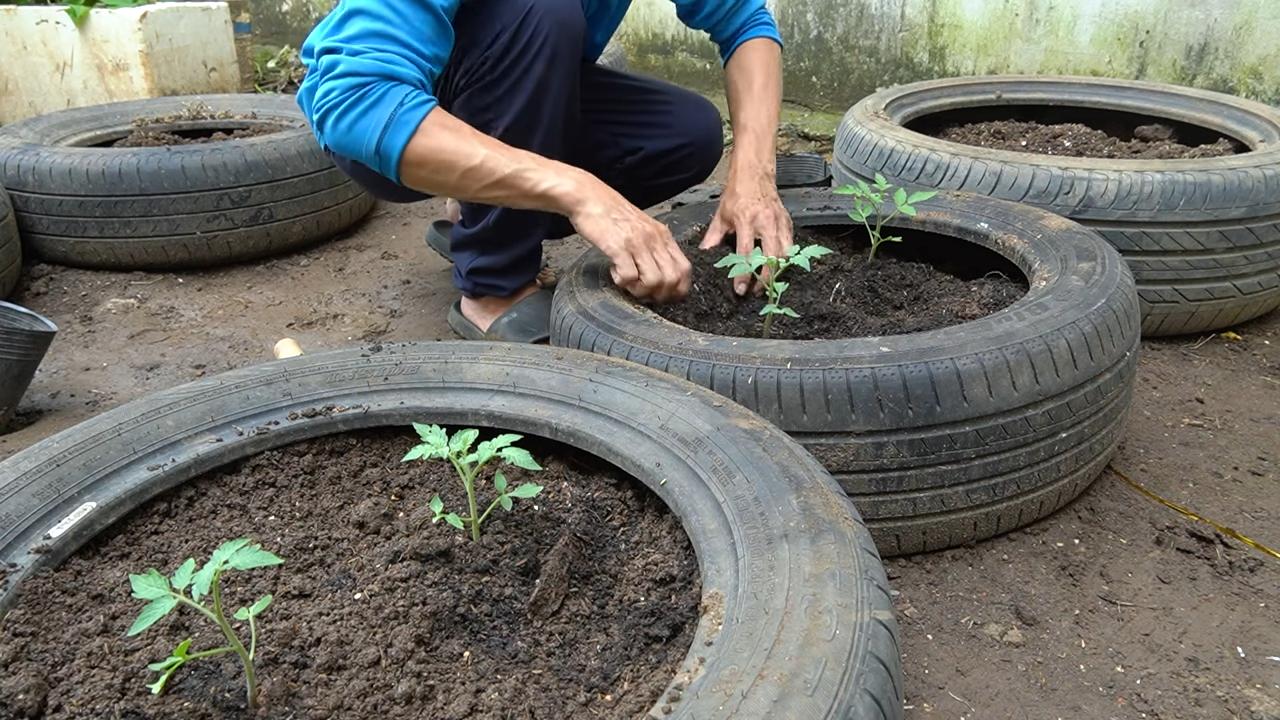
3. Töpfe vorbereiten: Wenn ihr eure Tomaten in Töpfen anbauen möchtet, wählt ausreichend große Töpfe (mindestens 10 Liter Volumen pro Pflanze). Füllt die Töpfe mit Tomatenerde.
Auspflanzen der Tomatenpflanzen (nach dem letzten Frost):
1. Abhärten der Jungpflanzen: Bevor ihr die Tomatenpflanzen ins Freie pflanzt, solltet ihr sie einige Tage lang abhärten. Stellt sie tagsüber für einige Stunden ins Freie und holt sie abends wieder herein. Dadurch gewöhnen sie sich an die veränderten Bedingungen.
2. Pflanzlöcher ausheben: Hebt Pflanzlöcher aus, die etwas größer sind als die Wurzelballen der Tomatenpflanzen.
3. Tomatenpflanzen einsetzen: Setzt die Tomatenpflanzen vorsichtig in die Pflanzlöcher. Achtet darauf, dass der Wurzelballen nicht beschädigt wird.
4. Mit Erde auffüllen: Füllt die Pflanzlöcher mit Erde auf und drückt die Erde leicht an.
5. Angießen: Gießt die Tomatenpflanzen gründlich an.
6. Pflanzstäbe oder Rankgitter anbringen: Bringt Pflanzstäbe oder Rankgitter an, um die wachsenden Tomatenpflanzen zu unterstützen.
Pflege der Tomatenpflanzen:
1. Gießen: Gießt die Tomatenpflanzen regelmäßig, besonders während trockener Perioden. Gießt am besten morgens, damit die Blätter über den Tag abtrocknen können. Vermeidet es, die Blätter direkt zu gießen, da dies Pilzkrankheiten fördern kann.
2. Düngen: Düngt die Tomatenpflanzen regelmäßig mit einem speziellen Tomatendünger. Beginnt mit dem Düngen etwa 2-3 Wochen nach dem Auspflanzen.
3. Ausgeizen: Entfernt regelmäßig die Seitentriebe, die in den Blattachseln wachsen. Dies wird als “Ausgeizen” bezeichnet. Das Ausgeizen fördert das Wachstum der Haupttriebe und sorgt für eine bessere Belüftung der Pflanzen.
4. Mulchen: Mulcht den Boden um die Tomatenpflanzen mit Stroh, Heu oder Rasenschnitt. Dies hilft, die Feuchtigkeit im Boden zu halten und Unkraut zu unterdrücken.
5. Krankheiten und Schädlinge: Achtet auf Anzeichen von Krankheiten und Schädlingen. Bei Bedarf könnt ihr biologische Pflanzenschutzmittel einsetzen.
Erntezeit:
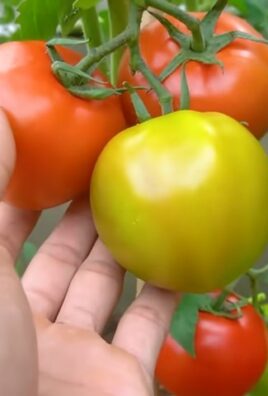
1. Reife erkennen: Tomaten sind reif, wenn sie ihre typische Farbe erreicht haben und sich leicht vom Stiel lösen lassen.
2. Ernten: Erntet die reifen Tomaten regelmäßig, um die Bildung neuer Früchte zu fördern.
Zusätzliche Tipps und Tricks:
* Sortenwahl: Wählt Tomatensorten, die für euer Klima und eure Bedürfnisse geeignet sind. Es gibt eine riesige Auswahl an verschiedenen Sorten, von kleinen Cherrytomaten bis hin zu großen Fleischtomaten.
* Fruchtfolge: Baut Tomaten nicht jedes Jahr am selben Standort an, um Krankheiten und Schädlingen vorzubeugen.
* Begleitpflanzen: Pflanzt Basilikum, Ringelblumen oder Kapuzinerkresse in die Nähe eurer Tomatenpflanzen. Diese Pflanzen können Schädlinge abwehren und das Wachstum der Tomaten fördern.
* Eigene Samen gewinnen: Wenn ihr eine besonders leckere Tomatensorte habt, könnt ihr die Samen für das nächste Jahr gewinnen. Lasst die Tomaten dafür vollständig ausreifen und entnehmt die Samen. Trocknet die Samen gut ab und bewahrt sie an einem kühlen und trockenen Ort auf.
Häufige Probleme und Lösungen:
* Blütenendfäule: Braune, ledrige Flecken am Blütenende der Tomaten. Ursache ist meist Calciummangel. Lösung: Regelmäßig mit einem calciumhaltigen Dünger düngen und auf eine gleichmäßige Bewässerung achten.
* Braunfäule: Braune Flecken auf den Blättern und Früchten. Ursache ist ein Pilz. Lösung: Befallene Blätter und Früchte entfernen und die Pflanzen mit einem Fungizid
Conclusion
So, there you have it! Growing tomatoes at home isn’t just a gardening hobby; it’s a gateway to incredibly flavorful, sun-ripened goodness that you simply can’t replicate with store-bought varieties. We’ve explored a simple yet effective DIY trick that can significantly boost your tomato yield and overall plant health. This method, focusing on [mention the specific DIY trick discussed in the article – assuming it was about pruning] strategic pruning, allows your tomato plants to focus their energy on producing larger, juicier fruits instead of wasting resources on unnecessary foliage.
Think about biting into a perfectly ripe tomato, bursting with sweet and tangy flavor, knowing you nurtured it from seedling to table. That’s the reward waiting for you! This DIY approach is not only cost-effective but also incredibly satisfying. You’re taking control of your food source, reducing your reliance on commercial agriculture, and connecting with nature in a tangible way.
But don’t stop there! Experiment with different tomato varieties to discover your favorites. Try heirloom tomatoes for their unique flavors and colors, or opt for cherry tomatoes for a prolific harvest of bite-sized treats. You can also adapt this pruning technique to different growing conditions. If you’re growing tomatoes in containers, for example, you might need to prune more frequently to manage their size. Consider companion planting with herbs like basil or marigolds to deter pests and enhance the flavor of your tomatoes.
We’ve provided a solid foundation for successful tomato growing, but the real magic happens when you personalize the process. Observe your plants, learn their needs, and adapt your approach accordingly. Remember, gardening is a journey of continuous learning and discovery.
We wholeheartedly encourage you to try this DIY trick for growing tomatoes at home. It’s a game-changer that will transform your tomato harvest and elevate your culinary creations. Don’t be afraid to get your hands dirty and embrace the joys of homegrown tomatoes.
Once you’ve experienced the satisfaction of harvesting your own delicious tomatoes, we’d love to hear about your experience! Share your tips, tricks, and photos in the comments section below. Let’s create a community of tomato enthusiasts who are passionate about growing their own food. Your insights could inspire others to embark on their own tomato-growing adventures. Happy gardening!
Frequently Asked Questions (FAQ)
What are the benefits of growing tomatoes at home compared to buying them from the store?
Growing tomatoes at home offers a multitude of benefits. First and foremost, the flavor is unparalleled. Homegrown tomatoes are allowed to ripen fully on the vine, resulting in a sweetness and intensity of flavor that is often lacking in commercially grown tomatoes, which are typically picked green and ripened artificially. Secondly, you have complete control over the growing process. You can choose organic methods, avoid harmful pesticides, and ensure that your tomatoes are grown in healthy, nutrient-rich soil. This translates to healthier and more nutritious fruits. Finally, growing your own tomatoes is a rewarding and therapeutic experience. It connects you with nature, reduces stress, and provides a sense of accomplishment.
Is this DIY trick suitable for all types of tomato plants?
While the core principles of this DIY trick, primarily focusing on pruning, are applicable to most tomato varieties, there are some nuances to consider. Determinate tomato plants, which grow to a fixed size and produce all their fruit at once, require less pruning than indeterminate varieties, which continue to grow and produce fruit throughout the season. For determinate tomatoes, focus on removing suckers below the first flower cluster. Indeterminate tomatoes benefit from more aggressive pruning to maintain airflow and encourage fruit production. Cherry tomatoes, while indeterminate, can tolerate slightly less pruning as they tend to be more vigorous. Always research the specific needs of your tomato variety for optimal results.
How often should I prune my tomato plants using this DIY method?
The frequency of pruning depends on the growth rate of your tomato plants and the specific variety. Generally, you should aim to prune your tomato plants at least once a week, especially during periods of rapid growth. Check for suckers (the small shoots that grow between the main stem and branches) and remove them promptly. Regular pruning helps to maintain airflow, prevent disease, and direct the plant’s energy towards fruit production. However, avoid over-pruning, as this can stress the plant and reduce its overall yield. A good rule of thumb is to remove only the suckers and any yellowing or diseased leaves.
What are some common mistakes to avoid when growing tomatoes at home?
Several common mistakes can hinder your tomato-growing success. One of the most frequent errors is overwatering. Tomatoes prefer consistent moisture but don’t like to sit in soggy soil. Ensure your soil is well-draining and water deeply but infrequently. Another mistake is neglecting to provide adequate support. Tomato plants, especially indeterminate varieties, can become quite heavy with fruit and require staking, caging, or trellising to prevent them from collapsing. Insufficient sunlight is another common issue. Tomatoes need at least 6-8 hours of direct sunlight per day to thrive. Finally, failing to fertilize your tomato plants can result in nutrient deficiencies and reduced yields. Use a balanced fertilizer specifically formulated for tomatoes, following the instructions on the label.
What are some signs that my tomato plants are not thriving, and how can I address them?
Several signs can indicate that your tomato plants are struggling. Yellowing leaves can be a sign of nutrient deficiency, overwatering, or disease. Wilting leaves, even when the soil is moist, can indicate root rot or a vascular disease. Blossom end rot, characterized by a dark, leathery spot on the bottom of the tomato, is caused by calcium deficiency. Pest infestations, such as aphids or whiteflies, can also weaken your plants. To address these issues, first, identify the underlying cause. Adjust your watering schedule, amend the soil with compost or fertilizer, provide adequate support, and treat any pest or disease problems promptly. Regular monitoring and proactive care are essential for maintaining healthy and productive tomato plants.
Can I use this DIY trick for growing tomatoes in containers?
Yes, this DIY trick is perfectly suitable for growing tomatoes in containers. In fact, pruning is even more important for container-grown tomatoes, as it helps to manage their size and prevent them from becoming root-bound. Choose a large container with good drainage and use a high-quality potting mix. Prune your container-grown tomatoes regularly, removing suckers and any yellowing or diseased leaves. You may also need to water and fertilize them more frequently than tomatoes grown in the ground, as the soil in containers tends to dry out and lose nutrients more quickly.
What are some good companion plants for tomatoes?
Companion planting can enhance the growth and flavor of your tomatoes while also deterring pests. Basil is a classic companion plant for tomatoes, as it repels tomato hornworms and whiteflies and is said to improve the flavor of the tomatoes. Marigolds are another excellent choice, as they repel nematodes and other soil pests. Other beneficial companion plants include onions, garlic, carrots, and parsley. Avoid planting tomatoes near brassicas (such as cabbage and broccoli) or fennel, as these plants can inhibit their growth.
How do I know when my tomatoes are ripe and ready to harvest?
The best way to determine if a tomato is ripe is to look at its color and feel its texture. Ripe tomatoes will have a deep, uniform color, depending on the variety. They should also feel slightly soft to the touch but not mushy. Gently twist the tomato from the vine; if it comes off easily, it’s ripe. The aroma of a ripe tomato is also a good indicator. It should have a sweet, earthy scent. Remember that different tomato varieties ripen at different rates, so be patient and observe your plants regularly.
Leave a Comment