
Growing Sweet Potatoes can seem daunting, especially if you’re new to home gardening. But trust me, with a few simple tricks and a little know-how, you can harvest a bounty of these delicious and nutritious root vegetables right in your own backyard! Forget those bland, store-bought sweet potatoes – imagine sinking your teeth into a homegrown, perfectly sweet and earthy spud. Sounds amazing, right?
Sweet potatoes have a rich history, dating back thousands of years in Central and South America. They were a staple food for the Incas and other ancient civilizations, and their cultivation eventually spread across the globe. Today, they’re enjoyed in countless dishes, from savory stews to sweet pies. But why settle for buying them when you can experience the satisfaction of growing sweet potatoes yourself?
In this beginner’s guide, I’ll share my favorite DIY tricks and hacks to help you succeed, even if you have limited space or experience. We’ll cover everything from choosing the right varieties to preparing your soil and harvesting your crop. Plus, I’ll reveal some insider tips to maximize your yield and avoid common pitfalls. So, grab your gardening gloves, and let’s get started on your sweet potato adventure! You’ll be amazed at how easy and rewarding it is to grow your own food.
Süßkartoffeln selbst anbauen: Einsteigerfreundliche Anleitung
Hallo liebe Gartenfreunde! Habt ihr Lust, euch an etwas Neues zu wagen und eure eigenen Süßkartoffeln anzubauen? Keine Sorge, es ist einfacher als ihr denkt! Ich zeige euch, wie ihr mit ein paar einfachen Schritten und etwas Geduld eure eigene Ernte einfahren könnt. Los geht’s!
Was ihr für den Süßkartoffelanbau benötigt
Bevor wir loslegen, hier eine Liste mit allem, was ihr braucht:
* Süßkartoffeln: Am besten Bio-Süßkartoffeln, da diese nicht mit Keimhemmern behandelt wurden.
* Wasserglas oder Gefäß: Um die Süßkartoffel zum Austreiben zu bringen.
* Zahnstocher: Um die Süßkartoffel im Wasserglas zu stabilisieren.
* Pflanztöpfe oder Anzuchtschalen: Für die vorgezogenen Triebe.
* Anzuchterde: Nährstoffarm und locker für die jungen Pflanzen.
* Gartenbeet oder große Pflanzkübel: Für die endgültige Pflanzung.
* Kompost oder organischer Dünger: Um den Boden anzureichern.
* Gießkanne oder Gartenschlauch: Zum Bewässern.
* Geduld: Süßkartoffeln brauchen etwas Zeit, um zu wachsen.
Phase 1: Süßkartoffeln zum Austreiben bringen (Slip Production)
Der erste Schritt ist, die Süßkartoffel dazu zu bringen, Triebe (sogenannte “Slips”) zu bilden. Diese Triebe werden später zu unseren eigentlichen Süßkartoffelpflanzen.
1. Süßkartoffel vorbereiten: Sucht euch eine gesunde Süßkartoffel aus. Sie sollte fest sein und keine weichen Stellen haben.
2. Zahnstocher anbringen: Steckt vier Zahnstocher etwa in der Mitte der Süßkartoffel ein, sodass sie sich gegenseitig gegenüberliegen. Diese dienen dazu, die Süßkartoffel im Wasserglas zu stabilisieren.
3. Ins Wasserglas setzen: Füllt ein Glas oder Gefäß mit Wasser. Das Wasser sollte etwa die untere Hälfte der Süßkartoffel bedecken. Die Zahnstocher verhindern, dass die Süßkartoffel komplett im Wasser liegt.
4. Warm und hell platzieren: Stellt das Glas an einen warmen und hellen Ort, aber nicht in die direkte Sonne. Ein Fensterbrett ist ideal.
5. Wasserstand kontrollieren: Achtet darauf, dass der Wasserstand immer gleich bleibt. Füllt bei Bedarf Wasser nach.
6. Warten und beobachten: Nach einigen Wochen (ca. 2-4 Wochen) sollten sich an der Süßkartoffel Triebe bilden. Habt Geduld, es kann etwas dauern!
Phase 2: Triebe bewurzeln (Rooting the Slips)
Sobald die Triebe etwa 15-20 cm lang sind, können wir sie von der Süßkartoffel abnehmen und bewurzeln.
1. Triebe abbrechen oder abschneiden: Brecht oder schneidet die Triebe vorsichtig von der Süßkartoffel ab. Achtet darauf, dass ihr die Süßkartoffel nicht beschädigt.
2. In Wasser stellen: Stellt die Triebe in ein Glas mit Wasser. Achtet darauf, dass die unteren Blätter nicht im Wasser sind, da sie sonst faulen könnten.
3. Wurzelbildung abwarten: Stellt das Glas mit den Trieben an einen hellen Ort, aber nicht in die direkte Sonne. Nach einigen Tagen sollten sich Wurzeln bilden. Das kann 1-2 Wochen dauern. Wechselt das Wasser alle paar Tage, um Fäulnis zu vermeiden.
Phase 3: Triebe in Anzuchterde pflanzen (Potting the Slips)
Sobald die Triebe ausreichend Wurzeln gebildet haben (ca. 2-3 cm lange Wurzeln), können wir sie in Anzuchterde pflanzen.
1. Pflanztöpfe vorbereiten: Füllt kleine Pflanztöpfe oder Anzuchtschalen mit Anzuchterde.
2. Triebe einpflanzen: Macht mit einem Finger oder einem kleinen Stift ein Loch in die Erde. Setzt die bewurzelten Triebe vorsichtig in die Löcher und drückt die Erde leicht an.
3. Angießen: Gießt die Triebe vorsichtig an. Die Erde sollte feucht, aber nicht nass sein.
4. Warm und hell platzieren: Stellt die Töpfe an einen warmen und hellen Ort, aber nicht in die direkte Sonne.
5. Feuchtigkeit halten: Haltet die Erde feucht, indem ihr die Triebe regelmäßig gießt.
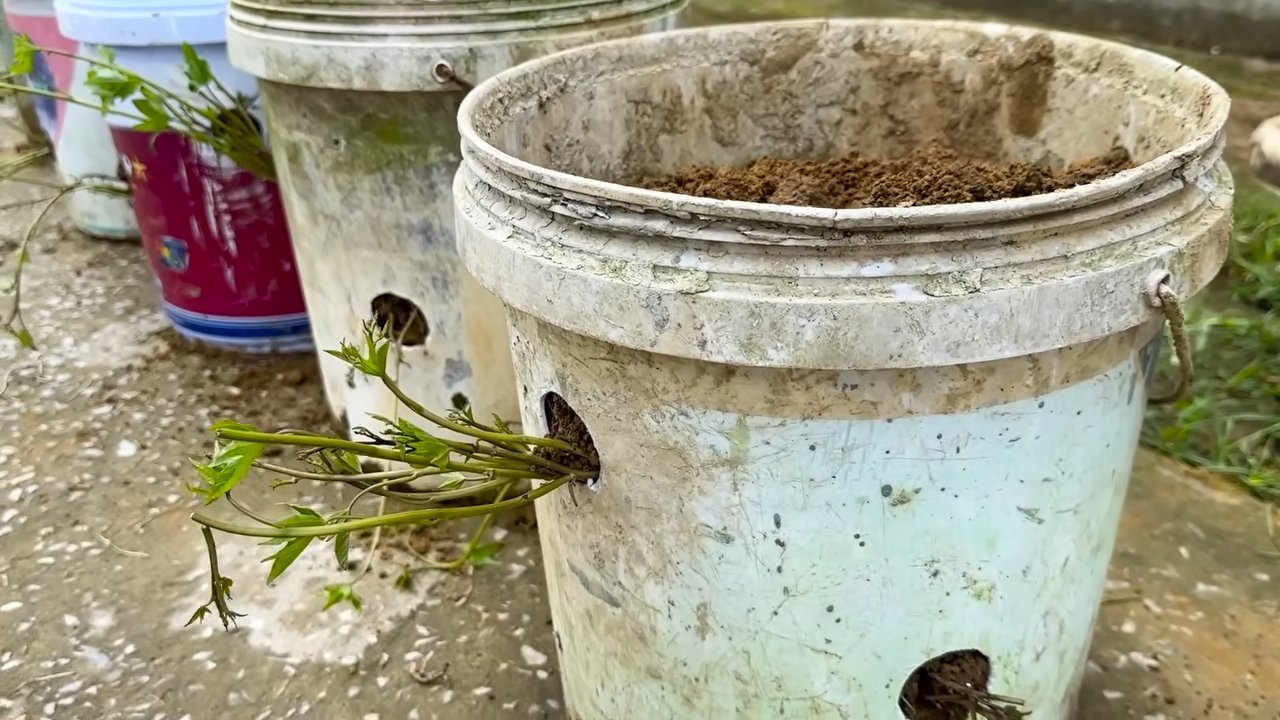
Phase 4: Auspflanzen ins Freie (Transplanting Outdoors)
Sobald die Gefahr von Frost vorüber ist (in der Regel Mitte Mai), können wir die Süßkartoffelpflanzen ins Freie pflanzen. Süßkartoffeln lieben Wärme!
1. Standort vorbereiten: Wählt einen sonnigen Standort für eure Süßkartoffeln. Der Boden sollte locker und gut durchlässig sein.
2. Boden verbessern: Reichert den Boden mit Kompost oder organischem Dünger an. Süßkartoffeln sind Starkzehrer und benötigen viele Nährstoffe.
3. Pflanzlöcher ausheben: Hebt Pflanzlöcher aus, die etwas größer sind als die Wurzelballen der Süßkartoffelpflanzen.
4. Pflanzen einsetzen: Setzt die Süßkartoffelpflanzen vorsichtig in die Pflanzlöcher. Der Abstand zwischen den Pflanzen sollte etwa 30-45 cm betragen.
5. Angießen: Gießt die Pflanzen gründlich an.
6. Mulchen: Mulcht den Boden um die Pflanzen herum mit Stroh oder Rasenschnitt. Das hilft, die Feuchtigkeit im Boden zu halten und Unkraut zu unterdrücken.
Phase 5: Pflege der Süßkartoffelpflanzen (Ongoing Care)
Nach dem Auspflanzen ist es wichtig, die Süßkartoffelpflanzen gut zu pflegen, damit sie prächtig gedeihen.
1. Regelmäßig gießen: Gießt die Pflanzen regelmäßig, besonders bei trockenem Wetter. Süßkartoffeln benötigen ausreichend Feuchtigkeit, um gut zu wachsen.
2. Düngen: Düngt die Pflanzen regelmäßig mit einem organischen Dünger. Achtet darauf, dass der Dünger reich an Kalium ist, da Kalium die Knollenbildung fördert.
3. Unkraut entfernen: Entfernt regelmäßig Unkraut, das um die Pflanzen herum wächst. Unkraut konkurriert mit den Süßkartoffeln um Nährstoffe und Wasser.
4. Boden lockern: Lockert den Boden regelmäßig auf, um die Belüftung zu verbessern.
5. Schädlinge kontrollieren: Achtet auf Schädlinge wie Kartoffelkäfer oder Blattläuse. Bei Bedarf könnt ihr natürliche Schädlingsbekämpfungsmittel einsetzen.
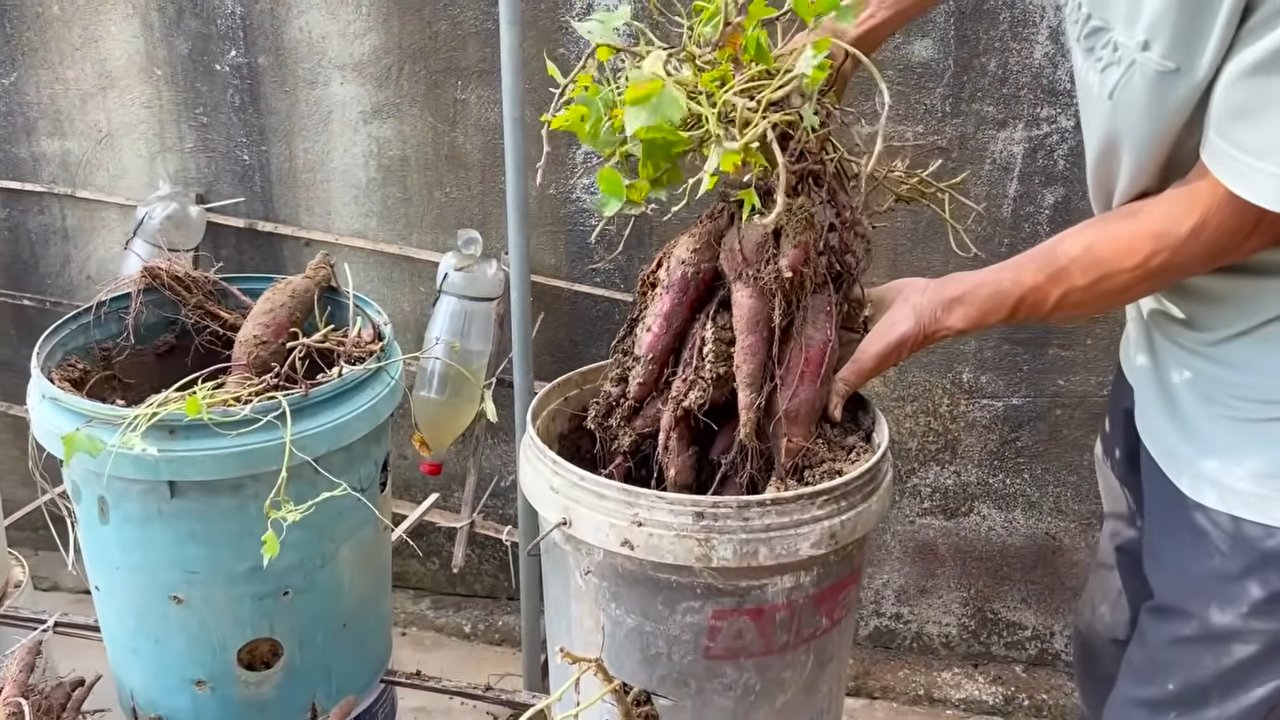
Phase 6: Ernte der Süßkartoffeln (Harvesting)
Die Erntezeit für Süßkartoffeln ist in der Regel im Herbst, kurz vor dem ersten Frost.
1. Erntezeitpunkt bestimmen: Die Blätter der Süßkartoffelpflanzen beginnen sich gelb zu färben und abzusterben. Das ist ein Zeichen dafür, dass die Süßkartoffeln reif sind.
2. Vorsichtig ausgraben: Grabt die Süßkartoffeln vorsichtig mit einer Grabegabel aus. Achtet darauf, die Knollen nicht zu beschädigen.
3. Trocknen lassen: Lasst die Süßkartoffeln nach der Ernte einige Tage an einem warmen und trockenen Ort trocknen. Dadurch härtet die Schale aus und die Süßkartoffeln sind länger haltbar.
4. Lagern: Lagert die getrockneten Süßkartoffeln an einem kühlen, dunklen und trockenen Ort. Ideal ist eine Temperatur von etwa 12-15 Grad Celsius.
Zusätzliche Tipps für den Süßkartoffelanbau
* Sortenwahl: Es gibt verschiedene Süßkartoffelsorten mit unterschiedlichen Farben und Geschmacksrichtungen. Informiert euch vor dem Anbau über die verschiedenen Sorten und wählt diejenige aus, die euch am besten gefällt.
* Vorkultur: Süßkartoffeln können auch in Töpfen oder Kübeln vorgezogen werden, bevor sie ins
Conclusion
So, there you have it! Growing sweet potatoes at home, even as a beginner, is not only achievable but also incredibly rewarding. From the initial sprouting of slips to the final harvest of those vibrant, nutrient-packed tubers, the entire process is a testament to the magic of gardening. We’ve walked through each step, demystifying the process and providing you with the knowledge and confidence to embark on your own sweet potato growing adventure.
Why is this DIY trick a must-try? Because it connects you to your food source in a profound way. There’s nothing quite like the satisfaction of nurturing a plant from start to finish and then enjoying the fruits (or rather, the roots!) of your labor. Beyond the personal fulfillment, growing your own sweet potatoes allows you to control the quality of your food, ensuring it’s free from harmful pesticides and packed with the nutrients you need. Plus, it’s a fantastic way to reduce your carbon footprint and contribute to a more sustainable lifestyle.
But the benefits don’t stop there. Growing sweet potatoes can be a fun and educational activity for the whole family. It’s a great way to teach children about where their food comes from and the importance of healthy eating. And let’s not forget the delicious possibilities! Sweet potatoes are incredibly versatile in the kitchen, lending themselves to a wide range of sweet and savory dishes. From classic sweet potato pie to roasted sweet potato fries, the culinary options are endless.
Ready to take your sweet potato growing to the next level? Consider experimenting with different varieties. Beauregard is a popular choice for its reliable yields and vibrant orange flesh, but there are many other options to explore, such as Japanese sweet potatoes with their purple skin and white flesh, or even ornamental varieties with beautiful foliage. You can also try different growing methods, such as container gardening or raised beds, to suit your space and preferences.
Another variation to consider is companion planting. Sweet potatoes thrive when planted alongside certain other vegetables and herbs. For example, beans can help fix nitrogen in the soil, while thyme can deter pests. Experimenting with companion planting can help you create a healthier and more productive garden.
Don’t be afraid to get your hands dirty and embrace the challenges that come with gardening. Remember, even experienced gardeners encounter setbacks from time to time. The key is to learn from your mistakes and keep experimenting until you find what works best for you.
We are confident that with the information provided in this guide, you’ll be well on your way to harvesting a bountiful crop of sweet potatoes. So, grab your gardening gloves, gather your supplies, and get ready to experience the joy of growing your own food.
We encourage you to try this DIY trick and share your experience with us! Post photos of your sweet potato plants, share your tips and tricks, and let us know what you’ve learned along the way. Together, we can create a community of passionate gardeners who are dedicated to growing their own healthy and delicious food. Let’s all become experts in growing sweet potatoes!
Frequently Asked Questions (FAQ)
Q: How long does it take to grow sweet potatoes?
A: Sweet potatoes typically take between 90 and 120 days to mature from transplanting the slips. This timeframe can vary depending on the variety, climate, and growing conditions. Warmer climates generally result in faster growth. Keep an eye on the foliage; when it starts to yellow, it’s a good indication that your sweet potatoes are ready to harvest.
Q: What kind of soil is best for growing sweet potatoes?
A: Sweet potatoes prefer well-drained, sandy loam soil. Heavy clay soil can hinder root development and result in misshapen tubers. If you have clay soil, amend it with plenty of organic matter, such as compost or aged manure, to improve drainage and aeration. A slightly acidic soil pH of 5.5 to 6.5 is ideal.
Q: How often should I water my sweet potato plants?
A: Sweet potatoes need consistent moisture, especially during the first few weeks after transplanting. Water deeply whenever the top inch of soil feels dry to the touch. Once the plants are established, you can reduce watering frequency, but be sure to provide adequate moisture during periods of drought. Avoid overwatering, as this can lead to root rot.
Q: What are slips, and how do I get them?
A: Slips are the sprouts that grow from a mature sweet potato. You can purchase slips from a nursery or start your own by suspending a sweet potato in water or burying it in moist soil. Keep the sweet potato in a warm, sunny location, and the slips will begin to emerge in a few weeks. Once the slips are 6-8 inches long, you can carefully twist them off the sweet potato and root them in water before transplanting them into the garden.
Q: What are common pests and diseases that affect sweet potatoes?
A: Common pests that can affect sweet potatoes include sweet potato weevils, flea beetles, and aphids. Diseases include fusarium wilt, black rot, and scurf. Regularly inspect your plants for signs of pests or diseases and take appropriate action, such as using organic pesticides or fungicides. Crop rotation and good sanitation practices can also help prevent problems.
Q: Can I grow sweet potatoes in containers?
A: Yes, you can grow sweet potatoes in containers, but you’ll need a large container with good drainage. Choose a container that is at least 20 gallons in size and fill it with well-draining potting mix. Be sure to provide adequate support for the vines, as they can become quite long. Container-grown sweet potatoes may not produce as many tubers as those grown in the ground, but they can still provide a decent harvest.
Q: How do I harvest sweet potatoes?
A: Harvest sweet potatoes before the first frost. Use a garden fork to carefully lift the tubers from the soil, being careful not to damage them. Brush off any excess soil and allow the sweet potatoes to cure in a warm, dry place for 10-14 days. Curing helps to heal any wounds and improves the flavor and storage life of the sweet potatoes.
Q: How do I store sweet potatoes?
A: Store cured sweet potatoes in a cool, dark, and well-ventilated place, such as a basement or pantry. The ideal storage temperature is between 55 and 60 degrees Fahrenheit. Avoid storing sweet potatoes in the refrigerator, as this can cause them to develop a hard core. Properly stored sweet potatoes can last for several months.
Q: Can I eat the sweet potato leaves?
A: Yes, sweet potato leaves are edible and nutritious. They can be cooked like spinach or other leafy greens. Choose young, tender leaves for the best flavor. Sweet potato leaves are a good source of vitamins A and C, as well as fiber and antioxidants.
Q: What are some creative ways to use sweet potatoes in cooking?
A: Sweet potatoes are incredibly versatile in the kitchen. You can roast them, bake them, mash them, or fry them. They can be used in sweet dishes like pies, casseroles, and muffins, or in savory dishes like stews, curries, and salads. Try adding roasted sweet potatoes to your next grain bowl or using them as a topping for tacos. The possibilities are endless!


Leave a Comment