
Growing Pumpkins in Small Spaces might seem like a fairytale, right? Like something only possible in sprawling fields with scarecrows and endless sunshine. But guess what? I’m here to tell you that you can absolutely cultivate those gorgeous gourds, even if your “garden” is a balcony, a patio, or a tiny patch of earth!
Pumpkins have a rich history, deeply intertwined with autumn festivals and harvest celebrations for centuries. From their humble beginnings in Central America to their iconic status as jack-o’-lanterns, pumpkins represent abundance and the joy of the season. But you don’t need acres of land to partake in this tradition!
Let’s face it, not everyone has the luxury of a sprawling garden. But that shouldn’t stop you from enjoying the satisfaction of growing your own food and decorations. That’s where these DIY tricks and hacks come in. I’m going to show you how to maximize your limited space and create the perfect environment for your pumpkin patch to thrive. Imagine the look on your neighbor’s faces when they see those vibrant orange globes peeking out from your balcony! Growing Pumpkins in Small Spaces is not only possible, but it’s also incredibly rewarding. So, grab your gardening gloves, and let’s get started on this exciting adventure!
Growing Pumpkins in Small Spaces: A DIY Guide
Hey there, fellow gardening enthusiasts! So, you’re dreaming of carving your own homegrown pumpkin this Halloween, but you’re short on space? Don’t worry, I’ve got you covered! Growing pumpkins in small spaces is totally achievable with a little planning and some clever techniques. I’m going to walk you through everything you need to know, from choosing the right variety to training your vines like a pro. Let’s get started!
Choosing the Right Pumpkin Variety
The first, and arguably most important, step is selecting a pumpkin variety that’s suitable for container gardening or small gardens. Forget those giant Atlantic Giants – we need something more compact. Here are a few of my favorite smaller pumpkin varieties:
* Jack Be Little: These adorable mini pumpkins are perfect for individual servings or decorations. They only need about 85-90 days to mature.
* Baby Boo: Another small white pumpkin variety, great for adding a ghostly touch to your fall decor. They’re also relatively quick to mature.
* Small Sugar: A classic pie pumpkin that’s smaller than the typical carving pumpkin. It’s delicious and manageable in size.
* Spookies: These are slightly larger than the “Jack Be Little” but still compact enough for container growing.
* Kakai: A unique variety with edible seeds and orange flesh. The hull-less seeds are great for roasting!
Key Considerations When Choosing:
* Vine Length: Look for varieties described as “bush” or “semi-bush” types. These will have shorter vines than traditional sprawling pumpkins.
* Fruit Size: Obviously, smaller pumpkins are easier to manage in limited spaces.
* Days to Maturity: Choose varieties with shorter maturity times, especially if you have a shorter growing season.
Preparing Your Growing Space
Okay, now that we’ve picked our pumpkin stars, let’s get their home ready!
* Sunlight: Pumpkins are sun-worshippers! They need at least 6-8 hours of direct sunlight per day. Choose the sunniest spot you have.
* Container Size: If you’re growing in containers, bigger is better. I recommend a container that’s at least 20 gallons in size. A half whiskey barrel or a large, sturdy plastic tub works well.
* Soil: Pumpkins are heavy feeders, so you’ll need rich, well-draining soil. I like to use a mix of:
* Compost (about 1/3 of the mix)
* Potting soil (about 1/3 of the mix)
* Well-rotted manure (about 1/3 of the mix)
* Support Structure: Since we’re trying to keep things compact, we’ll need a trellis or other support system to train the vines vertically. A sturdy tomato cage, a wooden trellis, or even a repurposed ladder can work.
Step-by-Step Planting and Growing Guide
Alright, let’s get our hands dirty!
1. Start Seeds Indoors (Optional): You can start pumpkin seeds indoors about 2-3 weeks before the last expected frost. This gives them a head start.
* Sow seeds in peat pots or biodegradable pots to avoid disturbing the roots when transplanting.
* Plant 1-2 seeds per pot, about 1 inch deep.
* Keep the soil moist and warm (around 70-80°F).
* Once the seedlings emerge, provide them with plenty of light.
2. Direct Sowing: If you prefer, you can sow seeds directly into your container or garden bed after the last frost.
* Make sure the soil is warm (at least 60°F).
* Plant seeds about 1 inch deep and 2-3 inches apart.
* Thin to the strongest seedling once they emerge.
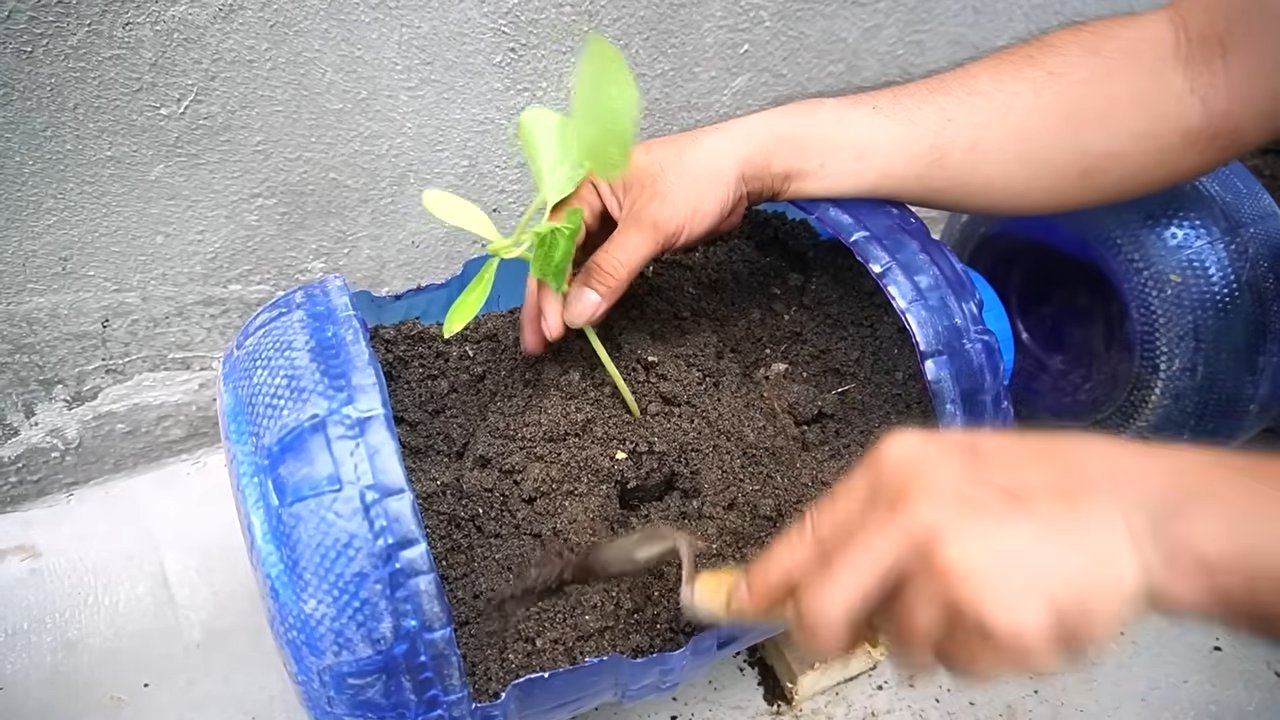
3. Transplanting Seedlings (If Starting Indoors): Once the seedlings have a few true leaves and the weather is warm enough, it’s time to transplant them.
* Harden off the seedlings by gradually exposing them to outdoor conditions for a week before transplanting.
* Dig a hole slightly larger than the root ball.
* Gently remove the seedling from the pot and place it in the hole.
* Backfill with soil and water thoroughly.
4. Watering: Pumpkins need consistent moisture, especially during hot weather.
* Water deeply whenever the top inch of soil feels dry.
* Avoid watering the leaves, as this can lead to fungal diseases.
* Consider using a soaker hose or drip irrigation to deliver water directly to the roots.
5. Fertilizing: As I mentioned, pumpkins are heavy feeders.
* Apply a balanced fertilizer (e.g., 10-10-10) every 2-3 weeks.
* Once the pumpkins start to form, switch to a fertilizer higher in phosphorus and potassium (e.g., 5-15-15) to promote fruit development.
* You can also supplement with compost tea or fish emulsion.
6. Pruning and Training: This is where the “small space” magic happens!
* Pruning: Once the vines start to get long, prune off any side shoots or excess foliage to encourage the plant to focus its energy on producing fruit.
* Training: Gently guide the vines up your trellis or support structure. You can use plant ties or twine to secure them.
* Pinching: Pinch off the ends of the vines once you have a few pumpkins developing. This will help the plant focus on ripening the existing fruit rather than producing more vines.
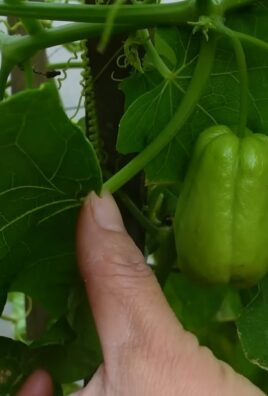
7. Pollination: Pumpkins have separate male and female flowers. The female flowers have a small, immature pumpkin at the base.
* If you’re not seeing any pumpkins develop, you may need to hand-pollinate the flowers.
* In the early morning, use a small paintbrush to transfer pollen from the male flowers to the female flowers.
8. Supporting the Fruit: As the pumpkins grow, they can become quite heavy.
* If you’re growing them on a trellis, you may need to provide additional support for the fruit.
* You can use slings made from old pantyhose or burlap to cradle the pumpkins and prevent them from breaking off the vine.
9. Pest and Disease Control: Keep an eye out for common pumpkin pests and diseases.
* Squash bugs: Handpick them or use insecticidal soap.
* Powdery mildew: Improve air circulation and apply a fungicide if necessary.
* Squash vine borers: Wrap the base of the vines with aluminum foil to prevent them from laying eggs.
10. Harvesting: Pumpkins are ready to harvest when the skin is hard and the stem is dry and brown.
* Cut the pumpkin from the vine, leaving a few inches of stem attached.
* Cure the pumpkins in a warm, dry place for a week or two to harden the skin and improve their storage life.
Troubleshooting Tips
Even with the best planning, things can sometimes go wrong. Here are a few common problems and how to fix them:
* No Flowers: Make sure your plants are getting enough sunlight and fertilizer.
* Flowers But No Pumpkins: This could be due to poor pollination. Try hand-pollinating the flowers.
* Yellowing Leaves: This could be a sign of overwatering, underwatering, or nutrient deficiency. Adjust your watering and fertilizing accordingly.
* Rotting Pumpkins: This could be due to fungal diseases. Improve air circulation and apply a fungicide if necessary.
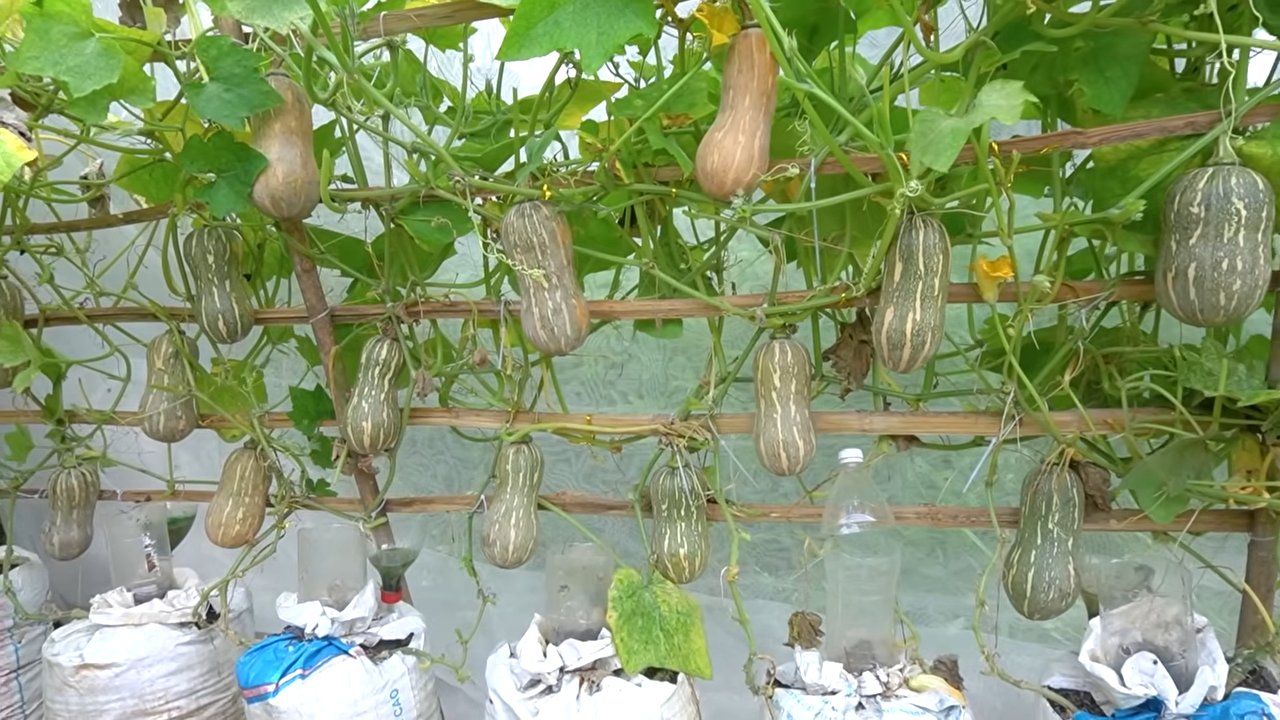
Vertical Growing Techniques
Since we’re all about small spaces, let’s dive deeper into vertical growing techniques. This is where you can really maximize your pumpkin yield without taking up a ton of ground space.
* Trellises: As mentioned earlier, a sturdy trellis is essential for vertical growing. Choose a trellis that’s tall enough to support the vines and strong enough to hold the weight of the pumpkins.
* Arbors: If you have a bit more space, an arbor can be a beautiful and functional way to grow pumpkins vertically. The vines will climb up and over the arbor, creating a stunning display.
* Hanging Baskets (For Mini Pumpkins): For the really small varieties like “Jack Be Little” or “Baby Boo,” you can even try growing them in hanging baskets. Just make sure the baskets are large enough and strong enough to support the weight of the pumpkins.
* DIY Structures: Get creative! You can build your own vertical growing structures using repurposed materials like pallets, ladders, or even old tires.
Maximizing Your Yield
Want to get the most pumpkins possible from your small
Conclusion
So, there you have it! Growing pumpkins in small spaces isn’t just a whimsical dream; it’s an achievable reality with a little planning, the right techniques, and a whole lot of pumpkin-loving enthusiasm. We’ve explored the secrets to vertical gardening, container selection, and strategic pruning, all designed to maximize your yield even when square footage is at a premium.
Why is this DIY trick a must-try? Because it unlocks the joy of homegrown pumpkins for everyone, regardless of their living situation. Imagine the satisfaction of carving a jack-o’-lantern from a pumpkin you nurtured from seed to glorious gourd, all within the confines of your balcony, patio, or tiny backyard. It’s a rewarding experience that connects you to nature, provides fresh produce, and adds a touch of autumnal charm to your urban or suburban life.
But the fun doesn’t stop there! Feel free to experiment with different pumpkin varieties. While smaller cultivars like ‘Baby Boo’ and ‘Jack Be Little’ are ideal for containers, you might be surprised at how well other compact varieties adapt with proper support and care. Consider trying ‘Spookies’ for their adorable size and ghostly white color, or even a miniature ‘Cinderella’ pumpkin for a touch of fairytale magic.
Don’t be afraid to get creative with your trellising system. While we’ve discussed basic A-frames and netting, you can repurpose old ladders, build custom wooden structures, or even train your pumpkin vines along existing fences or walls. Just ensure your support system is sturdy enough to handle the weight of the developing pumpkins.
And speaking of weight, remember to provide extra support for your pumpkins as they grow larger. Slings made from old t-shirts or pantyhose can cradle the fruits and prevent them from breaking off the vine prematurely. This is especially important for larger varieties grown in containers.
Beyond the practical benefits, growing pumpkins in small spaces is a fantastic conversation starter and a unique way to express your creativity. Imagine the envy of your neighbors as they admire your thriving pumpkin patch in the middle of the city!
We wholeheartedly encourage you to embark on this pumpkin-growing adventure. It’s a fun, educational, and ultimately delicious experience that will bring joy to your life and a touch of autumn to your surroundings.
Once you’ve harvested your bounty, don’t forget to share your success stories (and any challenges you encountered!) with us. Post photos of your pumpkin patch, share your favorite recipes, and let us know what you learned along the way. Your experiences can inspire others to embrace the joy of growing pumpkins, no matter how small their space may be. Let’s build a community of small-space pumpkin growers and share the harvest together! So go ahead, give **growing pumpkins in small spaces** a try – you might just surprise yourself with what you can achieve.
Frequently Asked Questions (FAQ)
What kind of soil is best for growing pumpkins in containers?
Pumpkins are heavy feeders, so they need a rich, well-draining soil. A good mix would be equal parts compost, potting soil, and perlite or vermiculite. The compost provides nutrients, the potting soil provides structure, and the perlite/vermiculite improves drainage and aeration. Avoid using garden soil in containers, as it can become compacted and doesn’t drain well. You can also amend your potting mix with a slow-release fertilizer to provide a steady supply of nutrients throughout the growing season. Remember to test your soil pH; pumpkins prefer a slightly acidic to neutral pH of around 6.0 to 7.0.
How often should I water my container pumpkins?
Watering frequency depends on several factors, including the size of your container, the weather, and the stage of growth. Generally, you’ll need to water more frequently during hot, dry weather and when the pumpkins are actively growing. Check the soil moisture regularly by sticking your finger about an inch into the soil. If it feels dry, it’s time to water. Water deeply until water drains out of the bottom of the container. Avoid overwatering, as this can lead to root rot. Mulching around the base of the plant can help retain moisture and reduce the need for frequent watering.
How do I pollinate my pumpkin flowers if I don’t see any bees?
Pumpkins have separate male and female flowers. The female flowers have a small, immature pumpkin at the base, while the male flowers do not. If you’re not seeing bees or other pollinators, you may need to hand-pollinate your pumpkins. To do this, use a small paintbrush or cotton swab to collect pollen from the male flower and transfer it to the stigma of the female flower. The best time to hand-pollinate is in the morning, when the pollen is fresh. You can identify the male and female flowers easily. The male flower will have a long, thin stem, while the female flower will have a small, immature pumpkin behind the flower.
How much sunlight do pumpkins need?
Pumpkins need at least 6-8 hours of direct sunlight per day to thrive. Choose a location that receives plenty of sunlight throughout the day. If you’re growing pumpkins on a balcony or patio, make sure it’s not shaded by buildings or trees. If you don’t have enough sunlight, you can supplement with grow lights.
What kind of fertilizer should I use for my pumpkins?
Pumpkins are heavy feeders and benefit from regular fertilization. Start with a balanced fertilizer (e.g., 10-10-10) when planting, and then switch to a fertilizer higher in phosphorus and potassium (e.g., 5-15-15) once the pumpkins start to develop. Phosphorus promotes root growth and flowering, while potassium promotes fruit development. You can also use organic fertilizers like compost tea or fish emulsion. Apply fertilizer according to the package directions, and avoid over-fertilizing, as this can burn the roots.
How do I prevent pests and diseases from attacking my pumpkins?
Prevention is key when it comes to pests and diseases. Start by choosing disease-resistant varieties. Keep your plants healthy by providing them with adequate sunlight, water, and nutrients. Inspect your plants regularly for signs of pests or diseases. Common pumpkin pests include squash bugs, squash vine borers, and aphids. Common diseases include powdery mildew and downy mildew. If you find pests or diseases, treat them promptly with appropriate organic or chemical controls. You can also use row covers to protect your plants from pests.
How do I know when my pumpkins are ripe?
Pumpkins are typically ripe when the skin is hard and resistant to scratching, and the stem is dry and brown. The color of the pumpkin should also be uniform and vibrant. You can also tap the pumpkin; a ripe pumpkin will sound hollow. Leave about 2-3 inches of stem attached when harvesting to prevent rot.
Can I grow pumpkins indoors?
While it’s possible to start pumpkin seeds indoors, it’s not recommended to grow them indoors for their entire life cycle. Pumpkins need a lot of sunlight and space to thrive, which is difficult to provide indoors. However, you can start your seeds indoors 3-4 weeks before the last frost and then transplant them outdoors once the weather warms up.
What are some good companion plants for pumpkins?
Companion planting can help improve the health and yield of your pumpkins. Good companion plants for pumpkins include marigolds (which deter pests), nasturtiums (which attract beneficial insects), and beans (which fix nitrogen in the soil). Avoid planting pumpkins near potatoes or brassicas (like cabbage and broccoli), as they can compete for nutrients.
How do I store my harvested pumpkins?
Store your harvested pumpkins in a cool, dry place with good ventilation. A basement or garage is ideal. Avoid storing pumpkins in direct sunlight or in areas with high humidity. Handle your pumpkins carefully to avoid bruising them. With proper storage, pumpkins can last for several months.

Leave a Comment