
Growing Potatoes in Buckets: Imagine harvesting a bounty of fresh, homegrown potatoes right from your patio or balcony! No sprawling garden needed. For centuries, potatoes have been a staple food source, fueling civilizations and providing essential nutrients. From their humble beginnings in the Andes Mountains to becoming a global culinary icon, potatoes have a rich and fascinating history. But what if you lack the space for a traditional potato patch?
That’s where this DIY trick comes in! I’m going to show you how to cultivate your own potato crop using simple buckets. This method is perfect for urban dwellers, apartment residents, or anyone with limited gardening space. Forget back-breaking digging and weeding; this container gardening approach is easy, efficient, and incredibly rewarding.
Why do you need this DIY trick? Because fresh, homegrown potatoes taste infinitely better than store-bought ones! Plus, you’ll have complete control over the growing process, ensuring your potatoes are free from harmful chemicals and pesticides. Get ready to experience the joy of harvesting your own delicious, homegrown potatoes with this simple and effective bucket gardening method. Let’s get started and unlock the secrets to successfully growing potatoes in buckets!
Growing Potatoes in Buckets: A Beginner’s Guide
Hey there, fellow gardening enthusiasts! I’m so excited to share one of my favorite gardening hacks with you: growing potatoes in buckets! It’s a fantastic way to enjoy fresh, homegrown potatoes, even if you don’t have a sprawling garden. Plus, it’s super easy and rewarding. Let’s dive in!
Why Grow Potatoes in Buckets?
Before we get started, you might be wondering why buckets are such a great option. Well, here are a few reasons:
* Space-Saving: Perfect for balconies, patios, or small yards.
* Easy Harvesting: No more digging around in the dirt! Just tip the bucket over.
* Control Over Soil: You can create the perfect growing environment.
* Mobility: Move your potatoes to the sunniest spot as needed.
* Pest Control: Easier to monitor and protect from pests.
What You’ll Need
Okay, let’s gather our supplies. Here’s what you’ll need to get started:
* Buckets: 5-gallon buckets are ideal, but larger ones work too. Make sure they’re clean and food-grade if possible.
* Seed Potatoes: These are potatoes specifically grown for planting. You can find them at your local garden center. Choose a variety you love to eat!
* Potting Mix: A good quality potting mix is essential. Avoid using garden soil, as it can compact and hinder drainage.
* Compost: Compost adds nutrients and improves soil structure.
* Water: Essential for keeping your potatoes hydrated.
* Drill (Optional): For adding drainage holes if your buckets don’t have them.
* Fertilizer (Optional): A balanced fertilizer can give your potatoes an extra boost.
* Gloves: To keep your hands clean.
Step-by-Step Instructions: Planting Your Potatoes
Alright, let’s get our hands dirty! Here’s how to plant your seed potatoes in buckets:
1. Prepare Your Buckets:
* First, make sure your buckets are clean.
* If your buckets don’t have drainage holes, drill several holes in the bottom. This is crucial to prevent waterlogging, which can rot your potatoes. I usually drill about 4-5 holes, each about half an inch in diameter.
2. Cut Your Seed Potatoes (If Necessary):
* If your seed potatoes are small (about the size of a golf ball), you can plant them whole.
* If they’re larger, cut them into pieces, making sure each piece has at least 2-3 “eyes” (those little buds that will sprout).
* After cutting, let the pieces sit for a day or two to callous over. This helps prevent rot.
3. Add the Initial Soil Layer:
* Pour about 4-6 inches of potting mix into the bottom of each bucket.
* Mix in a generous amount of compost. I usually aim for about a 1:4 ratio of compost to potting mix.
* Water the soil lightly to moisten it.
4. Plant the Seed Potatoes:
* Place the seed potato pieces (or whole potatoes) on top of the soil, with the eyes facing up.
* Space them evenly in the bucket. If you’re using a large bucket, you can plant 2-3 pieces.
5. Cover the Potatoes:
* Cover the seed potatoes with another 4-6 inches of potting mix and compost mixture.
* Gently water the soil again.
6. Place Your Buckets in a Sunny Location:
* Potatoes need at least 6-8 hours of sunlight per day. Choose a spot that gets plenty of sunshine.
7. Water Regularly:
* Keep the soil consistently moist, but not soggy. Water when the top inch of soil feels dry to the touch.
### Hilling Your Potatoes: The Key to a Bountiful Harvest
Hilling is a crucial step in growing potatoes in buckets. It encourages the plant to produce more potatoes along the stem. Here’s how to do it:
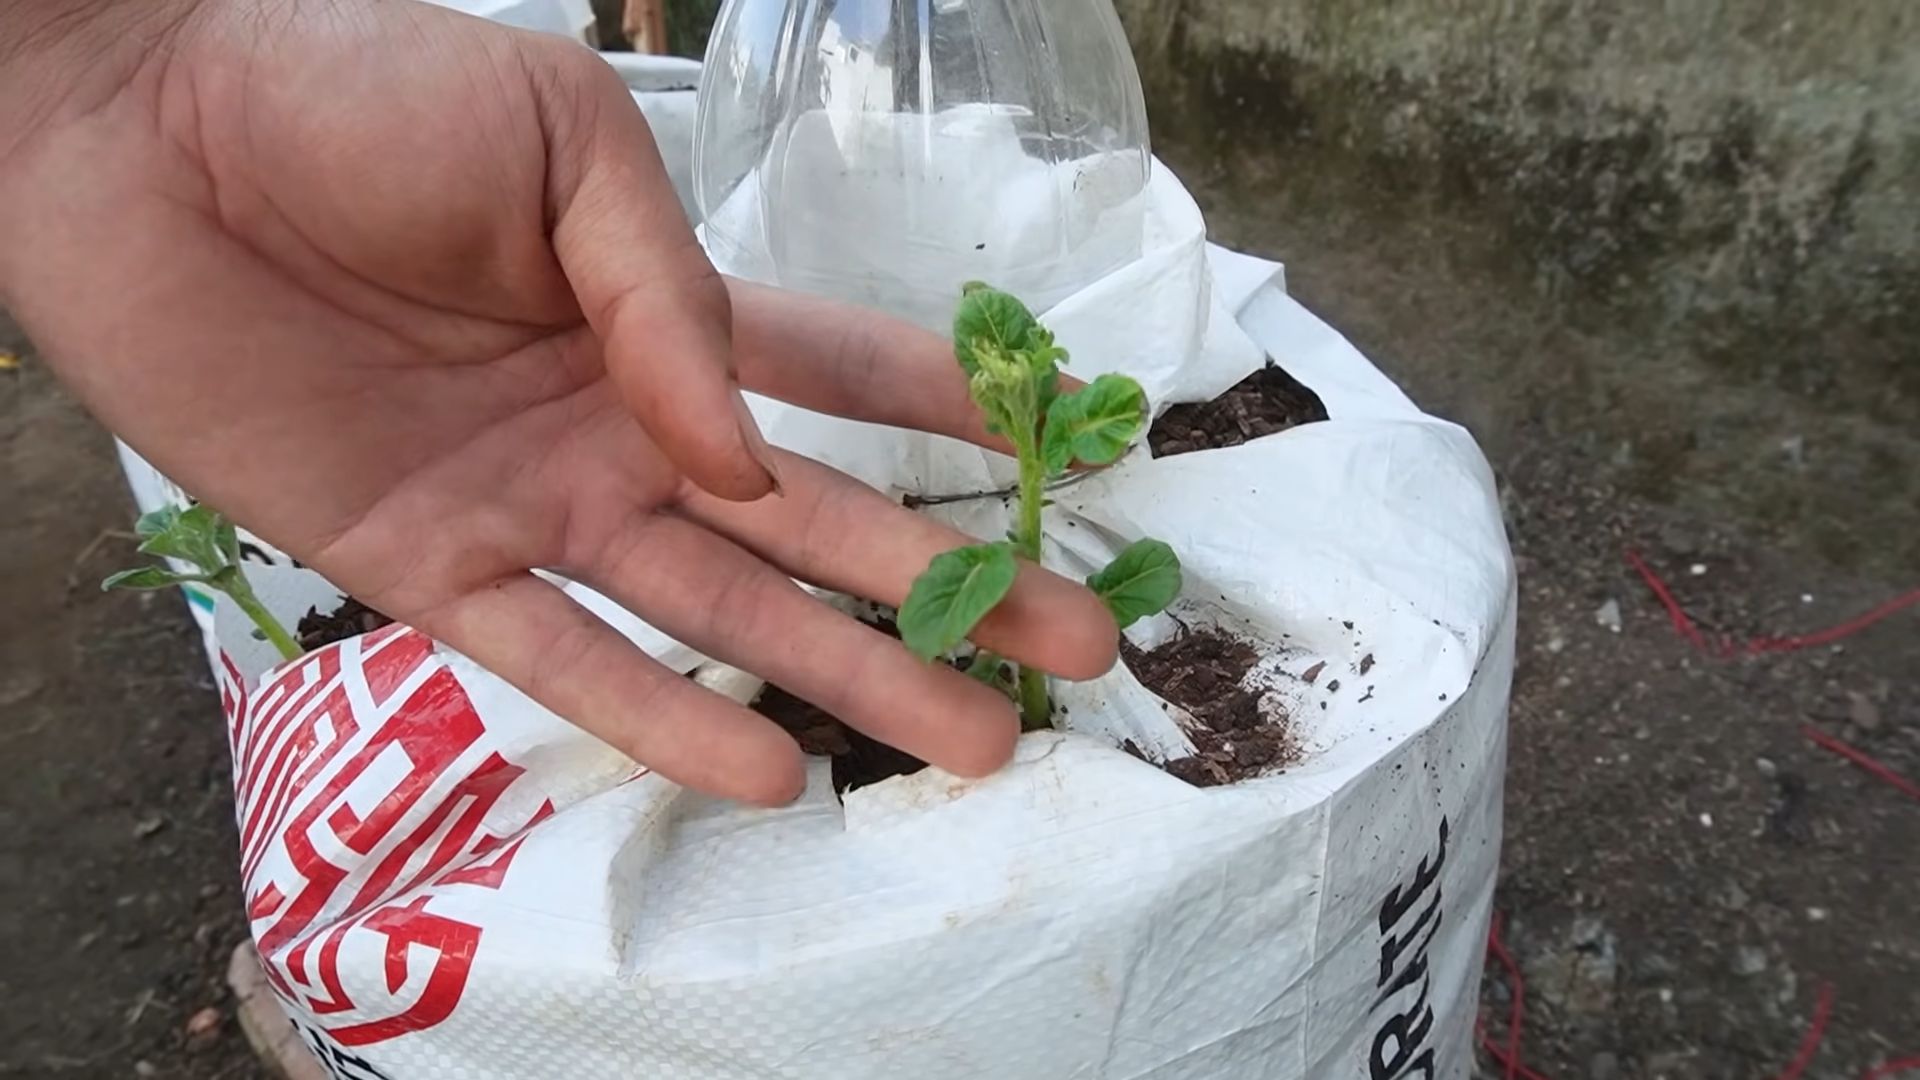
1. Wait for the Sprouts:
* Once the potato plants have sprouted and are about 6-8 inches tall, it’s time to hill.
2. Add More Soil:
* Carefully add more potting mix and compost mixture to the bucket, covering the stems of the plants, leaving only the top few leaves exposed.
* Water the soil after hilling.
3. Repeat the Process:
* As the plants continue to grow, repeat the hilling process every 2-3 weeks, until the soil level is almost to the top of the bucket.
* This encourages the plant to produce potatoes all along the buried stem.
### Caring for Your Potato Plants
Now that your potatoes are planted and hilled, here’s how to keep them happy and healthy:
1. Watering:
* Continue to water regularly, keeping the soil consistently moist.
* Avoid overwatering, as this can lead to root rot.
* During hot weather, you may need to water more frequently.
2. Fertilizing (Optional):
* If you want to give your potatoes an extra boost, you can fertilize them every few weeks with a balanced fertilizer.
* Follow the instructions on the fertilizer package.
3. Pest Control:
* Keep an eye out for pests, such as aphids, potato beetles, and flea beetles.
* If you spot any pests, you can try hand-picking them off the plants or using an organic insecticide.
4. Sunlight:
* Ensure your potatoes continue to receive at least 6-8 hours of sunlight per day.
* If you live in a very hot climate, you may need to provide some afternoon shade to prevent the plants from getting scorched.
### Harvesting Your Potatoes: The Moment of Truth!
The best part of growing potatoes is, of course, harvesting them! Here’s how to know when your potatoes are ready and how to harvest them:
1. When to Harvest:
* The timing of your harvest will depend on the variety of potatoes you’re growing.
* Generally, potatoes are ready to harvest when the plants start to flower or when the foliage begins to die back.
* You can also gently dig around in the soil to check the size of the potatoes.
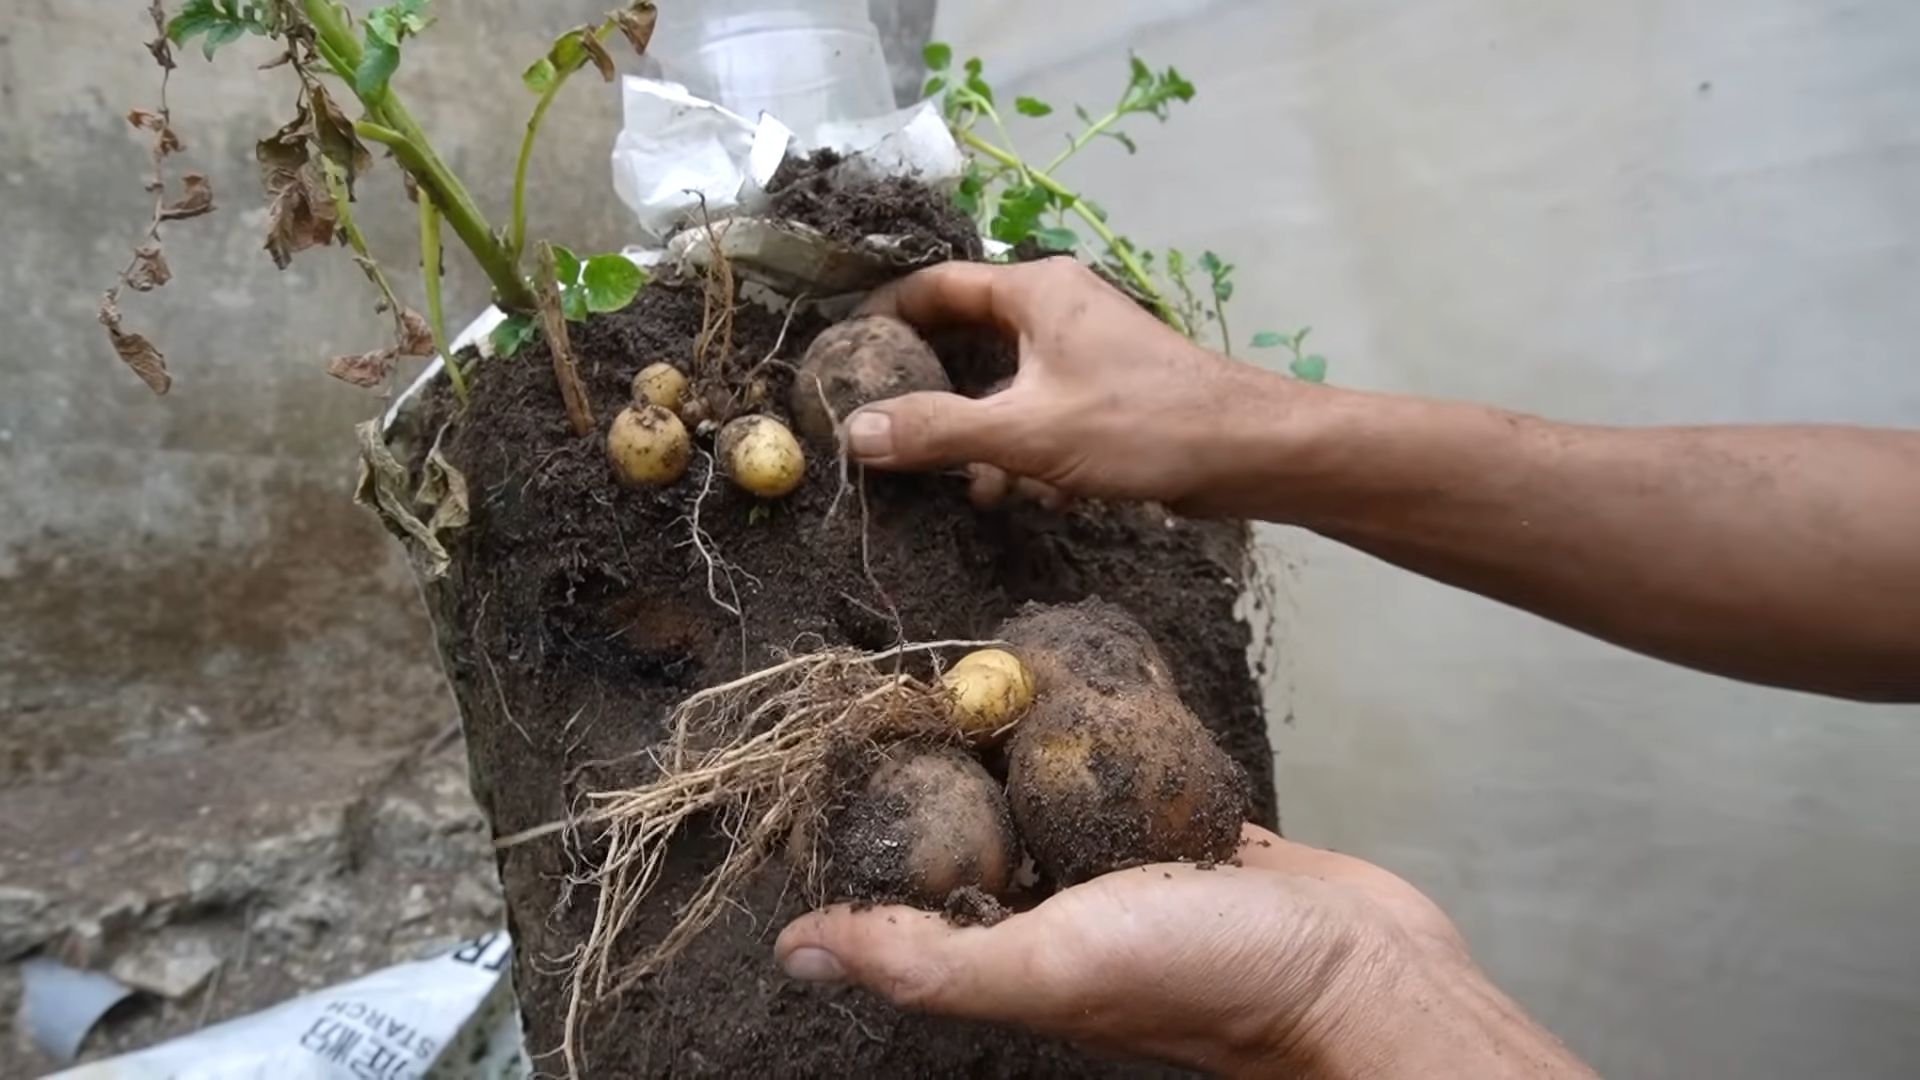
2. Harvesting:
* Stop watering a week or two before harvesting to allow the potatoes to dry out slightly.
* The easiest way to harvest potatoes from a bucket is to simply tip the bucket over and gently sift through the soil.
* Be careful not to damage the potatoes as you’re digging them out.
3. Curing (Optional):
* After harvesting, you can cure your potatoes to help them store longer.
* To cure potatoes, spread them out in a single layer in a cool, dark, and well-ventilated place for about a week.
* This allows the skins to harden and helps prevent rot.
4. Storing:
* Store your potatoes in a cool, dark, and dry place.
* Avoid storing them near apples or onions, as these can cause them to sprout prematurely.
Troubleshooting: Common Issues and Solutions
Even with the best care, you might encounter some issues while growing potatoes in buckets. Here are a few common problems and how to solve them:
* Potato Scab: This is a common fungal disease that causes rough, scabby patches on the potatoes. To prevent potato scab, use disease-free seed potatoes, avoid overwatering, and maintain a slightly acidic soil pH.
* Root Rot: This is caused by overwatering and poor drainage. To prevent root rot, make sure your buckets have adequate drainage holes and avoid overwatering.
* Pests: Aphids, potato beetles, and flea beetles can all damage potato plants. To control pests, try hand-picking them off the plants or using an organic insecticide.
* Lack of Sunlight: Potatoes need at least 6-8 hours of sunlight per day. If your plants aren’t getting enough sunlight, they may not produce many potatoes. Move your buckets to a sunnier location.
* Small Potatoes: If your potatoes are small, it could be due to a lack of nutrients, insufficient watering, or overcrowding. Make sure you’re fertilizing regularly, watering adequately, and not planting too many seed potatoes in each bucket.
Choosing the Right Potato Variety
Selecting the right potato variety is crucial for a successful bucket-growing experience. Here are a few popular and well-suited varieties:
* Yukon
Conclusion
So, there you have it! Growing potatoes in buckets isn’t just a gardening trend; it’s a game-changer for anyone, regardless of space or experience. Forget sprawling gardens and back-breaking digging. This method brings the joy of harvesting fresh, homegrown potatoes right to your doorstep, balcony, or patio. The ease of management, the control over soil conditions, and the sheer delight of tipping over a bucket to reveal a treasure trove of spuds make this a must-try for any food enthusiast.
Why is this DIY potato-growing trick a must-try? Because it democratizes gardening! It empowers even apartment dwellers to participate in the farm-to-table movement. It’s incredibly rewarding to nurture a plant from seed potato to harvest, knowing exactly where your food came from and what went into it. Plus, the yield from a single bucket can be surprisingly generous, providing you with enough potatoes for several delicious meals.
But the beauty of bucket potatoes lies not just in their practicality but also in their adaptability. Feel free to experiment with different potato varieties. Russets, Yukon Golds, red potatoes – each will bring its unique flavor and texture to your table. Consider adding companion plants like marigolds or basil to your buckets to deter pests and enhance the overall health of your potato plants. You can also tailor the soil mix to your specific needs, adding more compost for richer nutrients or perlite for better drainage.
For those seeking an even more compact solution, try using smaller buckets or even grow bags. While the yield might be slightly less, it’s a fantastic option for truly limited spaces. And if you’re feeling adventurous, why not try succession planting? Start a new bucket every few weeks to ensure a continuous harvest throughout the growing season.
Don’t be intimidated by the prospect of growing your own food. This method is incredibly forgiving, and even if you make a few mistakes along the way, you’re likely to still end up with a satisfying harvest. The key is to provide your plants with plenty of sunlight, water, and well-draining soil. And most importantly, have fun!
We wholeheartedly encourage you to give this DIY potato-growing trick a try. It’s a simple, rewarding, and delicious way to connect with nature and enjoy the fruits (or rather, vegetables) of your labor. Once you’ve experienced the joy of harvesting your own bucket potatoes, you’ll never look at store-bought spuds the same way again.
So, grab a bucket, some seed potatoes, and get ready to embark on a gardening adventure. And when you do, we’d love to hear about your experience! Share your photos, tips, and triumphs with us in the comments below. Let’s create a community of bucket potato enthusiasts and inspire others to discover the magic of homegrown food. Happy growing!
Frequently Asked Questions (FAQ)
What kind of potatoes should I use for growing in buckets?
You’ll want to use seed potatoes, which are potatoes specifically grown for planting. These are different from the potatoes you buy at the grocery store, which may have been treated to prevent sprouting. You can purchase seed potatoes from garden centers or online retailers. Choose varieties that are well-suited to your climate and personal preferences. Popular choices include Russet Burbank, Yukon Gold, Red Pontiac, and fingerling potatoes. Experimenting with different varieties is part of the fun!
What size bucket is best for growing potatoes?
A 5-gallon bucket is generally considered the minimum size for growing potatoes successfully. However, larger buckets, such as 10-gallon or even larger, will provide more room for the roots to develop and potentially result in a larger harvest. The key is to ensure adequate drainage, regardless of the bucket size.
What kind of soil should I use?
Potatoes need well-draining soil that is rich in organic matter. A good mix would be equal parts of potting soil, compost, and perlite or vermiculite. Avoid using garden soil, as it can be too heavy and compact, hindering drainage and root growth. The compost provides essential nutrients, while the perlite or vermiculite improves drainage and aeration.
How much sunlight do potatoes need?
Potatoes need at least 6-8 hours of direct sunlight per day to thrive. Choose a location that receives ample sunlight throughout the day. If you’re growing potatoes indoors, you may need to supplement with grow lights. Insufficient sunlight can lead to weak, leggy plants and reduced yields.
How often should I water my potato plants?
Water your potato plants regularly, especially during hot and dry weather. The soil should be consistently moist but not waterlogged. Check the soil moisture by sticking your finger about an inch deep. If the soil feels dry, it’s time to water. Overwatering can lead to root rot, so ensure the bucket has adequate drainage.
How does the “hilling” process work in a bucket?
Hilling is the process of adding more soil to the bucket as the potato plants grow. This encourages the plant to produce more potatoes along the buried stem. Start by filling the bucket about one-third full with soil. Plant your seed potatoes and cover them with a few inches of soil. As the plants grow, gradually add more soil until the bucket is nearly full, leaving a few inches at the top for watering.
When do I harvest my potatoes?
You can start harvesting “new potatoes” (small, tender potatoes) a few weeks after the plants flower. To harvest new potatoes, carefully reach into the bucket and remove a few potatoes without disturbing the rest of the plant. For a full harvest, wait until the foliage starts to die back and turn yellow or brown. This usually takes about 80-100 days from planting.
How do I store my harvested potatoes?
Store your harvested potatoes in a cool, dark, and dry place. A root cellar is ideal, but a basement or garage can also work. Avoid storing potatoes in the refrigerator, as this can cause them to convert starch to sugar, affecting their flavor and texture. Properly stored potatoes can last for several months.
What are some common pests and diseases that affect potato plants?
Common pests include aphids, potato beetles, and flea beetles. Diseases include early blight, late blight, and potato scab. Regularly inspect your plants for signs of pests or diseases. Use organic pest control methods, such as insecticidal soap or neem oil, to control pests. Ensure good air circulation and avoid overwatering to prevent diseases.
Can I reuse the soil from my potato buckets?
It’s generally not recommended to reuse the soil from your potato buckets for growing potatoes again in the same bucket the following year. This is because the soil may harbor pests or diseases that can affect the new crop. However, you can use the soil for other plants in your garden, as long as they are not susceptible to the same pests or diseases. Amending the soil with fresh compost before reusing it for other plants is always a good idea.
Leave a Comment