
Growing Potatoes at Home can feel like striking gold in your own backyard! Imagine the satisfaction of harvesting plump, earthy potatoes that you nurtured from tiny seed potatoes. Forget those bland, store-bought spuds – we’re talking about flavor explosions and bragging rights, my friend!
For centuries, potatoes have been a staple food, fueling civilizations from the Incas in the Andes to the Irish countryside. Their resilience and nutritional value have made them a vital crop worldwide. But you don’t need a sprawling farm to enjoy the fruits (or rather, tubers!) of your labor.
In today’s world, where we’re increasingly conscious of where our food comes from, growing potatoes at home offers a fantastic way to connect with nature, reduce your carbon footprint, and ensure you’re eating fresh, healthy produce. Plus, let’s be honest, who doesn’t love a good DIY project? This guide will provide you with simple, effective tricks and hacks to cultivate a thriving potato patch, even if you’re a complete beginner. So, grab your gardening gloves, and let’s get digging!
Kartoffeln zu Hause anbauen: Dein umfassender DIY-Leitfaden
Hey Gartenfreunde! Habt ihr euch jemals gefragt, wie es wäre, eure eigenen Kartoffeln anzubauen? Es ist einfacher als ihr denkt und unglaublich befriedigend, wenn ihr eure selbst geernteten Kartoffeln auf dem Teller habt. In diesem Artikel zeige ich euch Schritt für Schritt, wie ihr das ganz einfach zu Hause machen könnt – egal ob im Garten, auf dem Balkon oder sogar in einem Sack!
Was du brauchst: Die Vorbereitung
Bevor wir loslegen, brauchen wir ein paar Dinge. Keine Sorge, die meisten davon habt ihr wahrscheinlich schon zu Hause oder könnt sie leicht besorgen.
* Saatkartoffeln: Das sind spezielle Kartoffeln, die zum Anpflanzen gezüchtet wurden. Ihr bekommt sie in Gartencentern oder online. Achtet darauf, zertifizierte Saatkartoffeln zu kaufen, um Krankheiten zu vermeiden.
* Ein Pflanzgefäß: Das kann ein Gartenbeet, ein großer Topf (mindestens 30 Liter Fassungsvermögen), ein Pflanzsack oder sogar ein alter Eimer sein. Hauptsache, es hat Abzugslöcher, damit das Wasser ablaufen kann.
* Gute Erde: Eine Mischung aus Gartenerde, Kompost und etwas Sand ist ideal. Die Erde sollte locker und gut durchlässig sein.
* Kompost oder organischer Dünger: Kartoffeln sind hungrig! Kompost oder organischer Dünger versorgen sie mit den nötigen Nährstoffen.
* Gießkanne oder Schlauch: Zum Bewässern natürlich!
* Eine Schaufel oder Kelle: Zum Pflanzen und Anhäufeln.
* (Optional) Stroh oder Mulch: Zum Abdecken der Erde und zur Unkrautbekämpfung.
Schritt-für-Schritt-Anleitung: Kartoffeln pflanzen
Jetzt geht’s ans Eingemachte! Hier ist eine detaillierte Anleitung, wie ihr eure Kartoffeln pflanzt:
1. Saatkartoffeln vorbereiten:
* Einige Wochen vor dem Pflanzen (ca. 4-6 Wochen) solltet ihr die Saatkartoffeln vorkeimen lassen. Legt sie dazu an einen hellen, kühlen Ort (ca. 10-15°C).
* Ihr werdet sehen, dass sich kleine, grüne Triebe bilden. Diese Triebe sind wichtig für das Wachstum der Kartoffelpflanze.
* Wenn die Kartoffeln sehr groß sind, könnt ihr sie in Stücke schneiden. Achtet darauf, dass jedes Stück mindestens 2-3 Triebe hat. Lasst die Schnittflächen vor dem Pflanzen ein paar Tage antrocknen, um Fäulnis zu vermeiden.
2. Pflanzgefäß vorbereiten:
* Füllt euer Pflanzgefäß mit einer Schicht Erde (ca. 10-15 cm hoch).
* Mischt etwas Kompost oder organischen Dünger unter die Erde.
3. Kartoffeln pflanzen:
* Legt die Saatkartoffeln mit den Trieben nach oben auf die Erde.
* Achtet darauf, dass die Kartoffeln genügend Abstand zueinander haben (ca. 20-30 cm).
* Bedeckt die Kartoffeln mit einer weiteren Schicht Erde (ca. 5-10 cm hoch).
4. Gießen:
* Gießt die Erde gut an, aber vermeidet Staunässe. Die Erde sollte feucht, aber nicht nass sein.
5. Standort wählen:
* Stellt euer Pflanzgefäß an einen sonnigen Ort. Kartoffeln brauchen mindestens 6 Stunden Sonne pro Tag.
Die Pflege: So bleiben deine Kartoffeln glücklich
Nach dem Pflanzen ist vor der Pflege! Hier sind ein paar Tipps, wie ihr eure Kartoffeln gesund und glücklich haltet:
1. Gießen:
* Gießt regelmäßig, besonders während trockener Perioden. Die Erde sollte immer leicht feucht sein.
2. Anhäufeln:
* Das Anhäufeln ist ein wichtiger Schritt, um den Ertrag zu erhöhen. Wenn die Kartoffelpflanzen ca. 20-30 cm hoch sind, häufelt ihr Erde um die Stängel an. Dadurch werden mehr Kartoffeln gebildet und die Knollen vor Sonnenlicht geschützt (was sie grün und ungenießbar machen würde).
* Wiederholt das Anhäufeln alle paar Wochen, bis das Pflanzgefäß fast voll ist.
3. Düngen:
* Düngt eure Kartoffeln regelmäßig mit Kompost oder organischem Dünger. Das sorgt für eine gute Nährstoffversorgung.
4. Unkraut bekämpfen:
* Entfernt regelmäßig Unkraut, damit es den Kartoffeln keine Nährstoffe wegnimmt.
5. Schädlinge und Krankheiten:
* Achtet auf Schädlinge wie Kartoffelkäfer oder Blattläuse. Bei Befall könnt ihr natürliche Schädlingsbekämpfungsmittel einsetzen.
* Achtet auch auf Krankheiten wie Kraut- und Braunfäule. Bei Befall solltet ihr die befallenen Blätter entfernen und gegebenenfalls ein Fungizid einsetzen.
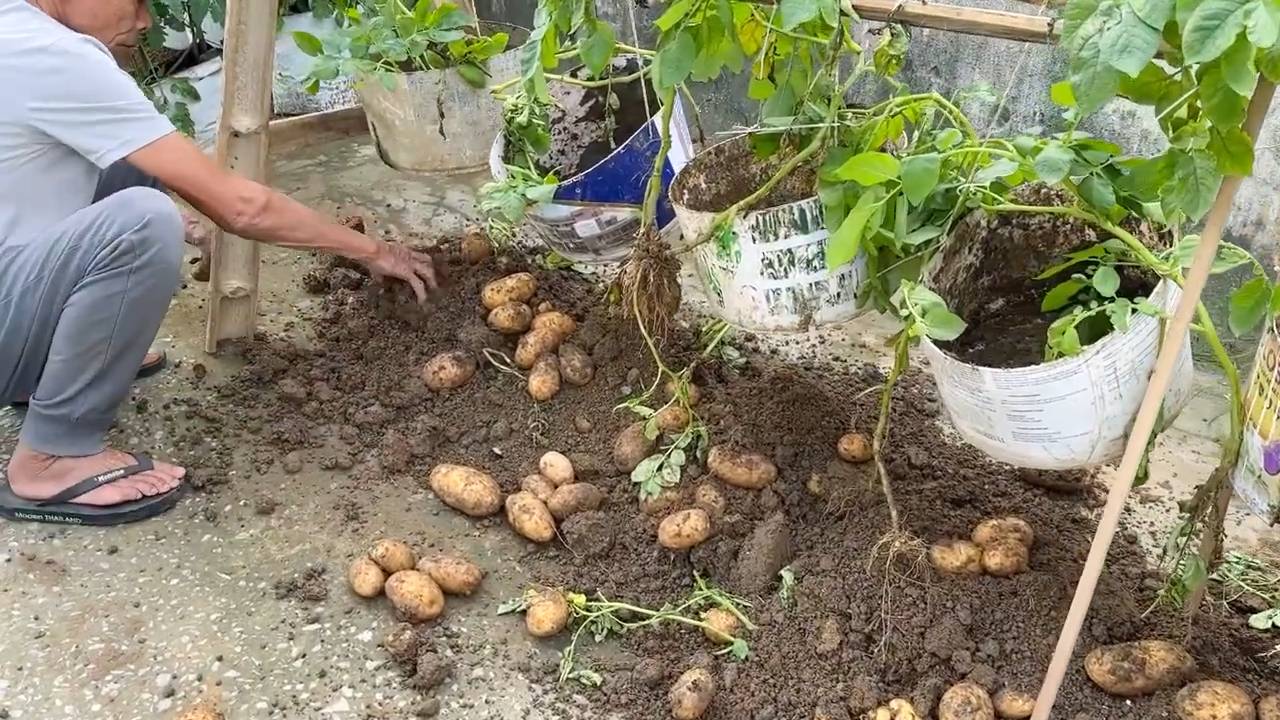
Die Ernte: Der Lohn deiner Mühe
Nach ca. 3-4 Monaten (je nach Sorte) sind eure Kartoffeln erntereif! Hier sind ein paar Tipps, wie ihr sie erntet:
1. Erntezeitpunkt:
* Die Blätter der Kartoffelpflanzen werden gelb und welk. Das ist ein Zeichen, dass die Kartoffeln reif sind.
* Ihr könnt auch eine “Probeernte” machen, indem ihr vorsichtig eine Pflanze ausgrabt und schaut, ob die Kartoffeln die gewünschte Größe haben.
2. Ernten:
* Grabt die Kartoffeln vorsichtig mit einer Grabegabel oder Schaufel aus. Achtet darauf, die Knollen nicht zu beschädigen.
* Lasst die Kartoffeln nach dem Ausgraben ein paar Stunden an der Luft trocknen.
3. Lagern:
* Lagert die Kartoffeln an einem kühlen, dunklen und trockenen Ort. Ideal ist ein Keller oder eine Speisekammer.
* Entfernt beschädigte oder kranke Kartoffeln, bevor ihr sie lagert.
Spezielle Techniken für den Anbau im Sack oder Eimer
Der Anbau im Sack oder Eimer ist eine tolle Alternative, wenn du keinen Garten hast. Hier sind ein paar Besonderheiten:
1. Wähle den richtigen Sack/Eimer:
* Der Sack oder Eimer sollte groß genug sein (mindestens 30 Liter Fassungsvermögen) und Abzugslöcher haben.
* Du kannst auch einen alten Jutesack oder einen stabilen Müllsack verwenden.
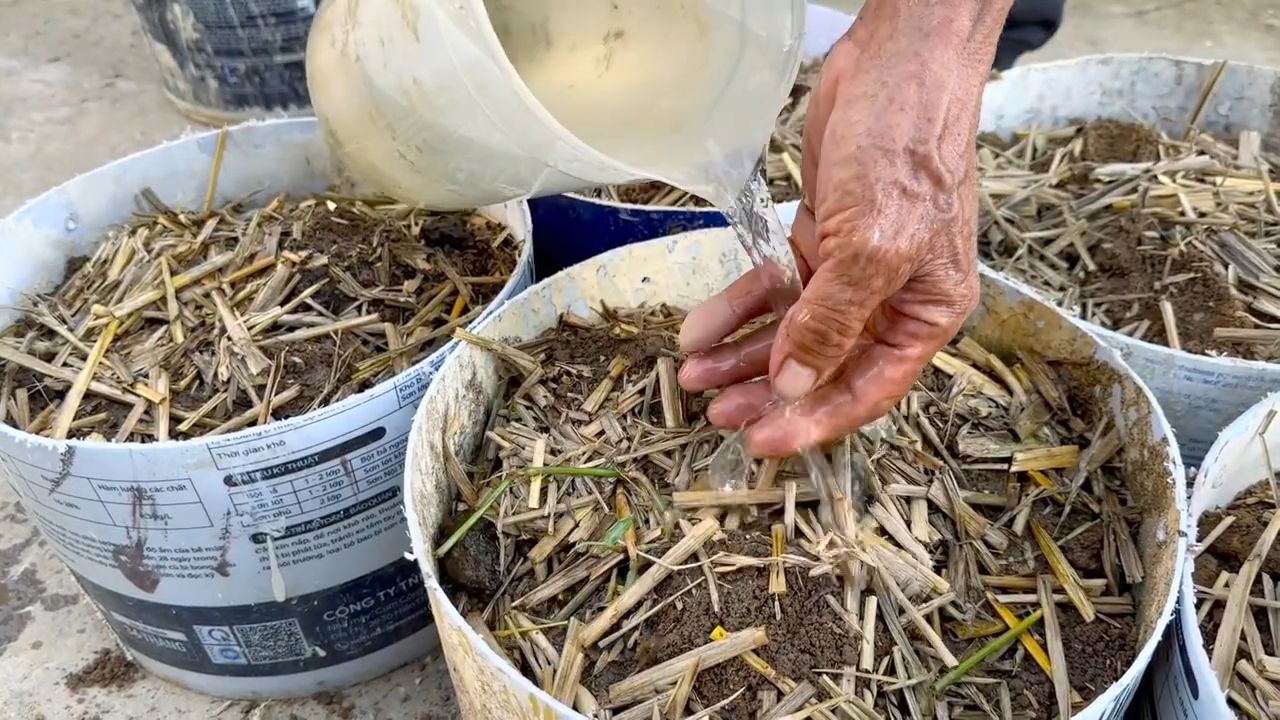
2. Schichtweises Pflanzen:
* Fülle den Sack/Eimer mit einer Schicht Erde (ca. 10-15 cm hoch).
* Lege die Saatkartoffeln darauf und bedecke sie mit einer weiteren Schicht Erde (ca. 5-10 cm hoch).
* Wenn die Pflanzen wachsen, häufelst du immer wieder Erde an, bis der Sack/Eimer fast voll ist.
3. Bewässerung:
* Achte darauf, dass die Erde im Sack/Eimer nicht austrocknet. Gieße regelmäßig, besonders an heißen Tagen.
4. Ernte:
* Zum Ernten kannst du den Sack/Eimer einfach umkippen und die Kartoffeln heraussuchen.
Zusätzliche Tipps und Tricks
* Sortenwahl: Wähle Kartoffelsorten, die für den Anbau im Topf oder Sack geeignet sind. Frühkartoffeln wie ‘Annabelle’ oder ‘Solist’ sind eine gute Wahl.
* Bodenverbesserung: Mische etwas Hornspäne oder Steinmehl unter die Erde, um die Nährstoffversorgung zu verbessern.
* Mulchen: Bedecke die Erde mit Stroh oder Mulch, um die Feuchtigkeit zu halten und Unkraut zu unterdrücken.
* Schutz vor Frost: Wenn Frost droht, decke die Kartoffelpflanzen mit Vlies oder Folie ab.
Ich hoffe, dieser Leitfaden hat euch geholfen, eure eigenen Kartoffeln anzubauen. Es ist ein tolles Gefühl, seine eigenen Lebensmittel zu ernten und zu wissen, wo sie herkommen. Viel
Conclusion
So, there you have it! Growing potatoes at home is not only achievable, even for those with limited space, but it’s also incredibly rewarding. From the satisfaction of nurturing a plant from a humble seed potato to the unparalleled flavor of freshly harvested, homegrown spuds, this DIY project offers a unique connection to your food. We’ve explored the simple yet effective methods, from container gardening to utilizing grow bags, ensuring that anyone can participate in this fulfilling experience.
Why is this a must-try? Because beyond the delicious outcome, growing your own potatoes offers a level of control and transparency that you simply can’t get from store-bought varieties. You know exactly what goes into your food – no mystery pesticides or long-distance transportation. Plus, it’s a fantastic way to reduce your carbon footprint and embrace a more sustainable lifestyle. The taste difference alone is worth the effort. Imagine the creamy texture and earthy flavor of a potato that went from garden to plate in a matter of hours. It’s an experience that will redefine your appreciation for this versatile vegetable.
But the benefits don’t stop there. Growing potatoes at home is also a fantastic educational opportunity, especially for children. It teaches them about the life cycle of plants, the importance of healthy soil, and the rewards of patience and hard work. It’s a hands-on learning experience that they’ll remember for years to come.
Ready to take it to the next level? Consider experimenting with different potato varieties. From the classic Russet Burbank to the vibrant Yukon Gold or the fingerling potatoes with their unique shape and flavor, the possibilities are endless. You can also try companion planting to improve your potato yield and deter pests. Marigolds, for example, are known to repel nematodes, while basil can help ward off potato beetles.
Don’t be afraid to get creative with your growing methods. If you have a small balcony, try vertical gardening with stacked tires or repurposed pallets. If you have a larger garden, consider planting your potatoes in raised beds for better drainage and soil control. The key is to adapt the techniques to your specific environment and resources.
We are confident that you will find the process of growing potatoes at home to be both enjoyable and educational. The satisfaction of harvesting your own potatoes, knowing that you nurtured them from start to finish, is truly unparalleled.
So, grab some seed potatoes, prepare your soil, and get ready to embark on this exciting gardening adventure. We encourage you to try this DIY trick and experience the joy of homegrown potatoes for yourself. And most importantly, don’t forget to share your experiences with us! We’d love to hear about your successes, challenges, and any unique tips or tricks you discover along the way. Share your photos and stories on our social media channels using #HomegrownPotatoes. Let’s build a community of potato enthusiasts and inspire others to embrace the joys of gardening. Happy growing!
Frequently Asked Questions (FAQ)
What are seed potatoes and where can I get them?
Seed potatoes are potatoes specifically grown to be planted and produce new potato plants. They are different from potatoes you buy at the grocery store, which may have been treated to prevent sprouting. Seed potatoes are certified disease-free and are available at most garden centers, nurseries, and online retailers. Look for varieties that are well-suited to your climate and growing conditions.
How do I prepare seed potatoes for planting?
Chitting, or pre-sprouting, seed potatoes can give them a head start. About 4-6 weeks before planting, place the seed potatoes in a cool, bright location (but not direct sunlight) to encourage them to sprout. You can place them in egg cartons or trays with the “eyes” facing upwards. Once the sprouts are about 1 inch long, they are ready to be planted. If your seed potatoes are large, you can cut them into smaller pieces, ensuring that each piece has at least one or two “eyes.” Allow the cut pieces to dry for a day or two before planting to prevent rotting.
What kind of soil is best for growing potatoes?
Potatoes prefer well-drained, loose soil that is rich in organic matter. A slightly acidic soil pH of 6.0 to 6.5 is ideal. Amend your soil with compost, aged manure, or other organic materials to improve drainage and fertility. Avoid heavy clay soils, as they can become waterlogged and hinder potato growth. If you have clay soil, consider growing potatoes in raised beds or containers.
How much sunlight do potatoes need?
Potatoes need at least 6-8 hours of direct sunlight per day to thrive. Choose a planting location that receives plenty of sunlight throughout the growing season. If you are growing potatoes in containers, you can move them around to ensure they get enough sunlight.
How often should I water my potato plants?
Water your potato plants regularly, especially during dry periods. Keep the soil consistently moist, but avoid overwatering, which can lead to rot. Water deeply and less frequently, rather than shallowly and more often. Check the soil moisture by sticking your finger into the soil about an inch deep. If the soil feels dry, it’s time to water.
How do I “hill” my potato plants?
Hilling is the process of mounding soil around the base of the potato plants as they grow. This encourages the plants to produce more potatoes along the buried stems. Start hilling when the plants are about 6-8 inches tall. Gently mound soil around the stems, leaving a few inches of the top leaves exposed. Repeat this process every few weeks as the plants grow, until the soil level reaches the top of your container or raised bed.
What are common potato pests and diseases?
Common potato pests include potato beetles, aphids, and nematodes. Diseases include early blight, late blight, and potato scab. Monitor your plants regularly for signs of pests or diseases. Use organic pest control methods, such as hand-picking pests, using insecticidal soap, or introducing beneficial insects. To prevent diseases, choose disease-resistant potato varieties, practice crop rotation, and avoid overwatering.
When are potatoes ready to harvest?
The timing of harvest depends on the potato variety and your desired use. “New potatoes,” which are small and tender, can be harvested a few weeks after the plants flower. For larger, mature potatoes, wait until the foliage begins to die back. This usually occurs about 2-3 months after planting. To harvest, gently dig around the base of the plant with a garden fork, being careful not to damage the potatoes.
How do I store my harvested potatoes?
Store your harvested potatoes in a cool, dark, and well-ventilated place. A temperature of around 40-50°F (4-10°C) is ideal. Avoid storing potatoes near apples or onions, as they release gases that can cause potatoes to spoil. Properly stored potatoes can last for several months.
Can I grow potatoes in a small space, like a balcony?
Absolutely! Growing potatoes in containers or grow bags is a great option for small spaces. Choose a large container (at least 10 gallons) with drainage holes. Fill the container with well-draining soil and plant your seed potatoes as described above. Water regularly and fertilize as needed. You can even grow potatoes vertically using stacked tires or repurposed pallets.
Leave a Comment