
Growing Pink Radishes at Home might sound like a whimsical dream, but trust me, it’s an achievable and incredibly rewarding experience! Forget those bland, store-bought radishes; imagine plucking vibrant, peppery pink gems straight from your own garden. It’s easier than you think, and I’m here to guide you through every step of the process with some simple DIY tricks and hacks.
Radishes, in general, have a surprisingly long and fascinating history. They’ve been cultivated for thousands of years, with evidence suggesting they were enjoyed by the ancient Egyptians and Greeks. While the classic red radish is well-known, exploring the world of pink radishes adds a touch of elegance and fun to your homegrown harvest. Think of them as the garden’s little jewels!
But why should you bother with this DIY project? Well, for starters, growing pink radishes at home allows you to control exactly what goes into your food – no pesticides, no hidden chemicals, just pure, fresh goodness. Plus, radishes are incredibly fast-growing, offering almost instant gratification for the impatient gardener (like me!). They’re also a fantastic way to introduce children to the joys of gardening and healthy eating. And let’s be honest, who wouldn’t want to impress their friends with a beautiful salad featuring these rosy root vegetables? So, let’s dive in and discover the secrets to cultivating your own pink radish paradise!

Rosa Radieschen selbst anbauen: Ein DIY-Leitfaden für Anfänger
Hallo Gartenfreunde! Habt ihr Lust auf knackige, leicht scharfe und wunderschön pinke Radieschen aus dem eigenen Garten? Ich zeige euch, wie ihr das ganz einfach selbst hinbekommt. Radieschen sind super pflegeleicht und wachsen unglaublich schnell – perfekt also für ungeduldige Gärtner wie mich!
Warum rosa Radieschen?
Rosa Radieschen sind nicht nur ein Hingucker im Salat, sondern auch geschmacklich eine tolle Abwechslung. Sie sind oft milder als die klassischen roten Sorten und bringen Farbe auf den Teller. Außerdem sind sie reich an Vitaminen und Mineralstoffen. Was will man mehr?
Was ihr braucht:
* Radieschensamen (am besten eine rosa Sorte wie ‘French Breakfast’ oder ‘Pink Beauty’)
* Einen sonnigen bis halbschattigen Standort
* Lockere, humusreiche Erde
* Einen Rechen
* Eine Gießkanne oder einen Gartenschlauch mit Brausekopf
* Eventuell etwas Kompost oder organischen Dünger
Der perfekte Standort für eure rosa Radieschen
Radieschen lieben die Sonne, aber pralle Mittagssonne kann ihnen schaden. Ein halbschattiger Standort ist ideal, besonders im Sommer. Achtet darauf, dass der Boden gut durchlässig ist, damit sich keine Staunässe bildet.
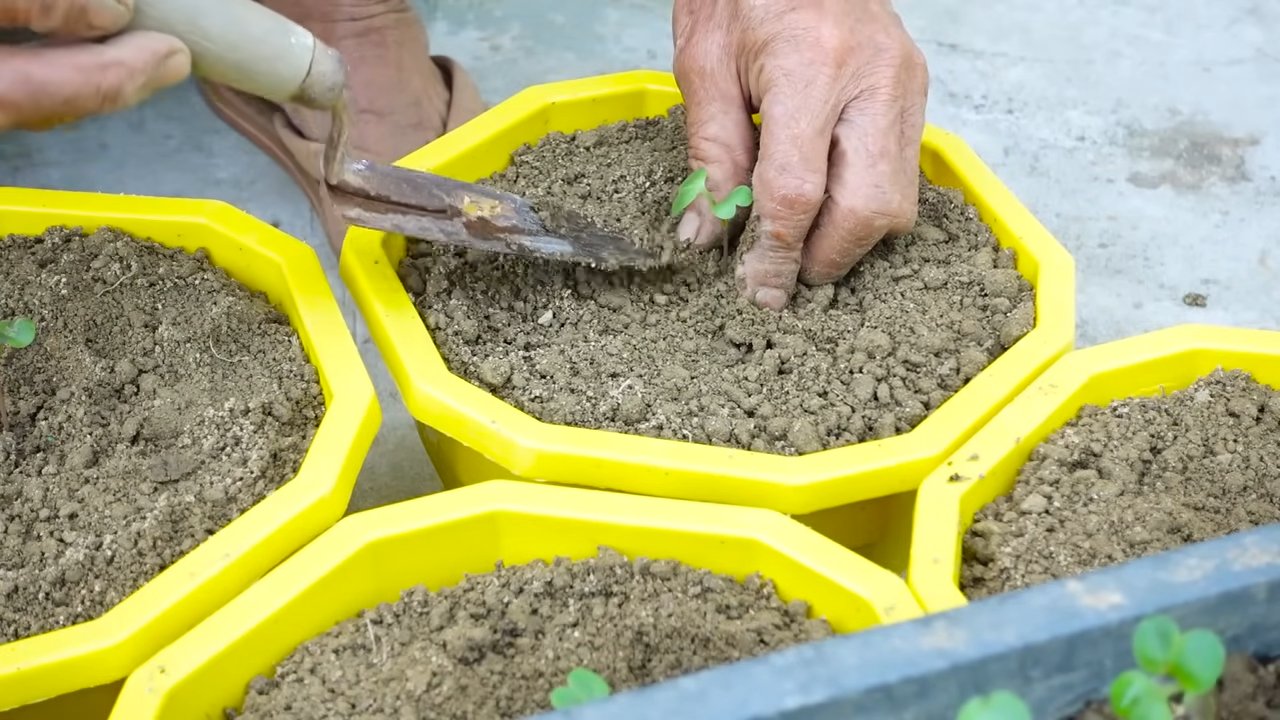
Schritt-für-Schritt-Anleitung: Radieschen säen
1. Bodenvorbereitung: Zuerst müsst ihr den Boden vorbereiten. Lockert ihn mit einem Rechen auf und entfernt Steine und Unkraut. Wenn der Boden sehr sandig oder lehmig ist, könnt ihr etwas Kompost oder organischen Dünger einarbeiten, um ihn zu verbessern. Ich mache das immer, um sicherzustellen, dass meine Radieschen alles bekommen, was sie brauchen.
2. Rillen ziehen: Zieht mit dem Rechen oder einem Stock flache Rillen in den Boden. Die Rillen sollten etwa 1-2 cm tief sein und einen Abstand von etwa 10-15 cm zueinander haben.
3. Aussaat: Verteilt die Radieschensamen gleichmäßig in den Rillen. Achtet darauf, dass die Samen nicht zu dicht liegen, da die Radieschen sonst nicht genug Platz zum Wachsen haben. Ich säe die Samen immer etwas dünner aus und pikiere später, falls nötig.
4. Samen bedecken: Bedeckt die Samen vorsichtig mit Erde und drückt sie leicht an.
5. Gießen: Gießt die Erde vorsichtig mit einer Gießkanne oder einem Gartenschlauch mit Brausekopf an. Achtet darauf, dass die Erde feucht, aber nicht nass ist.
6. Beschriften: Vergesst nicht, eure Radieschenreihe zu beschriften, damit ihr später wisst, was ihr gesät habt!
Radieschenpflege: So bleiben eure Pflanzen gesund und glücklich
* Gießen: Radieschen brauchen regelmäßig Wasser, besonders während der Keimung und des Wachstums. Achtet darauf, dass die Erde immer feucht ist, aber vermeidet Staunässe. Ich gieße meine Radieschen am liebsten morgens, damit die Blätter über den Tag abtrocknen können.
* Unkraut jäten: Haltet das Beet unkrautfrei, damit die Radieschen nicht um Nährstoffe und Licht konkurrieren müssen. Unkraut jäten ist zwar nicht meine Lieblingsbeschäftigung, aber es lohnt sich!
* Ausdünnen: Wenn die Radieschen zu dicht stehen, müsst ihr sie ausdünnen. Entfernt die schwächsten Pflanzen, damit die übrigen genug Platz zum Wachsen haben. Die entfernten Radieschen könnt ihr natürlich trotzdem essen!
* Schutz vor Schädlingen: Radieschen können von verschiedenen Schädlingen befallen werden, wie zum Beispiel Erdflöhen oder Schnecken. Um sie zu schützen, könnt ihr ein Netz über das Beet spannen oder natürliche Schädlingsbekämpfungsmittel verwenden. Ich habe gute Erfahrungen mit Kaffeesatz gegen Schnecken gemacht.
Erntezeit: Wann sind die rosa Radieschen reif?
Radieschen wachsen unglaublich schnell! Je nach Sorte und Witterung könnt ihr sie schon nach 3-4 Wochen ernten. Die Radieschen sind reif, wenn sie eine Größe von etwa 2-3 cm erreicht haben. Zieht die Radieschen vorsichtig aus der Erde. Wenn sie sich schwer ziehen lassen, sind sie wahrscheinlich noch nicht reif.
Tipps und Tricks für eine reiche Radieschenernte
* Nachsaat: Um kontinuierlich Radieschen ernten zu können, könnt ihr alle 2-3 Wochen neu aussäen.
* Mischkultur: Radieschen vertragen sich gut mit anderen Gemüsesorten wie Salat, Karotten oder Spinat.
* Bodenverbesserung: Wenn der Boden sehr sandig ist, könnt ihr Bentonit-Tonmehl einarbeiten, um die Wasserspeicherfähigkeit zu verbessern.
* Schutz vor Frost: Bei Frostgefahr könnt ihr das Beet mit einem Vlies abdecken.
Radieschen in Töpfen anbauen: Geht das?
Ja, klar! Radieschen lassen sich auch wunderbar in Töpfen oder Balkonkästen anbauen. Wählt einen Topf mit ausreichend Volumen (mindestens 15 cm Durchmesser) und verwendet eine gute Blumenerde. Achtet darauf, dass der Topf Abzugslöcher hat, damit das Wasser ablaufen kann. Die Pflege ist die gleiche wie im Beet.
Radieschen richtig lagern: So bleiben sie knackig
Radieschen sind nicht lange haltbar. Am besten schmecken sie frisch geerntet. Wenn ihr sie lagern möchtet, entfernt das Grün und bewahrt die Radieschen in einem feuchten Tuch im Kühlschrank auf. So bleiben sie ein paar Tage knackig.
Rezeptideen mit rosa Radieschen
* Radieschensalat: Einfach Radieschen in Scheiben schneiden und mit Essig, Öl, Salz und Pfeffer anmachen.
* Radieschenbutter: Radieschen fein hacken und mit weicher Butter vermischen. Mit Salz und Pfeffer abschmecken.
* Radieschenblätter-Pesto: Die Blätter der Radieschen sind essbar und schmecken leicht scharf. Ihr könnt sie zu einem Pesto verarbeiten.
* Radieschen als Rohkost: Einfach pur knabbern oder mit einem Dip servieren.
Häufige Probleme und Lösungen
* Radieschen werden nicht dick: Das kann verschiedene Ursachen haben. Entweder stehen die Radieschen zu dicht, der Boden ist zu trocken oder es fehlen Nährstoffe. Achtet auf ausreichend Abstand, regelmäßiges Gießen und düngt bei Bedarf.
* Radieschen sind scharf: Das kann an der Sorte liegen oder daran, dass die Radieschen zu lange in der Erde waren. Erntet die Radieschen rechtzeitig und wählt eine mildere Sorte.
* Radieschen sind hohl: Das kann an unregelmäßiger Bewässerung liegen. Achtet darauf, dass die Erde immer gleichmäßig feucht ist.
Fazit: Ran an die Radieschen!
Ich hoffe, dieser Leitfaden hat euch Mut gemacht, selbst rosa Radieschen anzubauen. Es ist wirklich kinderleicht und macht Spaß! Mit ein bisschen Geduld und Pflege könnt ihr schon bald eure eigenen knackigen Radieschen ernten und genießen. Viel Erfolg!
Conclusion
So, there you have it! Growing pink radishes at home is not only achievable, but it’s also a rewarding experience that brings a burst of color and flavor to your table. Forget those bland, store-bought radishes; imagine the vibrant crunch of a freshly harvested, homegrown pink radish, adding a peppery zing to your salads, sandwiches, or even enjoyed as a simple, healthy snack.
This DIY trick, as we’ve outlined, is a game-changer for anyone looking to cultivate their own produce, regardless of garden size or experience level. The beauty of growing your own pink radishes lies in the control you have over the entire process – from selecting the perfect variety to ensuring optimal growing conditions. You’ll know exactly what’s going into your food, free from harmful pesticides and chemicals.
Beyond the health benefits, growing pink radishes is incredibly satisfying. Watching those tiny seeds sprout and transform into beautiful, edible roots is a testament to the power of nature and a reminder of the simple joys in life. Plus, the vibrant pink hue adds a touch of whimsy to your garden, making it a conversation starter and a source of pride.
But the fun doesn’t stop there! Feel free to experiment with different varieties of pink radishes. There are numerous cultivars available, each with its own unique flavor profile and appearance. Try the ‘French Breakfast’ radish for a mild, elongated option, or the ‘Cherry Belle’ for a classic, round shape and slightly spicier taste. You can even try succession planting, sowing seeds every few weeks, to ensure a continuous harvest throughout the growing season.
Consider companion planting your pink radishes with other vegetables like carrots, lettuce, or spinach. These pairings can help deter pests, improve soil health, and maximize your garden’s productivity. You can also use the radish greens in salads or stir-fries, adding a nutritious and peppery kick to your meals. Don’t let any part of your harvest go to waste!
We wholeheartedly encourage you to give this DIY trick a try. It’s a simple, affordable, and incredibly rewarding way to connect with nature, improve your diet, and add a touch of beauty to your life. Whether you’re a seasoned gardener or a complete beginner, growing pink radishes at home is an experience you won’t regret.
Once you’ve harvested your first batch of homegrown pink radishes, we’d love to hear about your experience! Share your photos, tips, and tricks with us in the comments below. Let’s create a community of radish enthusiasts and inspire others to embrace the joy of gardening. Happy growing!
Frequently Asked Questions (FAQ)
What are the best conditions for growing pink radishes?
Pink radishes thrive in cool weather, making spring and fall the ideal seasons for planting. They prefer well-drained soil that is rich in organic matter. Aim for a soil pH between 6.0 and 7.0. Radishes need at least 6 hours of sunlight per day to grow properly. If you’re growing them indoors, ensure they have access to a grow light. Consistent moisture is crucial, so water regularly, especially during dry spells. Avoid overwatering, as this can lead to root rot.
How long does it take for pink radishes to grow?
One of the best things about growing pink radishes is their quick growth cycle. Most varieties mature in just 3-4 weeks from planting. This makes them a perfect crop for impatient gardeners or those looking for a quick harvest. Keep an eye on the size of the radish roots; they’re usually ready to harvest when they reach about 1 inch in diameter.
What are some common problems when growing pink radishes, and how can I prevent them?
Several issues can arise when growing pink radishes, but most are easily preventable. One common problem is flea beetles, which can create small holes in the leaves. Cover your plants with row covers to protect them from these pests. Root maggots can also be a problem, especially in areas with heavy clay soil. Improve soil drainage by adding compost or other organic matter. Overcrowding can lead to stunted growth, so be sure to thin your seedlings to the recommended spacing. Finally, bolting (premature flowering) can occur in hot weather. Plant your radishes during cooler seasons to avoid this issue.
Can I grow pink radishes in containers?
Absolutely! Pink radishes are well-suited for container gardening. Choose a container that is at least 6 inches deep and has drainage holes. Fill it with a well-draining potting mix. Sow the seeds directly into the container, spacing them about 1 inch apart. Water regularly and fertilize with a balanced liquid fertilizer every few weeks. Place the container in a sunny location. Container gardening is a great option for those with limited space or poor soil conditions.
How do I harvest pink radishes?
Harvesting pink radishes is simple. Gently loosen the soil around the radish and pull it straight up by the greens. If the radish is difficult to pull, use a garden fork to carefully lift it from the ground. Harvest radishes when they reach the desired size, usually about 1 inch in diameter. Don’t let them get too large, as they can become woody and bitter. After harvesting, remove the greens and store the radishes in the refrigerator for up to a week.
What are some creative ways to use pink radishes in cooking?
Pink radishes are incredibly versatile in the kitchen. They can be eaten raw in salads, sandwiches, or as a crunchy snack. Slice them thinly and add them to tacos or wraps for a peppery kick. Roast them with other root vegetables for a sweet and savory side dish. Pickle them for a tangy condiment. You can even use the radish greens in salads, stir-fries, or soups. Don’t be afraid to experiment and find your favorite ways to enjoy these colorful and flavorful vegetables.
Are pink radishes nutritious?
Yes, pink radishes are a good source of vitamins and minerals. They are low in calories and high in fiber, making them a healthy addition to any diet. Radishes contain vitamin C, potassium, and folate. They also have antioxidant properties, which can help protect against cell damage.
Can I save seeds from my pink radishes?
Saving seeds from pink radishes is possible, but it requires allowing the plants to bolt and produce seed pods. This process takes longer than growing them for their roots. If you want to save seeds, select healthy, vigorous plants and allow them to flower. Once the seed pods are dry and brown, harvest them and extract the seeds. Store the seeds in a cool, dry place until you’re ready to plant them. Keep in mind that radishes are cross-pollinated, so the seeds may not produce plants that are identical to the parent plants.
What are the different varieties of pink radishes I can grow?
There are several varieties of pink radishes available, each with its own unique characteristics. ‘French Breakfast’ is a popular variety with elongated roots and a mild flavor. ‘Cherry Belle’ is a classic round radish with a slightly spicier taste. ‘Pink Beauty’ is another round variety with a vibrant pink color. ‘Easter Egg’ radishes are a mix of different colors, including pink, red, purple, and white. Experiment with different varieties to find your favorites.
How often should I fertilize my pink radishes?
Pink radishes don’t require heavy fertilization, but a light feeding can help them grow. Apply a balanced liquid fertilizer every 2-3 weeks, starting when the seedlings are about 2 inches tall. Avoid over-fertilizing, as this can lead to excessive foliage growth at the expense of root development. You can also amend the soil with compost or other organic matter before planting to provide a slow-release source of nutrients.
Leave a Comment