
Growing Peanuts Indoors might sound like a quirky experiment reserved for seasoned gardeners, but trust me, it’s a surprisingly rewarding and accessible project for anyone! Forget the sprawling fields of Georgia; you can cultivate your own little peanut patch right in the comfort of your home.
Peanuts, though often called nuts, are actually legumes, belonging to the same family as beans and peas. Their cultivation dates back thousands of years in South America, where they were revered for their nutritional value and incorporated into various cultural practices. From ancient Incan tombs to modern-day snack bowls, peanuts have a rich and fascinating history.
But why bother growing them indoors? Well, for starters, it’s a fantastic way to extend the growing season, especially if you live in a region with shorter summers. More importantly, it’s a fun and educational activity for the whole family! Imagine the delight of harvesting your own homegrown peanuts, knowing exactly where they came from and how they were nurtured. Plus, growing peanuts indoors allows you to control the environment, minimizing the risk of pests and diseases that can plague outdoor crops.
This DIY guide will walk you through every step of the process, from selecting the right seeds to harvesting your very own batch of delicious, homegrown peanuts. So, grab your gardening gloves, and let’s get started on this exciting indoor adventure!
Erdnüsse im Haus anbauen: Dein umfassender DIY-Leitfaden
Hey Pflanzenfreunde! Hast du jemals darüber nachgedacht, Erdnüsse im Haus anzubauen? Klingt verrückt, oder? Aber es ist tatsächlich machbar und macht super viel Spaß! Ich habe es selbst ausprobiert und möchte meine Erfahrungen und mein Wissen mit dir teilen. Es ist ein tolles Projekt, besonders wenn du Kinder hast, da sie den gesamten Lebenszyklus einer Pflanze beobachten können, von der Nuss bis zur fertigen Erdnuss. Also, lass uns loslegen!
Was du brauchst: Die Vorbereitung
Bevor wir mit dem Pflanzen beginnen, müssen wir sicherstellen, dass wir alles Notwendige zur Hand haben. Hier ist eine Liste der Dinge, die du brauchst:
* Ungesalzene, rohe Erdnüsse: Das ist das A und O! Achte darauf, dass sie ungeröstet und ungesalzen sind, da geröstete oder gesalzene Erdnüsse nicht keimen werden. Du findest sie in den meisten Supermärkten oder Bioläden.
* Töpfe: Wähle Töpfe mit einem Durchmesser von mindestens 20 cm und einer Tiefe von 25 cm. Erdnusspflanzen brauchen Platz für ihre Wurzeln und die Erdnüsse, die sich unter der Erde bilden.
* Hochwertige Blumenerde: Verwende eine gut durchlässige Blumenerde. Du kannst auch etwas Sand oder Perlit hinzufügen, um die Drainage zu verbessern.
* Wasser: Klares, sauberes Wasser zum Gießen.
* Sonnenlicht: Ein sonniger Standort ist entscheidend. Erdnusspflanzen lieben die Sonne! Ein Südfenster ist ideal.
* Optional: Pflanzenlampe, falls du nicht genügend Sonnenlicht hast.
* Optional: Dünger für Erdnusspflanzen (spezieller Erdnussdünger oder ein ausgewogener Dünger).
Die Aussaat: Der Start ins Erdnuss-Abenteuer
Jetzt, wo wir alles haben, können wir mit dem Pflanzen beginnen. Keine Sorge, es ist einfacher als du denkst!
1. Erdnüsse vorbereiten: Weiche die Erdnüsse für etwa 24 Stunden in lauwarmem Wasser ein. Das hilft, die Keimung zu beschleunigen.
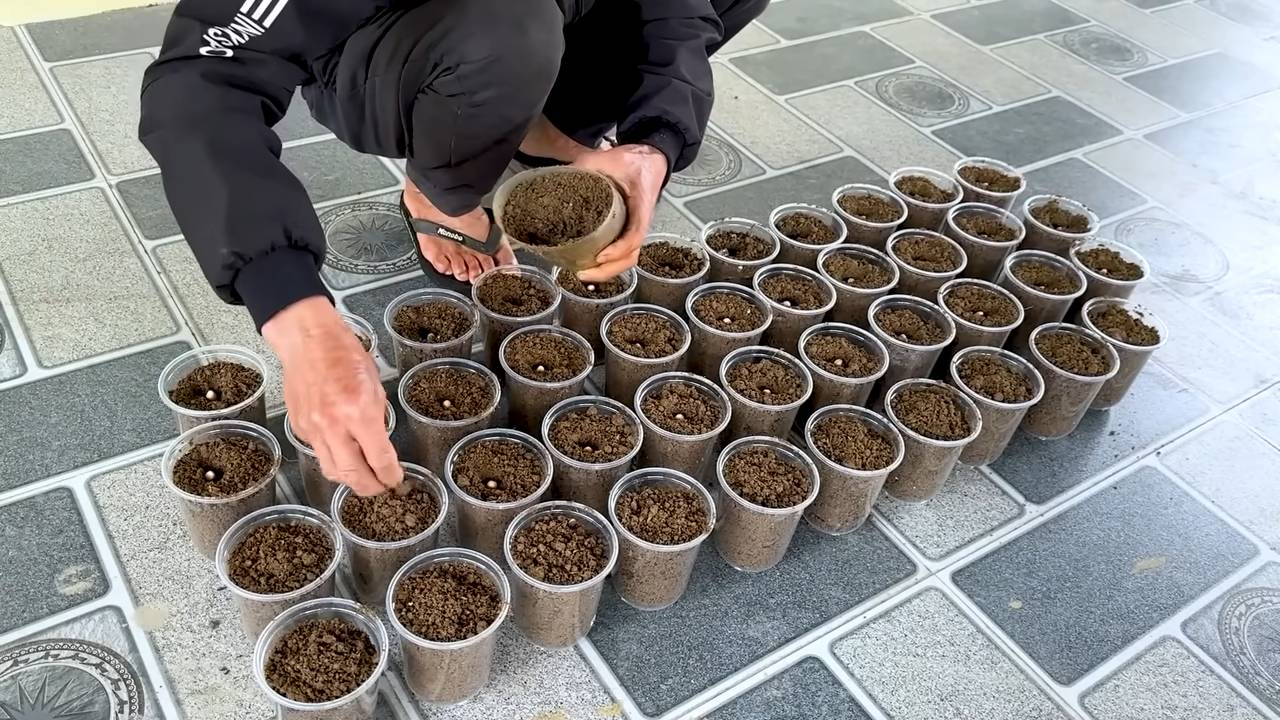
2. Töpfe vorbereiten: Fülle die Töpfe mit Blumenerde, lasse aber etwa 2-3 cm Platz bis zum Rand.
3. Erdnüsse pflanzen: Drücke die Erdnüsse etwa 2-3 cm tief in die Erde. Pflanze 2-3 Erdnüsse pro Topf, um die Chancen auf eine erfolgreiche Keimung zu erhöhen.
4. Gießen: Gieße die Erde vorsichtig, bis sie feucht, aber nicht durchnässt ist.
5. Standort: Stelle die Töpfe an einen warmen, sonnigen Ort.
Die Pflege: Geduld zahlt sich aus
Nach der Aussaat beginnt die eigentliche Arbeit: die Pflege der kleinen Erdnusspflanzen. Hier sind einige wichtige Tipps, die du beachten solltest:
* Gießen: Erdnusspflanzen brauchen regelmäßige Bewässerung, besonders während der Blütezeit und der Erdnussbildung. Die Erde sollte immer leicht feucht sein, aber vermeide Staunässe. Überprüfe die Feuchtigkeit der Erde, indem du deinen Finger etwa 2 cm tief in die Erde steckst. Wenn sie sich trocken anfühlt, ist es Zeit zum Gießen.
* Sonnenlicht: Stelle sicher, dass deine Erdnusspflanzen mindestens 6-8 Stunden Sonnenlicht pro Tag bekommen. Wenn du nicht genügend Sonnenlicht hast, verwende eine Pflanzenlampe.
* Düngen: Dünge deine Erdnusspflanzen alle 2-3 Wochen mit einem speziellen Erdnussdünger oder einem ausgewogenen Dünger. Befolge die Anweisungen auf der Verpackung.
* Boden anhäufeln: Wenn die Pflanzen wachsen und blühen, bilden sie sogenannte “Pegs” (Fruchtstiele), die sich in die Erde bohren, um dort die Erdnüsse zu bilden. Häufele Erde um die Basis der Pflanzen an, um diesen Prozess zu unterstützen.
* Schädlinge: Achte auf Schädlinge wie Blattläuse oder Spinnmilben. Wenn du Schädlinge entdeckst, behandle die Pflanzen mit einem biologischen Insektizid oder einer Mischung aus Wasser und Spülmittel.
Die Ernte: Der Lohn der Mühe
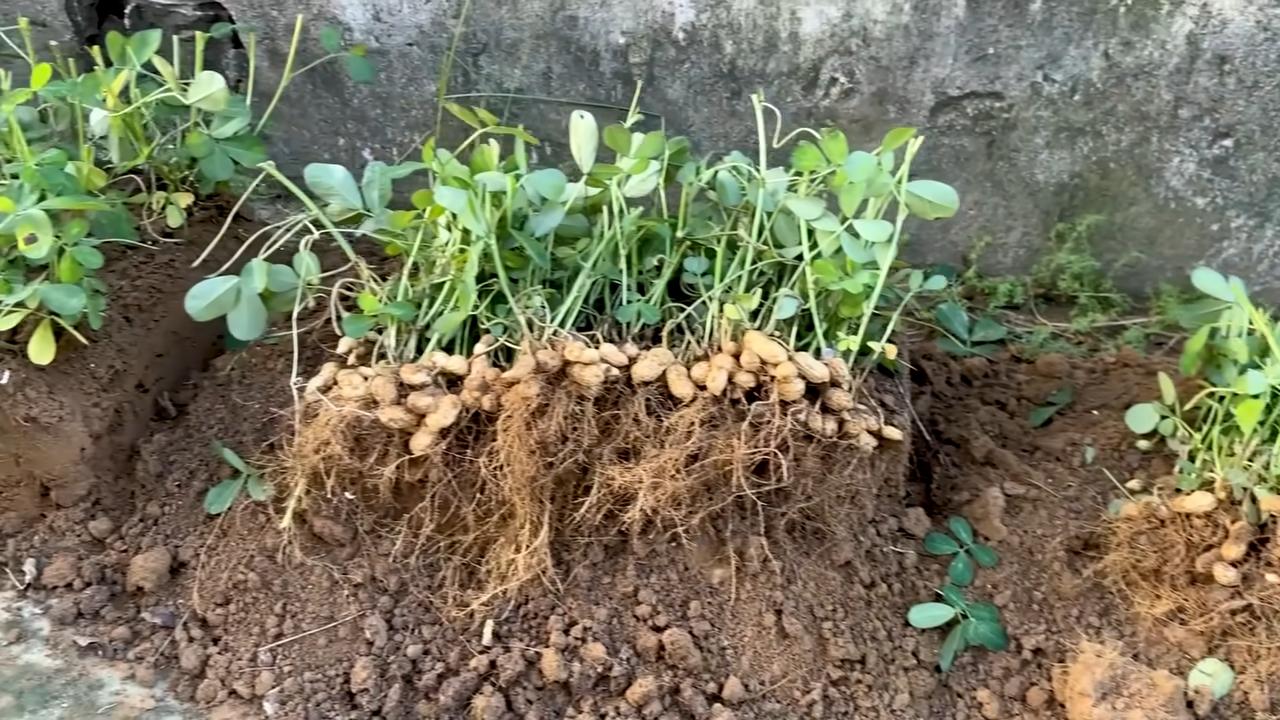
Nach etwa 4-5 Monaten, wenn die Blätter gelb werden und zu welken beginnen, ist es Zeit für die Ernte. Das ist der aufregendste Teil!
1. Pflanzen ausgraben: Grabe die Pflanzen vorsichtig aus dem Topf.
2. Erdnüsse ernten: Schüttle die Erde von den Wurzeln und sammle die Erdnüsse ein.
3. Erdnüsse trocknen: Lege die Erdnüsse zum Trocknen an einen warmen, trockenen Ort. Lasse sie dort für etwa 1-2 Wochen liegen, bis die Schalen vollständig getrocknet sind.
4. Erdnüsse lagern: Lagere die getrockneten Erdnüsse in einem luftdichten Behälter an einem kühlen, trockenen Ort.
Häufige Probleme und Lösungen
Auch beim Erdnussanbau im Haus können Probleme auftreten. Hier sind einige häufige Probleme und wie du sie lösen kannst:
* Keine Keimung: Wenn die Erdnüsse nicht keimen, kann das verschiedene Gründe haben. Stelle sicher, dass die Erdnüsse frisch und ungesalzen sind. Überprüfe auch die Temperatur und die Feuchtigkeit der Erde.
* Gelbe Blätter: Gelbe Blätter können ein Zeichen für Überwässerung, Nährstoffmangel oder Schädlingsbefall sein. Überprüfe die Bewässerung, dünge die Pflanzen und suche nach Schädlingen.
* Kleine Erdnüsse: Kleine Erdnüsse können ein Zeichen für Nährstoffmangel oder unzureichende Bewässerung sein. Dünge die Pflanzen regelmäßig und stelle sicher, dass sie genügend Wasser bekommen.
* Schimmel: Schimmel kann auftreten, wenn die Erde zu feucht ist oder die Luftzirkulation schlecht ist. Sorge für eine gute Belüftung und vermeide Staunässe.
Zusätzliche Tipps für den erfolgreichen Erdnussanbau
* Wähle die richtige Sorte: Es gibt verschiedene Erdnusssorten. Einige Sorten sind besser für den Anbau im Haus geeignet als andere. Informiere dich vor dem Pflanzen über die verschiedenen Sorten und wähle eine Sorte, die gut in Töpfen wächst.
* Drehe die Töpfe: Drehe die Töpfe regelmäßig, damit alle Seiten der Pflanzen genügend Sonnenlicht bekommen.
* Sei geduldig: Der Erdnussanbau braucht Zeit und Geduld. Gib nicht auf, wenn es nicht sofort klappt. Mit der richtigen Pflege und etwas Glück wirst du bald deine eigenen Erdnüsse ernten können.
* Beobachte deine Pflanzen: Beobachte deine Pflanzen regelmäßig und achte auf Veränderungen. Je früher du Probleme erkennst, desto besser kannst du sie beheben.
Fazit: Dein eigenes Erdnuss-Paradies
Ich hoffe, dieser Leitfaden hat dir geholfen, dich für den Erdnussanbau im Haus zu begeistern. Es ist ein lohnendes Projekt, das dir nicht nur frische Erdnüsse liefert, sondern auch viel Freude bereitet. Also, worauf wartest du noch? Hol dir deine Erdnüsse und starte dein eigenes Erdnuss-Paradies! Viel Erfolg und viel Spaß beim Gärtnern!
Conclusion
So, there you have it! Growing peanuts indoors might seem like a whimsical endeavor, but with a little patience and the right approach, you can cultivate your own miniature peanut patch right in your home. This DIY project isn’t just about harvesting a handful of peanuts; it’s about the joy of witnessing the entire life cycle of a plant, from seed to snack. It’s a fantastic educational experience for kids and a rewarding hobby for adults.
Why is this a must-try? Because it’s unique, engaging, and surprisingly simple. In a world dominated by mass-produced goods, there’s something incredibly satisfying about nurturing your own food source, even on a small scale. Plus, freshly grown peanuts have a flavor that store-bought varieties simply can’t match. The subtle sweetness and earthy notes are amplified when you know you’ve grown them yourself.
But the benefits extend beyond just the taste. Growing peanuts indoors is a fantastic way to connect with nature, even when you’re stuck inside. It’s a calming and meditative activity that can help reduce stress and improve your overall well-being. And let’s not forget the bragging rights! Imagine serving your guests a bowl of homegrown peanuts – they’ll be amazed!
Looking for variations? Consider experimenting with different peanut varieties. Valencia peanuts, with their multiple small kernels per shell, are a good choice for indoor growing due to their compact size. You can also try roasting your harvested peanuts with different spices for a personalized snack. A sprinkle of sea salt and smoked paprika, a dash of cayenne pepper for a kick, or even a sweet coating of cinnamon and sugar – the possibilities are endless! Another fun variation is to use the peanut plants as a decorative element. Their lush green foliage adds a touch of natural beauty to any room. You can even train the vines to climb a small trellis for a more dramatic effect.
Don’t be intimidated by the process. While it requires some attention, growing peanuts indoors is far from complicated. The key is to provide the right environment – plenty of sunlight, well-draining soil, and consistent watering. And remember, patience is key. It takes time for peanuts to mature, so don’t get discouraged if you don’t see results immediately.
We wholeheartedly encourage you to give this DIY trick a try. It’s a fun, rewarding, and educational experience that will bring a touch of nature into your home. Once you’ve harvested your first batch of homegrown peanuts, we’d love to hear about your experience! Share your photos, tips, and stories with us in the comments below. Let’s create a community of indoor peanut growers and inspire others to embark on this exciting journey. So, grab some peanut seeds, prepare your pots, and get ready to experience the joy of growing your own delicious and nutritious snacks. You might just discover your new favorite hobby!
Frequently Asked Questions (FAQ)
What kind of peanuts should I use for growing indoors?
The best type of peanuts for indoor growing are those that are raw and unsalted. Avoid roasted or salted peanuts, as they will not germinate. Virginia peanuts, Valencia peanuts, and Spanish peanuts are all good options. Valencia peanuts are often preferred due to their smaller size and multiple kernels per shell, making them well-suited for container gardening. Look for organic varieties if possible, to avoid any potential chemical treatments. You can find these at most health food stores or online retailers specializing in seeds and gardening supplies.
How much sunlight do indoor peanut plants need?
Peanut plants thrive in full sunlight, requiring at least 6-8 hours of direct sunlight per day. If you don’t have a sunny window, you can supplement with grow lights. Position the grow lights about 6-12 inches above the plants and keep them on for 12-16 hours a day. Rotate the plants regularly to ensure even light exposure on all sides. Insufficient sunlight can lead to leggy growth and reduced peanut production.
What type of soil is best for growing peanuts indoors?
Peanuts prefer well-draining, sandy loam soil. A good mix would be equal parts potting soil, sand, and compost. The sand helps with drainage, while the compost provides essential nutrients. Avoid heavy clay soils, as they can become waterlogged and inhibit root growth. You can also add a small amount of perlite to improve drainage further. Ensure the pot you use has drainage holes to prevent water from accumulating at the bottom.
How often should I water my indoor peanut plants?
Water your peanut plants regularly, keeping the soil consistently moist but not waterlogged. Water when the top inch of soil feels dry to the touch. Avoid overwatering, as this can lead to root rot. During the flowering and pegging stages (when the plant sends down shoots into the soil to form peanuts), ensure the soil is consistently moist. Reduce watering slightly during the dormant season.
What are “pegs” and why are they important?
“Pegs” are the specialized stems that grow downwards from the base of the peanut plant after flowering. These pegs contain the developing peanuts and need to penetrate the soil in order to mature. This is why it’s crucial to use a large enough pot and ensure the soil is loose and easy for the pegs to penetrate. You can gently mound soil around the base of the plant to encourage pegging.
How long does it take to grow peanuts indoors?
It typically takes around 120-150 days (4-5 months) from planting to harvest. The exact time will depend on the variety of peanut, the growing conditions, and the amount of sunlight the plants receive. Be patient and monitor the plants closely for signs of maturity, such as yellowing leaves and hardening peanut shells.
How do I know when my peanuts are ready to harvest?
The best way to determine if your peanuts are ready to harvest is to dig up a few plants and check the peanut shells. The shells should be fully formed, hard, and have a distinct peanut-like aroma. The inside of the shells should also be darkened. If the shells are still thin and white, they are not ready. Another sign is yellowing and browning of the leaves.
How do I harvest and cure my homegrown peanuts?
To harvest, carefully dig up the entire plant, being careful not to damage the peanuts. Gently shake off any excess soil. Hang the plants upside down in a warm, dry, well-ventilated place for 2-4 weeks to cure. This allows the peanuts to dry and develop their flavor. Once the plants are dry, you can remove the peanuts from the vines.
How do I store my harvested peanuts?
Store your harvested peanuts in a cool, dry place in an airtight container. Properly stored peanuts can last for several months. You can also roast them for a longer shelf life. To roast, spread the peanuts in a single layer on a baking sheet and bake at 350°F (175°C) for 15-20 minutes, or until golden brown.
Are there any common pests or diseases that affect indoor peanut plants?
Common pests that can affect indoor peanut plants include aphids, spider mites, and whiteflies. These can be controlled with insecticidal soap or neem oil. Overwatering can lead to fungal diseases such as root rot. Ensure proper drainage and avoid overwatering to prevent these problems. Regularly inspect your plants for any signs of pests or diseases and take action promptly.
Can I grow peanuts indoors year-round?
Yes, you can grow peanuts indoors year-round, provided you can provide the necessary growing conditions, including sufficient light, warmth, and humidity. If you live in a region with cold winters, you may need to supplement with grow lights to ensure the plants receive enough sunlight.


Leave a Comment