
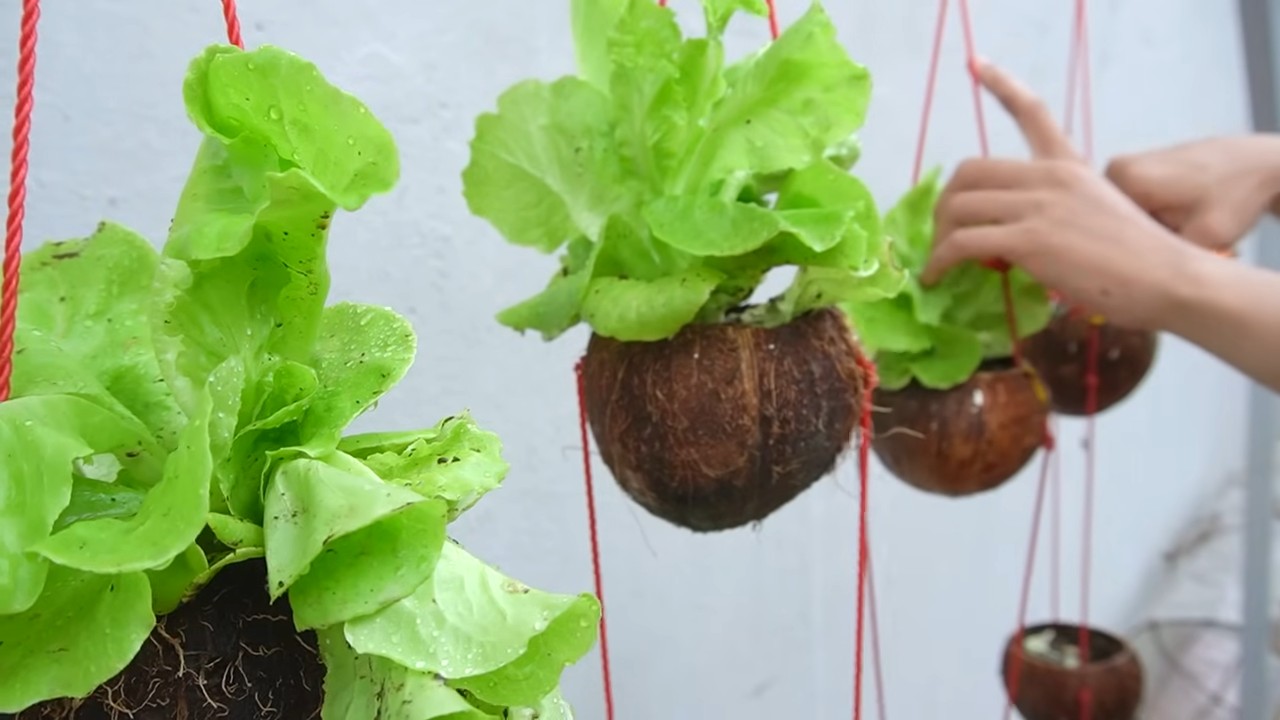
Growing lettuce in coconut shells might sound like something straight out of a tropical fairytale, but trust me, it’s a surprisingly practical and utterly charming way to add a touch of whimsy to your home garden! For centuries, resourceful gardeners around the world have been finding innovative ways to repurpose natural materials, and this is just a modern twist on that age-old tradition.
Imagine this: instead of the usual plastic pots, you have a collection of adorable, earthy coconut shells overflowing with vibrant, leafy lettuce. Not only is it visually stunning, but it’s also incredibly eco-friendly! We all know how important it is to reduce our plastic consumption, and this DIY project offers a fun and sustainable alternative. Plus, coconut shells provide excellent drainage and aeration for your lettuce, leading to healthier and happier plants.
But why should *you* try growing lettuce in coconut shells? Well, beyond the aesthetic appeal and environmental benefits, it’s a fantastic way to maximize space, especially if you’re working with a small balcony or patio. It’s also a super easy and rewarding project for beginners. I’m going to guide you through every step, from preparing the shells to harvesting your delicious, homegrown lettuce. Get ready to impress your friends and family with your unique and sustainable gardening skills!
DIY: Salat in Kokosnussschalen ziehen – Ein tropischer Touch für deinen Garten
Hallo liebe Gartenfreunde! Habt ihr Lust auf ein ungewöhnliches und nachhaltiges Gartenprojekt? Dann seid ihr hier genau richtig! Ich zeige euch, wie ihr Salat in Kokosnussschalen ziehen könnt. Das ist nicht nur super dekorativ, sondern auch eine tolle Möglichkeit, Abfall zu vermeiden und eurem Garten einen tropischen Touch zu verleihen. Los geht’s!
Was du brauchst:
* Reife Kokosnüsse (am besten solche, die ihr selbst geleert habt)
* Salatsamen (ich empfehle Pflücksalat oder Mini-Romanasalat)
* Anzuchterde oder Kokoserde
* Bohrmaschine mit Holzbohrer (optional)
* Messer oder Säge
* Schleifpapier (optional)
* Gießkanne oder Sprühflasche
* Kleine Steine oder Tonscherben (für die Drainage)
* Handschuhe (optional, aber empfehlenswert)
Vorbereitung der Kokosnussschalen
Bevor wir mit dem Bepflanzen beginnen können, müssen wir die Kokosnussschalen vorbereiten. Das ist der wichtigste Schritt, um sicherzustellen, dass euer Salat später gut wächst.
1. **Kokosnuss öffnen:** Wenn ihr die Kokosnuss noch nicht geöffnet habt, müsst ihr das jetzt tun. Es gibt verschiedene Methoden, um eine Kokosnuss zu öffnen. Ich persönlich bevorzuge die Methode mit dem Hammer und Schraubenzieher. Sucht die drei “Augen” an einem Ende der Kokosnuss. Stecht mit dem Schraubenzieher in eines der Augen und klopft vorsichtig mit dem Hammer darauf, bis ihr ein Loch habt. Wiederholt das bei den anderen beiden Augen. Lasst das Kokoswasser ablaufen (ihr könnt es trinken oder für Smoothies verwenden!). Um die Kokosnuss zu spalten, legt sie auf eine harte Oberfläche und schlagt mit einem Hammer oder einer Axt in der Mitte entlang der “Naht” der Kokosnuss.
2. **Fruchtfleisch entfernen:** Nachdem ihr die Kokosnuss geöffnet habt, müsst ihr das Fruchtfleisch entfernen. Das kann etwas mühsam sein, aber es lohnt sich. Am einfachsten geht es, wenn ihr ein Messer oder einen Löffel verwendet, um das Fruchtfleisch von der Schale zu lösen. Achtet darauf, euch nicht zu schneiden!
3. **Reinigen der Schalen:** Spült die leeren Kokosnussschalen gründlich mit warmem Wasser und Spülmittel aus, um alle Rückstände zu entfernen. Lasst sie anschließend gut trocknen.
4. **Drainagelöcher bohren (optional):** Damit das Wasser gut ablaufen kann und Staunässe vermieden wird, könnt ihr mit einer Bohrmaschine und einem Holzbohrer (ca. 6-8 mm Durchmesser) einige Drainagelöcher in den Boden der Kokosnussschalen bohren. Das ist besonders wichtig, wenn ihr in einer Gegend mit viel Regen wohnt. Wenn ihr keine Bohrmaschine habt, könnt ihr auch vorsichtig mit einem Nagel und Hammer Löcher in den Boden schlagen.
5. **Schleifen (optional):** Wenn ihr möchtet, dass eure Kokosnussschalen besonders schön aussehen, könnt ihr die Kanten mit Schleifpapier glätten. Das ist aber kein Muss.
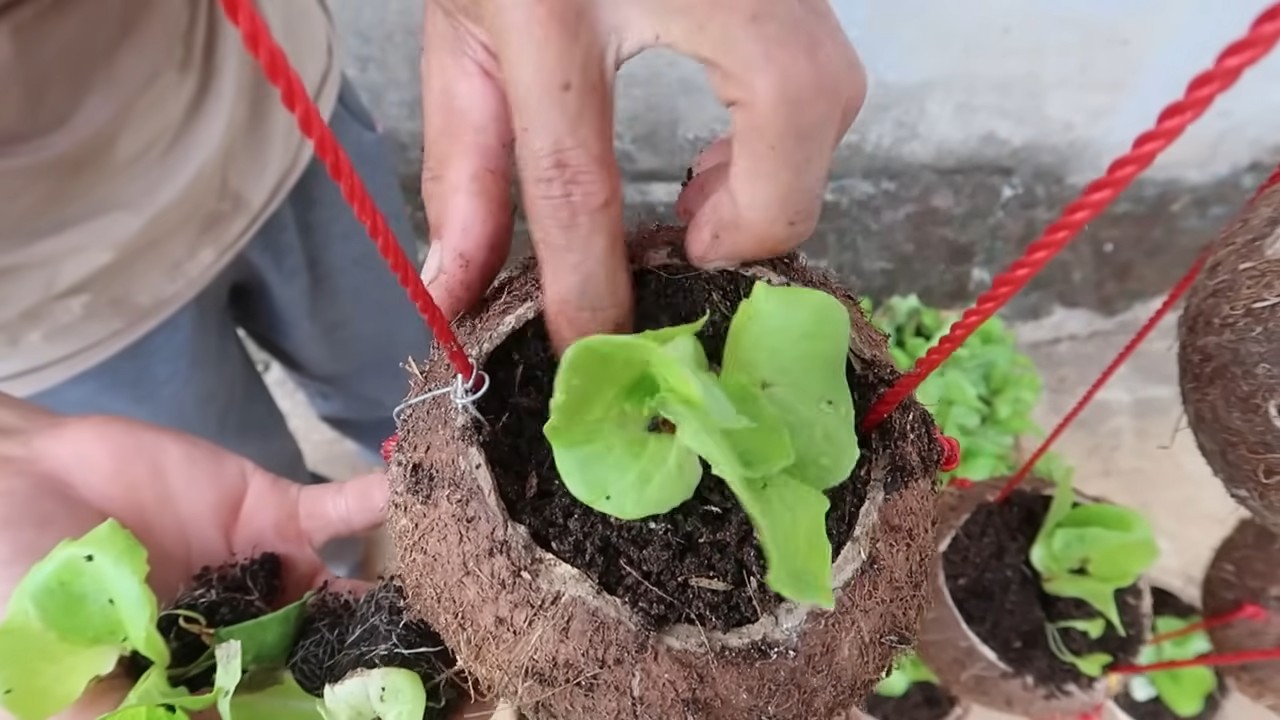
Bepflanzen der Kokosnussschalen
Jetzt kommt der spaßige Teil: das Bepflanzen!
1. **Drainageschicht einfüllen:** Legt eine Schicht kleine Steine oder Tonscherben auf den Boden der Kokosnussschalen. Diese Schicht sorgt für eine gute Drainage und verhindert, dass die Wurzeln des Salats im Wasser stehen.
2. **Erde einfüllen:** Füllt die Kokosnussschalen mit Anzuchterde oder Kokoserde. Lasst etwa 2-3 cm Platz bis zum Rand. Die Erde sollte locker und gut durchlässig sein.
3. **Salatsamen aussäen:** Verteilt die Salatsamen gleichmäßig auf der Erde. Achtet darauf, die Samen nicht zu dicht zu säen, da der Salat sonst zu eng wächst. Ich empfehle, etwa 5-10 Samen pro Kokosnussschale zu säen.
4. **Samen bedecken:** Bedeckt die Samen mit einer dünnen Schicht Erde (ca. 0,5 cm). Drückt die Erde leicht an.
5. **Gießen:** Gießt die Erde vorsichtig mit einer Gießkanne oder Sprühflasche an. Die Erde sollte feucht, aber nicht nass sein.
Pflege des Salats in Kokosnussschalen
Damit euer Salat gut wächst und gedeiht, ist die richtige Pflege wichtig.
1. **Standort:** Stellt die bepflanzten Kokosnussschalen an einen hellen und sonnigen Standort. Salat benötigt mindestens 6 Stunden Sonnenlicht pro Tag.
2. **Gießen:** Gießt den Salat regelmäßig, aber vermeidet Staunässe. Die Erde sollte immer leicht feucht sein. An heißen Tagen müsst ihr möglicherweise täglich gießen.
3. **Düngen (optional):** Wenn ihr möchtet, könnt ihr den Salat regelmäßig mit einem organischen Flüssigdünger düngen. Das fördert das Wachstum und sorgt für einen kräftigen Salat.
4. **Schutz vor Schädlingen:** Achtet auf Schädlinge wie Schnecken oder Blattläuse. Bei Bedarf könnt ihr natürliche Schädlingsbekämpfungsmittel verwenden.
5. **Ernten:** Je nach Salatsorte könnt ihr den Salat nach etwa 4-6 Wochen ernten. Pflücksalat könnt ihr nach und nach ernten, indem ihr die äußeren Blätter abzupft. Mini-Romanasalat könnt ihr als ganze Köpfe ernten.
Zusätzliche Tipps und Tricks
* Verwende verschiedene Salatsorten: Probiert verschiedene Salatsorten aus, um herauszufinden, welche euch am besten schmecken und am besten in den Kokosnussschalen wachsen.
* Beschrifte die Schalen: Beschriftet die Kokosnussschalen mit dem Namen der Salatsorte, damit ihr den Überblick behaltet.
* Dekoriere die Schalen: Bemalt die Kokosnussschalen mit bunten Farben oder verziert sie mit Muscheln oder anderen Dekorationen. So werden sie zu einem echten Hingucker in eurem Garten.
* Upcycling: Verwendet alte Kokosnussschalen, die ihr sonst wegwerfen würdet. Das ist eine tolle Möglichkeit, Abfall zu vermeiden und die Umwelt zu schonen.
* Vertikale Gärten: Befestigt die Kokosnussschalen an einer Wand oder einem Zaun, um einen vertikalen Garten zu gestalten. Das spart Platz und sieht toll aus.
* Kokoserde: Kokoserde ist ein nachhaltiges Substrat, das aus den Fasern der Kokosnuss hergestellt wird. Sie ist eine gute Alternative zu herkömmlicher Anzuchterde.
* Achte auf die Drainage: Eine gute Drainage ist entscheidend für das Wachstum des Salats. Achtet darauf, dass das Wasser gut ablaufen kann, um Staunässe zu vermeiden.
* Schneckenkorn: Wenn ihr Probleme mit Schnecken habt, könnt ihr Schneckenkorn um die Kokosnussschalen streuen. Achtet darauf, ein für Haustiere und Kinder unbedenkliches Produkt zu verwenden.
* Schatten: An sehr heißen Tagen kann es sinnvoll sein, den Salat vor direkter Sonneneinstrahlung zu schützen, um Verbrennungen zu vermeiden.
* Regelmäßige Kontrolle: Kontrolliert den Salat regelmäßig auf Schädlinge und Krankheiten. Je früher ihr Probleme erkennt, desto einfacher könnt ihr sie beheben.
Häufige Probleme und Lösungen
* Salat keimt nicht: Möglicherweise sind die Samen zu alt oder die Erde zu trocken. Verwendet frische Samen und achtet darauf, die Erde feucht zu halten.
* Salat wächst langsam: Möglicherweise bekommt der Salat nicht genug Sonnenlicht oder Nährstoffe. Stellt die Kokosnussschalen an einen sonnigeren Standort und düngt den Salat regelmäßig.
* Blattläuse: Sprüht den Salat mit einer Mischung aus Wasser und Spülmittel ein.
* Schnecken: Streut Schneckenkorn um die Kokosnussschalen.
* Staunässe: Achtet darauf, dass das Wasser gut ablaufen kann. Bohrt zusätzliche Drainagelöcher in den Boden der Kokosnussschalen.
Ich hoffe, diese Anleitung hilft euch dabei, euren eigenen Salat in Kokosnussschalen zu ziehen. Es ist ein wirklich lohnendes Projekt, das nicht nur Spaß macht, sondern auch leck
Conclusion
So, there you have it! Growing lettuce in coconut shells isn’t just a quirky gardening trend; it’s a genuinely effective and rewarding way to cultivate fresh, delicious greens right at your fingertips. We’ve explored the numerous benefits, from the sustainable reuse of coconut shells to the enhanced drainage and aeration that promote healthy root development. This method is particularly appealing for urban gardeners, those with limited space, or anyone looking to add a touch of tropical charm to their edible garden.
But why is this DIY trick a must-try? Because it’s more than just a gardening project; it’s a statement. It’s a statement about sustainability, resourcefulness, and a commitment to fresh, homegrown food. It’s a conversation starter, a unique decorative element, and a surprisingly efficient way to produce a steady supply of crisp, flavorful lettuce.
Beyond the basic method, there’s plenty of room for experimentation. Consider using different types of coconut coir mixes to see which one your lettuce prefers. You could also try painting the coconut shells with vibrant colors or adding decorative elements to personalize your mini lettuce gardens. For a vertical gardening approach, hang the coconut shells from a sturdy frame or railing, creating a visually stunning and space-saving display. You can also try growing other leafy greens like spinach or kale in coconut shells, adapting the method to suit your preferences and climate.
Don’t be afraid to get creative with your lettuce varieties, too. Experiment with different types of lettuce, from crisp romaine to buttery butterhead, to discover your favorites. You can even mix and match different varieties in the same coconut shell for a colorful and flavorful salad blend.
The key to success with this method is consistent watering and proper drainage. Ensure that the coconut coir remains consistently moist but not waterlogged. Regularly check the drainage holes to prevent them from becoming clogged. And remember, lettuce thrives in cool temperatures, so provide shade during the hottest parts of the day.
We are confident that you’ll find growing lettuce in coconut shells to be a fun, fulfilling, and ultimately delicious experience. It’s a simple yet effective way to connect with nature, reduce waste, and enjoy the taste of homegrown goodness.
So, grab some coconut shells, gather your supplies, and get ready to embark on this exciting gardening adventure. We encourage you to try this DIY trick and share your experiences with us! Post photos of your coconut shell lettuce gardens on social media using #CoconutShellLettuce and let us know what you’ve learned. We can’t wait to see your creations and hear your success stories. Happy gardening!
Frequently Asked Questions (FAQ)
1. What type of lettuce grows best in coconut shells?
Almost any type of lettuce can be grown in coconut shells, but smaller, more compact varieties tend to thrive best. Consider varieties like butterhead, romaine (dwarf varieties), or loose-leaf lettuce. These types don’t require as much space for their root systems to develop fully. Experimenting with different varieties is part of the fun! You might find that certain types are better suited to your local climate and growing conditions.
2. How often should I water my lettuce growing in coconut shells?
Watering frequency depends on several factors, including the climate, the type of coconut coir you’re using, and the size of the coconut shell. Generally, you should water your lettuce whenever the top inch of the coir feels dry to the touch. In hot, dry weather, this might be every day, while in cooler, more humid conditions, it might be every other day. The key is to keep the coir consistently moist but not waterlogged. Overwatering can lead to root rot, so ensure the coconut shell has adequate drainage.
3. What kind of soil or growing medium should I use?
Coconut coir is the ideal growing medium for this project. It’s lightweight, retains moisture well, and provides excellent drainage. You can purchase coconut coir in compressed blocks or loose bags. Before using it, rehydrate the coir by soaking it in water until it expands. You can also mix the coir with other organic materials like compost or worm castings to further enrich the soil and provide additional nutrients for your lettuce. Avoid using heavy garden soil, as it can compact and restrict root growth.
4. How much sunlight does lettuce in coconut shells need?
Lettuce thrives in partial shade, especially during the hottest parts of the day. Aim for at least 4-6 hours of sunlight per day. If you live in a hot climate, provide afternoon shade to prevent the lettuce from bolting (going to seed prematurely). You can achieve this by placing the coconut shells under a tree, on a shaded patio, or using a shade cloth.
5. How do I fertilize my lettuce growing in coconut shells?
Lettuce is a relatively light feeder, but it still benefits from regular fertilization. Use a balanced, water-soluble fertilizer diluted to half strength. Apply the fertilizer every 2-3 weeks, following the instructions on the product label. Alternatively, you can use organic fertilizers like compost tea or fish emulsion. These provide a slow-release source of nutrients and promote healthy soil microbes.
6. How do I prevent pests and diseases?
Regularly inspect your lettuce plants for signs of pests or diseases. Common lettuce pests include aphids, slugs, and snails. You can control aphids with a strong spray of water or by introducing beneficial insects like ladybugs. Slugs and snails can be handpicked or trapped using beer traps. To prevent fungal diseases, ensure good air circulation and avoid overwatering. If you notice any signs of disease, remove the affected leaves immediately.
7. How long does it take for lettuce to grow in coconut shells?
The time it takes for lettuce to mature depends on the variety and growing conditions. Generally, you can expect to harvest your lettuce in 30-60 days from planting. Loose-leaf lettuce varieties can be harvested as soon as the leaves are large enough to eat, while head lettuce varieties need to form a firm head before harvesting.
8. Can I reuse the coconut shells after harvesting the lettuce?
Yes, you can definitely reuse the coconut shells! After harvesting the lettuce, remove any remaining roots and debris. You can then replant with new lettuce seedlings or use the coconut shells for other gardening purposes, such as starting seeds or growing herbs. If the coconut shell is starting to decompose, you can add it to your compost pile.
9. What if I don’t have access to coconut shells?
While coconut shells are the focus of this DIY project, you can adapt the method to other containers, such as small pots, hanging baskets, or even repurposed plastic containers. The key is to ensure that the container has adequate drainage and is large enough to accommodate the lettuce’s root system.
10. Can I grow lettuce in coconut shells indoors?
Yes, you can grow lettuce in coconut shells indoors, especially if you have a sunny windowsill or grow lights. Ensure that the lettuce receives adequate light and maintain a consistent temperature. Indoor growing can be a great option for those who live in colder climates or have limited outdoor space.
Leave a Comment