
Growing Honeyberries at Home can feel like unlocking a secret garden superpower! Imagine plucking sweet, tangy berries straight from your backyard, knowing you cultivated them yourself. Forget those bland, store-bought berries – we’re talking about a burst of unique flavor that’ll elevate your breakfasts, desserts, and even your cocktails.
While honeyberries might seem like a modern marvel, their history stretches back centuries, deeply rooted in the colder climates of Russia and Japan. These hardy shrubs have long been cherished for their resilience and early fruiting season, offering a taste of summer long before other berries dare to emerge. Think of them as the unsung heroes of the berry world, finally stepping into the spotlight!
Why should you jump on the honeyberry bandwagon? Well, for starters, they’re incredibly easy to grow, even for beginners. Plus, they’re packed with antioxidants and vitamins, making them a healthy and delicious addition to your diet. But the real reason you need these DIY tricks and hacks is to maximize your harvest and avoid common pitfalls. I’m going to share my tried-and-true methods for growing honeyberries at home successfully, ensuring you’re enjoying a bountiful crop year after year. Let’s get our hands dirty and transform your garden into a honeyberry haven!
Growing Honeyberries at Home: A DIY Guide to Sweet Success
Okay, so you’re thinking about growing honeyberries? Awesome! They’re delicious, packed with antioxidants, and surprisingly easy to care for once you get them established. I’ve been growing them for a few years now, and I’m excited to share my tips and tricks with you. This guide will walk you through everything you need to know, from choosing the right varieties to harvesting your first sweet berries.
Choosing the Right Honeyberry Varieties
Before you even think about planting, you need to pick the right honeyberry varieties. This is crucial because most honeyberries need cross-pollination to produce a good crop. That means you need to plant at least two different varieties that bloom at the same time.
Here’s what to consider:
* Bloom Time: Make sure the varieties you choose bloom around the same time. Nurseries usually list the bloom time as early, mid, or late season. Pair early bloomers with other early bloomers, and so on.
* Flavor Profile: Honeyberries come in a range of flavors, from tart and tangy to sweet and mild. Read descriptions carefully to find varieties that appeal to your taste. Some are better for fresh eating, while others are ideal for jams and baking.
* Plant Size: Honeyberries can range in size from 3 to 6 feet tall and wide. Consider the space you have available when choosing varieties.
* Hardiness Zone: Make sure the varieties you choose are hardy in your USDA plant hardiness zone. Honeyberries are generally very cold-hardy, but it’s always best to double-check.
* Popular Varieties: Some popular and reliable varieties include ‘Aurora’, ‘Honeybee’, ‘Borealis’, ‘Indigo Gem’, and ‘Tundra’. I personally have ‘Aurora’ and ‘Honeybee’ and they produce like crazy!
Preparing the Planting Site
Honeyberries are pretty adaptable, but they’ll thrive if you give them the right start. Good soil preparation is key.
* Sunlight: Honeyberries prefer full sun (at least 6 hours of direct sunlight per day) for the best fruit production. They can tolerate partial shade, but you might not get as many berries.
* Soil: Honeyberries prefer well-drained soil that is rich in organic matter. They can tolerate a slightly acidic soil pH (around 6.0 to 6.8).
* Drainage: Good drainage is essential. Honeyberries don’t like to sit in soggy soil. If your soil is heavy clay, amend it with plenty of compost and other organic matter to improve drainage.
* Weed Control: Remove all weeds and grass from the planting area. Honeyberries don’t compete well with weeds, especially when they’re young.
Planting Your Honeyberries
Now for the fun part – planting!
1. Dig the Holes: Dig holes that are twice as wide as the root ball and just as deep.
2. Amend the Soil: Mix some compost or other organic matter into the soil you removed from the holes. This will help improve drainage and provide nutrients.
3. Remove the Plant from the Container: Gently remove the honeyberry plant from its container. If the roots are pot-bound (tightly circling the root ball), gently loosen them with your fingers.
4. Place the Plant in the Hole: Place the plant in the hole so that the top of the root ball is level with the surrounding soil.
5. Backfill the Hole: Backfill the hole with the amended soil, gently tamping it down as you go.
6. Water Thoroughly: Water the newly planted honeyberry thoroughly to settle the soil and help the roots establish.
7. Mulch: Apply a layer of mulch around the base of the plant to help retain moisture, suppress weeds, and regulate soil temperature. I like to use wood chips or shredded bark.
Caring for Your Honeyberries
Once your honeyberries are planted, they’re relatively low-maintenance. Here’s what you need to do to keep them happy and healthy:
* Watering: Water regularly, especially during dry periods. Honeyberries need consistent moisture, especially when they’re young and establishing their root systems. Aim for about 1 inch of water per week.
* Fertilizing: Fertilize in the spring with a balanced fertilizer, such as 10-10-10. Follow the instructions on the fertilizer package. You can also amend the soil with compost each spring.
* Pruning: Prune honeyberries in late winter or early spring, before new growth begins. Remove any dead, damaged, or crossing branches. You can also thin out the plant to improve air circulation. Honeyberries fruit on old wood, so don’t prune too heavily. I usually just remove a few of the oldest, thickest branches each year.
* Weed Control: Keep the area around your honeyberries free of weeds. Mulching helps, but you may still need to hand-pull weeds occasionally.
* Pest and Disease Control: Honeyberries are generally resistant to pests and diseases. However, they can occasionally be affected by aphids or powdery mildew. If you notice any problems, treat them promptly with an appropriate insecticide or fungicide. I prefer to use organic options whenever possible.
Protecting Your Honeyberries from Birds
Birds love honeyberries just as much as we do! If you don’t protect your plants, they’ll likely eat all your berries before you get a chance to harvest them.
Here are a few ways to protect your honeyberries from birds:
* Netting: The most effective way to protect your honeyberries is to cover them with netting. Drape bird netting over the plants before the berries start to ripen. Make sure the netting is securely fastened to the ground so that birds can’t get underneath it.
* Bird Scare Devices: You can also try using bird scare devices, such as shiny streamers, reflective tape, or ultrasonic bird repellers. These devices can help deter birds from your plants. However, they’re not always as effective as netting.
* Planting Decoy Plants: Some gardeners plant decoy plants, such as serviceberries or elderberries, near their honeyberries to attract birds away from the honeyberry plants. This can be a helpful strategy, but it’s not always foolproof.
Harvesting Your Honeyberries
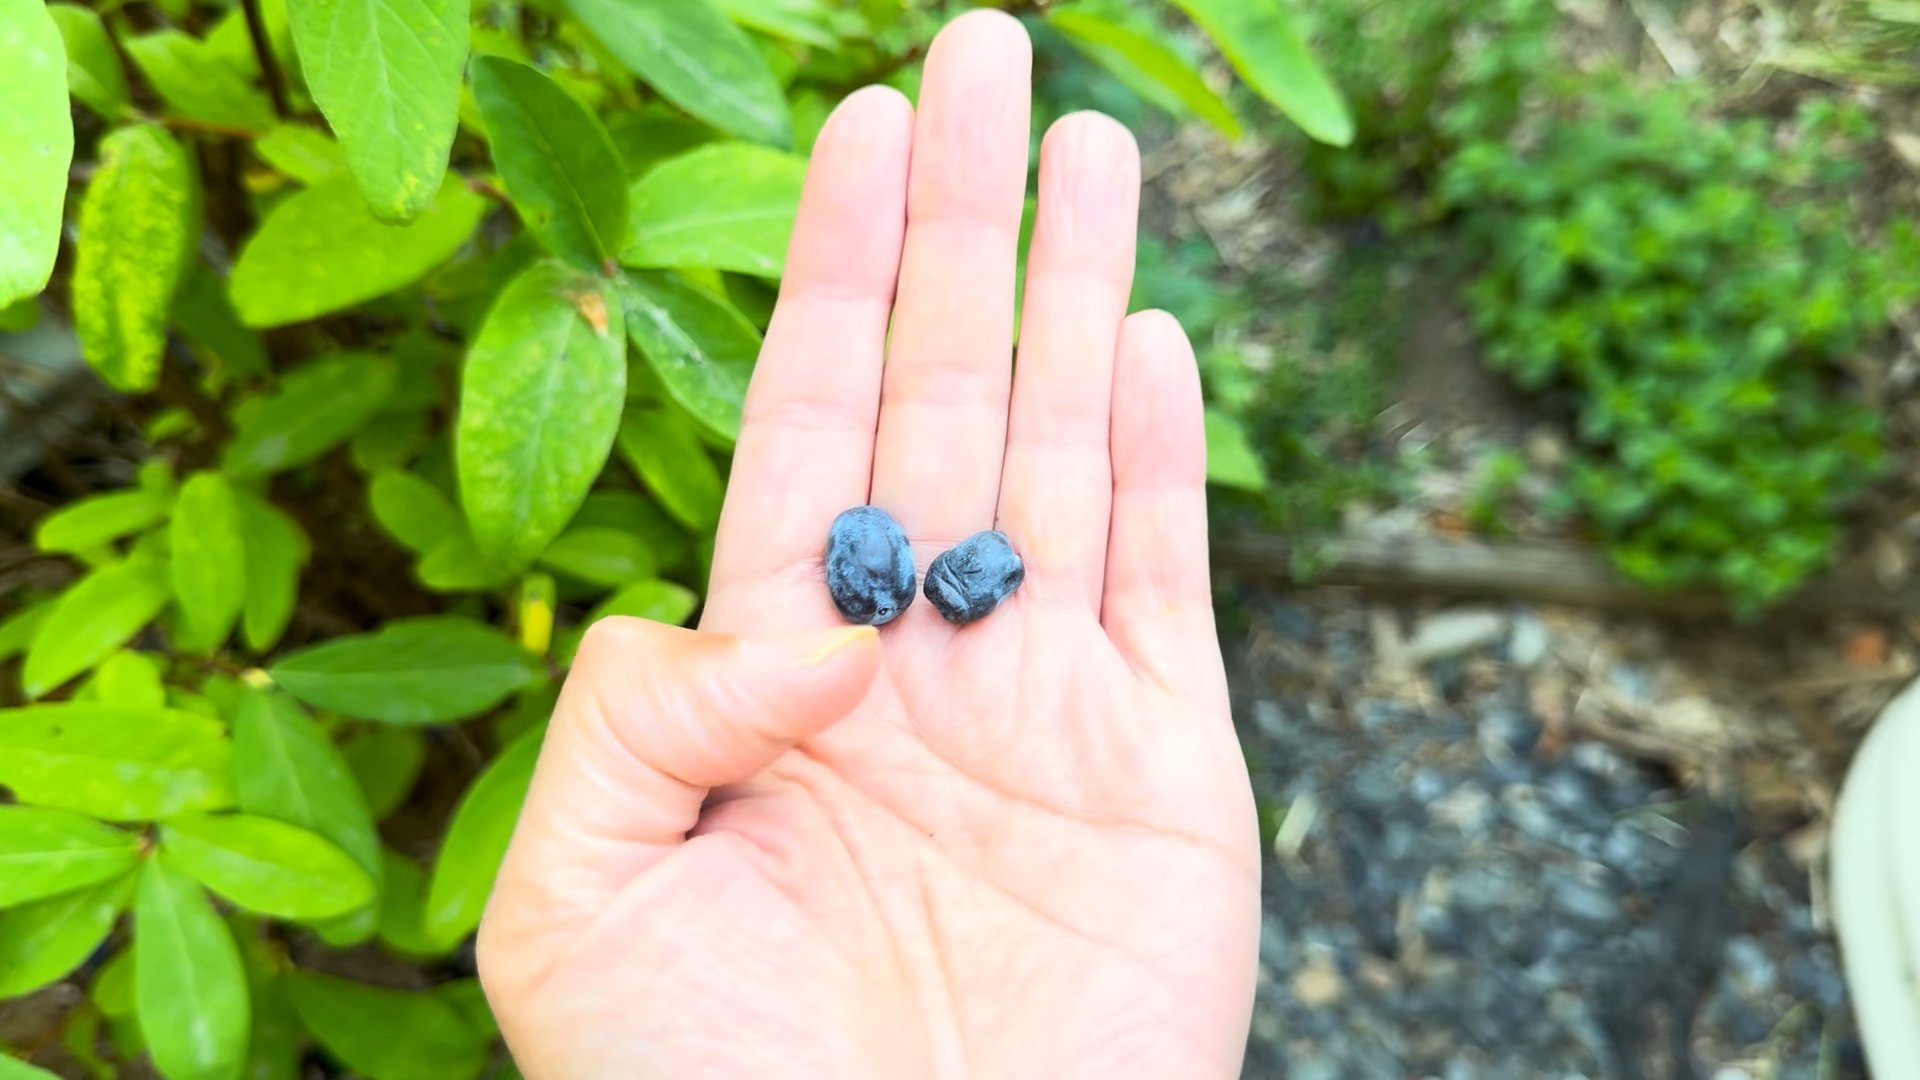
Honeyberries typically ripen in late spring or early summer, depending on the variety and your climate. The berries are ready to harvest when they turn a deep blue color and are soft to the touch.
* Gently Pick the Berries: Gently pick the berries from the plant. They should come off easily when they’re ripe.
* Taste Test: Taste a few berries to make sure they’re ripe. Honeyberries can be tart when they’re underripe.
* Harvest Regularly: Harvest the berries regularly as they ripen. This will encourage the plant to produce more berries.
* Store the Berries: Store the harvested berries in the refrigerator for up to a week. You can also freeze them for longer storage.
Troubleshooting Common Honeyberry Problems
Even with the best care, you might encounter a few problems when growing honeyberries. Here are some common issues and how to address them:
* Poor Fruit Set: If your honeyberries aren’t producing many berries, it could be due to a lack of pollination. Make sure you have at least two different varieties planted that bloom at the same time. You can also try hand-pollinating the flowers with a small paintbrush.
* Yellowing Leaves: Yellowing leaves can be a sign of nutrient deficiency. Fertilize your plants with a balanced fertilizer in the spring. You can also amend the soil with compost to improve its nutrient content.
* Powdery Mildew: Powdery mildew is a fungal disease that can cause a white, powdery coating on the leaves. Treat it with a fungicide specifically designed for powdery mildew. Improve air circulation around the plants by pruning them regularly.
* Aphids: Aphids are small, sap-sucking insects that can damage the leaves and stems of honeyberries. Treat them with an insecticidal soap or neem oil. You can also try attracting beneficial insects, such as ladybugs, to your garden to help control aphids.
* Birds Eating the Berries: As mentioned earlier, birds love honeyberries. Protect your plants with netting or other bird deterrents.
Propagating Honeyberries
Want more honeyberry plants? You can propagate them through cuttings.
1. Take Cuttings: In late winter or early spring, take hardwood cuttings from healthy, dormant honeyberry plants. The cuttings should be about 6-8 inches long and have several buds.
2. Prepare the Cuttings: Dip the cut end of each cutting in rooting hormone.
3. Plant the Cuttings: Plant the cuttings in a well-draining potting mix.
4. Keep Moist: Keep the potting mix moist but not soggy.
5. Provide Humidity:
Conclusion
So, there you have it! Growing honeyberries at home is not just a gardening project; it’s an investment in your health, your garden’s biodiversity, and your culinary adventures. We’ve explored the ins and outs of cultivating these delightful berries, from selecting the right varieties to ensuring optimal growing conditions. The ease with which you can establish and maintain honeyberry bushes makes them a truly rewarding addition to any garden, regardless of size or experience level.
Why is this a must-try? Because unlike many other berry bushes, honeyberries are incredibly resilient and adaptable. They thrive in colder climates, often producing fruit even after late frosts that would decimate other berry crops. This means a reliable harvest of delicious, antioxidant-rich berries year after year. Plus, the unique tart-sweet flavor of honeyberries makes them incredibly versatile in the kitchen, lending themselves beautifully to jams, jellies, pies, smoothies, and even savory dishes.
But the benefits extend beyond the kitchen. Honeyberry bushes are early bloomers, providing a vital source of nectar for pollinators when other food sources are scarce. This makes them a valuable asset in supporting local bee populations and contributing to a healthier ecosystem. Imagine your garden buzzing with life, thanks to these unassuming yet powerful plants!
Ready to take your honeyberry growing to the next level? Consider experimenting with different companion plants to enhance growth and deter pests. Planting herbs like thyme or rosemary around your honeyberry bushes can help repel unwanted insects, while nitrogen-fixing plants like clover can improve soil fertility. You could also try different pruning techniques to maximize fruit production. Some gardeners prefer a more aggressive pruning approach to encourage new growth, while others opt for a lighter touch to maintain a more natural shape.
Don’t be afraid to get creative with your honeyberry harvest! While jams and jellies are classic choices, explore other culinary possibilities. Honeyberry sauce is a delicious accompaniment to grilled meats or poultry. Honeyberry ice cream is a refreshing treat on a hot summer day. And honeyberry wine or mead is a unique and flavorful way to preserve your harvest.
We strongly encourage you to embark on this exciting journey of growing honeyberries at home. It’s a relatively low-maintenance project with a high return on investment, both in terms of delicious fruit and ecological benefits. The satisfaction of harvesting your own homegrown berries is unparalleled.
So, grab your gardening gloves, choose your honeyberry varieties, and get planting! We’re confident that you’ll be delighted with the results. And most importantly, don’t forget to share your experiences with us! We’d love to hear about your successes, your challenges, and your favorite ways to enjoy your homegrown honeyberries. Share your photos, recipes, and tips in the comments below. Let’s build a community of honeyberry enthusiasts and spread the word about these amazing berries! Let’s all enjoy the benefits of growing honeyberries at home.
Frequently Asked Questions (FAQ)
What are the best honeyberry varieties for beginners?
For beginners, we recommend starting with varieties known for their ease of growth and reliable fruit production. ‘Honeybee’ and ‘Blue Velvet’ are excellent choices for pollinators and fruit set. ‘Aurora’ is another popular variety known for its large, flavorful berries and vigorous growth. These varieties are generally considered to be self-pollinating to some extent, but planting two or more different varieties together will significantly improve fruit set and yield. Research the chill hours required for each variety to ensure they are suitable for your climate.
How much space do honeyberry bushes need?
Honeyberry bushes typically grow to be 3-5 feet tall and wide, so it’s important to provide them with adequate spacing. Plant them at least 4-5 feet apart to allow for proper air circulation and sunlight penetration. If you’re planting multiple rows, space the rows 8-10 feet apart. Consider the mature size of the specific variety you’re planting, as some may grow larger than others. Proper spacing will prevent overcrowding and ensure that your bushes receive the resources they need to thrive.
What kind of soil do honeyberries prefer?
Honeyberries prefer well-drained soil that is rich in organic matter. They can tolerate a range of soil pH levels, but a slightly acidic to neutral pH (6.0-7.0) is ideal. Before planting, amend your soil with compost or other organic matter to improve drainage and fertility. Avoid planting in heavy clay soil, as this can lead to root rot. If you have clay soil, consider planting your honeyberries in raised beds or containers. Regular soil testing can help you determine if your soil needs any amendments.
How often should I water my honeyberry bushes?
Water your honeyberry bushes regularly, especially during the first year after planting. Keep the soil consistently moist, but not waterlogged. Water deeply and less frequently, rather than shallowly and more often. During hot, dry weather, you may need to water more frequently. Mulching around the base of the bushes can help retain moisture and suppress weeds. Established honeyberry bushes are relatively drought-tolerant, but they will still benefit from regular watering during dry periods.
Do honeyberries need fertilizer?
Honeyberries benefit from regular fertilization, especially during the growing season. Apply a balanced fertilizer in early spring, before the bushes begin to leaf out. You can also apply a second application of fertilizer after the harvest. Avoid over-fertilizing, as this can lead to excessive vegetative growth at the expense of fruit production. Organic fertilizers, such as compost or manure, are a great option for providing slow-release nutrients. Soil testing can help you determine the specific nutrient needs of your soil.
How do I prune honeyberry bushes?
Pruning honeyberry bushes is important for maintaining their shape, promoting air circulation, and maximizing fruit production. Prune in late winter or early spring, before the bushes begin to leaf out. Remove any dead, damaged, or crossing branches. Also, remove any branches that are growing inward or are rubbing against other branches. As the bushes mature, you may need to remove some of the older, less productive branches to encourage new growth. Avoid pruning too heavily, as this can reduce fruit production.
What pests and diseases affect honeyberries?
Honeyberries are generally resistant to pests and diseases, but they can be susceptible to certain problems. Aphids, spider mites, and Japanese beetles can occasionally infest honeyberry bushes. These pests can be controlled with insecticidal soap or horticultural oil. Powdery mildew and fungal leaf spots can also occur, especially in humid conditions. These diseases can be prevented by ensuring good air circulation and avoiding overhead watering. If you notice any signs of pests or diseases, treat them promptly to prevent them from spreading.
When do honeyberries ripen?
Honeyberries are one of the first berries to ripen in the spring, typically in late May or early June. The exact ripening time will depend on the variety and your local climate. The berries are ready to harvest when they are fully colored and easily detach from the bush. Taste-test the berries to ensure they are ripe, as they can sometimes appear ripe before they are actually ready. Harvest the berries regularly to prevent them from becoming overripe and attracting birds.
How do I store honeyberries?
Honeyberries can be stored in the refrigerator for up to a week. For longer storage, you can freeze them. Spread the berries out on a baking sheet and freeze them for a few hours, then transfer them to a freezer bag or container. Frozen honeyberries will keep for up to a year. You can also preserve honeyberries by making jam, jelly, or juice. Dried honeyberries are another delicious and convenient way to store them.
Can I grow honeyberries in containers?
Yes, honeyberries can be grown successfully in containers. Choose a large container that is at least 15-20 gallons in size. Use a well-draining potting mix that is rich in organic matter. Water regularly and fertilize as needed. Container-grown honeyberries may need to be watered more frequently than those grown in the ground. Also, protect the containers from extreme temperatures during the winter. Growing honeyberries in containers is a great option for gardeners with limited space or poor soil.


Leave a Comment