
Growing Hibiscus Sabdariffa Year Round might seem like a tropical dream reserved for those living in perpetually sunny climates, but I’m here to tell you it’s more achievable than you think! Have you ever been captivated by the vibrant crimson hues of hibiscus tea, or perhaps admired the plant’s stunning flowers, only to feel disheartened thinking you couldn’t cultivate it yourself? Well, get ready to ditch that doubt because this guide is packed with DIY tricks and hacks to help you enjoy this beautiful and beneficial plant, regardless of your location.
Hibiscus Sabdariffa, also known as Roselle, boasts a rich history, deeply intertwined with cultures across Africa and Asia. For centuries, it’s been cherished not only for its ornamental beauty but also for its medicinal properties and culinary uses. Think refreshing beverages, flavorful jams, and even natural dyes! But beyond its historical significance, the real reason you need these DIY tricks is simple: access to fresh, homegrown goodness. Imagine brewing your own hibiscus tea with flowers you nurtured yourself, knowing exactly what went into them.
This article will empower you to extend the growing season and create the ideal conditions for growing Hibiscus Sabdariffa year round, even if you’re facing cooler temperatures or shorter days. We’ll explore simple yet effective DIY solutions, from creating mini-greenhouses to mastering the art of indoor cultivation. So, let’s embark on this exciting journey together and unlock the secrets to enjoying the vibrant beauty and health benefits of Hibiscus Sabdariffa, all year long!
Hibiskus Sabdariffa ganzjährig anbauen: Dein DIY-Leitfaden für eine reiche Ernte
Hey Pflanzenfreunde! Hast du dich jemals gefragt, wie du diese wunderschöne Hibiskus Sabdariffa, auch bekannt als Roselle, das ganze Jahr über anbauen kannst? Ich habe es auch! Und nach vielen Versuchen und Irrtümern habe ich einen Weg gefunden, der wirklich funktioniert. In diesem Artikel teile ich meine Geheimnisse mit dir, damit auch du diese leckere und gesunde Pflanze in deinem Garten oder sogar in Innenräumen genießen kannst. Lass uns loslegen!
Was du brauchst: Die richtige Ausrüstung und Materialien
Bevor wir anfangen, stelle sicher, dass du alles hast, was du brauchst. Das macht den Prozess viel reibungsloser. Hier ist eine Liste:
* Hibiskus Sabdariffa Samen: Kaufe hochwertige Samen von einem vertrauenswürdigen Anbieter.
* Anzuchttöpfe oder -schalen: Kleine Töpfe oder Schalen für die Anzucht der Samen.
* Anzuchterde: Spezielle Erde für die Anzucht, die leicht und gut drainierend ist.
* Größere Töpfe oder ein Gartenbeet: Für das Umpflanzen der Sämlinge.
* Gartenerde: Eine Mischung aus Gartenerde, Kompost und etwas Sand für eine gute Drainage.
* Kompost: Für die Nährstoffversorgung der Pflanzen.
* Dünger: Ein ausgewogener Dünger für Hibiskus oder ein organischer Dünger.
* Gießkanne oder Sprühflasche: Zum Bewässern der Pflanzen.
* Pflanzenetiketten: Um den Überblick über deine Pflanzen zu behalten.
* Eine sonnige Fensterbank oder ein Gewächshaus: Für die Anzucht und das Wachstum der Pflanzen.
* Optional: Eine Pflanzenlampe, falls du nicht genügend Sonnenlicht hast.
* Optional: Mulch, um die Feuchtigkeit im Boden zu halten.
Phase 1: Die Anzucht der Samen
Die Anzucht ist ein entscheidender Schritt, um sicherzustellen, dass deine Hibiskus Sabdariffa Pflanzen einen guten Start haben.
1. Samen vorbereiten: Um die Keimung zu beschleunigen, kannst du die Samen für 24 Stunden in lauwarmem Wasser einweichen. Das hilft, die harte Samenschale aufzuweichen.
2. Aussaat: Fülle deine Anzuchttöpfe oder -schalen mit Anzuchterde. Drücke die Erde leicht an und säe die Samen etwa 1 cm tief. Lege 2-3 Samen pro Topf, um sicherzustellen, dass mindestens einer keimt.
3. Bewässerung: Befeuchte die Erde vorsichtig mit einer Sprühflasche. Die Erde sollte feucht, aber nicht durchnässt sein.
4. Abdeckung: Decke die Töpfe oder Schalen mit einer transparenten Plastikfolie oder einem Deckel ab, um eine hohe Luftfeuchtigkeit zu gewährleisten.
5. Standort: Stelle die Töpfe an einen warmen und hellen Ort. Eine Temperatur zwischen 20-25°C ist ideal.
6. Beobachtung: Überprüfe die Erde täglich und befeuchte sie bei Bedarf. Die Samen sollten innerhalb von 7-14 Tagen keimen.
7. Entfernung der Abdeckung: Sobald die Sämlinge erscheinen, entferne die Plastikfolie oder den Deckel, um Schimmelbildung zu vermeiden.
Phase 2: Umpflanzen der Sämlinge
Sobald deine Sämlinge stark genug sind, ist es Zeit, sie in größere Töpfe oder ins Gartenbeet umzupflanzen.
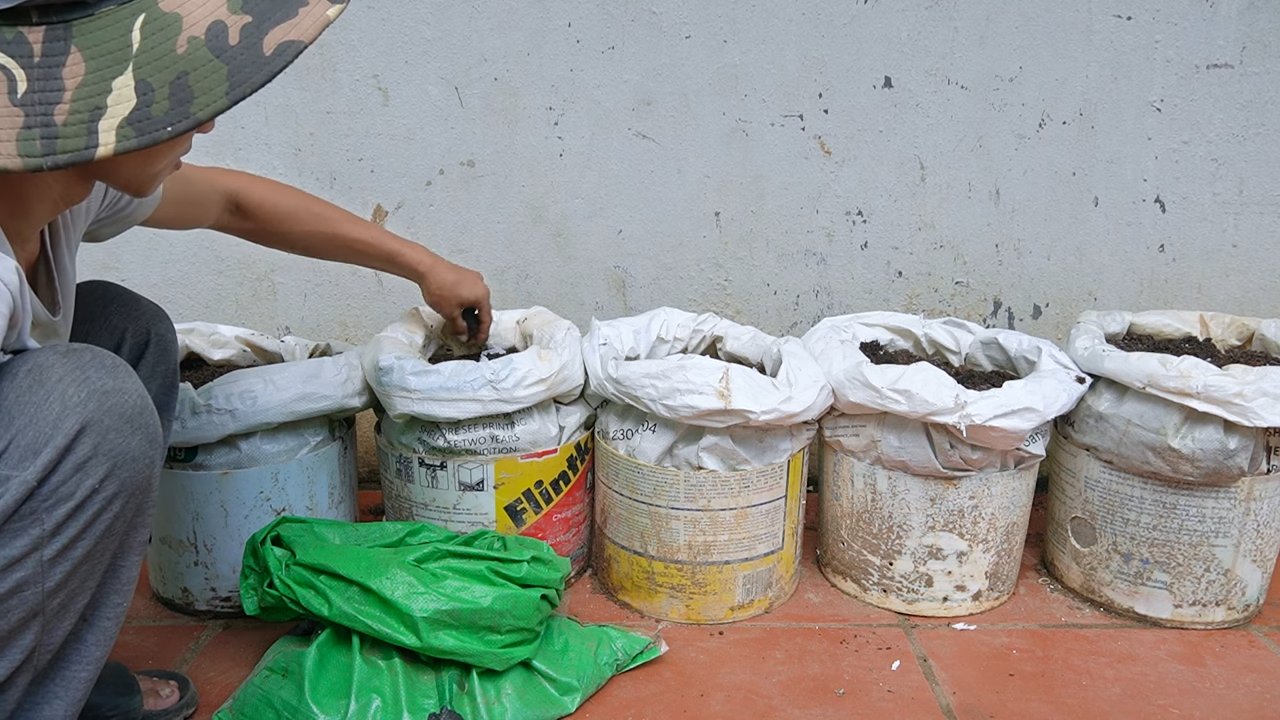
1. Vorbereitung der Töpfe oder des Beets: Fülle größere Töpfe (mindestens 20 cm Durchmesser) mit einer Mischung aus Gartenerde, Kompost und etwas Sand. Wenn du die Pflanzen ins Gartenbeet pflanzt, lockere die Erde auf und mische Kompost unter.
2. Umpflanzen: Grabe vorsichtig ein Loch, das groß genug ist, um den Wurzelballen des Sämlings aufzunehmen. Nimm den Sämling vorsichtig aus dem Anzuchttopf und setze ihn in das Loch. Achte darauf, die Wurzeln nicht zu beschädigen.
3. Auffüllen: Fülle das Loch mit Erde auf und drücke sie leicht an.
4. Bewässerung: Gieße die Pflanzen gründlich, um die Erde zu setzen.
5. Standort: Stelle die Töpfe an einen sonnigen Standort. Hibiskus Sabdariffa benötigt mindestens 6 Stunden Sonnenlicht pro Tag. Wenn du die Pflanzen ins Gartenbeet gepflanzt hast, achte darauf, dass der Standort gut drainiert ist.
Phase 3: Pflege und Wachstum
Die richtige Pflege ist entscheidend, um sicherzustellen, dass deine Hibiskus Sabdariffa Pflanzen gesund wachsen und eine reiche Ernte liefern.
1. Bewässerung: Gieße die Pflanzen regelmäßig, besonders während der heißen Sommermonate. Die Erde sollte immer leicht feucht sein, aber nicht durchnässt. Vermeide Staunässe, da dies zu Wurzelfäule führen kann.
2. Düngung: Dünge die Pflanzen alle 2-4 Wochen mit einem ausgewogenen Dünger für Hibiskus oder einem organischen Dünger. Achte darauf, die Anweisungen auf der Verpackung zu befolgen.
3. Beschneidung: Beschneide die Pflanzen regelmäßig, um das Wachstum zu fördern und die Blütenbildung anzuregen. Entferne abgestorbene oder beschädigte Äste.
4. Schutz vor Schädlingen: Überprüfe die Pflanzen regelmäßig auf Schädlinge wie Blattläuse oder Spinnmilben. Bei Bedarf kannst du natürliche Schädlingsbekämpfungsmittel wie Neemöl verwenden.
5. Überwinterung: Wenn du in einer Region mit kalten Wintern lebst, musst du die Pflanzen überwintern. Stelle die Töpfe an einen hellen und kühlen Ort (etwa 10-15°C). Reduziere die Bewässerung und Dünung während der Wintermonate.
Phase 4: Die Ernte
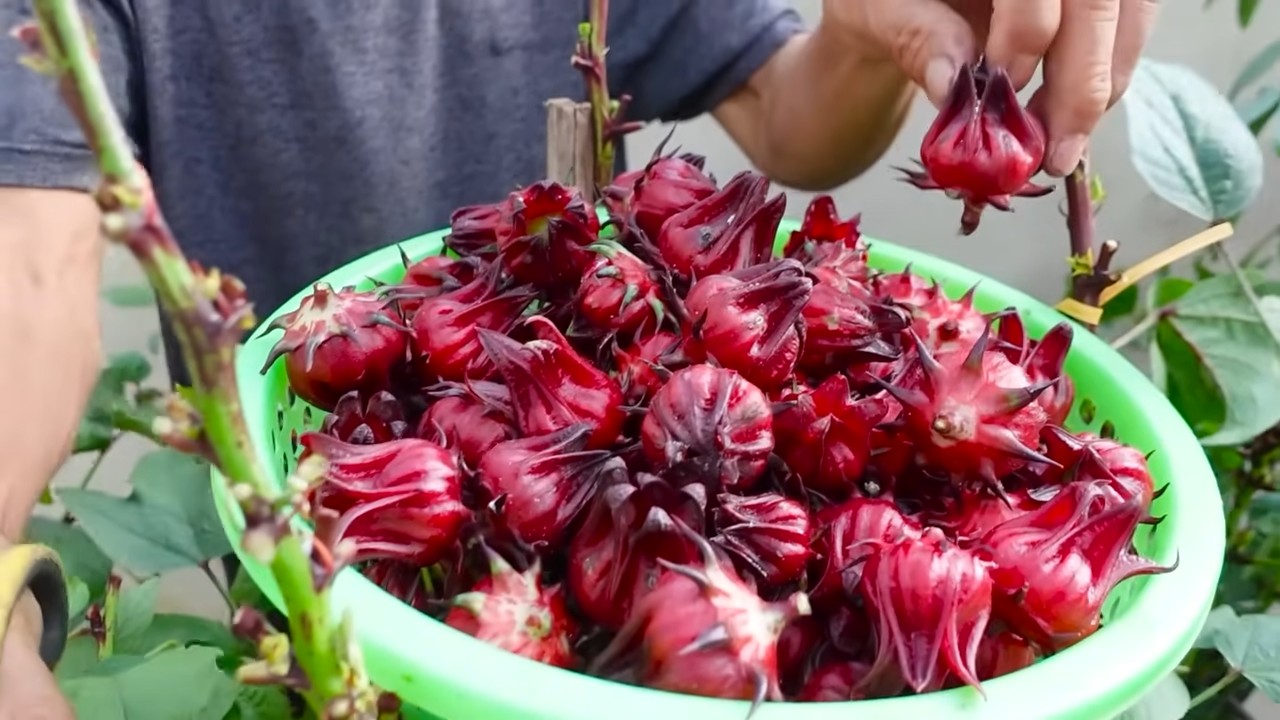
Die Ernte ist der aufregendste Teil! Du kannst die Blütenkelche ernten, sobald sie reif sind.
1. Erntezeitpunkt: Die Blütenkelche sind reif, wenn sie eine leuchtend rote Farbe haben und sich leicht vom Stiel lösen lassen.
2. Erntemethode: Schneide die Blütenkelche mit einer Gartenschere ab. Achte darauf, die Pflanze nicht zu beschädigen.
3. Verarbeitung: Die Blütenkelche können frisch verwendet oder getrocknet werden. Um sie zu trocknen, lege sie an einen trockenen und luftigen Ort.
4. Verwendung: Die Blütenkelche können für Tee, Marmelade, Saft oder andere kulinarische Zwecke verwendet werden. Sie sind reich an Vitamin C und Antioxidantien.
Zusätzliche Tipps für den ganzjährigen Anbau
* Innenanbau: Wenn du Hibiskus Sabdariffa in Innenräumen anbauen möchtest, benötigst du eine Pflanzenlampe, um ausreichend Licht zu gewährleisten. Stelle die Lampe etwa 30-60 cm über die Pflanzen.
* Temperaturkontrolle: Hibiskus Sabdariffa bevorzugt warme Temperaturen. Achte darauf, dass die Temperatur nicht unter 15°C fällt.
* Luftfeuchtigkeit: Hibiskus Sabdariffa mag eine hohe Luftfeuchtigkeit. Du kannst die Luftfeuchtigkeit erhöhen, indem du die Pflanzen regelmäßig mit Wasser besprühst oder einen Luftbefeuchter verwendest.
* Bodenqualität: Achte darauf, dass der Boden gut drainiert ist und ausreichend Nährstoffe enthält. Verwende regelmäßig Kompost oder organischen Dünger.
* Rotation: Wenn du Hibiskus Sabdariffa im Gartenbeet anbaust, wechsle den Standort jedes Jahr, um die Bodenqualität zu erhalten und Krankheiten vorzubeugen.
Häufige Probleme und Lösungen
* Gelbe Blätter: Gelbe Blätter können ein Zeichen für Überwässerung, Nährstoffmangel oder Schädlingsbefall sein. Überprüfe die Bewässerung, dünge die Pflanzen und untersuche sie auf Schädlinge.
* Blattfall: Blattfall kann durch Stress, Temperaturschwankungen oder Wassermangel verursacht werden. Achte auf eine gleichmäßige Bew
Conclusion
So, there you have it! Growing Hibiscus sabdariffa year-round might seem like a tropical dream reserved for warmer climates, but with a little ingenuity and these simple DIY tricks, you can absolutely cultivate this vibrant and beneficial plant no matter where you live. We’ve walked through the essential steps, from understanding the plant’s needs to creating a controlled environment that mimics its ideal growing conditions.
The beauty of this approach lies in its adaptability. You’re not just passively waiting for the right season; you’re actively creating it. Think of it as your own personal microclimate, tailored specifically for your Hibiscus sabdariffa. And the rewards are well worth the effort. Imagine harvesting your own fresh roselle calyces for teas, jams, and other culinary delights, knowing you nurtured them from seed to harvest, regardless of the outside temperature.
Why is this DIY approach a must-try? Because it empowers you to take control of your gardening experience. It’s about more than just growing a plant; it’s about understanding its needs and providing the optimal conditions for it to thrive. It’s about extending your growing season and enjoying the fruits (or in this case, calyces) of your labor year-round. Plus, it’s incredibly satisfying to see your Hibiscus sabdariffa flourish when others might think it’s impossible.
Consider these variations to further personalize your growing experience:
* Hydroponics: For a more advanced approach, explore hydroponic systems. This method allows you to precisely control nutrient delivery and water usage, potentially leading to even faster growth and higher yields.
* Different Lighting: Experiment with different types of grow lights. LED grow lights are energy-efficient and provide a full spectrum of light, but you can also explore high-pressure sodium (HPS) or metal halide (MH) lights for different growth stages.
* Companion Planting: Research companion plants that can benefit your Hibiscus sabdariffa. Certain herbs or flowers can deter pests or improve soil health.
* Container Gardening: If space is limited, focus on container gardening. Choose large pots with good drainage and use a well-draining potting mix.
Don’t be afraid to experiment and adapt these techniques to your specific environment and resources. The key is to observe your plants closely and adjust your approach as needed.
We are confident that with these tips, you’ll be well on your way to enjoying a year-round harvest of Hibiscus sabdariffa. Now, it’s your turn! We encourage you to try these DIY tricks and share your experiences with us. Let us know what works best for you, what challenges you encounter, and any creative solutions you come up with. Share your photos, your recipes, and your stories. Together, we can create a community of passionate Hibiscus sabdariffa growers who are pushing the boundaries of what’s possible. So, get your seeds, gather your supplies, and get growing! We can’t wait to see what you create.
Frequently Asked Questions (FAQ)
What is the ideal temperature for growing Hibiscus sabdariffa?
Hibiscus sabdariffa thrives in warm temperatures, ideally between 65°F and 85°F (18°C and 29°C). Temperatures below 50°F (10°C) can damage or even kill the plant. When growing indoors, ensure your plants are not exposed to drafts or cold windows. Use a thermometer to monitor the temperature in your growing area and adjust heating or cooling as needed. If you are growing outdoors in a cooler climate, consider bringing your plants indoors during the colder months or using protective measures like row covers or greenhouses.
How much light does Hibiscus sabdariffa need?
Hibiscus sabdariffa requires at least 6-8 hours of direct sunlight per day to produce abundant blooms and calyces. If you’re growing indoors, supplement natural light with grow lights. Full-spectrum LED grow lights are an excellent choice, as they provide the necessary wavelengths for photosynthesis. Position the lights close enough to the plants to provide adequate illumination, but not so close that they burn the leaves. Rotate your plants regularly to ensure even light exposure on all sides.
What type of soil is best for Hibiscus sabdariffa?
Hibiscus sabdariffa prefers well-draining, slightly acidic soil with a pH between 6.0 and 6.5. A good potting mix for container gardening should include a combination of peat moss, perlite, and vermiculite. You can also amend your soil with compost or aged manure to improve drainage and fertility. Avoid heavy clay soils, as they can retain too much moisture and lead to root rot. Ensure your pots have drainage holes to prevent waterlogging.
How often should I water my Hibiscus sabdariffa?
Water your Hibiscus sabdariffa regularly, keeping the soil consistently moist but not waterlogged. The frequency of watering will depend on factors such as temperature, humidity, and pot size. Check the soil moisture by sticking your finger about an inch deep into the soil. If it feels dry, it’s time to water. Water deeply, allowing excess water to drain out of the bottom of the pot. Avoid overhead watering, as this can promote fungal diseases. Reduce watering during the dormant season.
What kind of fertilizer should I use for Hibiscus sabdariffa?
Hibiscus sabdariffa benefits from regular fertilization, especially during the growing season. Use a balanced fertilizer with a ratio of 10-10-10 or 20-20-20, or a fertilizer specifically formulated for hibiscus plants. Follow the instructions on the fertilizer label for application rates and frequency. Avoid over-fertilizing, as this can burn the roots. You can also supplement with organic fertilizers such as compost tea or fish emulsion.
How do I prevent pests and diseases on my Hibiscus sabdariffa?
Regularly inspect your plants for signs of pests or diseases. Common pests that affect Hibiscus sabdariffa include aphids, spider mites, and whiteflies. Treat infestations with insecticidal soap, neem oil, or horticultural oil. Ensure good air circulation to prevent fungal diseases such as powdery mildew and root rot. Remove any dead or diseased leaves promptly. Avoid overwatering and provide adequate drainage to prevent root rot.
When and how do I harvest Hibiscus sabdariffa calyces?
The calyces of Hibiscus sabdariffa are typically ready for harvest about 6-8 weeks after the flowers bloom. The calyces should be plump, firm, and deep red in color. Use sharp scissors or pruning shears to cut the calyces from the plant. Harvest in the morning after the dew has dried. You can use the fresh calyces immediately or dry them for later use. To dry the calyces, spread them out in a single layer on a screen or tray and allow them to air dry in a well-ventilated area for several days, or use a dehydrator.
Can I grow Hibiscus sabdariffa from cuttings?
Yes, Hibiscus sabdariffa can be propagated from cuttings. Take cuttings from healthy, non-flowering stems in the spring or summer. The cuttings should be about 4-6 inches long and have several leaves. Remove the lower leaves and dip the cut end in rooting hormone. Plant the cuttings in a well-draining potting mix and keep them moist. Place the cuttings in a warm, humid location and provide indirect light. Roots should develop in a few weeks.
How do I overwinter my Hibiscus sabdariffa plants?
If you live in a climate with cold winters, you’ll need to overwinter your Hibiscus sabdariffa plants indoors. Before the first frost, prune the plants back to about 12-18 inches tall and repot them into smaller containers if necessary. Bring the plants indoors and place them in a bright, sunny location. Reduce watering and fertilization during the winter months. Monitor the plants for pests and diseases. In the spring, gradually acclimate the plants to outdoor conditions before transplanting them back into the garden.
Is Hibiscus sabdariffa safe for pets?
While Hibiscus sabdariffa is generally considered non-toxic to pets, it’s always best to exercise caution. Some animals may experience mild gastrointestinal upset if they ingest large quantities of the plant. Keep your plants out of reach of pets or supervise them when they are near the plants. If you have any concerns, consult with your veterinarian.

Leave a Comment