
Growing healthy bean plants can feel like a daunting task, but trust me, it doesn’t have to be! Have you ever dreamed of stepping outside your back door and harvesting a basket overflowing with crisp, delicious green beans? Imagine the satisfaction of knowing you nurtured those plants from tiny seeds to a bountiful harvest, all with your own two hands. This isn’t just a pipe dream; it’s an achievable reality with a few simple tricks and DIY hacks.
Beans have a rich history, dating back thousands of years and playing a vital role in cuisines across the globe. From ancient civilizations in South America to traditional European dishes, beans have been a staple food source, providing essential nutrients and sustenance. Today, the tradition of growing your own beans continues, offering not only fresh produce but also a connection to the earth and a sense of self-sufficiency.
But why bother with the effort? Well, store-bought beans often lack the vibrant flavor and freshness of homegrown varieties. Plus, you have complete control over what goes into your garden, ensuring your beans are free from harmful pesticides and chemicals. More importantly, growing healthy bean plants yourself is incredibly rewarding. This article is packed with easy-to-follow DIY tips and tricks that will help you cultivate a thriving bean patch, even if you’re a complete beginner. I’m here to guide you every step of the way, so let’s get started and unlock the secrets to a successful bean harvest!
DIY: Gesunde Bohnenpflanzen ziehen – So klappt’s garantiert!
Ich liebe es, mein eigenes Gemüse anzubauen, und Bohnen sind da ein absoluter Favorit! Sie sind relativ einfach zu ziehen, liefern eine reiche Ernte und schmecken einfach unschlagbar frisch. In diesem Artikel zeige ich dir, wie du mit ein paar einfachen Tricks und Kniffen gesunde und ertragreiche Bohnenpflanzen ziehen kannst. Los geht’s!
Die richtige Bohnensorte wählen
Bevor wir loslegen, ist es wichtig, die richtige Bohnensorte für deinen Garten und deine Bedürfnisse auszuwählen. Es gibt Buschbohnen, Stangenbohnen und Feuerbohnen, jede mit ihren eigenen Vor- und Nachteilen.
* **Buschbohnen:** Diese Bohnen wachsen kompakt und benötigen keine Rankhilfe. Sie sind ideal für kleinere Gärten oder Hochbeete. Die Ernte erfolgt meist auf einmal.
* **Stangenbohnen:** Diese Bohnen klettern an Rankhilfen empor und benötigen daher mehr Platz in der Höhe. Dafür liefern sie über einen längeren Zeitraum Ernte.
* **Feuerbohnen:** Diese Bohnen sind nicht nur lecker, sondern auch wunderschön anzusehen mit ihren roten Blüten. Sie sind ebenfalls Kletterpflanzen und benötigen eine Rankhilfe.
Überlege dir, wie viel Platz du hast, wie lange du ernten möchtest und welche Sorte dir am besten schmeckt. Ich persönlich mag Stangenbohnen, weil ich so lange ernten kann.
Die Vorbereitung: Der Schlüssel zum Erfolg
Eine gute Vorbereitung ist das A und O für gesunde Bohnenpflanzen. Hier sind die wichtigsten Schritte:
* **Der richtige Standort:** Bohnen lieben die Sonne! Wähle einen sonnigen Standort mit mindestens sechs Stunden direkter Sonneneinstrahlung pro Tag.
* **Der Boden:** Bohnen bevorzugen einen lockeren, gut durchlässigen Boden. Schwere Lehmböden sollten mit Kompost oder Sand verbessert werden. Der pH-Wert sollte idealerweise zwischen 6,0 und 7,0 liegen.
* **Bodenverbesserung:** Arbeite vor der Aussaat reichlich Kompost oder gut verrotteten Mist in den Boden ein. Das verbessert die Bodenstruktur, speichert Feuchtigkeit und liefert wichtige Nährstoffe.
* **Rankhilfe (für Stangenbohnen und Feuerbohnen):** Baue rechtzeitig eine stabile Rankhilfe. Du kannst ein einfaches Gerüst aus Bambusstäben, ein Spalier oder ein Ranknetz verwenden. Achte darauf, dass die Rankhilfe stabil genug ist, um das Gewicht der Pflanzen und der Bohnen zu tragen.
Aussaat: Wann und wie?
Der richtige Zeitpunkt für die Aussaat ist entscheidend. Bohnen sind frostempfindlich und sollten erst nach den letzten Frösten ausgesät werden.
* **Zeitpunkt:** Warte, bis der Boden sich auf mindestens 10°C erwärmt hat. Das ist in der Regel Mitte Mai bis Anfang Juni der Fall.
* **Direktsaat:** Bohnen werden direkt ins Freiland gesät.
* **Aussaattiefe:** Lege die Bohnen etwa 3-5 cm tief in die Erde.
* **Abstand:** Halte bei Buschbohnen einen Abstand von etwa 10-15 cm zwischen den Pflanzen und 40-50 cm zwischen den Reihen ein. Bei Stangenbohnen kannst du 2-3 Bohnen pro Rankhilfe säen.
* **Gießen:** Gieße die Erde nach der Aussaat gründlich an.
Wichtig: Weiche die Bohnen vor der Aussaat nicht ein! Das kann dazu führen, dass sie faulen.
Pflege: So bleiben deine Bohnen gesund und kräftig
Nach der Aussaat ist es wichtig, die Bohnen gut zu pflegen, damit sie gesund und kräftig wachsen.
* **Gießen:** Gieße die Bohnen regelmäßig, besonders während trockener Perioden. Achte darauf, dass der Boden gleichmäßig feucht ist, aber vermeide Staunässe.
* **Unkrautbekämpfung:** Halte das Beet unkrautfrei. Unkraut konkurriert mit den Bohnen um Nährstoffe und Wasser.
* **Mulchen:** Eine Mulchschicht aus Stroh oder Rasenschnitt hilft, die Feuchtigkeit im Boden zu halten, Unkraut zu unterdrücken und den Boden zu düngen.
* **Düngen:** Bohnen sind Stickstofffixierer, das heißt, sie können Stickstoff aus der Luft binden. Eine zusätzliche Düngung mit Stickstoff ist daher in der Regel nicht notwendig. Du kannst aber während der Blütezeit mit einem kaliumreichen Dünger nachhelfen.
* **Rankhilfe (für Stangenbohnen und Feuerbohnen):** Leite die jungen Triebe der Stangenbohnen und Feuerbohnen an der Rankhilfe entlang.
Schutz vor Schädlingen und Krankheiten
Auch Bohnen können von Schädlingen und Krankheiten befallen werden. Hier sind einige häufige Probleme und wie du sie bekämpfen kannst:
* **Blattläuse:** Blattläuse saugen Pflanzensaft und können die Pflanzen schwächen. Du kannst sie mit einem Wasserstrahl abspritzen oder mit einem biologischen Insektizid bekämpfen.
* **Bohnenfliege:** Die Larven der Bohnenfliege fressen an den Wurzeln der Bohnenpflanzen. Du kannst die Bohnenfliege durch eine frühe Aussaat und eine gute Bodenhygiene vermeiden.
* **Bohnenrost:** Bohnenrost ist eine Pilzkrankheit, die sich durch orangefarbene Pusteln auf den Blättern äußert. Entferne befallene Blätter und sorge für eine gute Belüftung der Pflanzen.
* **Schnecken:** Schnecken können junge Bohnenpflanzen kahl fressen. Schütze deine Pflanzen mit Schneckenzäunen oder Schneckenkorn.
Tipp: Kontrolliere deine Bohnenpflanzen regelmäßig auf Schädlinge und Krankheiten. Je früher du ein Problem erkennst, desto einfacher ist es, es zu beheben.
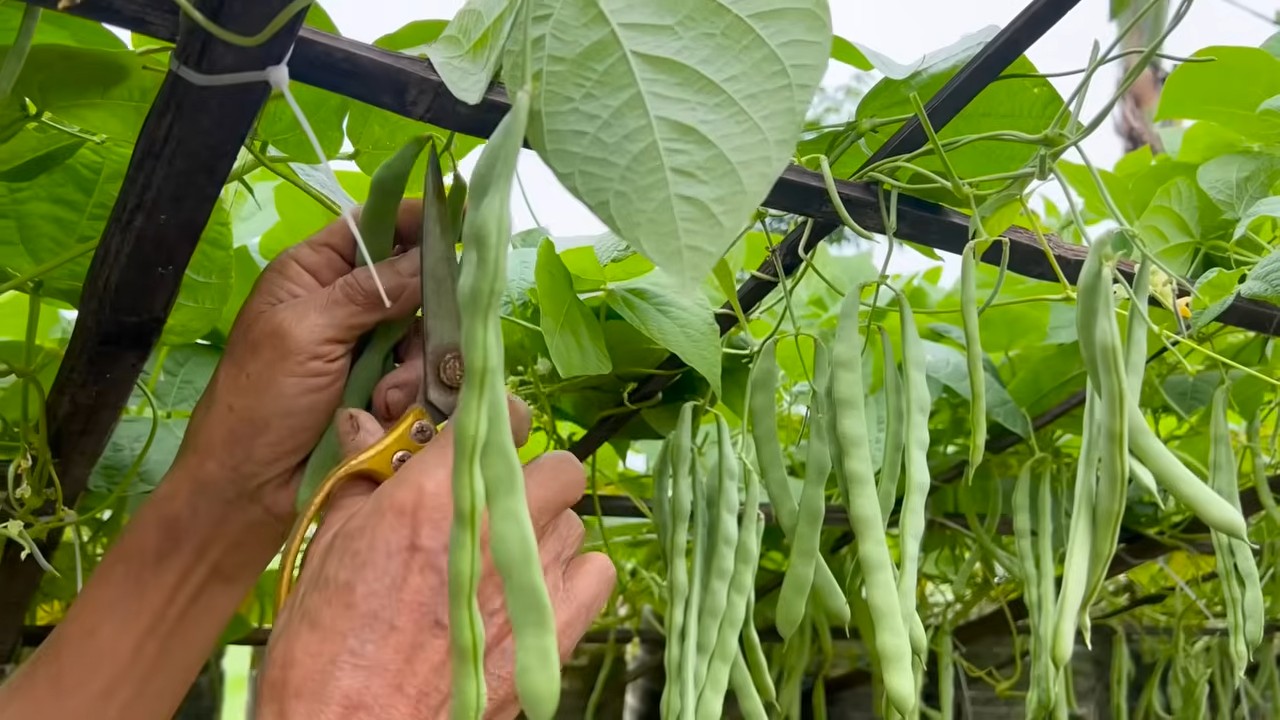
Ernte: Der Lohn der Mühe
Endlich ist es soweit: Die Bohnen sind reif und können geerntet werden!
* **Zeitpunkt:** Ernte die Bohnen, wenn sie prall und knackig sind. Die Hülsen sollten sich leicht brechen lassen.
* **Erntemethode:** Pflücke die Bohnen vorsichtig von der Pflanze ab.
* **Regelmäßige Ernte:** Ernte die Bohnen regelmäßig, um die Produktion neuer Hülsen anzuregen.
Wichtig: Lasse keine überreifen Bohnen an der Pflanze hängen, da dies die Produktion neuer Hülsen hemmt.
Bohnen konservieren: So hast du auch im Winter etwas davon
Wenn du eine reiche Ernte hast, kannst du die Bohnen konservieren, um auch im Winter etwas davon zu haben.
* **Einfrieren:** Blanchiere die Bohnen kurz in kochendem Wasser und friere sie dann ein.
* **Einlegen:** Lege die Bohnen in Essig oder Öl ein.
* **Trocknen:** Trockne die Bohnen im Backofen oder Dörrautomaten.
Zusammenfassung der wichtigsten Punkte
Hier noch einmal die wichtigsten Punkte für gesunde Bohnenpflanzen im Überblick:
* Wähle die richtige Bohnensorte für deinen Garten.
* Bereite den Boden gut vor.
* Säe die Bohnen nach den letzten Frösten aus.
* Gieße die Bohnen regelmäßig.
* Bekämpfe Unkraut und Schädlinge.
* Ernte die Bohnen regelmäßig.
Mit diesen Tipps und Tricks kannst du garantiert gesunde und ertragreiche Bohnenpflanzen ziehen. Viel Spaß beim Gärtnern! Ich hoffe, du hast bald eine reiche Ernte!
Conclusion
So, there you have it! Mastering the art of growing healthy bean plants doesn’t require a green thumb blessed by the gardening gods. It’s about understanding their needs, providing the right environment, and employing a few simple, yet effective, DIY tricks. We’ve explored how to create the perfect soil mix, build a budget-friendly trellis, and even concoct a natural pest repellent – all designed to give your bean plants the best possible start and a bountiful harvest.
Why is this DIY approach a must-try? Because it empowers you to take control of your garden’s ecosystem. You’re not relying on expensive, potentially harmful chemicals or pre-packaged solutions. Instead, you’re nurturing your plants with ingredients you trust, creating a sustainable and rewarding gardening experience. Plus, let’s be honest, there’s a certain satisfaction that comes from knowing you built that trellis yourself or whipped up a pest repellent that actually works!
But the journey doesn’t end here. Feel free to experiment with variations on these DIY techniques. For example, instead of bamboo stakes for your trellis, try using repurposed branches from your yard. Or, if you’re feeling adventurous, infuse your natural pest repellent with different herbs like rosemary or thyme to see if they offer additional benefits. Consider companion planting marigolds near your bean plants to further deter pests naturally. You could even try different types of beans – pole beans, bush beans, lima beans – each with its own unique growth habits and flavor profiles.
The key is to adapt these DIY tricks to your specific garden conditions and personal preferences. Observe your plants closely, pay attention to their needs, and don’t be afraid to tweak the recipes or techniques as you go. Gardening is a learning process, and every season brings new opportunities to refine your skills and discover what works best for you.
We wholeheartedly encourage you to try these DIY tricks for growing healthy bean plants. Whether you’re a seasoned gardener or a complete beginner, these techniques are accessible, affordable, and incredibly rewarding. Imagine the satisfaction of harvesting your own fresh, delicious beans, knowing that you nurtured them from seed to table using your own ingenuity and resourcefulness.
And most importantly, we want to hear about your experience! Share your successes, your challenges, and your own DIY innovations in the comments below. Let’s create a community of bean-growing enthusiasts who are passionate about sustainable gardening and sharing their knowledge with others. Together, we can unlock the secrets to a thriving bean patch and inspire others to embrace the joy of growing their own food. So, grab your gardening gloves, gather your supplies, and get ready to embark on a bean-growing adventure! Happy gardening!
Frequently Asked Questions (FAQ)
What kind of soil is best for growing healthy bean plants?
Bean plants thrive in well-draining soil that is rich in organic matter. A slightly acidic to neutral pH (around 6.0 to 7.0) is ideal. Avoid heavy clay soils that retain too much water, as this can lead to root rot. A good DIY soil mix would include equal parts of compost, garden soil, and either perlite or vermiculite for drainage. The compost provides essential nutrients, the garden soil provides structure, and the perlite/vermiculite ensures proper drainage and aeration. You can also amend your soil with aged manure or other organic fertilizers to boost its fertility. Remember to test your soil pH before planting and adjust accordingly with lime (to raise pH) or sulfur (to lower pH).
How often should I water my bean plants?
Watering frequency depends on several factors, including the weather, soil type, and stage of plant growth. Generally, bean plants need consistent moisture, especially during flowering and pod development. Water deeply when the top inch of soil feels dry to the touch. Avoid overwatering, as this can lead to fungal diseases. A good rule of thumb is to water 2-3 times per week, but adjust as needed based on your local conditions. Mulching around your bean plants can help retain moisture in the soil and reduce the need for frequent watering. Drip irrigation or soaker hoses are excellent options for delivering water directly to the roots, minimizing water waste and reducing the risk of foliar diseases.
What are some common pests that affect bean plants, and how can I control them naturally?
Common pests that attack bean plants include aphids, bean beetles, spider mites, and slugs. A natural pest control strategy involves a multi-pronged approach. First, inspect your plants regularly for signs of infestation. Hand-picking pests like bean beetles and slugs can be effective for small infestations. For aphids and spider mites, try spraying your plants with a strong stream of water to dislodge them. You can also make a DIY insecticidal soap by mixing a tablespoon of liquid dish soap (avoid detergents with bleach or degreasers) with a quart of water and spraying it on the affected areas. Neem oil is another effective natural insecticide that can control a wide range of pests. Companion planting with marigolds, nasturtiums, or garlic can also help deter pests. Encourage beneficial insects like ladybugs and lacewings, which prey on aphids and other pests.
How do I build a simple and affordable trellis for my bean plants?
A simple and affordable trellis can be built using readily available materials. Bamboo stakes are a great option – simply insert them into the ground around your bean plants and tie them together at the top to create a teepee-like structure. You can also use branches from your yard or repurposed materials like old ladders or wooden pallets. Another option is to create a wire trellis by stringing wire or twine between two posts. The height of your trellis will depend on the type of bean you are growing – pole beans require taller trellises than bush beans. Ensure that your trellis is sturdy enough to support the weight of the mature plants and their pods.
When is the best time to harvest my bean plants?
The best time to harvest your bean plants depends on the type of bean you are growing and your desired use. For snap beans (green beans), harvest them when the pods are firm, plump, and snap easily. Avoid letting them become too large and tough. For shell beans (like lima beans), harvest them when the pods are mature and the beans inside are fully developed but still tender. For dry beans (like kidney beans or black beans), allow the pods to dry completely on the plant before harvesting. Once harvested, dry beans should be stored in a cool, dry place. Regular harvesting encourages continued production, so check your plants frequently and harvest beans as they ripen.
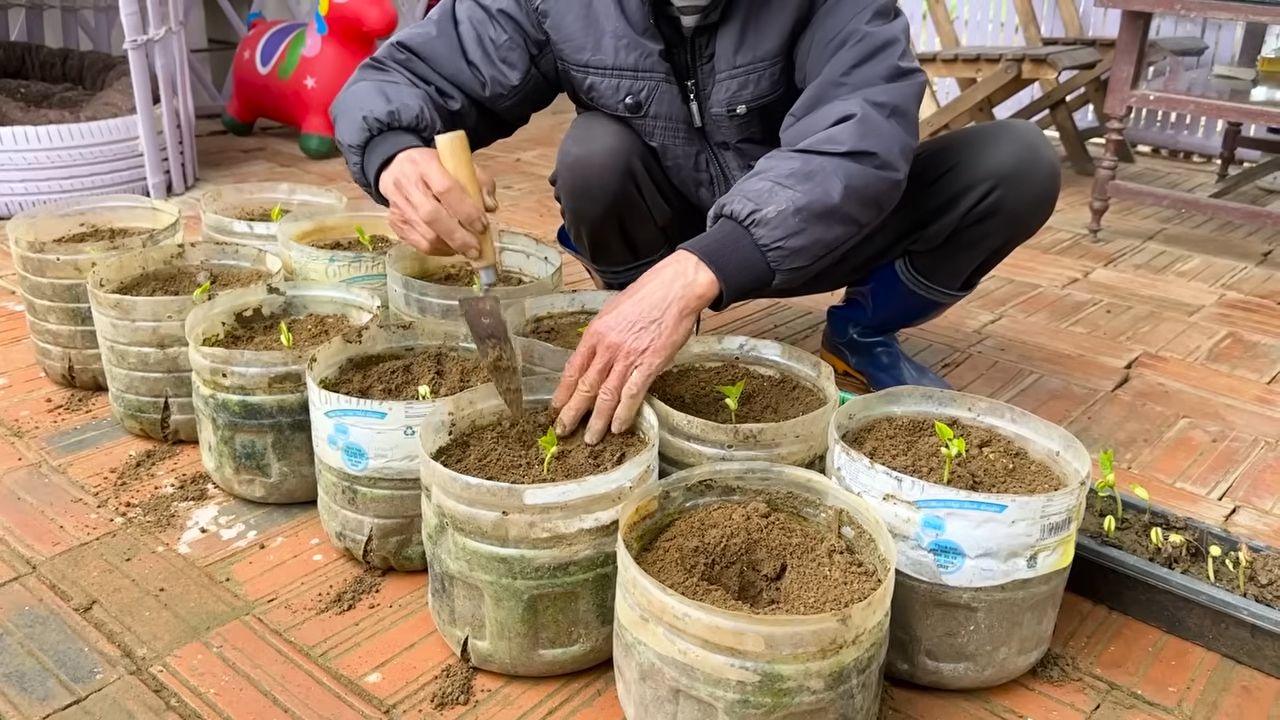
Can I grow bean plants in containers?
Yes, you can successfully grow bean plants in containers, especially bush bean varieties. Choose a container that is at least 12 inches in diameter and depth to provide enough room for the roots to grow. Use a well-draining potting mix and ensure that the container has drainage holes. Water regularly and fertilize every few weeks with a balanced fertilizer. Place the container in a sunny location that receives at least 6-8 hours of sunlight per day. You may need to provide support for the plants, such as a small trellis or stakes. Container gardening is a great option for those with limited space or poor soil conditions.
How can I improve the yield of my bean plants?
Several factors can contribute to a higher yield of bean plants. First, ensure that your plants are receiving adequate sunlight, water, and nutrients. Amend your soil with compost or other organic matter to improve its fertility. Provide support for the plants with a trellis or stakes to maximize their growth potential. Practice succession planting by planting new seeds every few weeks to extend the harvest season. Regularly harvest beans as they ripen to encourage continued production. Control pests and diseases promptly to prevent them from damaging your plants. Consider using a bean inoculant, which contains beneficial bacteria that help the plants fix nitrogen from the air, resulting in healthier growth and higher yields.


Leave a Comment