
Growing Chives at Home is easier than you might think, and I’m here to show you how! Forget those sad, wilted bunches at the grocery store. Imagine snipping fresh, flavorful chives right from your own windowsill or garden bed whenever you need them. Sounds amazing, right?
For centuries, chives have been a culinary staple, adding a delicate oniony flavor to dishes across the globe. Their use dates back to ancient Rome, where they were believed to ward off evil spirits and even soothe sunburns! While I can’t promise they’ll protect you from sunburn, I can guarantee they’ll elevate your cooking.
In today’s busy world, convenience is key. But what if you could combine convenience with fresh, homegrown goodness? That’s where these DIY tricks come in. Growing chives at home not only saves you money but also ensures you always have a burst of fresh flavor on hand. Plus, it’s incredibly rewarding to nurture your own little herb garden. I’ll guide you through simple, step-by-step methods to successfully grow chives, even if you have limited space or gardening experience. Let’s get started and unlock the secrets to a thriving chive patch!
Growing Chives at Home: A Beginner’s Guide
Hey there, fellow gardening enthusiasts! I’m so excited to share my experience with growing chives at home. It’s incredibly easy, rewarding, and adds a fresh, flavorful touch to so many dishes. Plus, having fresh herbs readily available is a game-changer in the kitchen. Let’s dive in!
Choosing Your Chives: Seeds vs. Starts
Before we get our hands dirty, let’s talk about how you want to start your chive journey. You have two main options: seeds or starter plants (also called “starts”).
* Seeds: Starting from seeds is the most economical option. It allows you to grow a larger quantity of chives for a lower initial cost. However, it requires a bit more patience, as it takes longer for the chives to mature.
* Starts: Buying starter plants gives you a head start. You’ll have usable chives much sooner. This is a great option if you’re eager to start cooking with them right away or if you’re short on time.
I’ve tried both methods, and honestly, both work great! If you’re a beginner, starts might be a bit easier to manage initially.
Materials You’ll Need
Here’s a list of everything you’ll need to get started. Don’t worry, it’s not a long list!
* Chive seeds or starter plants
* Potting soil (well-draining is key!)
* A pot with drainage holes (at least 6 inches in diameter)
* Watering can or spray bottle
* Optional: Plant fertilizer (organic is always a good choice!)
* Optional: Gardening gloves (to keep your hands clean)
* Optional: Small trowel or gardening fork
Planting Your Chives: Step-by-Step
Okay, let’s get to the fun part – planting!
Planting from Seeds
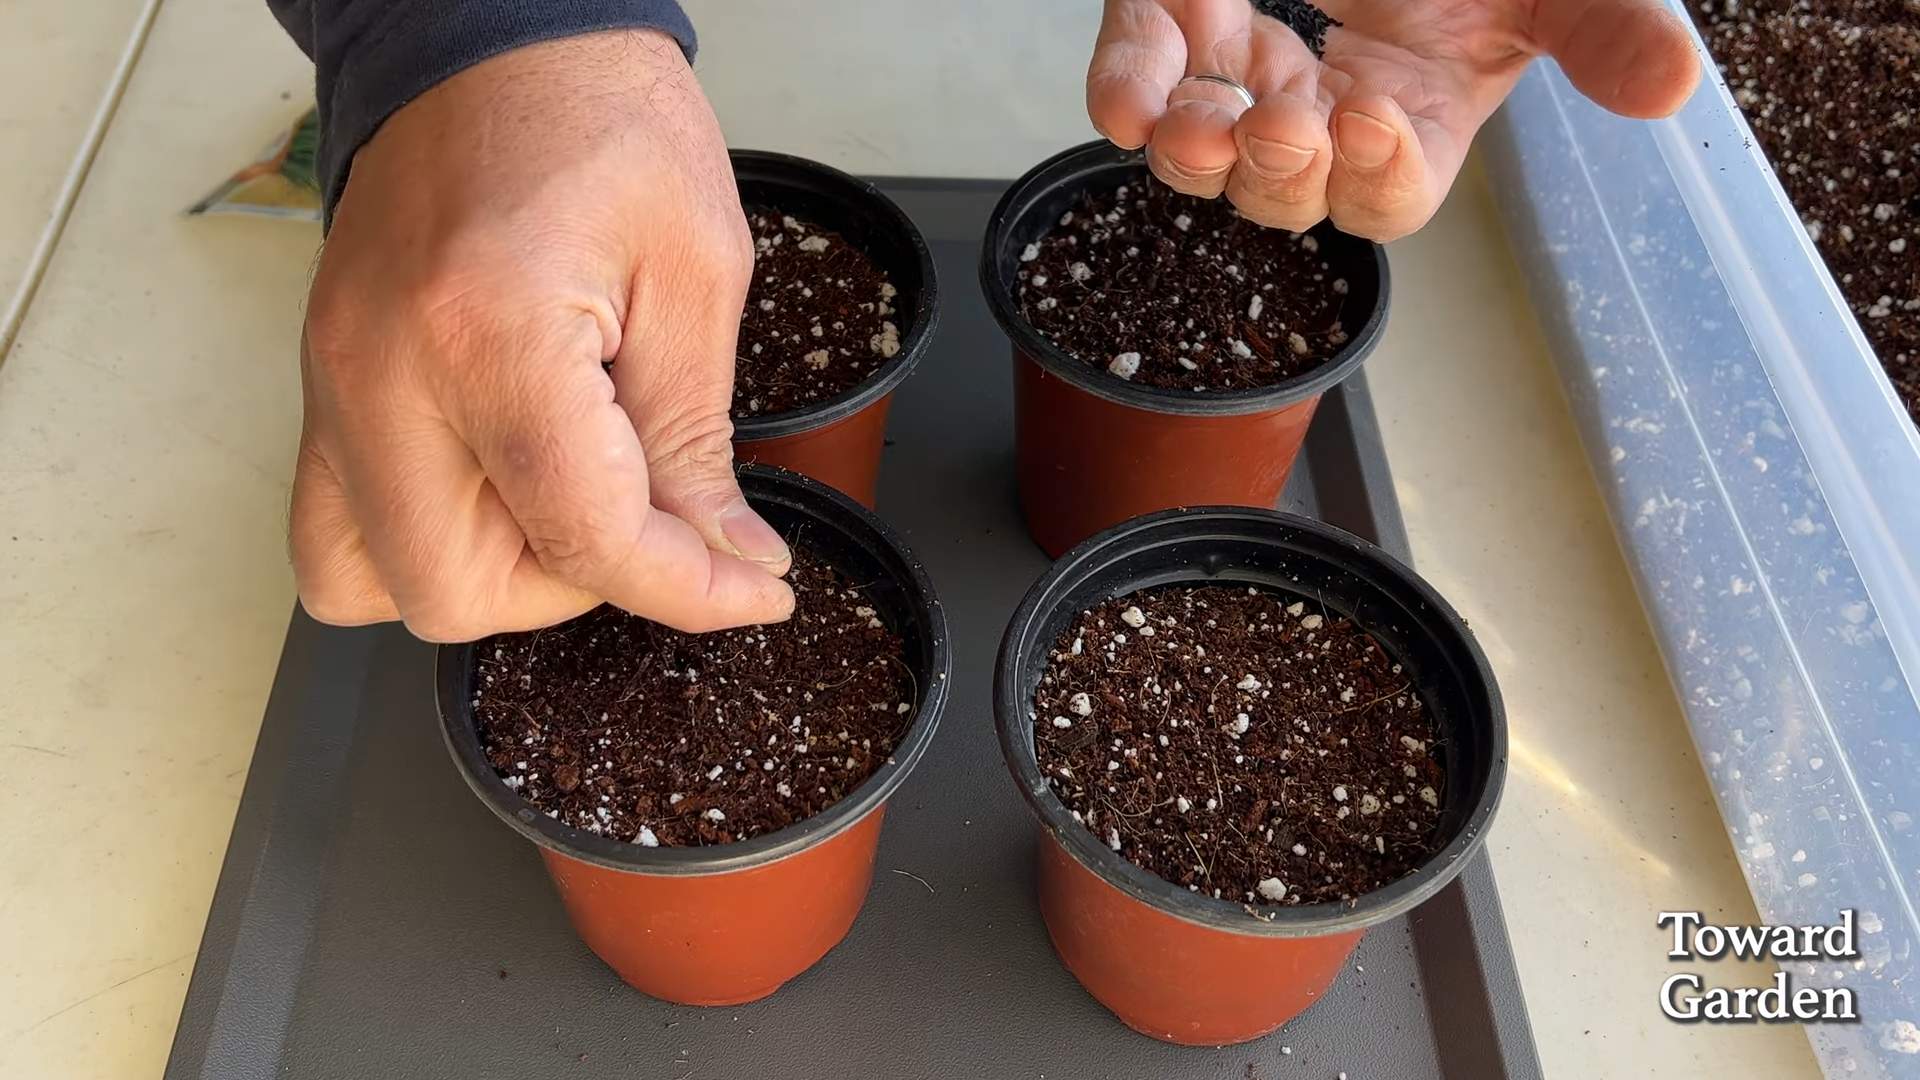
1. Prepare the Pot: Fill your pot with potting soil, leaving about an inch of space at the top. Gently pat down the soil to create a firm surface.
2. Sow the Seeds: Sprinkle the chive seeds evenly over the surface of the soil. You don’t need to bury them too deep; about 1/4 inch is perfect.
3. Cover the Seeds: Lightly cover the seeds with a thin layer of potting soil.
4. Water Gently: Use a watering can or spray bottle to gently moisten the soil. Be careful not to wash away the seeds.
5. Find a Sunny Spot: Place the pot in a sunny location. Chives need at least 6 hours of sunlight per day. A windowsill or balcony works well.
6. Keep the Soil Moist: Keep the soil consistently moist, but not soggy. Check the soil moisture daily and water when the top inch feels dry.
7. Be Patient: Germination usually takes about 1-2 weeks. Once the seedlings emerge, thin them out if they’re too crowded. You want to give each plant enough space to grow.
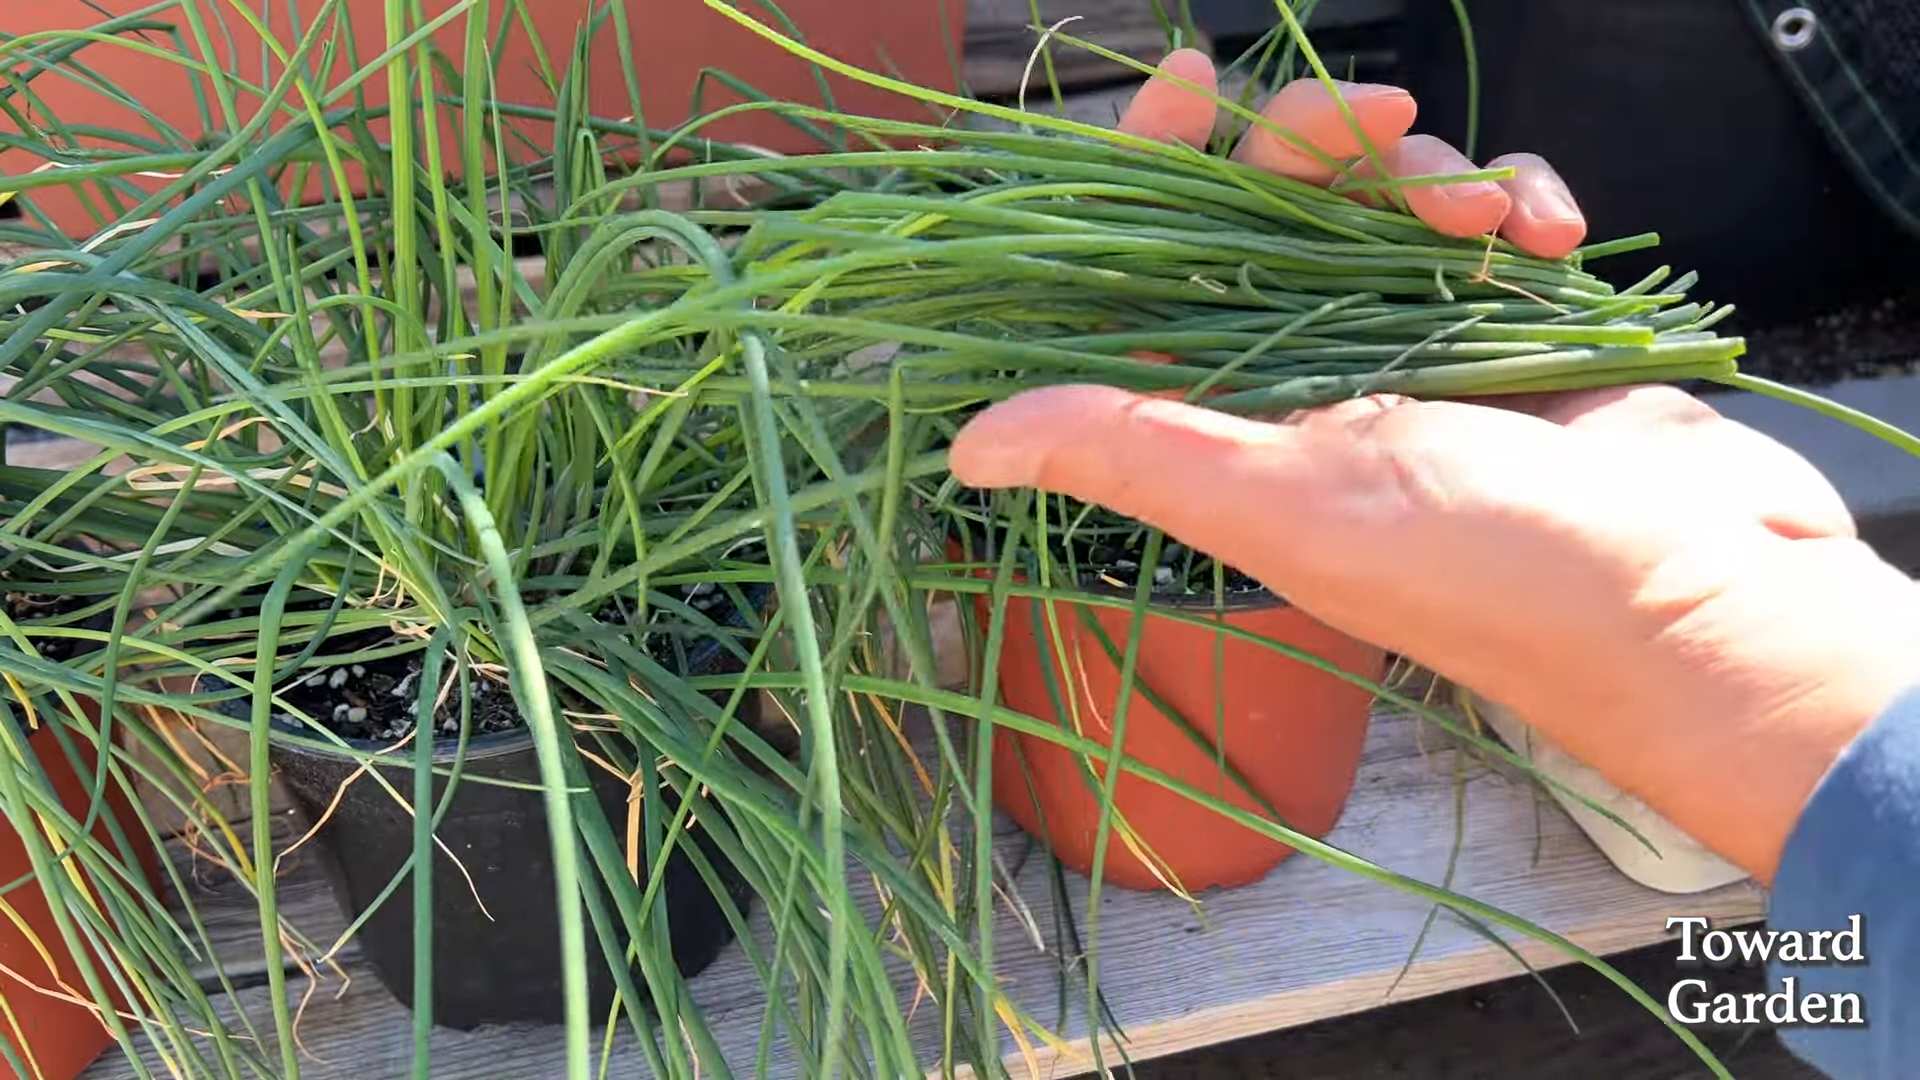
Planting Starter Plants
1. Prepare the Pot: Fill your pot with potting soil, leaving about an inch of space at the top.
2. Make a Hole: Dig a hole in the center of the pot that’s large enough to accommodate the root ball of your starter plant.
3. Remove the Plant: Gently remove the chive plant from its nursery container. Loosen the roots slightly with your fingers.
4. Place the Plant: Place the plant in the hole and backfill with potting soil. Gently pat down the soil around the base of the plant.
5. Water Thoroughly: Water the plant thoroughly until the water drains out of the bottom of the pot.
6. Find a Sunny Spot: Place the pot in a sunny location.
7. Monitor and Water: Keep the soil consistently moist, but not soggy.
Caring for Your Chives: Tips and Tricks
Now that your chives are planted, let’s talk about how to keep them happy and healthy.
* Sunlight: Chives thrive in full sun, so make sure they get at least 6 hours of sunlight per day. If you’re growing them indoors, a sunny windowsill is ideal. If you don’t have enough natural light, you can supplement with a grow light.
* Watering: Water your chives regularly, especially during hot weather. The soil should be consistently moist, but not waterlogged. Overwatering can lead to root rot. I usually check the soil moisture every day and water when the top inch feels dry.
* Fertilizing: Chives are not heavy feeders, but they will benefit from occasional fertilization. Use an organic fertilizer diluted to half strength every few weeks during the growing season.
* Pruning: Regular pruning is essential for keeping your chives healthy and productive. Snip off the flower stalks as soon as they appear. This will encourage the plant to produce more leaves.
* Dividing: Every few years, you may need to divide your chive plants. This will help to prevent them from becoming overcrowded and will also rejuvenate the plant. To divide, simply dig up the plant and gently separate the clumps of roots. Replant the clumps in separate pots or in the garden.
* Pest Control: Chives are generally pest-resistant, but they can occasionally be affected by aphids or spider mites. If you notice any pests, you can try spraying the plants with insecticidal soap or neem oil.
Harvesting Your Chives: When and How
Harvesting your chives is the best part! You can start harvesting them as soon as they’re about 6 inches tall.
1. Use Scissors: Use sharp scissors to snip off the chives about an inch above the soil level.
2. Harvest Regularly: Harvest regularly to encourage new growth. Don’t be afraid to cut them back hard; they’ll grow back quickly.
3. Use Fresh: Chives are best used fresh. You can add them to salads, soups, omelets, and many other dishes.
4. Store Properly: If you have more chives than you can use, you can store them in the refrigerator for a few days. Wrap them in a damp paper towel and place them in a plastic bag. You can also freeze chives for longer storage. Chop them up and freeze them in ice cube trays with a little water or olive oil.
Troubleshooting: Common Issues and Solutions
Even with the best care, you might encounter a few issues along the way. Here are some common problems and how to fix them:
* Yellowing Leaves: Yellowing leaves can be a sign of overwatering, underwatering, or nutrient deficiency. Check the soil moisture and adjust your watering accordingly. If the soil is dry, water more frequently. If the soil is soggy, water less frequently. You can also try fertilizing the plants with a balanced fertilizer.
* Slow Growth: Slow growth can be caused by insufficient sunlight, poor soil, or lack of nutrients. Make sure your chives are getting enough sunlight. If the soil is poor, amend it with compost or other organic matter. You can also try fertilizing the plants with a balanced fertilizer.
* Pests: As mentioned earlier, chives can occasionally be affected by aphids or spider mites. Spray the plants with insecticidal soap or neem oil to control these pests.
* Bolting (Flowering): While chive flowers are pretty, they can make the leaves taste bitter. To prevent bolting, snip off the flower stalks as soon as they appear.
Enjoying Your Homegrown Chives
Now that you’ve successfully grown your own chives, it’s time to enjoy the fruits (or rather, herbs) of your labor! Here are just a few ideas for using your fresh chives:
* Garnish: Sprinkle chopped chives over salads, soups, baked potatoes, and other dishes.
* Omelets and Scrambled Eggs: Add chopped chives to omelets and scrambled eggs for a burst of flavor.
* Dips and Sauces: Mix chopped chives into dips and sauces, such as sour cream dip or tartar sauce.
* Compound Butter: Make compound butter by mixing chopped chives with softened butter. Use it to top grilled meats, vegetables, or bread.
* Vinegar: Infuse vinegar with chives for a flavorful salad dressing.
Growing chives at home is a simple and rewarding experience. With a little bit of care, you can enjoy fresh, flavorful chives all season long. Happy gardening!
Conclusion
So, there you have it! Growing chives at home is not only incredibly simple, but it’s also a game-changer for anyone who loves fresh, flavorful herbs at their fingertips. Forget those sad, wilted bunches from the grocery store – with just a little effort, you can have a thriving chive plant providing you with a constant supply of deliciousness.
Why is this DIY trick a must-try? Because it’s economical, sustainable, and undeniably satisfying. Think about it: you’re saving money by not buying chives regularly, reducing plastic waste from packaging, and experiencing the joy of nurturing something from seed (or transplant) to table. Plus, the flavor of homegrown chives is simply unmatched – brighter, more vibrant, and bursting with that characteristic oniony zest.
But the best part? The possibilities are endless! While we’ve focused on the basics, feel free to experiment. Try growing different varieties of chives, such as garlic chives for a milder, garlicky flavor. Consider companion planting – chives are known to deter pests from other plants like tomatoes and carrots, making them a valuable addition to your garden. You can even grow them indoors on a sunny windowsill if you don’t have outdoor space.
For a spicier kick, infuse your chive oil with a pinch of red pepper flakes. Or, for a more delicate flavor, try adding a sprig of thyme or rosemary to the oil as it infuses. The key is to have fun and tailor the process to your own taste preferences.
Don’t be intimidated if you’ve never grown herbs before. Growing chives at home is a fantastic starting point, as they are incredibly resilient and forgiving. Even if you make a few mistakes along the way, you’re likely to still end up with a bountiful harvest.
We wholeheartedly encourage you to give this DIY trick a try. Imagine the satisfaction of snipping fresh chives from your own plant to garnish your favorite dishes. Picture the vibrant green color and the burst of flavor they’ll add to your omelets, salads, soups, and more.
Once you’ve experienced the joy of growing your own chives, we’re confident you’ll be hooked! So, grab some seeds or a starter plant, follow our simple steps, and get ready to enjoy the freshest, most flavorful chives you’ve ever tasted.
And most importantly, we want to hear about your experience! Share your photos, tips, and variations in the comments below. Let’s create a community of chive-growing enthusiasts and inspire others to embrace the joys of homegrown herbs. Happy growing!
Frequently Asked Questions (FAQ)
What is the best time of year to plant chives?
The best time to plant chives depends on whether you’re starting from seed or transplanting. If starting from seed, sow them indoors 6-8 weeks before the last expected frost. You can then transplant them outdoors after the danger of frost has passed. If you’re transplanting a chive plant, spring or early fall are ideal times, as the weather is cooler and less stressful for the plant. In warmer climates, you can plant chives year-round, but avoid planting during the hottest months of summer.
How much sunlight do chives need?
Chives thrive in full sun, which means they need at least 6-8 hours of direct sunlight per day. However, they can also tolerate partial shade, especially in hotter climates. If you’re growing chives indoors, place them near a sunny window that receives plenty of light. If you notice the leaves becoming pale or leggy, it could be a sign that they’re not getting enough sunlight.
What kind of soil is best for growing chives?
Chives prefer well-draining soil that is rich in organic matter. A slightly acidic to neutral pH (around 6.0-7.0) is ideal. Before planting, amend the soil with compost or other organic matter to improve drainage and fertility. If you’re growing chives in containers, use a high-quality potting mix that is designed for herbs or vegetables.
How often should I water chives?
Chives need consistent moisture, but they don’t like to be waterlogged. Water them deeply whenever the top inch of soil feels dry to the touch. Avoid overwatering, as this can lead to root rot. During hot, dry weather, you may need to water them more frequently. When growing chives at home, ensure proper drainage to prevent water from pooling around the roots.
How do I harvest chives?
Harvesting chives is easy! Simply snip the leaves near the base of the plant with scissors or garden shears. Avoid cutting off more than one-third of the plant at a time, as this can weaken it. Regular harvesting encourages new growth and keeps the plant producing. You can harvest chives throughout the growing season, from spring to fall.
Do chives need fertilizer?
Chives are not heavy feeders, but they will benefit from occasional fertilization. In the spring, apply a balanced fertilizer (such as 10-10-10) according to the package directions. You can also side-dress the plants with compost or aged manure. Avoid over-fertilizing, as this can lead to excessive foliage growth at the expense of flavor.
How do I prevent chives from flowering?
While chive flowers are edible and attractive to pollinators, they can sometimes detract from the flavor of the leaves. To prevent chives from flowering, regularly snip off the flower buds as they appear. This will encourage the plant to focus its energy on producing more leaves.
Can I grow chives indoors?
Yes, you can definitely grow chives indoors! Choose a sunny windowsill or use a grow light to provide adequate light. Use a well-draining potting mix and water regularly. Indoor chives may not grow as vigorously as outdoor chives, but they will still provide you with a steady supply of fresh herbs.
How do I store harvested chives?
Freshly harvested chives are best used immediately. However, you can store them in the refrigerator for up to a week. Wrap them loosely in a damp paper towel and place them in a plastic bag or container. You can also freeze chives for longer storage. Chop them into small pieces and freeze them in ice cube trays with water or oil. Once frozen, transfer the cubes to a freezer bag.
Are chives deer resistant?
Yes, chives are generally considered to be deer resistant. Deer tend to avoid plants with strong odors, and chives have a distinct oniony scent that deters them. However, if deer are very hungry, they may still nibble on chives.
What are some common pests and diseases that affect chives?
Chives are generally pest and disease resistant, but they can occasionally be affected by aphids, onion thrips, or fungal diseases like rust. To prevent these problems, keep the plants well-ventilated and avoid overwatering. If you notice any pests or diseases, treat them promptly with an appropriate insecticide or fungicide.
Can I divide my chive plant?
Yes, dividing your chive plant is a great way to propagate new plants and rejuvenate older ones. In the spring or fall, carefully dig up the plant and separate the clumps of bulbs. Replant the divisions in separate locations, spacing them about 6-8 inches apart.
Are chive blossoms edible?
Yes, chive blossoms are edible and have a mild oniony flavor. They can be used to garnish salads, soups, and other dishes. They also make a beautiful addition to floral arrangements.
How long do chive plants live?
Chive plants are perennials, which means they can live for several years. With proper care, they can continue to produce fresh herbs for many seasons.

Leave a Comment