
Growing chili peppers at home can seem daunting, but trust me, with a few clever tricks and DIY solutions, you’ll be harvesting a fiery bounty in no time! Forget those bland, store-bought peppers – imagine the satisfaction of adding homegrown heat to your favorite dishes.
Chili peppers have a rich history, dating back thousands of years to South America, where they were not only a culinary staple but also held medicinal and even spiritual significance. From the ancient Aztecs to modern-day foodies, the love for chili peppers has only grown stronger. Today, they are a global phenomenon, adding zest and flavor to cuisines worldwide.
But why should you bother with the effort of growing your own? Well, for starters, the flavor of a freshly picked chili pepper is unparalleled. Plus, you have complete control over the growing process, ensuring your peppers are free from harmful pesticides and chemicals. More importantly, growing chili peppers at home allows you to cultivate unique varieties that you simply won’t find in your local supermarket. Think ghost peppers, habaneros, or even milder varieties like poblano – the possibilities are endless!
This article is packed with easy-to-follow DIY tricks and hacks that will help you overcome common challenges and maximize your chili pepper harvest. Whether you’re a seasoned gardener or a complete beginner, I’m confident that these tips will empower you to grow the hottest, most flavorful chili peppers you’ve ever tasted. So, grab your gardening gloves, and let’s get started!
Chili-Anbau für Jedermann: So ziehst du scharfe Schoten zu Hause!
Ich liebe Chili! Und was gibt es Besseres, als seine eigenen, super-frischen Chilis zu ernten? Egal ob du ein erfahrener Gärtner bist oder gerade erst anfängst, der Anbau von Chili-Pflanzen zu Hause ist einfacher als du denkst. In diesem Artikel zeige ich dir Schritt für Schritt, wie du deine eigenen scharfen Schoten erfolgreich anbauen kannst.
Was du brauchst: Die richtige Ausrüstung für deinen Chili-Erfolg
Bevor wir loslegen, lass uns sicherstellen, dass du alles hast, was du brauchst. Hier ist eine Liste der wichtigsten Dinge:
* Chili-Samen: Wähle deine Lieblingssorten! Es gibt eine riesige Auswahl, von milden Jalapeños bis zu extrem scharfen Habaneros. Achte auf qualitativ hochwertige Samen von einem vertrauenswürdigen Anbieter.
* Anzuchterde: Normale Blumenerde ist oft zu nährstoffreich für die Anzucht. Anzuchterde ist feiner und enthält weniger Nährstoffe, was die Keimung fördert.
* Anzuchtgefäße: Kleine Töpfe, Anzuchtschalen oder Torfquelltöpfe sind ideal.
* Mini-Gewächshaus (optional): Ein Mini-Gewächshaus hilft, die Luftfeuchtigkeit hoch zu halten und die Keimung zu beschleunigen. Eine durchsichtige Plastiktüte tut es aber auch!
* Pflanzgefäße: Wenn die Pflanzen größer werden, brauchst du größere Töpfe. Achte darauf, dass sie ausreichend Drainagelöcher haben.
* Blumenerde: Hochwertige Blumenerde mit guter Drainage ist wichtig für das Wachstum der Pflanzen.
* Dünger: Chili-Pflanzen sind hungrig! Ein spezieller Chili-Dünger oder ein Tomatendünger ist ideal.
* Gießkanne oder Sprühflasche: Zum Bewässern der Pflanzen.
* Pflanzstäbe (optional): Für Sorten, die hoch wachsen und Unterstützung benötigen.
* Sonniger Standort: Chili-Pflanzen lieben die Sonne!
Phase 1: Die Anzucht – So bringst du deine Chili-Samen zum Keimen
Die Anzucht ist der erste und wichtigste Schritt. Hier legst du den Grundstein für eine erfolgreiche Chili-Ernte.
1. Vorbereitung der Anzuchtgefäße: Fülle deine Anzuchtgefäße mit Anzuchterde. Drücke die Erde leicht an.
2. Aussaat der Samen: Lege pro Gefäß 1-2 Samen auf die Erde. Bedecke die Samen mit einer dünnen Schicht Anzuchterde (ca. 0,5 cm).
3. Bewässerung: Befeuchte die Erde vorsichtig mit einer Sprühflasche. Die Erde sollte feucht, aber nicht nass sein.
4. Mini-Gewächshaus oder Plastiktüte: Stelle die Anzuchtgefäße in ein Mini-Gewächshaus oder decke sie mit einer durchsichtigen Plastiktüte ab. Das erhöht die Luftfeuchtigkeit und fördert die Keimung.
5. Standort: Stelle das Mini-Gewächshaus oder die abgedeckten Anzuchtgefäße an einen warmen, hellen Ort. Eine Temperatur von 22-28°C ist ideal.
6. Geduld: Die Keimung kann je nach Sorte und Temperatur 1-3 Wochen dauern. Halte die Erde feucht und lüfte das Mini-Gewächshaus oder die Plastiktüte regelmäßig, um Schimmelbildung zu vermeiden.
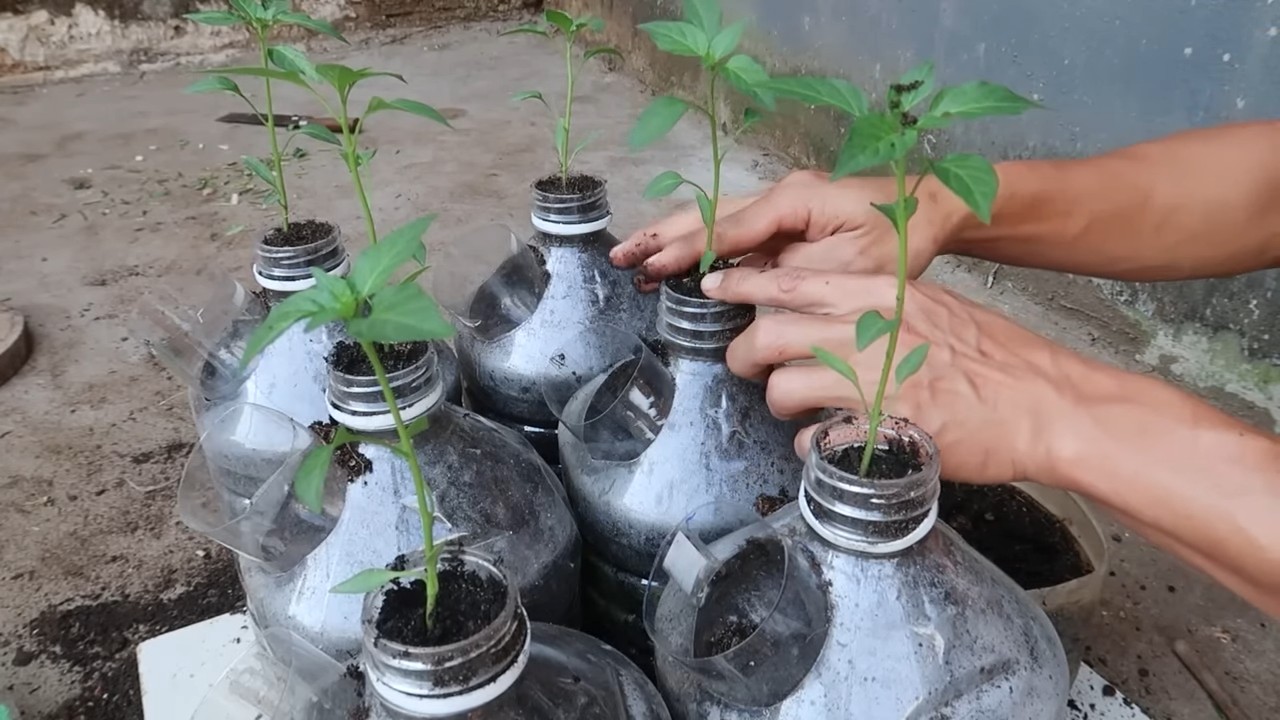
Phase 2: Pikieren – Den kleinen Chili-Pflanzen mehr Platz geben
Sobald die ersten Keimblätter (die ersten Blätter, die aus dem Samen kommen) und die ersten richtigen Blätter erscheinen, ist es Zeit zum Pikieren. Das bedeutet, dass du die kleinen Pflanzen in größere Töpfe umpflanzt, damit sie mehr Platz zum Wachsen haben.
1. Vorbereitung der Töpfe: Fülle kleine Töpfe (ca. 8-10 cm Durchmesser) mit Blumenerde.
2. Vorsichtiges Ausheben: Lockere die Erde um die kleinen Chili-Pflanzen vorsichtig mit einem Pikierstab oder einem Löffel. Achte darauf, die Wurzeln nicht zu beschädigen.
3. Umpflanzen: Hebe die Pflanze vorsichtig aus dem Anzuchtgefäß und setze sie in den neuen Topf. Die Pflanze sollte etwas tiefer sitzen als zuvor, bis zu den ersten Blättern.
4. Bewässerung: Gieße die Pflanzen nach dem Umpflanzen vorsichtig an.
5. Standort: Stelle die pikierten Pflanzen an einen hellen, aber nicht zu sonnigen Ort. Vermeide direkte Mittagssonne in den ersten Tagen.
Phase 3: Die Pflege – So bleiben deine Chili-Pflanzen gesund und stark
Nach dem Pikieren beginnt die eigentliche Pflege der Chili-Pflanzen. Hier sind einige wichtige Tipps, um sicherzustellen, dass deine Pflanzen gesund und stark wachsen:
* Bewässerung: Gieße die Pflanzen regelmäßig, aber vermeide Staunässe. Die Erde sollte immer leicht feucht sein. Überprüfe die Feuchtigkeit der Erde, indem du deinen Finger in die Erde steckst.
* Düngung: Dünge die Pflanzen regelmäßig mit einem Chili-Dünger oder einem Tomatendünger. Beginne mit dem Düngen etwa 2-3 Wochen nach dem Pikieren. Befolge die Anweisungen auf der Düngerpackung.
* Licht: Chili-Pflanzen brauchen viel Licht. Stelle sie an einen sonnigen Standort, idealerweise mit mindestens 6 Stunden direkter Sonneneinstrahlung pro Tag. Wenn du nicht genügend Sonnenlicht hast, kannst du auch Pflanzenlampen verwenden.
* Temperatur: Chili-Pflanzen mögen es warm. Die ideale Temperatur liegt zwischen 20-30°C. Vermeide Temperaturen unter 10°C.
* Belüftung: Sorge für eine gute Belüftung, um Schimmelbildung und Krankheiten vorzubeugen. Stelle die Pflanzen nicht zu eng zusammen und lüfte den Raum regelmäßig.
* Schädlinge: Achte auf Schädlinge wie Blattläuse oder Spinnmilben. Bei Befall kannst du natürliche Schädlingsbekämpfungsmittel verwenden, wie z.B. Neemöl oder Schmierseifenlösung.
Phase 4: Auspflanzen – Ab ins Freie oder in den größeren Topf
Sobald die Temperaturen steigen und keine Frostgefahr mehr besteht, kannst du deine Chili-Pflanzen ins Freie auspflanzen oder in größere Töpfe umtopfen.
1. Abhärten: Bevor du die Pflanzen ins Freie pflanzt, solltest du sie langsam an die Außenbedingungen gewöhnen. Stelle sie für einige Stunden pro Tag nach draußen und verlängere die Zeit jeden Tag.
2. Standortwahl: Wähle einen sonnigen Standort mit gut durchlässigem Boden.
3. Auspflanzen: Grabe ein Loch, das etwas größer ist als der Wurzelballen der Pflanze. Setze die Pflanze in das Loch und fülle es mit Erde auf. Gieße die Pflanze gut an.
4. Größere Töpfe: Wenn du die Pflanzen in Töpfen halten möchtest, wähle Töpfe mit einem Durchmesser von mindestens 20-30 cm. Fülle die Töpfe mit hochwertiger Blumenerde.
5. Unterstützung: Einige Chili-Sorten wachsen sehr hoch und benötigen Unterstützung. Verwende Pflanzstäbe oder Rankgitter, um die Pflanzen zu stützen.
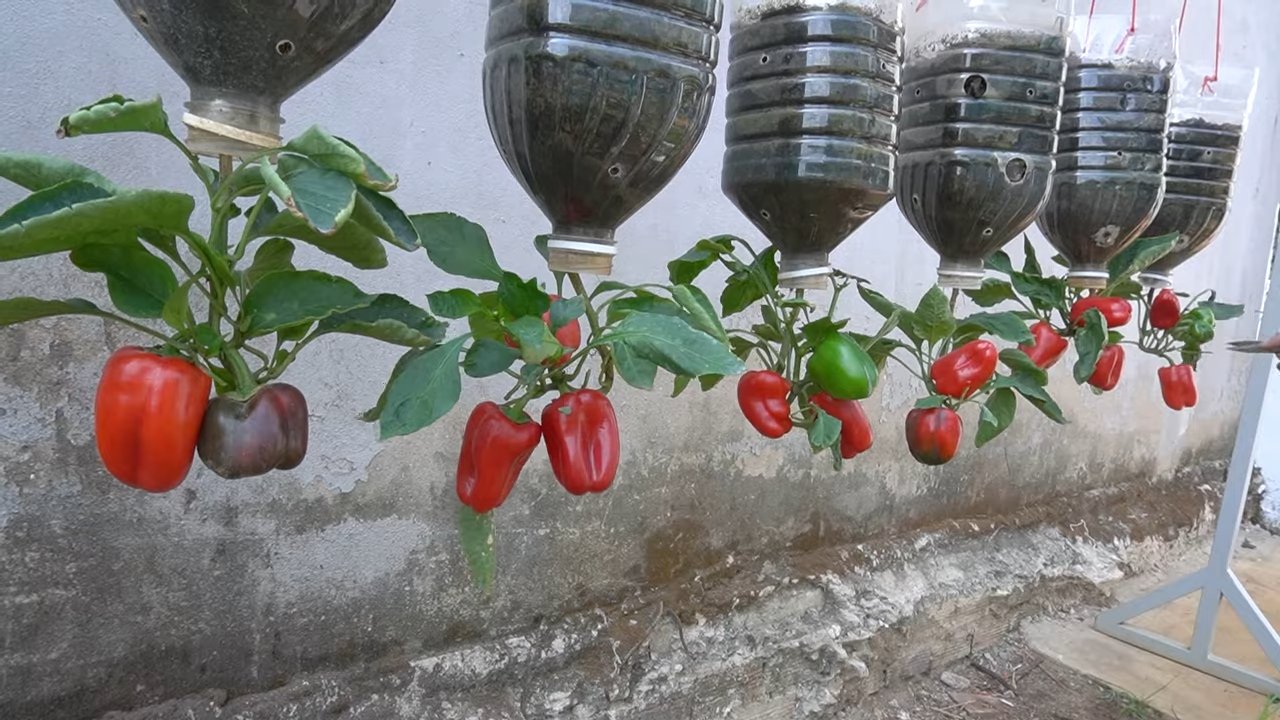
Phase 5: Die Ernte – Endlich scharfe Chilis!
Die Erntezeit hängt von der Chili-Sorte ab. In der Regel sind die Chilis reif, wenn sie ihre endgültige Farbe erreicht haben und sich leicht vom Stiel lösen lassen.
* Erntezeitpunkt: Die meisten Chilis sind rot, wenn sie reif sind, aber es gibt auch Sorten, die gelb, orange oder braun werden.
* Erntemethode: Schneide die Chilis mit einer Schere oder einem Messer vom Stiel ab.
* Vorsicht: Trage Handschuhe, wenn du scharfe Chilis erntest, um Hautreizungen zu vermeiden.
* Lagerung: Du kannst die Chilis frisch verwenden
Conclusion
So, there you have it! Growing chili peppers at home isn’t just a gardening hobby; it’s a gateway to a world of flavor, freshness, and fiery satisfaction. We’ve explored the simple yet effective DIY trick of using coffee grounds to supercharge your chili pepper plants, unlocking their full potential for robust growth and abundant harvests.
Why is this a must-try? Because it’s a win-win! You’re repurposing a common household waste product, reducing your environmental impact, and simultaneously providing your chili peppers with a nutrient-rich boost that commercial fertilizers often can’t match. The slow-release nitrogen, phosphorus, and potassium in coffee grounds are like a gentle, sustained energy source for your plants, promoting healthy foliage, strong stems, and, most importantly, a profusion of those vibrant, spicy peppers we all crave.
But the beauty of this DIY trick lies in its adaptability. Feel free to experiment with different types of coffee grounds – light roast, dark roast, even decaf (though caffeinated grounds are generally preferred for their higher nitrogen content). You can also adjust the application frequency based on your plant’s needs and the specific chili pepper variety you’re growing. Some peppers, like habaneros and scotch bonnets, are notoriously heavy feeders and may benefit from more frequent applications of coffee grounds. Others, like bell peppers (which, while not technically chili peppers, benefit from the same treatment), may require less.
Consider supplementing the coffee grounds with other organic amendments like compost or worm castings for an even richer soil environment. You can also brew a weak coffee solution and use it as a foliar spray to deter pests and provide an extra boost of nutrients directly to the leaves. Just remember to dilute the solution significantly to avoid burning the foliage.
Growing chili peppers at home is a journey of discovery, and this DIY trick is just one step along the way. Don’t be afraid to experiment, observe your plants closely, and adjust your approach as needed. The rewards – a bountiful harvest of homegrown chili peppers bursting with flavor – are well worth the effort.
We wholeheartedly encourage you to give this DIY trick a try. Whether you’re a seasoned gardener or a complete beginner, you’ll be amazed at the difference it can make. And most importantly, we want to hear about your experiences! Share your photos, tips, and stories in the comments below. Let’s build a community of chili pepper enthusiasts who are passionate about growing their own delicious, spicy goodness. Let us know what varieties you are growing and how the coffee grounds are working for you. Did you notice a difference in the size, color, or spiciness of your peppers? Did you encounter any challenges along the way? Your feedback will help others learn and grow, and together, we can unlock the secrets to successful home chili pepper cultivation. So, get your hands dirty, embrace the challenge, and prepare to be amazed by the power of coffee grounds!
Frequently Asked Questions (FAQ)
Q: What kind of coffee grounds should I use for my chili pepper plants?
A: Ideally, you should use used coffee grounds, as they are less acidic than fresh grounds. Both caffeinated and decaffeinated coffee grounds can be used, but caffeinated grounds are generally preferred due to their higher nitrogen content, which is essential for plant growth. Avoid using flavored coffee grounds, as the added ingredients may not be beneficial for your plants.
Q: How often should I apply coffee grounds to my chili pepper plants?
A: The frequency of application depends on several factors, including the size of your plants, the type of soil, and the climate. A general guideline is to apply a thin layer of coffee grounds around the base of your plants every 2-4 weeks. Avoid piling the grounds directly against the stem, as this can lead to rot. You can also mix the coffee grounds into the top layer of soil. Monitor your plants closely and adjust the frequency as needed. If you notice any signs of nutrient deficiency, such as yellowing leaves, you may need to apply the grounds more frequently.
Q: Can I use too much coffee grounds on my chili pepper plants?
A: Yes, it is possible to overdo it. Excessive amounts of coffee grounds can create an overly acidic soil environment, which can inhibit plant growth. It can also create a barrier that prevents water from reaching the roots. Always apply coffee grounds in moderation and monitor your plants for any signs of distress. If you suspect you’ve used too much, you can try flushing the soil with water to help balance the pH.
Q: Are coffee grounds safe for all types of chili pepper plants?
A: Generally, coffee grounds are safe for most types of chili pepper plants. However, it’s always a good idea to test a small area first before applying them to your entire garden. Some plants may be more sensitive to the acidity of coffee grounds than others. Observe your plants closely for any adverse reactions, such as leaf burn or stunted growth.
Q: How do coffee grounds benefit chili pepper plants?
A: Coffee grounds provide several benefits to chili pepper plants. They are a slow-release source of nitrogen, phosphorus, and potassium, which are essential nutrients for plant growth. They also improve soil drainage and aeration, which helps to prevent root rot. Additionally, coffee grounds can help to suppress weeds and deter certain pests, such as slugs and snails.
Q: Can I use coffee grounds in my compost pile?
A: Absolutely! Coffee grounds are a valuable addition to any compost pile. They are considered a “green” material, which means they are rich in nitrogen. When combined with “brown” materials, such as leaves and twigs, they help to create a balanced and nutrient-rich compost that can be used to improve the soil in your garden.
Q: Will coffee grounds make my chili peppers spicier?
A: While coffee grounds primarily contribute to the overall health and vigor of the plant, leading to potentially larger and more abundant peppers, there’s no direct scientific evidence to suggest that they will significantly increase the spiciness of your chili peppers. The spiciness of a chili pepper is primarily determined by its genetics and environmental factors, such as temperature and sunlight exposure. However, a healthier plant is more likely to produce peppers that reach their full potential in terms of flavor and heat.
Q: Can I use coffee grounds on my seedlings?
A: It’s generally not recommended to use coffee grounds directly on very young seedlings. Seedlings are more sensitive to changes in soil pH and nutrient levels. It’s best to wait until your chili pepper plants are a bit more established before introducing coffee grounds. You can, however, use compost that contains coffee grounds, as the composting process will have mellowed out the acidity and nutrient concentration.
Q: What are some other ways to use coffee grounds in my garden?
A: Besides using them directly on chili pepper plants, coffee grounds can be used in a variety of other ways in your garden. You can use them as a mulch to suppress weeds and retain moisture in the soil. You can also mix them into potting soil to improve drainage and aeration. Additionally, you can use coffee grounds to deter pests, such as ants and cats.
Q: Where can I get coffee grounds if I don’t drink coffee?
A: If you don’t drink coffee, you can often obtain used coffee grounds from local coffee shops. Many coffee shops are happy to give away their used grounds for gardening purposes. You can also ask friends, family members, or neighbors who drink coffee to save their grounds for you.
Leave a Comment