
Growing Cauliflower at Home can seem daunting, but trust me, it’s more achievable than you think! Have you ever dreamt of strolling through your backyard, snipping a perfectly formed cauliflower head, and knowing you nurtured it from seed to table? That’s the magic we’re unlocking today. For centuries, cauliflower has been a culinary staple, gracing tables from humble farmhouses to royal banquets. Its origins trace back to the Mediterranean, where it was selectively bred from wild cabbage.
But why bother growing cauliflower at home when you can simply buy it at the store? Well, for starters, the taste of a freshly harvested, homegrown cauliflower is simply unparalleled. Plus, you have complete control over what goes into your food – no pesticides or questionable farming practices here! In today’s world, where we’re increasingly conscious of our health and the environment, knowing exactly where our food comes from is more important than ever. This DIY guide will equip you with simple yet effective tricks and hacks to cultivate thriving cauliflower plants, even if you’re a complete beginner. Get ready to roll up your sleeves and discover the joy of homegrown goodness!

Growing Cauliflower at Home: A Complete DIY Guide
Okay, so you want to grow cauliflower at home? Awesome! It’s totally doable, and honestly, there’s nothing quite like harvesting your own fresh, crisp cauliflower. It might seem a little intimidating at first, but trust me, with a little patience and the right guidance, you’ll be enjoying homegrown cauliflower in no time. I’m going to walk you through everything you need to know, from choosing the right variety to dealing with pests. Let’s get started!
Choosing the Right Cauliflower Variety
First things first, you need to pick a cauliflower variety that suits your climate and growing season. There are tons of options out there, and it can be a bit overwhelming. Here’s a breakdown of some popular choices:
* Snowball: This is a classic, reliable variety that produces medium-sized, pure white heads. It’s relatively easy to grow and matures in about 50-60 days. Perfect for beginners!
* Early White Hybrid: As the name suggests, this one matures early, usually in around 45-50 days. It’s a good choice if you have a shorter growing season.
* Graffiti: Want something a little different? Graffiti cauliflower produces vibrant purple heads! It’s not just pretty; it also has a slightly sweeter flavor than white varieties. Matures in about 70-80 days.
* Cheddar: This variety produces orange heads and has a mild, slightly nutty flavor. It’s a real showstopper in the garden! Matures in about 65-75 days.
* Romanesco: If you’re feeling adventurous, try growing Romanesco. It has a unique, fractal-like head and a delicate, nutty flavor. It takes a bit longer to mature, around 75-85 days.
Important Considerations:
* Days to Maturity: Pay close attention to the “days to maturity” listed on the seed packet or plant label. This will help you determine when to start your seeds or transplants based on your local climate and frost dates.
* Climate: Cauliflower prefers cool weather, so it’s best grown in the spring or fall. If you live in a warmer climate, choose a heat-tolerant variety.
* Space: Cauliflower plants can get fairly large, so make sure you have enough space in your garden.
Starting Your Cauliflower: Seeds vs. Transplants
You have two options for starting your cauliflower: from seeds or from transplants. Both have their pros and cons.
* Starting from Seeds: This gives you more control over the entire growing process and is generally cheaper. However, it requires more time and effort.
* Using Transplants: This is a quicker and easier option, especially if you’re a beginner. You can buy transplants from your local garden center.
I personally prefer starting from seeds, but if you’re short on time or space, transplants are a great alternative.
Starting Cauliflower from Seeds: Step-by-Step
If you’re going the seed route, here’s how to do it:
1. Sow Seeds Indoors: About 4-6 weeks before the last expected frost, sow your cauliflower seeds indoors in seed trays or small pots filled with seed-starting mix. Plant the seeds about ¼ inch deep.
2. Provide Light and Warmth: Keep the soil moist and provide plenty of light. A sunny windowsill or a grow light will work well. The ideal temperature for germination is around 65-75°F (18-24°C).
3. Harden Off Seedlings: Once the seedlings have developed a few true leaves, gradually acclimate them to outdoor conditions by hardening them off. This involves exposing them to increasing amounts of sunlight and fresh air over a period of 7-10 days.
4. Transplant Seedlings: Once the danger of frost has passed and the soil has warmed up, transplant the seedlings into your garden. Space them about 18-24 inches apart in rows that are 24-36 inches apart.
Preparing the Soil and Planting
Cauliflower needs rich, well-drained soil to thrive. Here’s how to prepare your garden bed:
1. Choose a Sunny Location: Cauliflower needs at least 6 hours of sunlight per day.
2. Amend the Soil: Incorporate plenty of compost or well-rotted manure into the soil to improve its fertility and drainage. Cauliflower are heavy feeders, so this step is crucial.
3. Check the Soil pH: Cauliflower prefers a slightly acidic soil pH of around 6.0-7.0. You can test your soil pH with a soil testing kit and amend it accordingly.
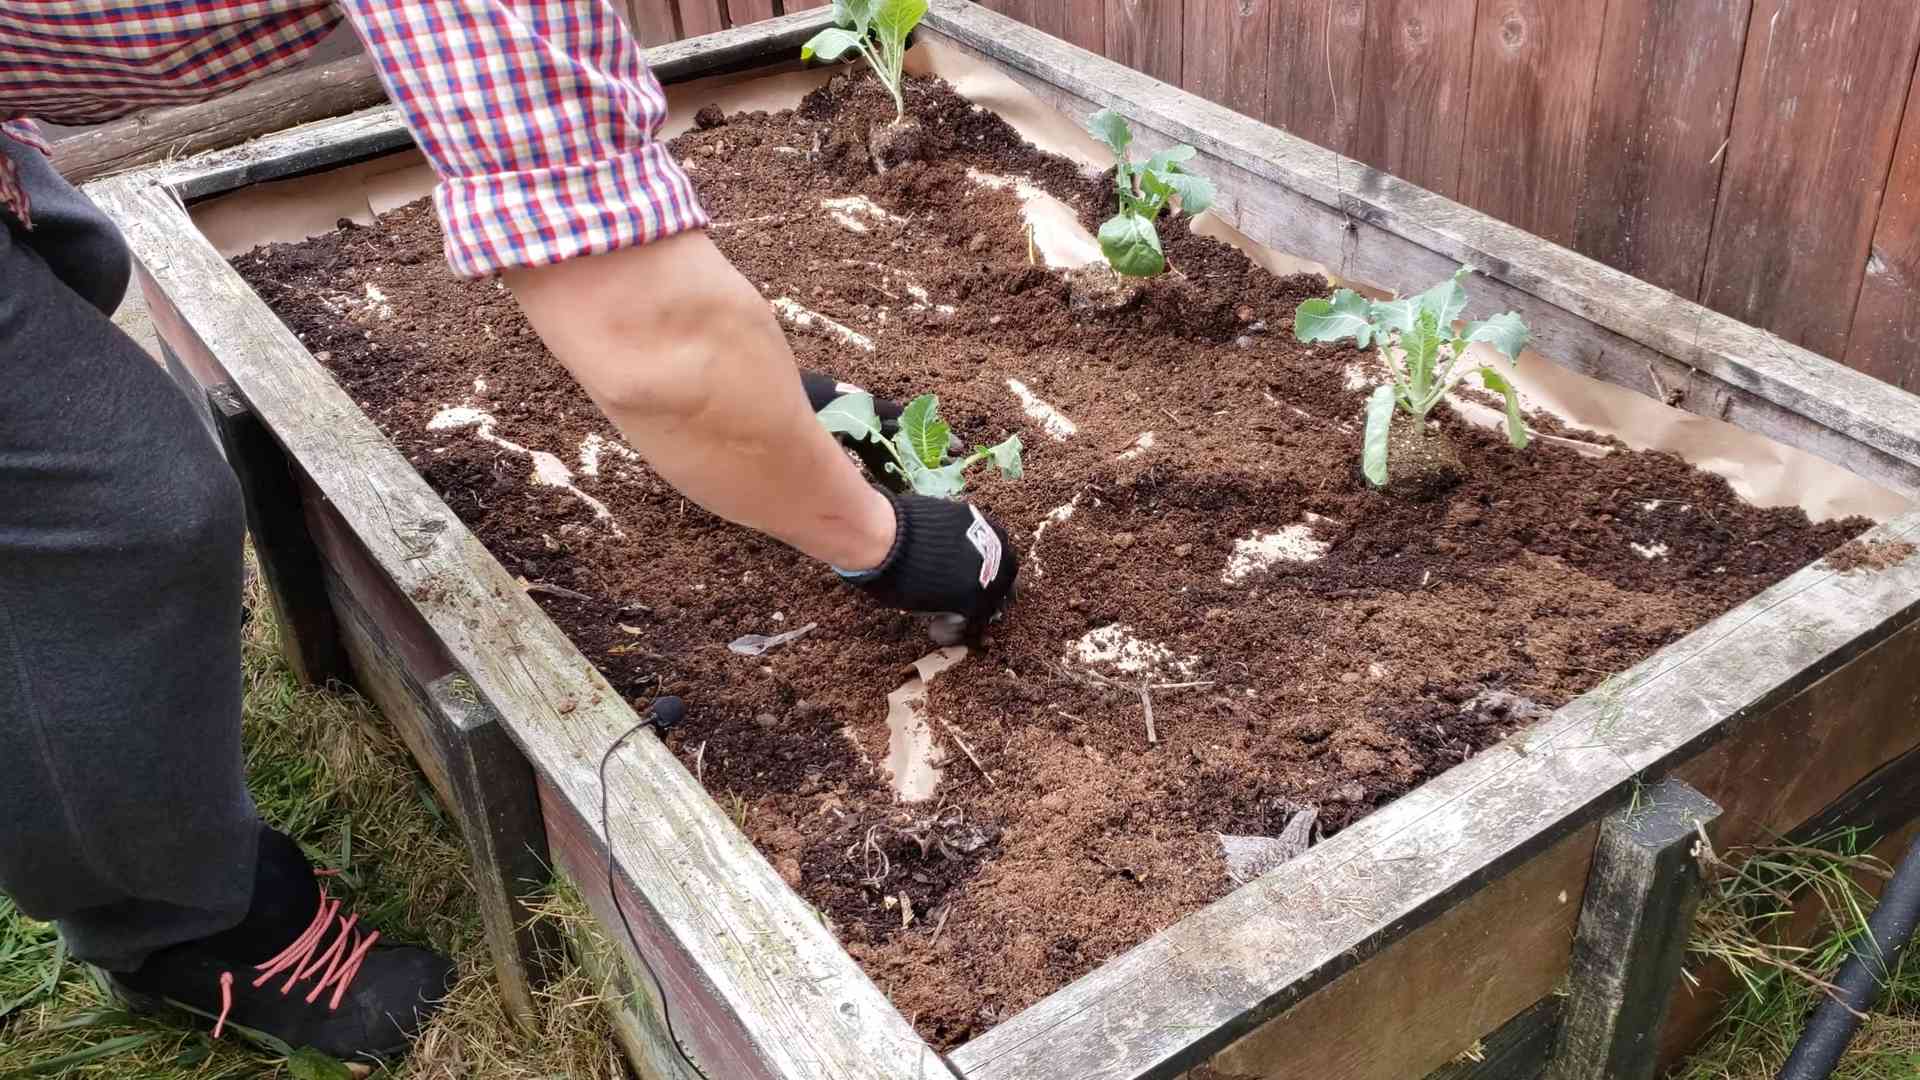
4. Planting: Dig a hole that’s slightly larger than the root ball of your transplant. Gently remove the transplant from its container and place it in the hole. Backfill with soil and water thoroughly.
Caring for Your Cauliflower Plants
Once your cauliflower plants are in the ground, it’s important to provide them with proper care to ensure a successful harvest.
1. Watering: Cauliflower needs consistent moisture, especially during head formation. Water deeply and regularly, especially during dry spells. Aim for about 1-2 inches of water per week.
2. Fertilizing: Feed your cauliflower plants with a balanced fertilizer every 2-3 weeks. You can also side-dress them with compost or manure.
3. Weeding: Keep the area around your cauliflower plants free of weeds. Weeds compete with the plants for nutrients and water.
4. Mulching: Apply a layer of mulch around your cauliflower plants to help retain moisture, suppress weeds, and regulate soil temperature.
5. Blanching (Optional): Some cauliflower varieties, like Snowball, need to be blanched to keep their heads white. This involves tying the outer leaves together over the developing head to protect it from sunlight. Start blanching when the head is about 2-3 inches in diameter.
Dealing with Pests and Diseases
Unfortunately, cauliflower is susceptible to a few pests and diseases. Here’s how to deal with them:
* Cabbage Worms: These green cate
Okay, so you want to grow cauliflower at home? Awesome! It’s totally doable, and honestly, there’s nothing quite like harvesting your own fresh, crisp cauliflower. It might seem a little intimidating at first, but trust me, with a little patience and the right guidance, you’ll be enjoying homegrown cauliflower in no time. I’m going to walk you through everything you need to know, from choosing the right variety to dealing with pests. Let’s get started!
Choosing the Right Cauliflower Variety
First things first, you need to pick a cauliflower variety that suits your climate and growing season. There are tons of options out there, and it can be a bit overwhelming. Here’s a breakdown of some popular choices:
* Snowball: This is a classic, reliable variety that produces medium-sized, pure white heads. It’s relatively easy to grow and matures in about 50-60 days. Perfect for beginners!
* Early White Hybrid: As the name suggests, this one matures early, usually in around 45-50 days. It’s a good choice if you have a shorter growing season.
* Graffiti: Want something a little different? Graffiti cauliflower produces vibrant purple heads! It’s not just pretty; it also has a slightly sweeter flavor than white varieties. Matures in about 70-80 days.
* Cheddar: This variety produces orange heads and has a mild, slightly nutty flavor. It’s a real showstopper in the garden! Matures in about 65-75 days.
* Romanesco: If you’re feeling adventurous, try growing Romanesco. It has a unique, fractal-like head and a delicate, nutty flavor. It takes a bit longer to mature, around 75-85 days.
Important Considerations:
* Days to Maturity: Pay close attention to the “days to maturity” listed on the seed packet or plant label. This will help you determine when to start your seeds or transplants based on your local climate and frost dates.
* Climate: Cauliflower prefers cool weather, so it’s best grown in the spring or fall. If you live in a warmer climate, choose a heat-tolerant variety.
* Space: Cauliflower plants can get fairly large, so make sure you have enough space in your garden.
Starting Your Cauliflower: Seeds vs. Transplants
You have two options for starting your cauliflower: from seeds or from transplants. Both have their pros and cons.
* Starting from Seeds: This gives you more control over the entire growing process and is generally cheaper. However, it requires more time and effort.
* Using Transplants: This is a quicker and easier option, especially if you’re a beginner. You can buy transplants from your local garden center.
I personally prefer starting from seeds, but if you’re short on time or space, transplants are a great alternative.
Starting Cauliflower from Seeds: Step-by-Step
If you’re going the seed route, here’s how to do it:
1. Sow Seeds Indoors: About 4-6 weeks before the last expected frost, sow your cauliflower seeds indoors in seed trays or small pots filled with seed-starting mix. Plant the seeds about ¼ inch deep.
2. Provide Light and Warmth: Keep the soil moist and provide plenty of light. A sunny windowsill or a grow light will work well. The ideal temperature for germination is around 65-75°F (18-24°C).
3. Harden Off Seedlings: Once the seedlings have developed a few true leaves, gradually acclimate them to outdoor conditions by hardening them off. This involves exposing them to increasing amounts of sunlight and fresh air over a period of 7-10 days.
4. Transplant Seedlings: Once the danger of frost has passed and the soil has warmed up, transplant the seedlings into your garden. Space them about 18-24 inches apart in rows that are 24-36 inches apart.
Preparing the Soil and Planting
Cauliflower needs rich, well-drained soil to thrive. Here’s how to prepare your garden bed:
1. Choose a Sunny Location: Cauliflower needs at least 6 hours of sunlight per day.
2. Amend the Soil: Incorporate plenty of compost or well-rotted manure into the soil to improve its fertility and drainage. Cauliflower are heavy feeders, so this step is crucial.
3. Check the Soil pH: Cauliflower prefers a slightly acidic soil pH of around 6.0-7.0. You can test your soil pH with a soil testing kit and amend it accordingly.
4. Planting: Dig a hole that’s slightly larger than the root ball of your transplant. Gently remove the transplant from its container and place it in the hole. Backfill with soil and water thoroughly.
Caring for Your Cauliflower Plants
Once your cauliflower plants are in the ground, it’s important to provide them with proper care to ensure a successful harvest.
1. Watering: Cauliflower needs consistent moisture, especially during head formation. Water deeply and regularly, especially during dry spells. Aim for about 1-2 inches of water per week.
2. Fertilizing: Feed your cauliflower plants with a balanced fertilizer every 2-3 weeks. You can also side-dress them with compost or manure.
3. Weeding: Keep the area around your cauliflower plants free of weeds. Weeds compete with the plants for nutrients and water.
4. Mulching: Apply a layer of mulch around your cauliflower plants to help retain moisture, suppress weeds, and regulate soil temperature.
5. Blanching (Optional): Some cauliflower varieties, like Snowball, need to be blanched to keep their heads white. This involves tying the outer leaves together over the developing head to protect it from sunlight. Start blanching when the head is about 2-3 inches in diameter.
Dealing with Pests and Diseases
Unfortunately, cauliflower is susceptible to a few pests and diseases. Here’s how to deal with them:
* Cabbage Worms: These green caterpillars can devour cauliflower leaves. Handpick them off the plants or use a biological insecticide like Bacillus thuringiensis (Bt).
* Cabbage Loopers: Similar to cabbage worms, cabbage loopers can also damage cauliflower leaves. Use the same control methods as for cabbage worms.
* Aphids: These tiny insects can suck the sap from cauliflower leaves, causing them to become distorted and yellow. Spray them off with a strong stream of water or use insecticidal soap.
* Clubroot: This fungal disease causes the roots of cauliflower plants to become swollen and distorted. Prevent clubroot by practicing crop rotation and amending the soil with lime to raise the pH.
* Downy Mildew: This fungal disease causes yellow spots on the upper surface of cauliflower leaves and a white, downy growth on the underside. Prevent downy mildew by providing good air circulation and avoiding overhead watering.
Harvesting Your Cauliflower
The moment you’ve been waiting for! Here’s how to harvest your cauliflower:
1. Check for Maturity: Cauliflower is ready to harvest when the head is firm, compact, and has reached the desired size. The size will vary depending on the variety.
2. Cut the Head: Use a sharp knife to cut the head from the plant, leaving a few leaves attached to protect it.
3. Harvest in the Morning: Harvest cauliflower in the morning when the heads are cool and crisp.
4. Store Properly: Store harvested cauliflower in the refrigerator for up to a week.
Troubleshooting Common Problems
Even with the best care, you might encounter a few problems while growing cauliflower. Here are some common issues and how to fix them:
* Small Heads: This can be caused by insufficient sunlight, poor soil fertility, or lack of water. Make sure your plants are getting enough sunlight, fertilize them regularly, and water them deeply.
* Loose Heads: This can be caused by hot weather or inconsistent watering. Choose a heat-tolerant variety and water your plants consistently.
* Yellowing Leaves: This can be caused by nutrient deficiencies, pests, or diseases. Check your plants for pests and diseases and fertilize them with a balanced fertilizer.
* Buttoning: This is when the cauliflower head forms prematurely and remains small. It’s often caused by stress, such as cold weather or transplant shock. Protect your plants from cold weather and handle transplants carefully.
Enjoying Your Homegrown Cauliflower
Congratulations! You’ve successfully grown cauliflower at home. Now it’s time to enjoy the fruits (or rather, vegetables) of your labor. There are endless ways to prepare cauliflower, from roasting and steaming to mashing and pureeing. You can even use it to make cauliflower rice or pizza crust!
Here are a few of my favorite cauliflower recipes
Conclusion
So, there you have it! Growing cauliflower at home might seem daunting at first, but with a little patience, the right techniques, and this simple DIY trick, you can cultivate beautiful, delicious heads of cauliflower right in your own backyard. We’ve shown you how to nurture your plants from seedling to harvest, and most importantly, how to protect them from common pests and diseases using our all-natural, homemade solution.
Why is this DIY trick a must-try? Because it empowers you to take control of your garden’s health without relying on harsh chemicals. You’ll be enjoying organically grown cauliflower, knowing exactly what went into its cultivation. Plus, it’s incredibly satisfying to see your plants thrive thanks to your own ingenuity. This method is not only effective but also environmentally friendly and cost-effective. You’ll save money on expensive pesticides and contribute to a healthier ecosystem.
But don’t stop there! Feel free to experiment with different variations of our DIY pest control solution. For example, you could add a few drops of neem oil for an extra boost against aphids and cabbage worms. Or, if you’re dealing with a fungal issue, try incorporating a small amount of baking soda into the mixture. Remember to always test any new additions on a small area of your plant first to ensure it doesn’t cause any adverse reactions.
Consider companion planting to further enhance your cauliflower’s growing environment. Marigolds, for instance, are known to repel many common pests, while herbs like rosemary and thyme can attract beneficial insects that prey on harmful ones. Strategic planting can create a natural defense system for your cauliflower, reducing the need for any pest control measures at all.
Another variation to consider is the timing of your planting. Depending on your climate, you might be able to grow cauliflower twice a year – once in the spring and once in the fall. This extends your harvest season and allows you to enjoy fresh, homegrown cauliflower for a longer period. Just be sure to choose cauliflower varieties that are suited to the specific growing conditions of each season.
Growing cauliflower at home is more than just a gardening project; it’s a journey of discovery and connection with nature. It’s about understanding the life cycle of a plant, learning to anticipate its needs, and celebrating the rewards of your hard work. And with our DIY trick, you’ll be well-equipped to overcome any challenges that come your way.
We wholeheartedly encourage you to give this DIY trick a try and experience the joy of growing your own cauliflower. We’re confident that you’ll be amazed by the results. And once you’ve harvested your first head of cauliflower, don’t forget to share your experience with us! We’d love to hear your stories, see your photos, and learn from your successes (and even your failures). Together, we can create a community of passionate gardeners who are committed to growing healthy, delicious food in a sustainable way. So, grab your gardening gloves, mix up a batch of our DIY solution, and get ready to grow some amazing cauliflower! Let’s make growing cauliflower at home a rewarding and enjoyable experience for everyone.
Frequently Asked Questions (FAQ)
Q: What exactly is the DIY trick you’re referring to?
A: The DIY trick we’ve been discussing is a homemade pest control solution designed to protect your cauliflower plants from common pests and diseases without the use of harsh chemicals. It typically involves a mixture of ingredients like water, dish soap, and potentially other natural additives like garlic or chili powder, depending on the specific pests you’re targeting. The exact recipe can be found in the main body of the article. This solution acts as a repellent and can also suffocate smaller insects, providing a safe and effective way to keep your cauliflower healthy.
Q: How often should I apply the DIY pest control solution to my cauliflower plants?
A: The frequency of application depends on the severity of the pest infestation and the weather conditions. As a general guideline, we recommend applying the solution every 7-10 days as a preventative measure. If you notice a significant increase in pests, you may need to apply it more frequently, perhaps every 3-5 days, until the infestation is under control. After rain, it’s essential to reapply the solution, as it will likely have been washed away. Always observe your plants closely and adjust the frequency accordingly. Remember to spray both the tops and undersides of the leaves, as pests often hide there.
Q: Is this DIY solution safe for beneficial insects like bees and ladybugs?
A: While our DIY solution is generally safer than synthetic pesticides, it’s still important to take precautions to protect beneficial insects. Avoid spraying the solution during the day when bees and other pollinators are most active. The best time to apply it is in the early morning or late evening. You can also cover flowering plants with a light cloth during application to prevent accidental exposure. Additionally, consider using a targeted spray nozzle to minimize overspray and ensure that the solution only reaches the affected areas. Remember, the goal is to control pests without harming the beneficial insects that contribute to a healthy garden ecosystem.
Q: What if I don’t see any improvement after using the DIY solution for a while?
A: If you’re not seeing the desired results after using the DIY solution for a couple of weeks, it’s time to reassess the situation. First, double-check that you’re using the correct concentration of ingredients and applying the solution thoroughly. Make sure you’re spraying both the tops and undersides of the leaves, and that you’re reapplying after rain. Second, identify the specific pests or diseases that are affecting your cauliflower plants. Different pests may require different solutions. You might need to adjust the ingredients in your DIY mixture or try a different approach altogether. Finally, consider other factors that could be contributing to the problem, such as poor soil quality, inadequate sunlight, or overwatering. Addressing these underlying issues can help improve the overall health of your plants and make them more resistant to pests and diseases.
Q: Can I use this DIY trick on other vegetables in my garden?
A: Yes, in many cases, this DIY pest control solution can be used on other vegetables in your garden. However, it’s always a good idea to test it on a small area of the plant first to ensure that it doesn’t cause any adverse reactions. Some plants may be more sensitive to certain ingredients than others. For example, delicate leafy greens like lettuce might be more susceptible to damage from dish soap. As a general rule, the solution is most effective against soft-bodied insects like aphids, whiteflies, and spider mites. It may not be as effective against larger or more resistant pests like caterpillars or beetles. Always observe your plants closely and adjust the solution or application method as needed.
Q: How do I store the leftover DIY pest control solution?
A: To store leftover DIY pest control solution, pour it into a clean, airtight container, such as a glass jar or a plastic spray bottle. Label the container clearly with the contents and the date it was made. Store the solution in a cool, dark place, away from direct sunlight and heat. A basement or garage is often a good option. The solution should remain effective for several weeks, but it’s always best to use it as soon as possible. Before each use, give the container a good shake to ensure that the ingredients are properly mixed. If you notice any signs of spoilage, such as a foul odor or discoloration, discard the solution and make a fresh batch.
Q: What are some signs that my cauliflower plant is infested with pests?
A: There are several telltale signs that your cauliflower plant might be infested with pests. Look for small holes or chewed areas on the leaves, which could indicate the presence of caterpillars or beetles. Yellowing or wilting leaves can be a sign of aphids or other sap-sucking insects. Sticky residue on the leaves, known as honeydew, is another sign of aphids. You might also see the pests themselves, such as small green aphids clustered on the stems or whiteflies fluttering around the plant. Regularly inspect your plants for these signs, and take action promptly if you notice any problems. Early detection and treatment are key to preventing a major infestation.
Q: What type of dish soap should I use for the DIY solution?
A: When choosing dish soap for your DIY pest control solution, it’s important to select a mild, unscented, and dye-free variety. Avoid using dish soaps that contain bleach, degreasers, or other harsh chemicals, as these can damage your plants. A simple, basic dish soap is the best option. You only need a small amount of dish soap in the solution, as it acts as a surfactant to help the other ingredients stick to the leaves. Too much dish soap can actually harm your plants, so be sure to follow the recipe carefully.

Leave a Comment