
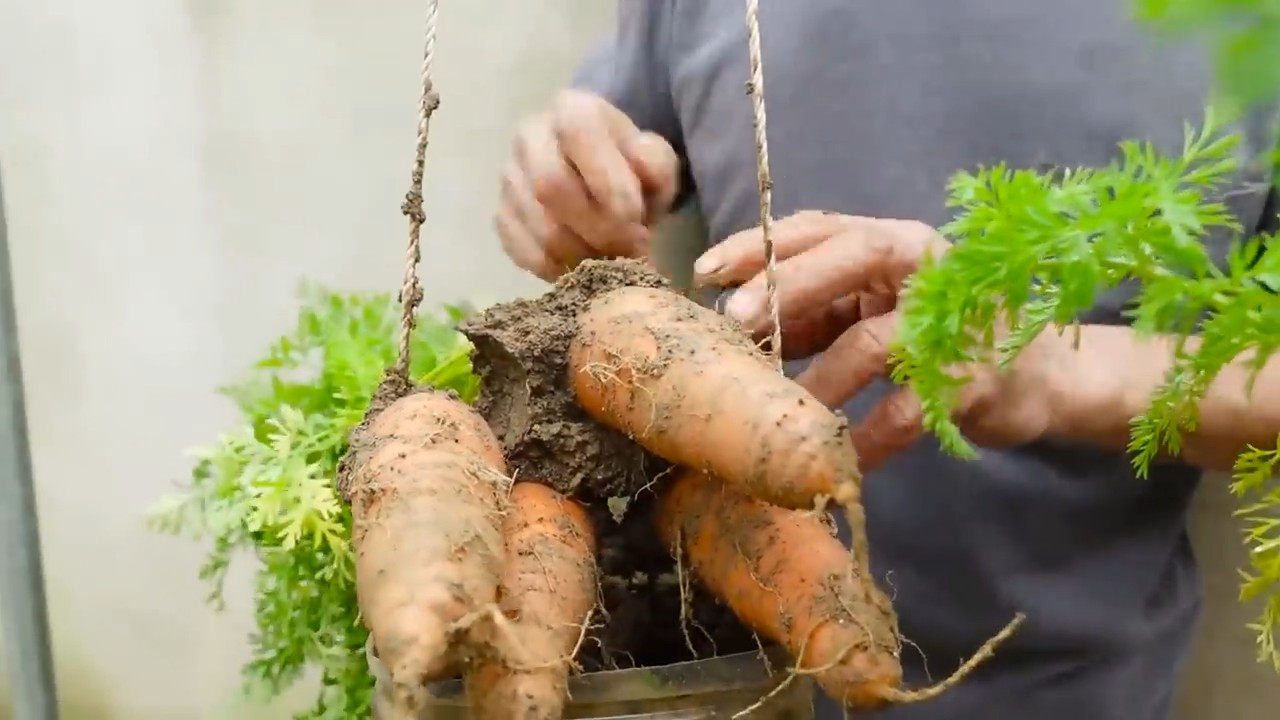
Growing Carrots at Home can seem daunting, but trust me, it’s easier than you think! Imagine plucking vibrant, sweet carrots straight from your own backyard – the taste is simply unmatched. For centuries, carrots have been a staple in diets worldwide, with evidence suggesting their cultivation dates back to ancient Persia. These root vegetables weren’t always the bright orange we know and love; they came in shades of purple, white, and yellow!
But why should you bother with the effort of growing your own? Well, store-bought carrots often lack the fresh, earthy flavor of homegrown ones. Plus, you have complete control over what goes into your garden, ensuring you’re eating organic, pesticide-free produce. In this article, I’m going to share some simple yet effective DIY tricks and hacks that will transform your garden into a carrot-growing haven, even if you’re a complete beginner.
Whether you have a sprawling garden or just a small balcony, growing carrots at home is entirely possible. I’ll guide you through everything from choosing the right carrot variety to preparing your soil and protecting your precious crop from pests. Get ready to roll up your sleeves and discover the joy of harvesting your own delicious, homegrown carrots!
Karottenanbau im eigenen Garten: So geht’s!
Hallo liebe Gartenfreunde! Ich zeige euch heute, wie ihr ganz einfach eure eigenen Karotten zu Hause anbauen könnt. Es ist wirklich nicht schwer und schmeckt einfach unschlagbar, wenn man die knackigen, selbstgezogenen Karotten erntet. Los geht’s!
Die Vorbereitung: Der richtige Standort und Boden
Bevor wir mit dem eigentlichen Pflanzen beginnen, müssen wir sicherstellen, dass unsere Karotten den bestmöglichen Start haben. Das fängt mit dem richtigen Standort und dem passenden Boden an.
* Sonniger Standort: Karotten lieben die Sonne! Sucht euch ein Plätzchen in eurem Garten aus, das mindestens sechs Stunden direkte Sonneneinstrahlung pro Tag bekommt.
* Lockere Erde: Das A und O für lange, gerade Karotten ist ein lockerer, steinloser Boden. Karottenwurzeln stoßen auf Widerstand, wenn sie auf Steine oder verdichtete Erde treffen, was zu krummen und verzweigten Karotten führt.
* Bodenverbesserung: Wenn euer Boden eher lehmig oder sandig ist, solltet ihr ihn unbedingt verbessern. Mischt Kompost, gut verrotteten Mist oder Sand unter, um die Drainage und Belüftung zu verbessern.
* pH-Wert: Karotten bevorzugen einen leicht sauren bis neutralen pH-Wert zwischen 6,0 und 7,0. Ihr könnt den pH-Wert eures Bodens mit einem Testkit aus dem Gartencenter überprüfen und gegebenenfalls anpassen.
Die Aussaat: So kommen die Samen in die Erde
Jetzt geht’s ans Eingemachte! Die Aussaat ist ein wichtiger Schritt, also nehmt euch Zeit und geht sorgfältig vor.
1. Den Boden vorbereiten: Harkt den Boden gründlich durch, um ihn zu lockern und Unebenheiten zu beseitigen. Entfernt alle Steine, Wurzeln und Unkräuter.
2. Saatrillen ziehen: Zieht mit einem Rechen oder einem Stock Saatrillen mit einem Abstand von etwa 20-30 cm zueinander. Die Rillen sollten etwa 1-2 cm tief sein.
3. Samen aussäen: Karottensamen sind sehr klein, daher ist es wichtig, sie nicht zu dicht auszusäen. Mischt die Samen am besten mit etwas Sand, um sie besser verteilen zu können. Streut die Samen gleichmäßig in die Saatrillen.
4. Mit Erde bedecken: Bedeckt die Samen vorsichtig mit einer dünnen Schicht Erde.
5. Angießen: Gießt die Saatrillen vorsichtig an, damit die Samen nicht weggespült werden. Verwendet am besten eine Gießkanne mit Brauseaufsatz.
6. Feucht halten: Haltet die Erde während der Keimung feucht, aber nicht nass. Am besten gießt ihr regelmäßig mit einer Sprühflasche.
Die Pflege: Gießen, Unkraut jäten und vereinzeln
Nach der Aussaat ist vor der Pflege! Karotten sind relativ pflegeleicht, aber ein paar Dinge solltet ihr beachten, damit sie gut wachsen.
* Gießen: Karotten brauchen regelmäßig Wasser, besonders während der Keimung und in Trockenperioden. Gießt am besten früh morgens oder spät abends, um Verdunstung zu vermeiden. Achtet darauf, dass die Erde nicht austrocknet, aber auch nicht zu nass ist.
* Unkraut jäten: Unkraut konkurriert mit den Karotten um Nährstoffe, Wasser und Licht. Jätet regelmäßig Unkraut, besonders in der Nähe der Karottenpflanzen. Seid dabei vorsichtig, um die zarten Wurzeln der Karotten nicht zu beschädigen.
* Vereinzeln: Wenn die Karottenpflanzen etwa 5-7 cm hoch sind, müsst ihr sie vereinzeln. Das bedeutet, dass ihr die schwächsten Pflanzen entfernt, damit die verbleibenden Pflanzen genügend Platz zum Wachsen haben. Lasst zwischen den Pflanzen etwa 3-5 cm Platz.
* Anhügeln: Wenn die Karotten größer werden, solltet ihr sie regelmäßig anhäufeln. Das bedeutet, dass ihr Erde um die Stängel der Pflanzen herum anhäuft. Das schützt die Karotten vor Sonnenbrand und sorgt dafür, dass sie gerader wachsen.
* Schädlinge und Krankheiten: Karotten können von verschiedenen Schädlingen und Krankheiten befallen werden. Achtet auf Anzeichen wie gelbe Blätter, Fraßspuren oder Pilzbefall. Bei Bedarf könnt ihr biologische Schädlingsbekämpfungsmittel oder Fungizide einsetzen.
Die Ernte: Wann sind die Karotten reif?
Der spannendste Teil: Die Ernte! Aber wann sind die Karotten eigentlich reif?
* Größe: Die Reifezeit von Karotten hängt von der Sorte ab. In der Regel sind Karotten nach etwa 70-80 Tagen erntereif. Ihr könnt die Größe der Karotten überprüfen, indem ihr vorsichtig etwas Erde um die Wurzeln entfernt.
* Farbe: Reife Karotten haben eine kräftige, leuchtende Farbe.
* Testen: Zieht eine Karotte vorsichtig aus der Erde, um zu überprüfen, ob sie reif ist. Wenn sie die gewünschte Größe und Farbe hat, könnt ihr mit der Ernte beginnen.
* Ernten: Zieht die Karotten vorsichtig aus der Erde. Wenn sie sich schwer ziehen lassen, könnt ihr eine Grabegabel verwenden, um den Boden zu lockern.
* Lagern: Entfernt das Grün der Karotten und lagert sie an einem kühlen, dunklen und feuchten Ort. Im Kühlschrank halten sich Karotten mehrere Wochen.
Sortenempfehlungen: Welche Karotten soll ich anbauen?
Es gibt unzählige Karottensorten, die sich in Größe, Form, Farbe und Geschmack unterscheiden. Hier sind ein paar Empfehlungen für den Anbau im eigenen Garten:
* Nantaise: Eine klassische Karottensorte mit langen, schlanken Wurzeln und einem süßen Geschmack.
* Amsterdam Forcing: Eine frühe Sorte, die sich gut für den Anbau im Frühjahr eignet.
* Chantenay Red Core: Eine robuste Sorte mit kurzen, kegelförmigen Wurzeln und einem kräftigen Geschmack.
* Purple Haze: Eine ungewöhnliche Sorte mit violetten Wurzeln und einem leicht würzigen Geschmack.
* Rainbow Mix: Eine Mischung aus verschiedenen Karottensorten in unterschiedlichen Farben.
Zusätzliche Tipps und Tricks für den Karottenanbau
Hier noch ein paar zusätzliche Tipps und Tricks, die euch beim Karottenanbau helfen können:
* Fruchtfolge: Baut Karotten nicht jedes Jahr am selben Standort an, um Krankheiten und Schädlingen vorzubeugen.
* Beetnachbarn: Gute Beetnachbarn für Karotten sind Zwiebeln, Knoblauch, Lauch, Salat und Ringelblumen. Sie halten Schädlinge fern und verbessern das Wachstum der Karotten.
* Mulchen: Mulcht den Boden um die Karottenpflanzen herum mit Stroh, Heu oder Rasenschnitt. Das hält den Boden feucht, unterdrückt Unkraut und schützt die Karotten vor Sonnenbrand.
* Schutz vor Schädlingen: Um Karottenfliegen fernzuhalten, könnt ihr ein Insektenschutznetz über die Karottenpflanzen spannen.
* Düngen: Karotten brauchen nicht viel Dünger. Eine leichte Düngung mit Kompost oder organischem Dünger reicht in der Regel aus.
Ich hoffe, diese Anleitung hilft euch dabei, eure eigenen Karotten erfolgreich anzubauen. Viel Spaß beim Gärtnern und guten Appetit!
Conclusion
So, there you have it! Growing carrots at home, while it might seem daunting at first, is a surprisingly rewarding and accessible endeavor. We’ve walked through the essential steps, from selecting the right carrot varieties and preparing your soil to nurturing your seedlings and harvesting your vibrant, homegrown bounty. But why should you take the plunge and dedicate some space to these root vegetables?
The answer is multifaceted. Firstly, the taste of a freshly harvested, homegrown carrot is simply unparalleled. Forget the bland, often woody carrots you find in the supermarket. Homegrown carrots boast a sweetness and crispness that will redefine your perception of this humble vegetable. Imagine the satisfaction of pulling a vibrant orange carrot from the earth, knowing you nurtured it from seed to table.
Secondly, growing your own carrots allows you to control every aspect of the process. You can choose organic methods, avoiding harmful pesticides and herbicides. You know exactly what went into your carrots, ensuring a healthier and more sustainable food source for you and your family. This level of control is invaluable in today’s world, where food safety and environmental consciousness are paramount.
Thirdly, it’s a fantastic learning experience! Gardening, in general, is a wonderful way to connect with nature, learn about plant life cycles, and develop patience and observation skills. Growing carrots, in particular, teaches you about soil composition, drainage, and the importance of proper spacing. It’s a hands-on lesson in biology and sustainable living.
But the benefits don’t stop there. Consider the cost savings. While the initial investment in seeds and soil amendments might seem like a hurdle, the long-term savings on grocery bills can be significant, especially if you plan to grow carrots regularly. Plus, you’ll always have fresh carrots on hand for snacks, salads, soups, and countless other culinary creations.
Don’t be afraid to experiment with different carrot varieties. Try Nantes for their cylindrical shape and sweet flavor, or Danvers for their classic tapered form and versatility. Consider growing rainbow carrots for a visually stunning and nutritious addition to your meals. You can also try succession planting, sowing seeds every few weeks to ensure a continuous harvest throughout the growing season.
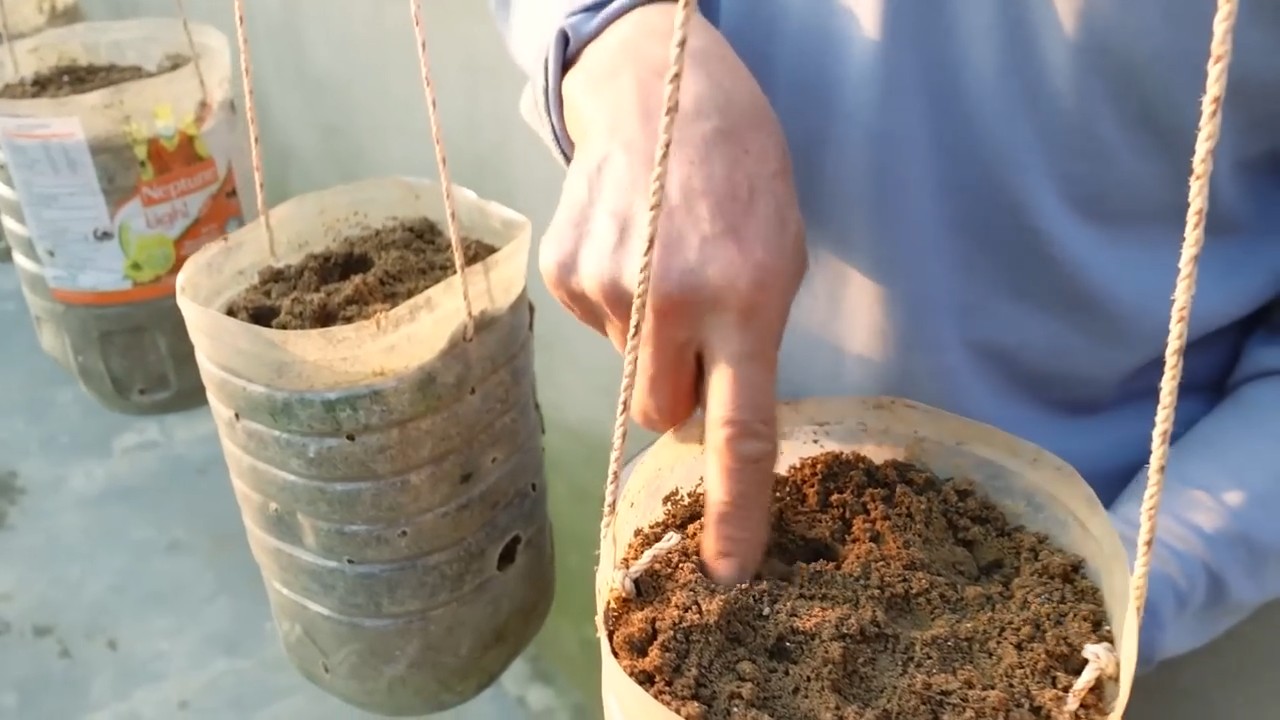
For those with limited space, container gardening is an excellent option. Choose a deep container (at least 12 inches) and fill it with well-draining potting mix. Dwarf carrot varieties are particularly well-suited for containers. Remember to provide adequate sunlight and water regularly.
Growing carrots at home is more than just a gardening project; it’s an investment in your health, your well-being, and your connection to the natural world.
So, what are you waiting for? Grab some seeds, prepare your soil, and embark on your carrot-growing adventure today! We encourage you to share your experiences with us. Post photos of your carrot harvests, share your tips and tricks, and let us know what challenges you faced and how you overcame them. Together, we can create a community of passionate carrot growers, sharing knowledge and inspiring others to embrace the joys of homegrown produce. Happy gardening!
Frequently Asked Questions (FAQ)
What is the best time of year to plant carrots?
The best time to plant carrots depends on your climate. In general, carrots are a cool-season crop and thrive in temperatures between 60°F and 70°F (15°C and 21°C). For most regions, this means planting in early spring or late summer/early fall. Spring plantings should occur as soon as the soil can be worked, typically a few weeks before the last expected frost. Fall plantings should be timed to allow carrots to mature before the first hard frost. In warmer climates, you may be able to grow carrots throughout the winter. Check your local gardening resources for specific planting dates in your area.
How much sunlight do carrots need?
Carrots need at least six hours of direct sunlight per day to thrive. While they can tolerate some partial shade, insufficient sunlight will result in smaller, less flavorful carrots. Choose a planting location that receives full sun for the majority of the day. If you’re growing carrots in containers, you can move them around to ensure they get enough sunlight.
What kind of soil is best for growing carrots?
Carrots prefer loose, well-drained soil that is rich in organic matter. Rocky or compacted soil can hinder root development, resulting in misshapen or stunted carrots. Before planting, amend your soil with compost or well-rotted manure to improve drainage and fertility. Avoid using fresh manure, as it can cause forking and other problems. The ideal soil pH for carrots is between 6.0 and 6.8. If your soil is heavy clay, consider growing carrots in raised beds or containers filled with a suitable potting mix.
How often should I water my carrots?
Carrots need consistent moisture to develop properly. Water deeply and regularly, especially during dry periods. Aim to keep the soil consistently moist but not waterlogged. Overwatering can lead to root rot, while underwatering can cause carrots to become tough and bitter. A good rule of thumb is to water when the top inch of soil feels dry to the touch. Mulching around your carrot plants can help retain moisture and suppress weeds.
Why are my carrots forking or splitting?
Forking or splitting in carrots is often caused by compacted soil, rocks, or other obstructions in the soil. When the carrot root encounters an obstacle, it splits or forks to grow around it. To prevent this, ensure your soil is loose and well-drained before planting. Remove any rocks or debris from the planting area. Avoid using fresh manure, as it can also contribute to forking. Another possible cause is inconsistent watering. Maintaining consistent moisture levels can help prevent splitting.
How do I thin my carrot seedlings?
Thinning is essential for ensuring that your carrots have enough space to develop properly. When seedlings are about 2 inches tall, thin them to about 1-2 inches apart. When they are about 4 inches tall, thin them again to about 3-4 inches apart. Gently pull out the unwanted seedlings, being careful not to disturb the roots of the remaining plants. You can eat the thinned seedlings as microgreens.
When are carrots ready to harvest?
Carrots are typically ready to harvest 60-80 days after planting, depending on the variety. Check the seed packet for specific maturity dates. You can harvest carrots when they reach the desired size, but keep in mind that they will continue to grow larger if left in the ground. To harvest, gently loosen the soil around the carrot and pull it straight up. If the soil is dry, water it beforehand to make harvesting easier.
Can I grow carrots in containers?
Yes, carrots can be successfully grown in containers, especially dwarf or shorter varieties. Choose a container that is at least 12 inches deep and has drainage holes. Fill the container with a well-draining potting mix. Plant the carrot seeds according to the instructions on the seed packet. Water regularly and provide adequate sunlight. Container-grown carrots may require more frequent watering than those grown in the ground.
What are some common pests and diseases that affect carrots?
Some common pests that affect carrots include carrot rust flies, aphids, and nematodes. Carrot rust flies lay their eggs near the base of carrot plants, and the larvae tunnel into the roots, causing damage. Aphids suck sap from the leaves, weakening the plants. Nematodes are microscopic worms that can damage the roots. Common diseases include leaf blight and root rot. To prevent pests and diseases, practice good garden hygiene, such as removing plant debris and rotating crops. You can also use organic pest control methods, such as insecticidal soap or neem oil.
How do I store harvested carrots?
To store harvested carrots, remove the green tops and gently brush off any excess soil. Do not wash the carrots until you are ready to use them. Store the carrots in a cool, dark, and humid place, such as the refrigerator crisper drawer. You can also store them in a container filled with moist sand or sawdust. Properly stored carrots can last for several weeks or even months.

Leave a Comment