
Growing cantaloupe in a barrel might sound a little unconventional, but trust me, it’s a game-changer for anyone with limited space or a desire for a truly unique gardening experience! Forget sprawling vines taking over your yard; we’re talking about juicy, homegrown cantaloupe bursting with flavor, all contained within the cozy confines of a barrel.
For centuries, humans have cultivated melons, with evidence suggesting their presence in ancient Egypt and beyond. While traditional methods often require ample land, the ingenuity of container gardening allows us to enjoy these sweet treats regardless of our garden size. Think of it as a modern twist on an age-old tradition!
Why should you try growing cantaloupe in a barrel? Well, imagine the satisfaction of harvesting your own delicious cantaloupe, knowing you nurtured it from seed to fruit. Plus, this method is perfect for small patios, balconies, or even sunny driveways. It also offers better control over soil conditions and reduces the risk of pests and diseases. I’m excited to share my tried-and-true tips and tricks to help you succeed with this rewarding project. Let’s get started and transform your barrel into a cantaloupe paradise!
Growing Cantaloupe in a Barrel: A Sweet and Simple DIY Project
Hey there, fellow gardening enthusiasts! I’m so excited to share one of my favorite gardening hacks with you: growing cantaloupe in a barrel! It’s a fantastic way to enjoy fresh, homegrown cantaloupe even if you have limited space. Plus, it’s a really rewarding project that’s surprisingly easy to pull off. Trust me, there’s nothing quite like biting into a juicy, sun-ripened cantaloupe that you grew yourself. So, let’s get started!
Why Grow Cantaloupe in a Barrel?
Before we dive into the how-to, let’s talk about why this method is so great.
* Space-Saving: Barrels are perfect for small gardens, patios, or balconies. You don’t need a huge plot of land to enjoy fresh cantaloupe.
* Improved Drainage: Barrels typically have good drainage, which is crucial for cantaloupe, as they don’t like soggy roots.
* Warmer Soil: The barrel material can help warm the soil faster in the spring, giving your cantaloupe a head start.
* Pest Control: Growing in a raised container can help deter some ground-dwelling pests.
* Aesthetic Appeal: Let’s be honest, a barrel overflowing with lush cantaloupe vines looks pretty darn good!
What You’ll Need
Okay, let’s gather our supplies. Here’s what you’ll need to grow cantaloupe in a barrel:
* A Large Barrel: A half-barrel (approximately 25-30 gallons) is ideal. Make sure it has drainage holes. If it doesn’t, you’ll need to drill some.
* Potting Mix: Use a high-quality potting mix that’s well-draining and rich in organic matter. Avoid using garden soil, as it can compact in a container.
* Compost: Compost is your friend! It adds nutrients and improves soil structure.
* Cantaloupe Seeds or Seedlings: Choose a variety that’s suitable for your climate and growing season. Bush varieties tend to work best in containers.
* Slow-Release Fertilizer: This will provide your cantaloupe with a steady supply of nutrients throughout the growing season.
* Trellis or Support: Cantaloupe vines can get heavy, so you’ll need a trellis or other support system to keep them off the ground.
* Watering Can or Hose: For regular watering.
* Gardening Gloves: To protect your hands.
* Hand Trowel: For planting.
* Mulch (Optional): Mulch helps retain moisture and suppress weeds. Straw or wood chips work well.
Preparing the Barrel
This is a crucial step to ensure your cantaloupe has a healthy start.
1. Drill Drainage Holes (If Needed): If your barrel doesn’t have drainage holes, drill several holes in the bottom to allow excess water to escape.
2. Line the Bottom (Optional): You can line the bottom of the barrel with landscape fabric to prevent soil from washing out through the drainage holes. This isn’t strictly necessary, but it can help.
3. Add a Layer of Gravel (Optional): Adding a layer of gravel to the bottom of the barrel can further improve drainage. Again, this is optional, but it’s a good idea if you live in an area with heavy rainfall.
4. Fill with Potting Mix and Compost: Mix equal parts potting mix and compost, and fill the barrel to within a few inches of the top. Gently pat down the soil.
Planting Your Cantaloupe
Now for the fun part – planting your cantaloupe!
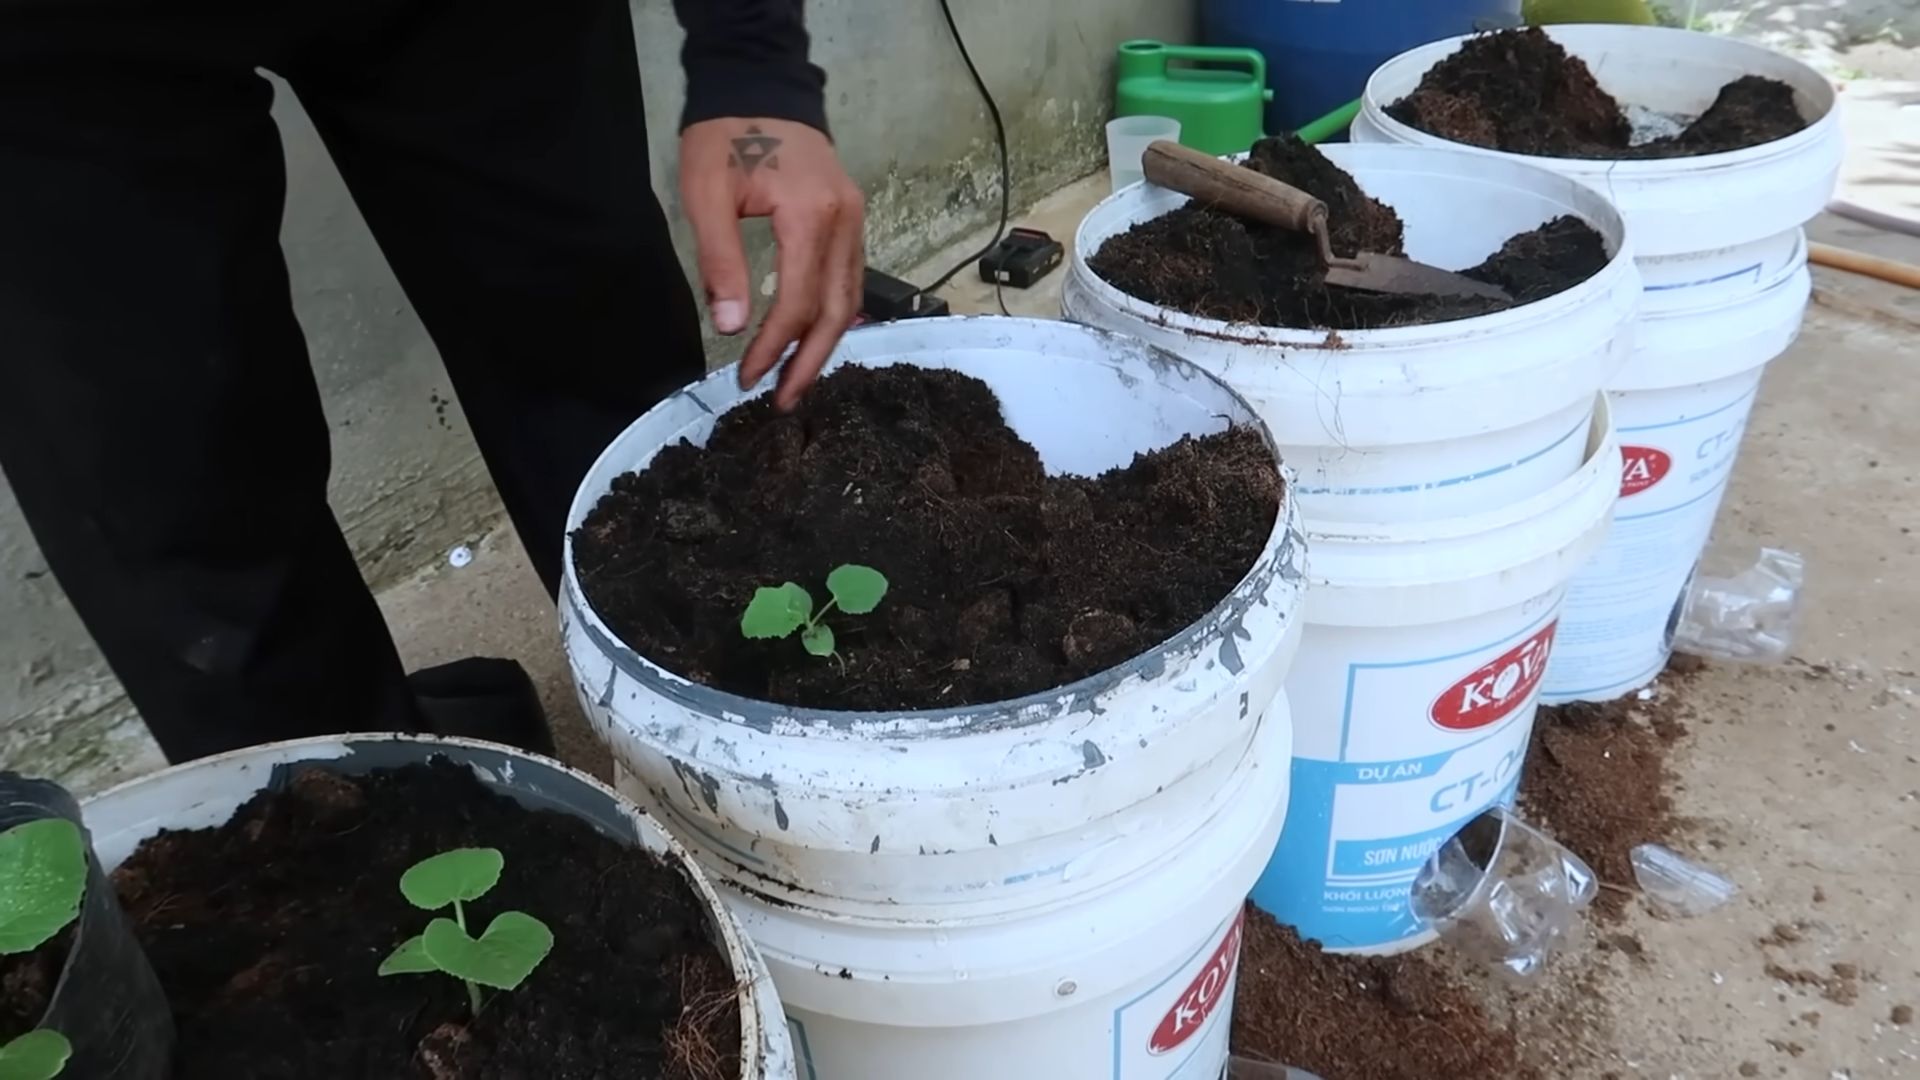
1. Choose Your Planting Method: You can either start with seeds or seedlings. Seedlings will give you a head start, but seeds are more economical.
2. Planting Seeds: If you’re starting with seeds, sow them directly into the barrel about 1 inch deep and 6 inches apart. Water gently. You might want to plant a few extra seeds to ensure germination and then thin them out later.
3. Planting Seedlings: If you’re using seedlings, gently remove them from their containers and plant them in the barrel, spacing them about 12 inches apart. Make sure the top of the root ball is level with the soil surface.
4. Water Thoroughly: After planting, water the seedlings or seeds thoroughly.
5. Add Slow-Release Fertilizer: Sprinkle a slow-release fertilizer around the base of the plants, following the instructions on the package.
6. Mulch (Optional): Add a layer of mulch around the plants to help retain moisture and suppress weeds.
Setting Up Support
Cantaloupe vines can get quite long and heavy, so providing support is essential.
1. Choose Your Support System: You can use a trellis, tomato cage, or even a sturdy stake. The key is to provide something for the vines to climb on.
2. Install the Support: Install the support system as soon as you plant the cantaloupe. This will prevent you from disturbing the roots later on.
3. Train the Vines: As the vines grow, gently train them to climb the support system. You may need to tie them to the support with soft twine or plant ties.
Caring for Your Cantaloupe
Now that your cantaloupe is planted and supported, it’s time to provide the care it needs to thrive.
1. Watering: Cantaloupe needs consistent moisture, especially during hot weather. Water deeply whenever the top inch of soil feels dry to the touch. Avoid overwatering, as this can lead to root rot.
2. Fertilizing: In addition to the slow-release fertilizer you added at planting, you can also feed your cantaloupe with a liquid fertilizer every few weeks. Choose a fertilizer that’s high in phosphorus and potassium, which are essential for fruit development.
3. Pruning: Pruning can help improve air circulation and encourage fruit production. Remove any yellowing or dead leaves. You can also pinch off the tips of the vines to encourage branching.
4. Pollination: Cantaloupe needs to be pollinated in order to produce fruit. If you don’t see any bees or other pollinators in your garden, you may need to hand-pollinate the flowers. To do this, use a small paintbrush to transfer pollen from the male flowers to the female flowers. Female flowers have a small fruit developing behind the flower, while male flowers do not.
5. Pest and Disease Control: Keep an eye out for pests and diseases. Common pests include aphids, squash bugs, and cucumber beetles. Common diseases include powdery mildew and fusarium wilt. Treat any problems promptly with organic pest control methods or fungicides.
6. Sunlight: Cantaloupe needs at least 6-8 hours of sunlight per day. Make sure your barrel is located in a sunny spot.
7. Rotating the Barrel: Periodically rotate the barrel to ensure that all sides of the plant receive equal sunlight.
Harvesting Your Cantaloupe
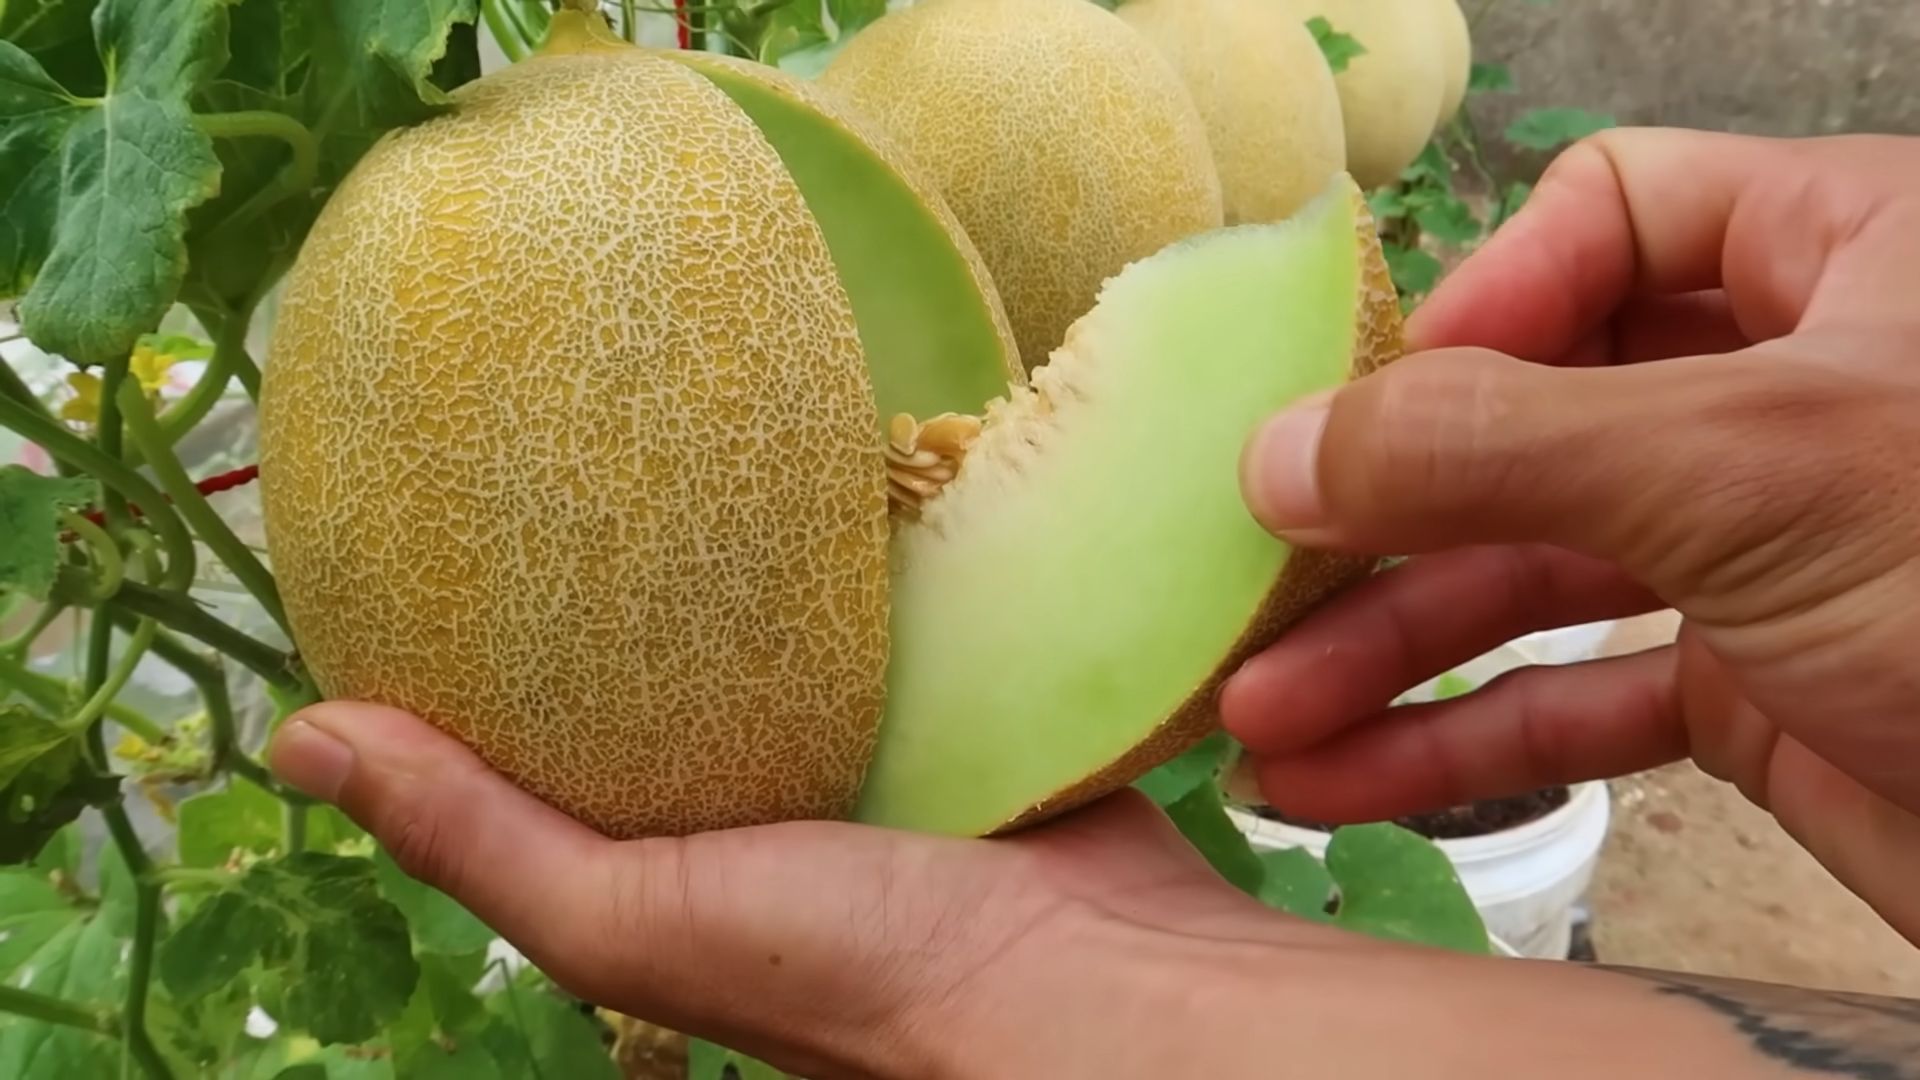
The moment you’ve been waiting for! Harvesting your own cantaloupe is incredibly satisfying.
1. Knowing When to Harvest: Cantaloupe is ready to harvest when it slips easily from the vine with a gentle tug. The skin will also turn from green to a tan or yellowish color, and the melon will have a sweet aroma.
2. Harvesting: Gently twist the cantaloupe from the vine. If it doesn’t come off easily, it’s not quite ripe yet.
3. Enjoying Your Harvest: Once you’ve harvested your cantaloupe, you can enjoy it right away or store it in the refrigerator for a few days.
Troubleshooting
Even with the best care, you might encounter some challenges. Here are a few common problems and how to address them:
* Yellowing Leaves: This could be a sign of overwatering, underwatering, nutrient deficiency, or disease. Check the soil moisture and adjust your watering accordingly. Fertilize with a balanced fertilizer. Inspect the leaves for signs of pests or diseases and treat accordingly.
* Lack of Fruit: This could be due to poor pollination, lack of sunlight, or nutrient deficiency. Hand-pollinate the flowers if necessary. Make sure the plant is getting enough sunlight. Fertilize with a fertilizer that’s high in phosphorus and potassium.
* Splitting Fruit: This is usually caused by inconsistent watering. Try to water regularly and avoid letting the soil dry out completely.
* Pests: Inspect your plants regularly for pests and treat them promptly with organic pest control methods.
Choosing the Right Cantaloupe Variety
Selecting the right cantaloupe variety is crucial for success, especially when growing in a container. Here are a few varieties that tend to perform well in barrels:
* Minnesota M
Conclusion
So, there you have it! Growing cantaloupe in a barrel isn’t just a quirky gardening experiment; it’s a genuinely effective way to cultivate these delicious melons, especially if you’re short on space or dealing with less-than-ideal soil conditions. We’ve walked you through the process, from selecting the right barrel and preparing the soil to nurturing your cantaloupe vine and harvesting your sweet reward.
Why is this DIY trick a must-try? Because it offers a multitude of benefits. First and foremost, it’s incredibly space-efficient. Forget sprawling vines taking over your garden; a single barrel can house a thriving cantaloupe plant, making it perfect for balconies, patios, or small yards. Second, barrel gardening provides excellent drainage, preventing root rot and other moisture-related issues that can plague cantaloupe plants grown directly in the ground. Third, you have complete control over the soil composition, ensuring your cantaloupe receives the nutrients it needs to flourish. Finally, the elevated position of the barrel can help protect your precious melons from pests and diseases.
But the beauty of this method lies in its adaptability. Feel free to experiment with different cantaloupe varieties. Smaller, bush-type cantaloupes are particularly well-suited for barrel growing. Consider adding companion plants like marigolds or basil to deter pests and attract pollinators. You can also adjust the watering schedule based on your local climate and the specific needs of your plant. If you live in a particularly hot region, consider providing some afternoon shade to prevent the soil from drying out too quickly.
Don’t be afraid to get creative with your barrel setup. You can paint it to match your outdoor decor, add trellises for the vines to climb, or even incorporate a self-watering system for added convenience. The possibilities are endless!
Ultimately, growing cantaloupe in a barrel is a rewarding and enjoyable experience. It’s a chance to connect with nature, learn new skills, and savor the unparalleled taste of homegrown cantaloupe. We strongly encourage you to give this DIY trick a try. You might be surprised at how easy and successful it can be.
And most importantly, we want to hear about your experience! Share your photos, tips, and challenges in the comments below. Let’s build a community of barrel-growing cantaloupe enthusiasts and learn from each other’s successes and failures. Together, we can unlock the secrets to cultivating the sweetest, juiciest cantaloupes imaginable, all within the confines of a humble barrel. So, grab your gloves, gather your supplies, and get ready to embark on a cantaloupe-growing adventure! We are confident that you will find that growing cantaloupe in a barrel is a very rewarding experience.
Frequently Asked Questions (FAQ)
What size barrel is best for growing cantaloupe?
A half-barrel (approximately 25-30 gallons) is generally sufficient for growing one cantaloupe plant. The larger the barrel, the more room the roots will have to grow, which can lead to a healthier and more productive plant. However, a half-barrel is a good compromise between size and manageability. Make sure the barrel has drainage holes to prevent waterlogging.
What type of soil should I use in the barrel?
A well-draining potting mix is essential. Avoid using garden soil, as it can become compacted in a container and restrict root growth. A good mix consists of equal parts potting soil, compost, and perlite or vermiculite. The compost provides nutrients, while the perlite or vermiculite improves drainage and aeration. You can also add a slow-release fertilizer to the mix to provide a steady supply of nutrients throughout the growing season.
How often should I water my cantaloupe plant in a barrel?
Water deeply and regularly, especially during hot, dry weather. The soil should be kept consistently moist but not waterlogged. Check the soil moisture level daily by sticking your finger about an inch into the soil. If it feels dry, it’s time to water. Water at the base of the plant to avoid wetting the foliage, which can promote fungal diseases. In general, you may need to water daily or every other day, depending on the weather and the size of your barrel.
How much sunlight does a cantaloupe plant need?
Cantaloupe plants need at least 6-8 hours of direct sunlight per day to thrive. Choose a location for your barrel that receives plenty of sunlight throughout the day. If you live in a particularly hot climate, you may need to provide some afternoon shade to prevent the soil from drying out too quickly.
Do I need to fertilize my cantaloupe plant?
Yes, cantaloupe plants are heavy feeders and benefit from regular fertilization. Use a balanced fertilizer (e.g., 10-10-10) every 2-3 weeks, following the instructions on the package. You can also supplement with compost tea or other organic fertilizers. Avoid over-fertilizing, as this can lead to excessive foliage growth at the expense of fruit production.
How do I know when my cantaloupe is ripe?
There are several signs that indicate a cantaloupe is ripe. The skin will change color from green to a tan or yellowish hue. The stem will begin to crack and separate from the fruit (this is called “slipping”). The melon will also have a sweet, musky aroma. Gently press on the blossom end of the melon; it should feel slightly soft. If all these signs are present, your cantaloupe is likely ripe and ready to harvest.
What are some common pests and diseases that affect cantaloupe plants?
Common pests include aphids, squash bugs, and cucumber beetles. These can be controlled with insecticidal soap or neem oil. Common diseases include powdery mildew and fusarium wilt. Powdery mildew can be prevented by ensuring good air circulation and avoiding overhead watering. Fusarium wilt is a soilborne disease that can be difficult to control. Choose disease-resistant varieties and practice crop rotation to minimize the risk.
Can I grow more than one cantaloupe plant in a barrel?
While it’s possible to grow two cantaloupe plants in a very large barrel, it’s generally best to stick to one plant per barrel. This will ensure that each plant has enough space to grow and receive adequate nutrients and sunlight. Overcrowding can lead to reduced fruit production and increased susceptibility to pests and diseases.
How do I support the cantaloupe as it grows?
As the cantaloupe grows larger, it may need some support to prevent it from falling off the vine. You can use a sling made from pantyhose or netting to support the fruit. Tie the sling to the trellis or barrel to provide extra support. This is especially important for larger cantaloupe varieties.
What if my cantaloupe plant isn’t producing fruit?
There are several reasons why your cantaloupe plant might not be producing fruit. It could be due to insufficient sunlight, poor pollination, or lack of nutrients. Make sure your plant is receiving at least 6-8 hours of direct sunlight per day. Hand-pollinate the flowers if you’re not seeing many bees or other pollinators. Fertilize regularly with a balanced fertilizer. Also, ensure the plant is not stressed by underwatering or overwatering.
Leave a Comment