
Growing Cabbage in Bottles: Sounds a little crazy, right? But trust me, this quirky DIY gardening trick might just revolutionize your small-space gardening game! Forget sprawling garden beds and endless weeding; we’re taking cabbage cultivation vertical and compact.
For centuries, cabbage has been a staple in diets across the globe, from the humble peasant’s stew to the elaborate feasts of royalty. Its resilience and nutritional value have made it a cherished crop. But let’s face it, traditional cabbage growing can be a bit of a space hog. That’s where our bottle-based brilliance comes in!
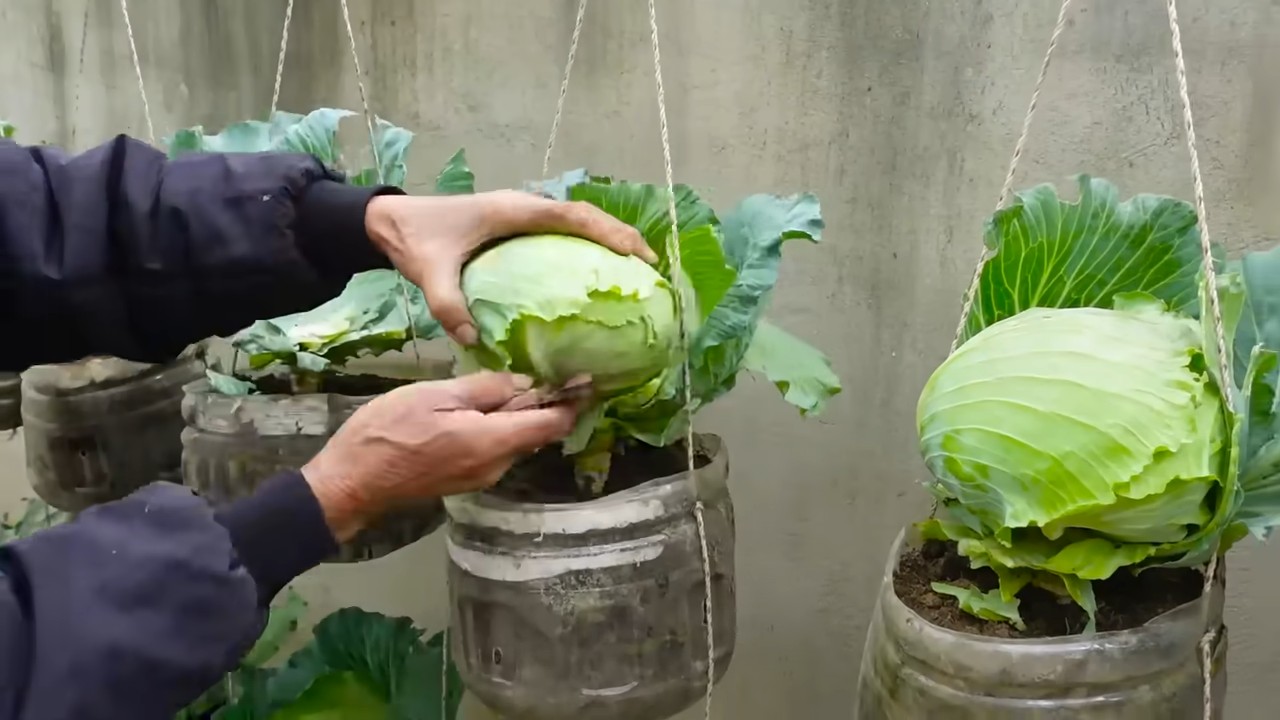
Imagine harvesting fresh, crisp cabbage heads right from your balcony, patio, or even a sunny windowsill. No more battling slugs, struggling with poor soil, or sacrificing precious garden real estate. This DIY project is perfect for apartment dwellers, urban gardeners, or anyone looking to add a touch of whimsy and efficiency to their gardening endeavors.
I know what you’re thinking: “Will it actually work?” Absolutely! This method provides excellent drainage, protects young plants from pests, and allows you to control the growing environment more effectively. Plus, it’s a fantastic way to recycle those plastic bottles piling up. So, are you ready to learn how to start growing cabbage in bottles and impress your friends with your innovative gardening skills? Let’s dive in!
Kohl im Flaschengarten: Eine DIY-Anleitung für den Anbau von Mini-Kohlköpfen
Hallo Gartenfreunde! Habt ihr Lust auf ein ungewöhnliches Gartenprojekt? Ich zeige euch heute, wie ihr Kohl in Flaschen anbauen könnt! Ja, richtig gelesen, in Flaschen! Das ist nicht nur platzsparend, sondern auch ein echter Hingucker und eine tolle Möglichkeit, auch auf kleinstem Raum frisches Gemüse zu ziehen. Keine Angst, es ist einfacher als es klingt. Lasst uns loslegen!
Was ihr für euren Flaschenkohlgarten braucht:
* Leere Plastikflaschen: Am besten eignen sich 1,5-Liter- oder 2-Liter-Flaschen. Achtet darauf, dass sie sauber und trocken sind.
* Kohlsaat: Wählt eine Kohlsorte, die für den Anbau in Töpfen geeignet ist. Mini-Kohlköpfe oder Spitzkohl sind eine gute Wahl.
* Anzuchterde: Diese ist nährstoffarm und ideal für die Keimung der Samen.
* Blumenerde: Eine nährstoffreiche Erde für das spätere Wachstum der Kohlpflanzen.
* Sand oder Kies: Für eine gute Drainage am Boden der Flasche.
* Messer oder Schere: Zum Zuschneiden der Flaschen.
* Sprühflasche: Zum Befeuchten der Erde.
* Gießkanne: Zum späteren Gießen der Pflanzen.
* Optional: Flüssigdünger für Gemüse (nach Bedarf).
* Optional: Etiketten und Stift zum Beschriften der Flaschen.
Vorbereitung der Flaschen:
1. Reinigung: Zuerst müsst ihr die Plastikflaschen gründlich reinigen. Entfernt alle Etiketten und spült sie mit warmem Wasser und Spülmittel aus. Achtet darauf, dass keine Spülmittelreste zurückbleiben. Lasst die Flaschen anschließend gut trocknen.
2. Zuschneiden: Jetzt kommt der spannende Teil: das Zuschneiden der Flaschen. Es gibt verschiedene Möglichkeiten, wie ihr das machen könnt. Ich bevorzuge es, die Flasche etwa 10-15 cm unterhalb des Flaschenhalses abzuschneiden. So erhaltet ihr einen “Topf” und einen “Deckel”. Der “Deckel” wird später umgedreht in den “Topf” gesteckt, um eine Art Mini-Gewächshaus zu schaffen. Achtet darauf, dass die Schnittkanten sauber sind, damit ihr euch nicht daran verletzt. Ihr könnt die Kanten auch mit Klebeband abkleben, um sie zu entschärfen.
3. Drainagelöcher: Damit das Wasser gut ablaufen kann und keine Staunässe entsteht, müsst ihr Drainagelöcher in den Boden des “Topfes” bohren oder schneiden. 3-4 Löcher reichen in der Regel aus.
Aussaat der Kohlsaat:
1. Befüllen mit Anzuchterde: Füllt den “Topf” mit Anzuchterde. Lasst etwa 2-3 cm Platz bis zum Rand. Drückt die Erde leicht an.
2. Aussaat: Verteilt die Kohlsaat gleichmäßig auf der Erde. Achtet darauf, dass die Samen nicht zu dicht beieinander liegen. Eine Handvoll Samen pro Flasche ist ausreichend.
3. Bedecken: Bedeckt die Samen mit einer dünnen Schicht Anzuchterde (ca. 0,5 cm).
4. Befeuchten: Befeuchtet die Erde vorsichtig mit einer Sprühflasche. Die Erde sollte feucht, aber nicht nass sein.
5. Mini-Gewächshaus: Stülpt den umgedrehten “Deckel” über den “Topf”. So entsteht ein Mini-Gewächshaus, das die Keimung der Samen fördert.
6. Standort: Stellt die Flaschen an einen hellen und warmen Ort. Ideal ist ein Fensterbrett oder ein Gewächshaus. Vermeidet direkte Sonneneinstrahlung, da die Erde sonst zu schnell austrocknen kann.
7. Regelmäßige Kontrolle: Kontrolliert die Erde regelmäßig und befeuchtet sie bei Bedarf mit der Sprühflasche. Nach einigen Tagen sollten die ersten Keimlinge zu sehen sein.
Pikieren und Umtopfen:
1. Pikieren: Sobald die Keimlinge ihre ersten richtigen Blätter (nach den Keimblättern) entwickelt haben, ist es Zeit zum Pikieren. Das bedeutet, dass ihr die kleinen Pflänzchen vorsichtig vereinzeln müsst, damit sie genügend Platz zum Wachsen haben. Nehmt dazu einen kleinen Löffel oder Pikierstab und hebt die Pflänzchen vorsichtig aus der Erde. Achtet darauf, die Wurzeln nicht zu beschädigen.
2. Vorbereitung der neuen Flaschen: Bereitet neue Flaschen wie oben beschrieben vor. Diesmal füllt ihr die Flaschen jedoch mit Blumenerde.
3. Einpflanzen: Macht ein kleines Loch in die Erde und setzt die Pflänzchen vorsichtig hinein. Drückt die Erde leicht an und gießt die Pflänzchen an.
4. Standort: Stellt die umgetopften Pflänzchen wieder an einen hellen und warmen Ort.
Pflege der Kohlpflanzen:
1. Gießen: Gießt die Kohlpflanzen regelmäßig, aber nicht zu viel. Die Erde sollte immer leicht feucht sein. Vermeidet Staunässe, da dies zu Wurzelfäule führen kann.
2. Düngen: Nach etwa 2-3 Wochen könnt ihr die Kohlpflanzen mit einem Flüssigdünger für Gemüse düngen. Beachtet dabei die Dosierungsanleitung auf der Verpackung.
3. Belüftung: Um Schimmelbildung zu vermeiden, solltet ihr die Flaschen regelmäßig belüften. Nehmt dazu den “Deckel” für einige Stunden ab.
4. Schädlinge: Achtet auf Schädlinge wie Blattläuse oder Kohlweißlinge. Bei Bedarf könnt ihr die Pflanzen mit einem biologischen Schädlingsbekämpfungsmittel behandeln.
5. Drehen: Dreht die Flaschen regelmäßig, damit die Pflanzen gleichmäßig wachsen und sich nicht zum Licht hin neigen.
Ernte:
Je nach Kohlsorte und Wachstumsbedingungen könnt ihr die Mini-Kohlköpfe nach etwa 2-3 Monaten ernten. Die Kohlköpfe sind erntereif, wenn sie fest und kompakt sind. Schneidet die Kohlköpfe mit einem scharfen Messer ab.
Zusätzliche Tipps:
* Sortenwahl: Wählt Kohlsorten, die für den Anbau in Töpfen geeignet sind. Mini-Kohlköpfe, Spitzkohl oder Pak Choi sind eine gute Wahl.
* Sonnenlicht: Kohlpflanzen brauchen viel Sonnenlicht. Stellt die Flaschen an einen möglichst sonnigen Ort.
* Temperatur: Die ideale Temperatur für das Wachstum von Kohlpflanzen liegt zwischen 15 und 20 Grad Celsius.
* Umpflanzen ins Freie: Wenn das Wetter es zulässt, könnt ihr die Kohlpflanzen auch ins Freie umpflanzen. Achtet darauf, dass die Pflanzen langsam an die Sonne gewöhnt werden.
* Kreativität: Seid kreativ bei der Gestaltung eures Flaschenkohlgartens. Bemalt die Flaschen, beklebt sie mit Etiketten oder verziert sie mit Bändern.
Ich hoffe, diese Anleitung hat euch gefallen und ihr habt Lust bekommen, euren eigenen Flaschenkohlgarten anzulegen. Es ist ein tolles Projekt, um auch auf kleinstem Raum frisches Gemüse zu ziehen und gleichzeitig etwas für die Umwelt zu tun. Viel Spaß beim Gärtnern!

Conclusion
So, there you have it! Growing cabbage in bottles might sound unconventional, but it’s a surprisingly effective and rewarding method, especially for urban gardeners, those with limited space, or anyone looking to add a touch of whimsy to their gardening endeavors. This DIY trick isn’t just about saving space; it’s about creating a controlled environment, protecting your precious cabbage seedlings from pests and harsh weather, and ultimately, enjoying a bountiful harvest of fresh, homegrown cabbage.
Why is this a must-try? Because it simplifies the process, making cabbage cultivation accessible to everyone, regardless of their gardening experience. Imagine the satisfaction of nurturing your cabbage from a tiny seedling to a leafy head, all within the confines of a recycled bottle. It’s a sustainable, cost-effective, and visually appealing way to grow your own food.
But don’t stop there! Experiment with different varieties of cabbage. Red cabbage, Savoy cabbage, or even bok choy can thrive in this bottle-growing system. Consider adding companion plants like marigolds or basil around the base of your bottles to deter pests naturally. You can also adjust the size of the bottle to accommodate larger or smaller cabbage varieties. For example, smaller varieties like baby bok choy might do well in smaller bottles, while larger varieties might require a larger container.
Furthermore, think about the aesthetic possibilities. Paint your bottles with vibrant colors, decorate them with stencils, or create a vertical garden by hanging them on a wall or fence. This method allows you to personalize your garden and turn it into a unique and eye-catching display.
We wholeheartedly encourage you to try this DIY trick for growing cabbage in bottles. It’s a fun, educational, and ultimately delicious experience. Don’t be afraid to get your hands dirty, experiment with different techniques, and adapt the method to suit your specific needs and preferences.
Most importantly, we want to hear about your experiences! Share your photos, tips, and challenges in the comments section below. Let’s create a community of bottle-cabbage growers and learn from each other. Your insights could inspire others to embark on their own gardening adventures. So, grab some bottles, some soil, and some cabbage seeds, and get ready to experience the joy of growing your own fresh, delicious cabbage in a whole new way. Happy gardening!
Frequently Asked Questions (FAQ)
What type of bottles are best for growing cabbage?
The ideal bottles are sturdy plastic bottles, such as those used for water, soda, or juice. Look for bottles that are at least 2 liters in size, as this will provide enough space for the cabbage roots to develop. Clear or translucent bottles are preferable, as they allow you to monitor the moisture level of the soil. Make sure to thoroughly clean the bottles before using them to remove any residue that could harm your plants. Avoid using bottles that have contained harsh chemicals or pesticides.
How do I prepare the bottles for planting?
First, thoroughly clean the bottles with soap and water to remove any residue. Then, cut off the top portion of the bottle, leaving enough space for the cabbage to grow. Drill drainage holes in the bottom of the bottle to prevent waterlogging. You can also add a layer of gravel or small stones to the bottom of the bottle to improve drainage. Some gardeners also like to paint the outside of the bottle white or cover it with reflective material to help regulate the soil temperature, especially in hot climates.
What type of soil should I use?
Use a well-draining potting mix that is rich in organic matter. You can also amend your soil with compost or aged manure to provide additional nutrients. Avoid using garden soil, as it can be too heavy and may not drain well in a container. A good potting mix will provide the necessary nutrients and drainage for your cabbage to thrive. You can also add a slow-release fertilizer to the soil to provide a steady supply of nutrients throughout the growing season.
How often should I water my cabbage plants in bottles?
Water your cabbage plants regularly, keeping the soil consistently moist but not waterlogged. Check the soil moisture level daily by sticking your finger into the soil. If the top inch of soil feels dry, it’s time to water. Water deeply, allowing the water to drain out of the drainage holes. Avoid overwatering, as this can lead to root rot. The frequency of watering will depend on the weather conditions and the size of the bottle.
How much sunlight do cabbage plants need?
Cabbage plants need at least 6 hours of sunlight per day to thrive. Place your bottles in a sunny location where they will receive plenty of direct sunlight. If you live in a hot climate, you may need to provide some afternoon shade to prevent the plants from overheating. If you don’t have enough natural sunlight, you can supplement with grow lights.
How do I protect my cabbage plants from pests and diseases?
Monitor your cabbage plants regularly for signs of pests and diseases. Common pests that attack cabbage include aphids, cabbage worms, and slugs. You can control these pests by handpicking them off the plants, using insecticidal soap, or applying Bacillus thuringiensis (Bt). To prevent diseases, ensure good air circulation around the plants and avoid overwatering. You can also use a fungicide to protect your plants from fungal diseases. Companion planting with herbs like rosemary or thyme can also help deter pests.
Can I transplant seedlings into bottles?
Yes, you can transplant seedlings into bottles. Start your cabbage seeds indoors or in a greenhouse and transplant them into the bottles when they are a few inches tall. Be careful not to damage the roots when transplanting. Water the seedlings well after transplanting and provide them with some shade for a few days to help them adjust to their new environment.
How long does it take to grow cabbage in bottles?
The time it takes to grow cabbage in bottles depends on the variety of cabbage and the growing conditions. Generally, it takes about 60-100 days from planting to harvest. You can harvest your cabbage when the head is firm and the desired size.
Can I grow cabbage in bottles indoors?
Yes, you can grow cabbage in bottles indoors, but you will need to provide them with adequate light. Place the bottles near a sunny window or use grow lights to supplement the natural light. You will also need to ensure good air circulation and maintain a consistent temperature.
What are some variations I can try with this method?
Consider using self-watering bottles by inverting a smaller bottle filled with water into the soil. This helps maintain consistent moisture levels. You can also create a vertical garden by hanging the bottles on a wall or fence. Experiment with different types of cabbage, such as red cabbage or Savoy cabbage. You can also try growing other leafy greens, such as lettuce or spinach, in bottles. Remember to adjust the size of the bottle and the growing conditions to suit the specific needs of the plant. This DIY trick is all about experimentation and finding what works best for you.
Leave a Comment