
Growing bell peppers in pots can seem daunting, but trust me, it’s easier than you think! Imagine plucking vibrant, juicy bell peppers straight from your patio – that’s the magic we’re unlocking today. For centuries, container gardening has allowed people, even those without sprawling yards, to connect with nature and cultivate their own food. From ancient rooftop gardens in Babylon to the modern urban farming movement, the desire to nurture life in limited spaces is deeply ingrained in us.
But why should *you* bother with growing bell peppers in pots? Well, beyond the sheer joy of homegrown produce, it offers incredible flexibility. Apartment dwellers, balcony enthusiasts, and even those with limited mobility can enjoy fresh, organic bell peppers. Plus, you have complete control over the soil quality and growing conditions, minimizing pests and diseases. I’m going to share some simple, yet effective, DIY tricks and hacks that will transform your container gardening experience. Get ready to harvest a bounty of delicious bell peppers, right at your doorstep!
Growing Bell Peppers in Pots: A Comprehensive DIY Guide
Hey there, fellow gardening enthusiasts! I’m so excited to share my tried-and-true method for growing beautiful, bountiful bell peppers right in pots. Forget the sprawling garden – with a little know-how, you can enjoy fresh, homegrown peppers even if you only have a balcony or patio. Let’s get started!
Choosing the Right Bell Pepper Variety
First things first, not all bell pepper varieties are created equal when it comes to container gardening. Some grow much larger and require more space than others. Here are a few of my favorite varieties that thrive in pots:
* ‘Patio Bell’: As the name suggests, this compact variety is perfect for containers. It produces smaller, but still delicious, peppers.
* ‘Mini Bell’: These adorable little peppers are not only cute but also incredibly productive. They’re great for snacking and stuffing.
* ‘Sweet Banana’: While technically not a bell pepper, these sweet, yellow peppers are easy to grow in pots and add a vibrant touch to your garden.
* ‘California Wonder’: This is a classic bell pepper that can be grown in a large pot, but be sure to provide adequate support as the plant grows.
Gathering Your Supplies
Before we dive into the planting process, let’s make sure we have everything we need. Here’s a checklist of essential supplies:
* Bell pepper seeds or seedlings: You can start from seeds indoors or purchase seedlings from a local nursery.
* Large pots: Choose pots that are at least 12 inches in diameter and depth. Larger pots (18-24 inches) are even better, especially for larger varieties.
* High-quality potting mix: Avoid using garden soil, as it can become compacted in pots. Opt for a well-draining potting mix specifically formulated for containers.
* Slow-release fertilizer: This will provide your pepper plants with a steady supply of nutrients throughout the growing season.
* Watering can or hose: Essential for keeping your plants hydrated.
* Stakes or tomato cages: These will provide support for your pepper plants as they grow and prevent them from toppling over.
* Gardening gloves: To protect your hands.
* Optional: Mulch (such as straw or wood chips) to help retain moisture and suppress weeds.
Starting from Seeds (Optional)
If you’re feeling ambitious, you can start your bell pepper plants from seeds indoors. This gives you a head start on the growing season, especially if you live in a cooler climate.
1. Sow the seeds: Fill small seed-starting trays or pots with seed-starting mix. Sow the seeds about ¼ inch deep and gently water them.
2. Provide warmth and light: Bell pepper seeds need warmth to germinate. Place the trays or pots in a warm location, such as on top of a refrigerator or on a heat mat. You’ll also need to provide them with plenty of light, either from a sunny window or a grow light.
3. Keep the soil moist: Water the seeds regularly to keep the soil consistently moist, but not soggy.
4. Transplant the seedlings: Once the seedlings have developed a few sets of true leaves (usually after 6-8 weeks), they’re ready to be transplanted into larger pots.
Planting Your Bell Pepper Plants
Whether you’re transplanting seedlings you started yourself or purchasing them from a nursery, the planting process is the same.
1. Prepare the pots: Fill your chosen pots with high-quality potting mix, leaving a few inches of space at the top.
2. Remove the seedlings from their containers: Gently squeeze the sides of the container to loosen the root ball. Carefully remove the seedling, being careful not to damage the roots.
3. Plant the seedlings: Dig a hole in the potting mix that is large enough to accommodate the root ball. Place the seedling in the hole and gently backfill with potting mix. Make sure the top of the root ball is level with the surface of the soil.
4. Water thoroughly: Water the newly planted seedlings thoroughly to help settle the soil and encourage root growth.
5. Add support: Insert a stake or tomato cage into the pot next to the seedling. This will provide support as the plant grows and prevent it from toppling over.
6. Mulch (optional): Add a layer of mulch around the base of the plant to help retain moisture and suppress weeds.
Caring for Your Bell Pepper Plants
Now that your bell pepper plants are planted, it’s time to provide them with the care they need to thrive.
1. Watering: Bell pepper plants need consistent moisture, especially during hot weather. Water deeply whenever the top inch of soil feels dry to the touch. Avoid overwatering, as this can lead to root rot. I usually water every other day, but it depends on the weather.
2. Fertilizing: Bell pepper plants are heavy feeders and need regular fertilization to produce abundant fruit. Apply a slow-release fertilizer at planting time and then supplement with a liquid fertilizer every 2-3 weeks throughout the growing season. I like to use a fertilizer that is specifically formulated for vegetables.
3. Sunlight: Bell pepper plants need at least 6-8 hours of sunlight per day to thrive. Choose a location that receives plenty of sun. If you live in a particularly hot climate, you may need to provide some afternoon shade to prevent the plants from getting scorched.
4. Pruning: Pruning is not essential for bell pepper plants, but it can help improve air circulation and encourage fruit production. Remove any yellowing or dead leaves, as well as any suckers (small shoots that grow from the base of the plant).
5. Pest and disease control: Bell pepper plants can be susceptible to various pests and diseases, such as aphids, spider mites, and blossom end rot. Inspect your plants regularly for signs of trouble and take action promptly. I like to use organic pest control methods, such as insecticidal soap or neem oil. For blossom end rot, which is caused by a calcium deficiency, you can add calcium to the soil or use a calcium-rich foliar spray.
6. Pollination: Bell pepper plants are self-pollinating, but they can benefit from a little help. Gently shake the plants or use a small paintbrush to transfer pollen from one flower to another. This is especially important if you’re growing your plants indoors or in a sheltered location where there are few pollinators.
Harvesting Your Bell Peppers
The moment we’ve all been waiting for! Harvesting your homegrown bell peppers is one of the most rewarding parts of gardening.
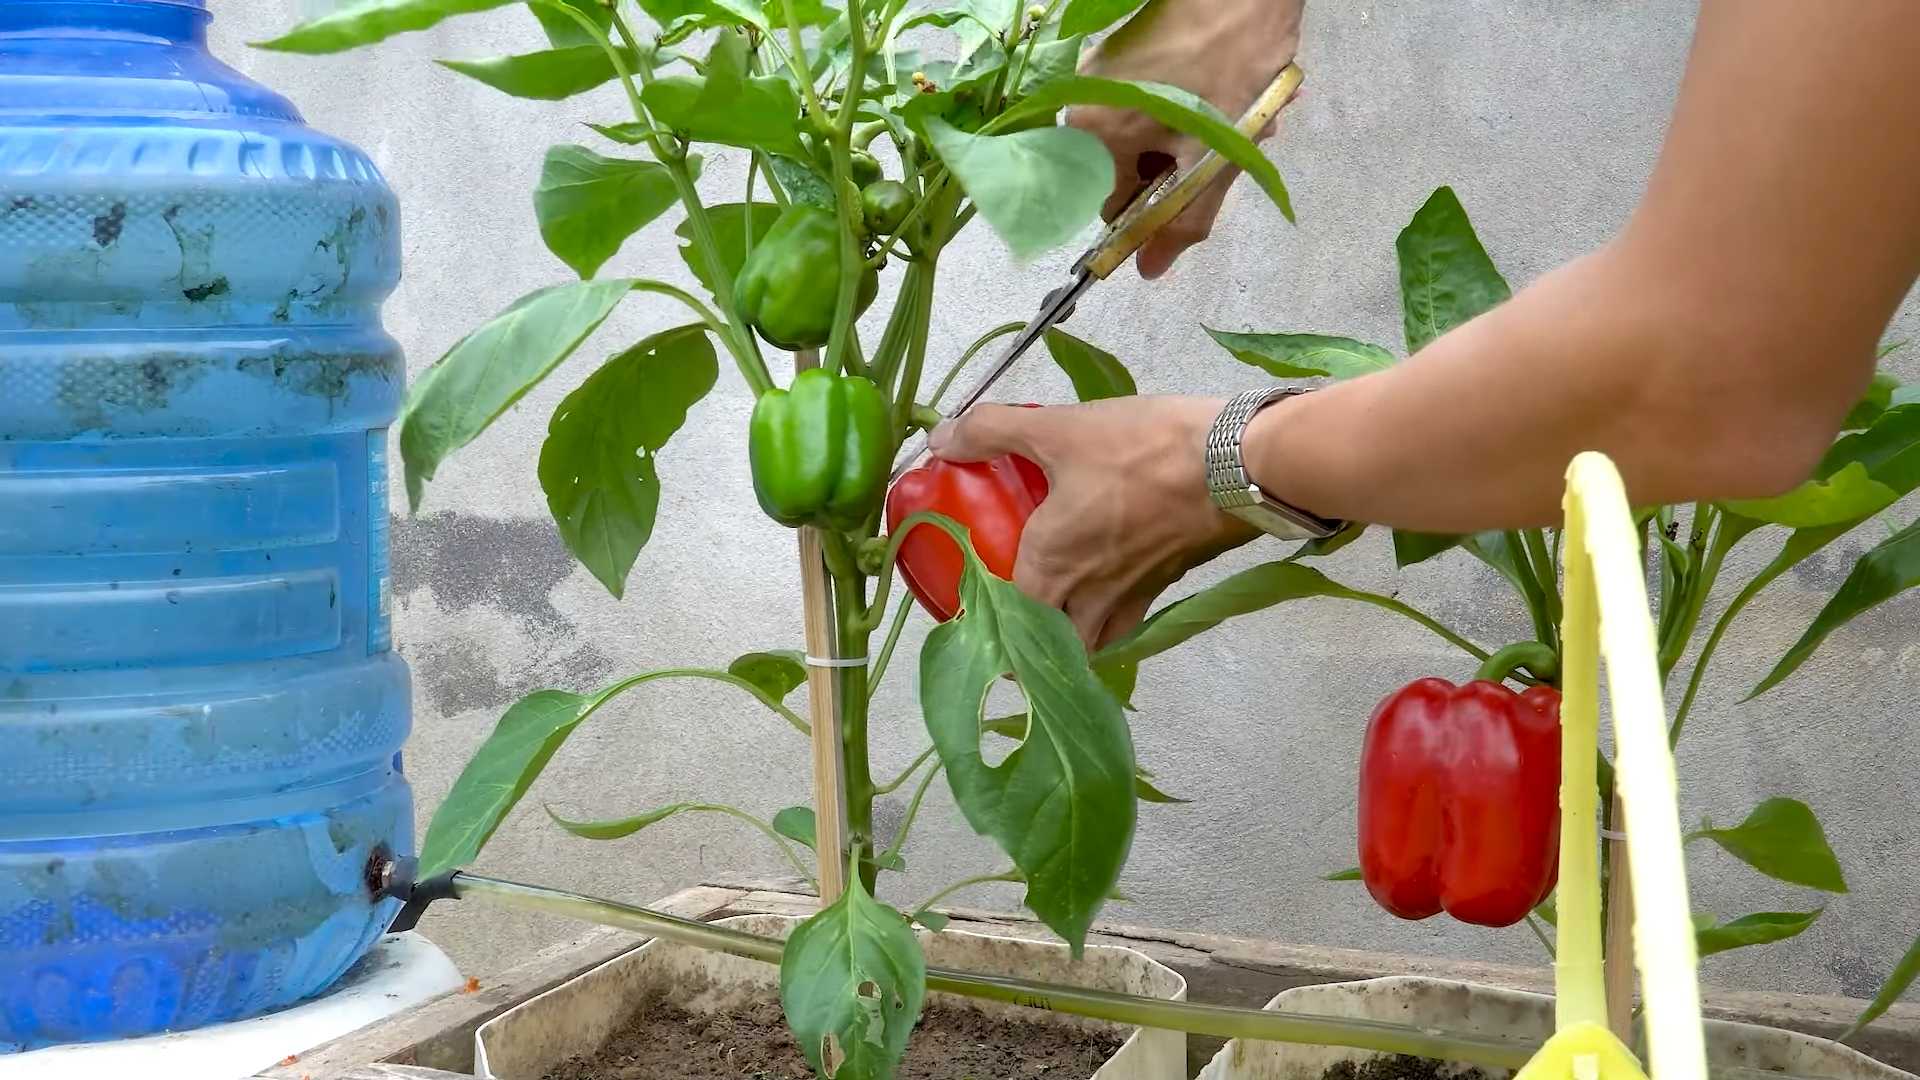
1. When to harvest: Bell peppers are typically ready to harvest when they are fully colored and firm to the touch. The exact time will depend on the variety and the growing conditions.
2. How to harvest: Use a sharp knife or pruning shears to cut the peppers from the plant, leaving a short stem attached.
3. Enjoy your harvest: Freshly harvested bell peppers are delicious eaten raw, cooked, or preserved. Use them in salads, stir-fries, soups, stews, or any other dish that calls for bell peppers.
Troubleshooting Common Problems
Even with the best care, you may encounter some problems while growing bell peppers in pots. Here are a few common issues and how to address them:
* Blossom end rot: This is a common problem that causes the bottom of the peppers to rot. It’s usually caused by a calcium deficiency. To prevent blossom end rot, add calcium to the soil or use a calcium-rich foliar spray. Also, make sure to water your plants consistently, as fluctuations in soil moisture can also contribute to the problem.
* Aphids: These tiny pests can suck the sap from your plants, causing them to weaken and become stunted. To control aphids, spray your plants with insecticidal soap or neem oil. You can also try attracting beneficial insects, such as ladybugs, which prey on aphids.
* Spider mites: These tiny pests can also suck the sap from your plants, causing them to develop yellow spots and webbing. To control spider mites, spray your plants with insecticidal soap or neem oil. You can also try increasing the humidity around your plants, as spider mites thrive in dry conditions.
* Lack of fruit: If your bell pepper plants are not producing fruit, it could be due to a number of factors, such as lack of sunlight, poor pollination, or nutrient deficiencies. Make sure your plants are getting enough sunlight, and try hand-pollinating the flowers. Also, fertilize your plants regularly with a fertilizer that is specifically formulated for vegetables.
Extending the Growing Season
If you live in a climate with a short growing season, there are a few things you can do to extend the season and get more peppers.
* Start seeds indoors: Starting your seeds indoors gives you a head start on the growing season.
* Use row covers: Row covers can protect your plants from frost and extend the growing season by

Conclusion
So, there you have it! Growing bell peppers in pots is not only achievable, but it can be incredibly rewarding. We’ve walked you through the essential steps, from selecting the right pot size and soil mix to providing adequate sunlight and consistent watering. But why is this DIY trick a must-try? Because it unlocks the joy of fresh, homegrown produce, even if you’re limited on space. Imagine stepping onto your balcony or patio and harvesting vibrant, crisp bell peppers for your next salad, stir-fry, or stuffed pepper recipe. The taste difference between store-bought and homegrown is undeniable – a burst of sunshine and freshness that you simply can’t replicate.
Beyond the superior flavor, growing bell peppers in pots offers a level of control you won’t find in a traditional garden. You can easily move your plants to chase the sun, protect them from unexpected frost, or shield them from heavy rain. This adaptability makes container gardening ideal for beginners and experienced gardeners alike. Plus, it’s a fantastic way to introduce children to the wonders of gardening and teach them about where their food comes from.
But the possibilities don’t stop there! Feel free to experiment with different varieties of bell peppers. Why not try growing a colorful mix of red, yellow, orange, and even purple peppers? Or, if you’re feeling adventurous, explore some of the spicier varieties, like poblano or Anaheim peppers, in containers. You can also companion plant your bell peppers with herbs like basil or oregano, which can help deter pests and enhance the flavor of your peppers. Another variation is to use self-watering pots, which can be a lifesaver if you tend to forget to water your plants regularly. Consider adding a trellis or stake to support your bell pepper plants as they grow, especially if you’re growing larger varieties.
Don’t be intimidated by the thought of growing your own food. Growing bell peppers in pots is a relatively simple and straightforward process, and the rewards are well worth the effort. With a little bit of care and attention, you’ll be harvesting delicious, homegrown bell peppers in no time.
We encourage you to give this DIY trick a try and experience the satisfaction of growing your own food. Share your experiences with us in the comments below! We’d love to hear about your successes, challenges, and any tips you’ve learned along the way. Let’s create a community of container gardeners and inspire others to embrace the joy of growing their own bell peppers. So, grab a pot, some soil, and a bell pepper seedling, and get ready to embark on a delicious and rewarding gardening adventure! We are confident that you will find that growing bell peppers in pots is a fun and fruitful endeavor.
Frequently Asked Questions (FAQ)
What is the best size pot for growing bell peppers?
The ideal pot size for growing bell peppers is at least 12 inches in diameter and 12 inches deep. However, a 5-gallon pot is generally recommended for optimal growth and fruit production. Larger pots, such as 7-gallon or 10-gallon containers, can provide even more space for the roots to develop, resulting in healthier and more productive plants. Ensure the pot has adequate drainage holes to prevent waterlogging, which can lead to root rot. Remember that the size of the pot will also influence how often you need to water and fertilize your bell pepper plants. Smaller pots will dry out more quickly and require more frequent watering and feeding.
What type of soil is best for growing bell peppers in pots?
Bell peppers thrive in well-draining, nutrient-rich soil. A good potting mix specifically formulated for vegetables is ideal. Avoid using garden soil, as it can be too heavy and compact, hindering root growth and drainage. You can also create your own potting mix by combining equal parts of peat moss, perlite, and compost. The peat moss helps retain moisture, the perlite improves drainage, and the compost provides essential nutrients. Consider adding a slow-release fertilizer to the potting mix at planting time to provide a steady supply of nutrients throughout the growing season. Regularly amend the soil with compost or other organic matter to maintain its fertility and structure.
How much sunlight do bell peppers need?
Bell peppers require at least 6-8 hours of direct sunlight per day to produce a bountiful harvest. Choose a location that receives full sun for most of the day. If you live in a particularly hot climate, you may need to provide some afternoon shade to prevent the plants from overheating. If you don’t have access to a sunny outdoor space, you can grow bell peppers indoors under grow lights. Use full-spectrum LED grow lights and position them close to the plants to provide adequate light intensity. Rotate the plants regularly to ensure even light exposure on all sides.
How often should I water bell peppers in pots?
Water bell peppers regularly, especially during hot and dry weather. The soil should be kept consistently moist but not waterlogged. Check the soil moisture by sticking your finger about an inch deep into the soil. If it feels dry, it’s time to water. Water deeply, until water drains out of the drainage holes. Avoid overhead watering, as this can promote fungal diseases. Instead, water at the base of the plant. During periods of heavy rain, you may need to reduce watering frequency to prevent the soil from becoming waterlogged.
What kind of fertilizer should I use for bell peppers?
Bell peppers are heavy feeders and require regular fertilization to produce a good crop. Use a balanced fertilizer with an NPK ratio of 5-10-10 or 10-10-10. Apply the fertilizer according to the package directions. You can also use organic fertilizers, such as compost tea or fish emulsion. Fertilize every 2-3 weeks during the growing season. Avoid over-fertilizing, as this can lead to excessive foliage growth and reduced fruit production. Monitor the plants for signs of nutrient deficiencies, such as yellowing leaves, and adjust the fertilizer accordingly.
How do I prevent pests and diseases on my bell pepper plants?
Regularly inspect your bell pepper plants for signs of pests and diseases. Common pests include aphids, spider mites, and whiteflies. You can control these pests by spraying the plants with insecticidal soap or neem oil. Diseases such as blossom end rot and fungal leaf spots can also affect bell peppers. Blossom end rot is caused by a calcium deficiency and can be prevented by adding calcium to the soil or using a calcium-rich fertilizer. Fungal leaf spots can be prevented by providing good air circulation and avoiding overhead watering. Remove any infected leaves promptly to prevent the disease from spreading. Companion planting with herbs like basil or marigolds can also help deter pests.
When should I harvest my bell peppers?
Bell peppers are typically ready to harvest 60-90 days after transplanting, depending on the variety. The peppers should be firm, glossy, and fully colored. You can harvest them at any stage of ripeness, but they will be sweetest and most flavorful when fully ripe. Use a sharp knife or pruning shears to cut the peppers from the plant, leaving a short stem attached. Regular harvesting encourages the plant to produce more peppers.
Can I overwinter my bell pepper plants?
In colder climates, you can overwinter your bell pepper plants indoors to extend their lifespan. Before the first frost, prune the plants back to about 6 inches tall and transplant them into smaller pots. Bring the plants indoors and place them in a sunny location or under grow lights. Water sparingly during the winter months, allowing the soil to dry out slightly between waterings. Fertilize only occasionally. In the spring, after the last frost, gradually acclimate the plants to outdoor conditions before transplanting them back into larger pots or the garden.
Leave a Comment