
Growing Beetroot Terrace Garden can seem daunting, especially if you’re new to the world of home gardening. But trust me, with a few clever tricks and a little DIY spirit, you can transform your terrace into a vibrant, beetroot-producing oasis! Imagine stepping outside your door and harvesting your own sweet, earthy beets – fresh, organic, and bursting with flavor. Sounds amazing, right?
Beetroot has a rich history, dating back to ancient times where its leaves were initially valued more than its root. Over centuries, different cultures have embraced beetroot for its nutritional benefits and culinary versatility. From the Romans who used it for medicinal purposes to the vibrant borscht of Eastern Europe, beetroot has truly earned its place in our hearts (and on our plates!).
But why should *you* bother with a DIY beetroot terrace garden? Well, for starters, store-bought beets simply can’t compare to the taste of freshly harvested ones. Plus, you have complete control over the growing process, ensuring your beets are free from harmful pesticides and chemicals. And let’s be honest, there’s something incredibly satisfying about nurturing a plant from seed to harvest. This DIY guide will provide you with the essential tips and tricks to successfully growing beetroot terrace garden, even if you have limited space or experience. So, grab your gardening gloves, and let’s get started!

Dein eigener Rote Bete-Terrassengarten: So geht’s!
Hey Gartenfreunde! Ich liebe es, frisches Gemüse direkt vor der Haustür zu haben, und Rote Bete ist da ganz vorne mit dabei. Sie ist nicht nur super gesund, sondern auch unglaublich vielseitig in der Küche. Und das Beste: Du brauchst keinen riesigen Garten, um deine eigene Rote Bete anzubauen. Mit einem Terrassengarten geht das ganz einfach! Ich zeige dir, wie du deinen eigenen kleinen Rote Bete-Paradies auf dem Balkon oder der Terrasse erschaffen kannst.
Was du für deinen Rote Bete-Terrassengarten brauchst:
* Geeignete Behälter: Hier sind deiner Kreativität keine Grenzen gesetzt! Du kannst Töpfe, Kübel, Balkonkästen oder sogar alte Eimer verwenden. Wichtig ist, dass sie ausreichend groß sind (mindestens 20 cm tief) und Drainagelöcher haben, damit das Wasser ablaufen kann.
* Hochwertige Erde: Rote Bete mag lockere, humusreiche Erde. Eine Mischung aus Gartenerde, Kompost und etwas Sand ist ideal. Du kannst auch spezielle Gemüseerde verwenden.
* Rote Bete Samen: Wähle am besten Sorten, die für den Anbau in Töpfen geeignet sind. Es gibt viele verschiedene Sorten, von klassischen roten bis hin zu gelben oder geringelten Varianten.
* Dünger: Ein organischer Gemüsedünger oder Komposttee sorgt für eine gute Nährstoffversorgung.
* Gießkanne oder Schlauch: Zum regelmäßigen Gießen.
* Gartenschere oder Messer: Zum Ernten.
* Optional: Mulchmaterial (z.B. Stroh oder Holzhackschnitzel) um die Feuchtigkeit im Boden zu halten und Unkraut zu unterdrücken.
Schritt-für-Schritt-Anleitung: Rote Bete säen und pflegen
1. Die Vorbereitung:
* Behälter vorbereiten: Reinige deine Behälter gründlich und stelle sicher, dass die Drainagelöcher frei sind. Lege eventuell eine Schicht Tonscherben oder Kies auf den Boden des Behälters, um die Drainage zu verbessern.
* Erde einfüllen: Fülle die Behälter mit der vorbereiteten Erde. Lass oben etwa 2-3 cm Platz.
* Erde anfeuchten: Gieße die Erde leicht an, bevor du die Samen aussäst.
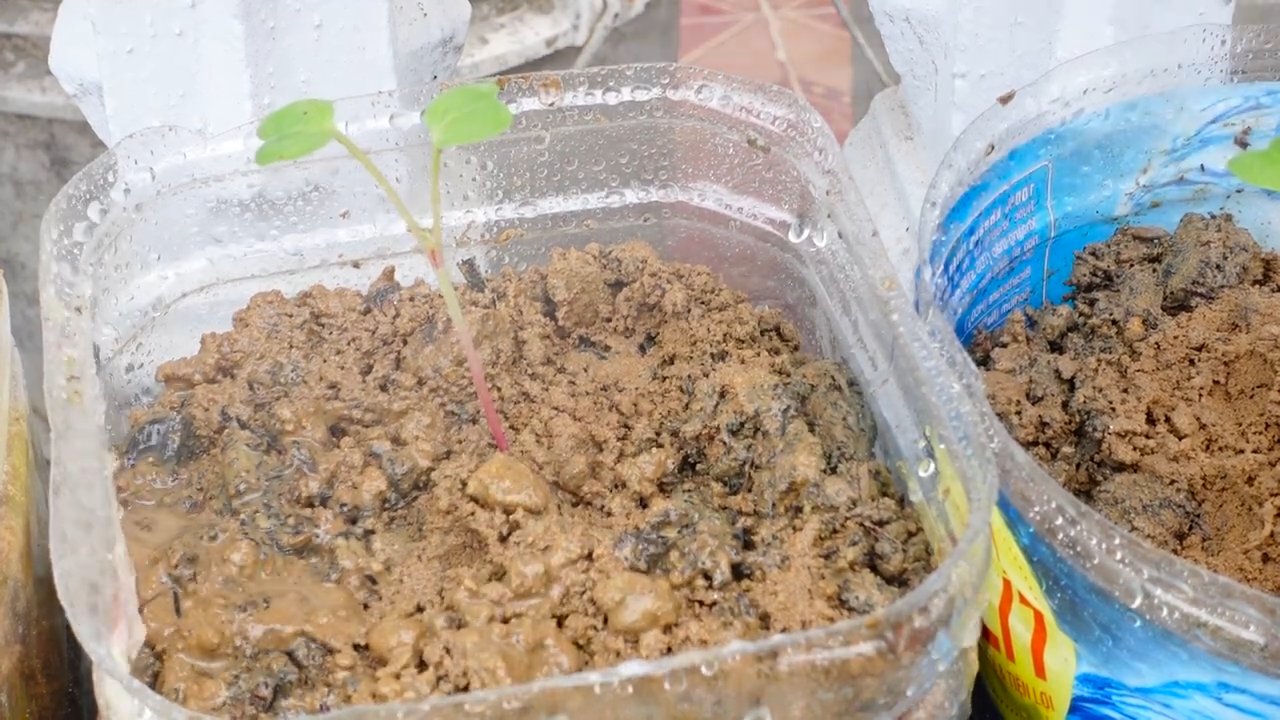
2. Aussaat:
* Samen aussäen: Rote Bete Samen sind eigentlich kleine Fruchtstände, die mehrere Samen enthalten. Lege 2-3 Samen pro Pflanzstelle in die Erde. Der Abstand zwischen den Pflanzstellen sollte etwa 5-10 cm betragen.
* Samen bedecken: Bedecke die Samen mit einer dünnen Schicht Erde (ca. 1-2 cm).
* Angießen: Gieße die Erde vorsichtig an, damit die Samen nicht weggeschwemmt werden.
* Standort wählen: Stelle die Behälter an einen sonnigen Standort. Rote Bete braucht mindestens 6 Stunden Sonne pro Tag.
3. Pflege:
* Gießen: Halte die Erde gleichmäßig feucht, aber nicht nass. Gieße am besten morgens oder abends, um Verdunstung zu vermeiden. Vermeide Staunässe, da dies zu Wurzelfäule führen kann.
* Vereinzeln: Sobald die Keimlinge etwa 5 cm groß sind, solltest du sie vereinzeln. Das bedeutet, dass du die schwächsten Pflanzen entfernst, sodass nur noch eine kräftige Pflanze pro Pflanzstelle übrig bleibt.
* Düngen: Beginne etwa 4-6 Wochen nach der Aussaat mit dem Düngen. Verwende einen organischen Gemüsedünger oder Komposttee. Dünge alle 2-3 Wochen.
* Unkraut entfernen: Halte die Behälter unkrautfrei. Unkraut konkurriert mit der Rote Bete um Nährstoffe und Wasser.
* Mulchen (optional): Eine Mulchschicht hilft, die Feuchtigkeit im Boden zu halten und Unkraut zu unterdrücken.
Spezielle Tipps für den Terrassengarten:
* Windschutz: Auf dem Balkon oder der Terrasse kann es windig sein. Stelle die Behälter an einen windgeschützten Ort oder verwende eine Windschutzwand.
* Schutz vor Schädlingen: Rote Bete kann von Blattläusen oder Erdflöhen befallen werden. Kontrolliere die Pflanzen regelmäßig und bekämpfe Schädlinge bei Bedarf mit natürlichen Mitteln.
* Sortenwahl: Wähle Sorten, die für den Anbau in Töpfen geeignet sind. Kleinere, runde Sorten sind oft besser geeignet als große, längliche Sorten.
* Regelmäßige Kontrolle: Überprüfe deine Pflanzen regelmäßig auf Krankheiten und Schädlinge. Je früher du Probleme erkennst, desto einfacher ist es, sie zu beheben.
Erntezeit!
Die Erntezeit für Rote Bete hängt von der Sorte und den Anbaubedingungen ab. In der Regel kannst du etwa 8-10 Wochen nach der Aussaat ernten.
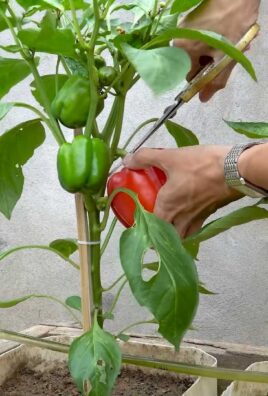
* Erntezeitpunkt: Die Knollen sollten etwa die Größe eines Tennisballs haben. Du kannst aber auch kleinere Knollen ernten, wenn du sie lieber magst.
* Ernten: Ziehe die Knollen vorsichtig aus der Erde. Du kannst auch eine Grabegabel verwenden, um die Erde zu lockern.
* Blätter: Die Blätter der Rote Bete sind ebenfalls essbar! Du kannst sie wie Spinat zubereiten.
* Lagerung: Entferne die Blätter (lasse aber etwa 2 cm Stiel stehen) und lagere die Knollen an einem kühlen, dunklen und trockenen Ort. Sie halten sich so mehrere Wochen.
Noch ein paar extra Tipps für dich:
* Fruchtfolge beachten: Baue Rote Bete nicht jedes Jahr am selben Standort an. Wechsle die Kulturen, um Krankheiten und Schädlinge zu vermeiden.
* Begleitpflanzen: Gute Begleitpflanzen für Rote Bete sind Zwiebeln, Knoblauch, Salat und Kohl.
* Rote Bete Blätter als Dünger: Die Blätter der Rote Bete sind reich an Nährstoffen. Du kannst sie kompostieren oder als Gründünger verwenden.
* Experimentiere mit Sorten: Probiere verschiedene Rote Bete Sorten aus, um herauszufinden, welche dir am besten schmecken und am besten in deinem Terrassengarten wachsen.
* Hab Spaß! Gärtnern soll Freude machen! Genieße den Prozess und freue dich auf deine selbst geerntete Rote Bete.
Häufige Probleme und Lösungen:
* Keine Keimung: Die Samen waren zu alt, die Erde war zu trocken oder zu kalt. Verwende frische Samen, halte die Erde feucht und sorge für eine ausreichende Bodentemperatur.
* Gelbe Blätter: Nährstoffmangel. Dünge regelmäßig mit einem organischen Gemüsedünger.
* Wurzelfäule: Staunässe. Sorge für eine gute Drainage und vermeide übermäßiges Gießen.
* Blattläuse: Befall mit Blattläusen. Spritze die Pflanzen mit einer Seifenlauge oder einem natürlichen Insektizid.
* Erdflöhe: Befall mit Erdflöhen. Halte die Erde feucht und bedecke die Pflanzen mit einem Vlies.
Leckere Rezeptideen mit deiner selbst geernteten Rote Bete:
* Rote Bete Salat: Gekochte Rote Bete in Scheiben schneiden und mit Ziegenkäse, Walnüssen und einem Honig-Senf-Dressing servieren.
* Rote Bete Suppe: Eine cremige Rote Bete Suppe mit Ingwer und Kokosmilch.
* Rote Bete Carpaccio: Rohe Rote Bete in hauchdünne Scheiben schneiden und mit Olivenöl, Zitronensaft und Parmesan servieren.
* Rote Bete Chips: Rote Bete in dünne Scheiben schneiden, mit Olivenöl und Gewürzen beträufeln und im Ofen knusprig backen.
* Eingelegte Rote Bete: Rote Bete in Essig, Zucker und Gewürzen einlegen.
Ich hoffe, diese Anleitung hilft dir dabei, deinen eigenen Rote
Conclusion
So, there you have it! Transforming your terrace into a vibrant beetroot haven is not only achievable but also incredibly rewarding. We’ve walked you through the essential steps, from selecting the right varieties and preparing the soil to nurturing your plants and harvesting your ruby-red treasures. But why is this DIY beetroot terrace garden a must-try?
Firstly, imagine stepping onto your terrace and being greeted by the lush green foliage of your own beetroot plants. The satisfaction of growing your own food, knowing exactly where it comes from and what went into it, is unparalleled. Store-bought beetroots simply can’t compare to the freshness and flavor of those you’ve nurtured yourself. Plus, you’re contributing to a more sustainable lifestyle by reducing your reliance on commercially grown produce.
Secondly, a beetroot terrace garden is a fantastic way to add beauty and visual interest to your outdoor space. The vibrant green leaves and the promise of the colorful roots beneath the soil create a captivating display. You can even incorporate companion planting techniques, adding flowers and herbs to further enhance the aesthetic appeal and attract beneficial insects.
Thirdly, growing your own beetroots allows you to experiment with different varieties and enjoy a wider range of flavors and textures. From the classic Detroit Dark Red to the golden Yellow Beet and the striped Chioggia, there’s a beetroot variety to suit every palate. You can also harvest the beetroot greens for salads or sautéing, adding another nutritious element to your meals.
Variations and Suggestions:
Don’t be afraid to get creative with your beetroot terrace garden! Here are a few ideas to inspire you:
* Vertical Gardening: If you’re short on space, consider using vertical planters or hanging baskets to grow your beetroots. This is a great way to maximize your yield and add a unique design element to your terrace.
* Container Gardening: Beetroots thrive in containers, making them perfect for terrace gardens. Choose containers that are at least 12 inches deep and wide to allow the roots to develop properly.
* Succession Planting: Plant beetroots in stages, every few weeks, to ensure a continuous harvest throughout the growing season.
* Companion Planting: Plant beetroots alongside other vegetables and herbs that can benefit their growth, such as onions, garlic, lettuce, and chamomile.
* Beetroot Greens: Don’t discard the beetroot greens! They are packed with nutrients and can be used in salads, soups, and stir-fries.
We encourage you to embark on this exciting journey of creating your own beetroot terrace garden. It’s a rewarding experience that will bring you closer to nature, provide you with fresh, delicious produce, and enhance the beauty of your outdoor space.
So, grab your seeds, prepare your soil, and get ready to witness the magic of growing your own beetroots. And most importantly, don’t forget to share your experiences with us! We’d love to hear about your successes, challenges, and creative ideas. Share your photos and stories on social media using #BeetrootTerraceGarden and inspire others to join the movement. Happy gardening!
Frequently Asked Questions (FAQ)
What is the best time of year to start a beetroot terrace garden?
The ideal time to start your beetroot terrace garden depends on your local climate. Beetroots are cool-season crops and thrive in temperatures between 60°F and 70°F (15°C and 21°C). In most regions, the best time to plant beetroots is in early spring or late summer/early fall. Avoid planting during the hottest months of summer, as high temperatures can cause the roots to become tough and bitter. Check your local planting calendar for specific dates.
How much sunlight do beetroots need in a terrace garden?
Beetroots need at least 6 hours of direct sunlight per day to thrive. Choose a location on your terrace that receives ample sunlight throughout the day. If your terrace is partially shaded, try to position your beetroot plants in the sunniest spot. If you don’t have enough natural sunlight, you can supplement with grow lights.
What type of soil is best for growing beetroots in containers?
Beetroots prefer well-draining, fertile soil with a pH between 6.0 and 7.0. A good potting mix for beetroots should contain a combination of compost, peat moss, and perlite or vermiculite. Avoid using heavy clay soil, as it can become waterlogged and inhibit root growth. You can also amend your soil with organic matter, such as compost or well-rotted manure, to improve its fertility and drainage.
How often should I water my beetroot plants in a terrace garden?
Water your beetroot plants regularly, especially during dry periods. The soil should be consistently moist but not waterlogged. Water deeply whenever the top inch of soil feels dry to the touch. Avoid overhead watering, as it can promote fungal diseases. Instead, water at the base of the plants. During hot weather, you may need to water your beetroots more frequently.
How do I prevent pests and diseases from affecting my beetroot plants?
Several pests and diseases can affect beetroot plants, including aphids, flea beetles, leaf miners, and fungal diseases. To prevent these problems, practice good garden hygiene, such as removing weeds and debris from around your plants. You can also use organic pest control methods, such as insecticidal soap or neem oil, to control aphids and flea beetles. To prevent fungal diseases, ensure good air circulation around your plants and avoid overhead watering. If you notice any signs of disease, remove the affected leaves immediately.
When and how do I harvest my beetroots?
Beetroots are typically ready to harvest 50-70 days after planting, depending on the variety. You can harvest them when the roots are about 2-3 inches in diameter. To harvest, gently loosen the soil around the beetroot and pull it out of the ground. You can also use a garden fork to lift the roots. After harvesting, remove the leaves and store the beetroots in a cool, dry place. The leaves can be eaten as well, so don’t throw them away!
Can I grow beetroots in the same container as other plants?
Yes, you can grow beetroots in the same container as other plants, as long as they have similar growing requirements. Good companion plants for beetroots include onions, garlic, lettuce, and chamomile. Avoid planting beetroots near plants that can inhibit their growth, such as beans and mustard. When planting beetroots with other plants, make sure to provide enough space for each plant to grow and thrive.
What are some common problems when growing beetroots and how can I fix them?
Some common problems when growing beetroots include:
* Poor germination: This can be caused by old seeds, cold soil, or dry soil. To improve germination, use fresh seeds, plant in warm soil, and keep the soil consistently moist.
* Slow growth: This can be caused by poor soil, lack of sunlight, or insufficient watering. To improve growth, amend your soil with compost, provide at least 6 hours of sunlight per day, and water regularly.
* Tough or bitter roots: This can be caused by high temperatures, dry soil, or over-fertilizing. To prevent tough or bitter roots, plant in early spring or late summer, water regularly, and avoid over-fertilizing.
* Pest and disease problems: As mentioned earlier, practice good garden hygiene and use organic pest control methods to prevent pest and disease problems.
How do I store my harvested beetroots?
To store your harvested beetroots, remove the leaves and gently brush off any excess soil. Do not wash the beetroots until you are ready to use them. Store the beetroots in a cool, dry place, such as a refrigerator or root cellar. They can be stored for several weeks or even months if stored properly. You can also pickle or can your beetroots for longer-term storage.

Leave a Comment