
Growing Basil Indoors can feel like a distant dream, especially when winter winds howl outside. But what if I told you that fresh, fragrant basil is within your reach, no matter the season? Imagine the aroma of homemade pesto filling your kitchen, or the satisfaction of snipping fresh basil leaves to garnish your favorite pasta dish, all thanks to your own indoor garden!
Basil, a herb deeply rooted in history and culture, has been cherished for centuries. Originating in Southeast Asia, it was revered by ancient civilizations for its medicinal properties and symbolic significance. In some cultures, it was even believed to ward off evil spirits! Today, basil remains a culinary staple worldwide, adding a burst of flavor to countless dishes.
But why bother with the hassle of growing basil indoors? Well, for starters, it gives you access to fresh herbs year-round, regardless of the weather. Plus, store-bought basil can be expensive and often lacks the vibrant flavor of homegrown varieties. More importantly, growing basil indoors is incredibly rewarding. It’s a chance to connect with nature, nurture a living thing, and enjoy the fruits (or rather, leaves!) of your labor. In this article, I’ll share some simple yet effective DIY tricks and hacks that will transform your windowsill into a thriving basil haven. Get ready to unleash your inner gardener and enjoy the delicious rewards!
Growing Basil Indoors: A Beginner’s Guide to Fresh Herbs Year-Round
Hey there, fellow plant enthusiasts! Ever dreamt of having fresh, fragrant basil right at your fingertips, no matter the season? Well, you’re in the right place! I’m going to walk you through everything you need to know to successfully grow basil indoors. Trust me, it’s easier than you think, and the reward of having homegrown basil for your pesto, pizzas, and salads is totally worth it.
Choosing the Right Basil Variety
First things first, let’s talk basil varieties. While all basil is delicious, some are better suited for indoor growing than others. Here are a few of my favorites:
* Genovese Basil: This is the classic Italian basil, perfect for pesto and all your culinary needs. It grows well indoors and is relatively easy to care for.
* Dwarf Basil (Bush Basil): As the name suggests, this variety stays compact, making it ideal for smaller spaces. It has a slightly spicier flavor than Genovese.
* Thai Basil: If you love Asian cuisine, Thai basil is a must-have. It has a distinct anise-like flavor and beautiful purple stems.
* Lemon Basil: This variety offers a refreshing citrusy aroma and flavor, perfect for teas and salads.
Gathering Your Supplies
Okay, now that you’ve chosen your basil variety, let’s gather the necessary supplies. Here’s what you’ll need:
* Basil Seeds or Seedlings: You can start from seeds or buy small basil plants from your local nursery. Starting from seeds is more economical, but seedlings will give you a head start.
* Potting Mix: Use a high-quality, well-draining potting mix. Avoid using garden soil, as it can be too heavy and compact for indoor containers.
* Pots: Choose pots that are at least 6 inches in diameter with drainage holes. Terra cotta pots are a good option because they allow the soil to breathe.
* Grow Lights (Optional but Recommended): Basil needs plenty of light, so if you don’t have a sunny windowsill, grow lights are essential.
* Watering Can or Spray Bottle: For gentle watering.
* Fertilizer: A balanced liquid fertilizer diluted to half strength.
* Small Gardening Tools: A trowel for transplanting and small scissors for harvesting.
Planting Your Basil
Alright, let’s get our hands dirty! Here’s how to plant your basil, whether you’re starting from seeds or seedlings:
Starting from Seeds:
1. Prepare the Pot: Fill your pot with potting mix, leaving about an inch of space at the top. Gently pat down the soil.
2. Sow the Seeds: Sprinkle the basil seeds evenly over the surface of the soil. You don’t need to bury them too deep; just lightly press them into the soil.
3. Water Gently: Use a spray bottle to mist the soil thoroughly. You want to keep the soil moist but not waterlogged.
4. Cover the Pot (Optional): To create a humid environment, you can cover the pot with plastic wrap or a clear plastic bag. This will help the seeds germinate.
5. Place in a Warm Location: Basil seeds need warmth to germinate, so place the pot in a warm spot, ideally around 70-80°F (21-27°C).
6. Wait for Germination: Basil seeds typically germinate in 5-10 days. Once the seedlings emerge, remove the plastic wrap.
7. Thin the Seedlings: Once the seedlings have a few sets of true leaves, thin them out, leaving only the strongest seedlings in the pot. Space them about 2-3 inches apart.
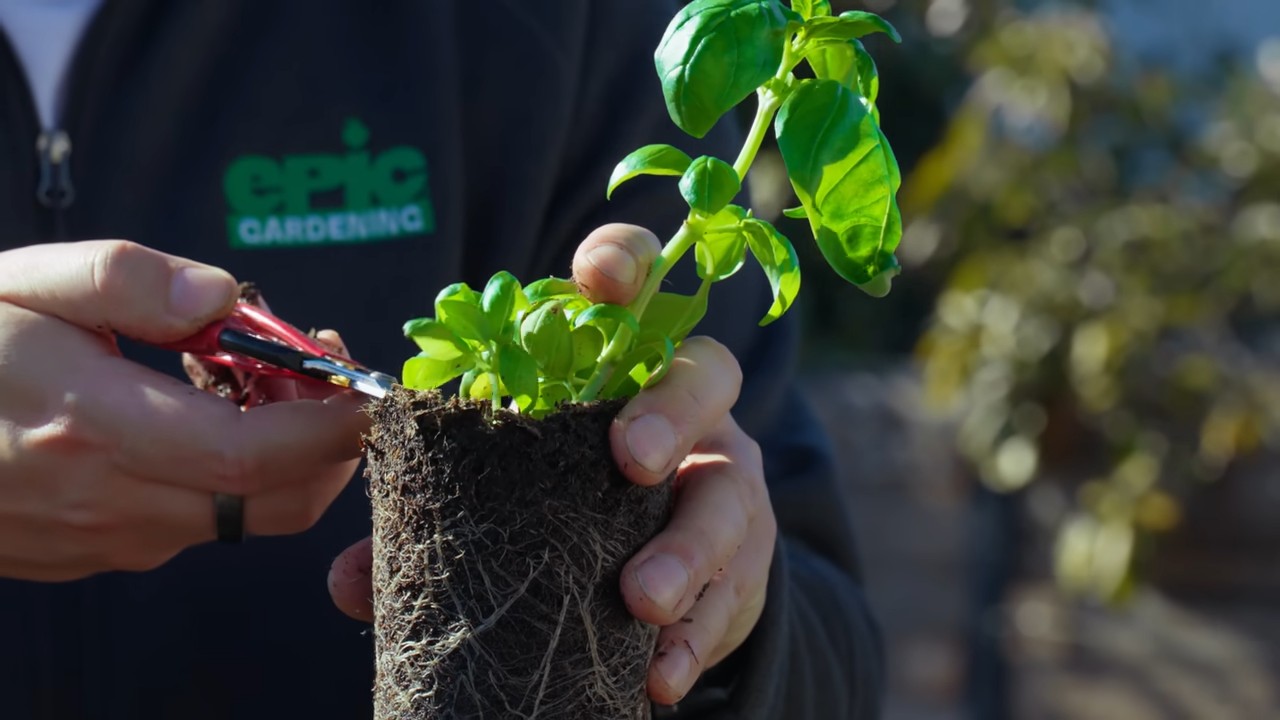
Transplanting Seedlings:
1. Prepare the Pot: Fill your pot with potting mix, leaving about an inch of space at the top.
2. Gently Remove the Seedling: Carefully remove the basil seedling from its original container. Gently loosen the roots if they are tightly bound.
3. Plant the Seedling: Dig a small hole in the potting mix and place the seedling in the hole. Make sure the top of the root ball is level with the soil surface.
4. Fill and Water: Fill the hole with potting mix and gently pat down the soil. Water thoroughly.
Providing the Right Environment
Basil thrives in warm, sunny conditions. Here’s how to create the perfect environment for your indoor basil plants:
* Light: Basil needs at least 6-8 hours of sunlight per day. If you don’t have a sunny windowsill, use grow lights. Place the grow lights about 6-12 inches above the plants. I’ve found that LED grow lights work really well and don’t generate too much heat.
* Temperature: Basil prefers temperatures between 65-80°F (18-27°C). Avoid placing your basil plants near drafts or cold windows.
* Humidity: Basil likes moderate humidity. If your home is very dry, you can increase humidity by placing a tray of water near the plants or using a humidifier.
* Air Circulation: Good air circulation is important to prevent fungal diseases. Make sure your basil plants have enough space between them and that there is good airflow in the room.
Watering and Fertilizing
Proper watering and fertilizing are crucial for healthy basil growth.
* Watering: Water your basil plants when the top inch of soil feels dry to the touch. Avoid overwatering, as this can lead to root rot. Water thoroughly, allowing excess water to drain out of the drainage holes. I usually check my basil every other day and water when needed.
* Fertilizing: Feed your basil plants every 2-4 weeks with a balanced liquid fertilizer diluted to half strength. Follow the instructions on the fertilizer label. I like to use an organic fertilizer for the best flavor.
Pruning and Harvesting
Pruning and harvesting are essential for encouraging bushy growth and preventing your basil plants from flowering too early.
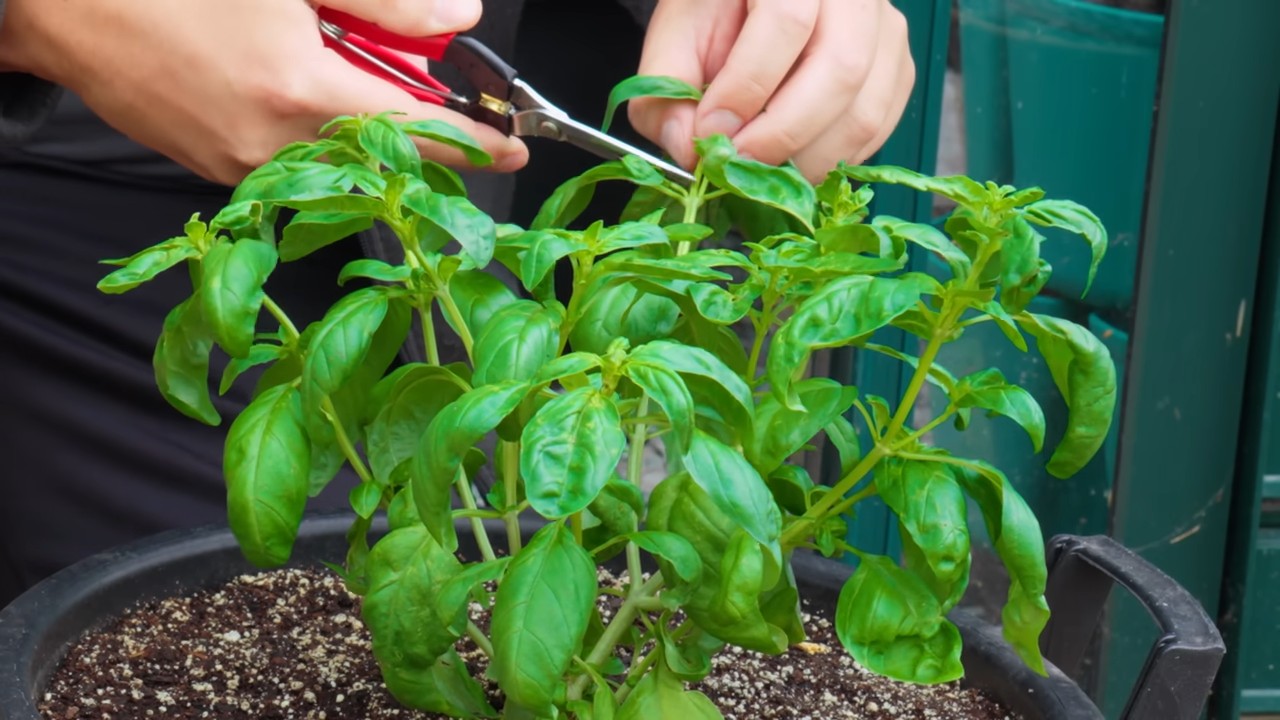
* Pinching Back: When your basil plants are about 6 inches tall, pinch off the top set of leaves. This will encourage the plant to branch out and produce more leaves.
* Harvesting: Harvest basil leaves regularly, starting from the top of the plant. Cut the stems just above a leaf node (the point where leaves grow from the stem). This will encourage new growth from the leaf node.
* Preventing Flowering: Basil plants will eventually flower, which can make the leaves taste bitter. To prevent flowering, pinch off any flower buds as soon as you see them.
Troubleshooting Common Problems
Even with the best care, you might encounter some problems when growing basil indoors. Here are a few common issues and how to address them:
* Yellowing Leaves: Yellowing leaves can be caused by overwatering, underwatering, or nutrient deficiencies. Check the soil moisture and adjust your watering accordingly. If the soil is dry, water thoroughly. If the soil is waterlogged, allow it to dry out before watering again. If the yellowing persists, try fertilizing with a balanced liquid fertilizer.
* Brown Spots: Brown spots on the leaves can be caused by fungal diseases or pests. Ensure good air circulation and avoid overwatering. If you suspect a fungal disease, you can try using a fungicide.
* Pests: Common pests that can affect basil plants include aphids, spider mites, and whiteflies. Inspect your plants regularly for pests. If you find any, you can try washing them off with a strong stream of water or using an insecticidal soap.
* Leggy Growth: Leggy growth (long, spindly stems with few leaves) is usually caused by insufficient light. Make sure your basil plants are getting enough light, either from a sunny windowsill or grow lights.
Enjoying Your Homegrown Basil
Now for the best part – enjoying your homegrown basil! Fresh basil is incredibly versatile and can be used in a variety of dishes. Here are a few ideas:
* Pesto: Make classic pesto with fresh basil, pine nuts, garlic, Parmesan cheese, and olive oil.
* Salads: Add fresh basil leaves to salads for a burst of flavor.
* Pizza: Sprinkle fresh basil leaves on pizza after it comes out of the oven.
* Pasta: Toss fresh basil leaves with pasta and your favorite sauce.
* Soups: Add fresh basil leaves to soups for a fragrant touch.
* Teas: Use lemon basil for a refreshing herbal tea.
Tips for Success
Here are a few extra tips to help you succeed in growing basil indoors:
* Rotate Your Plants: Rotate your basil plants regularly to ensure even light exposure.
* Clean Your Pots: Before planting, clean your pots thoroughly to prevent the spread of diseases.
* Use Filtered Water: Tap water can contain chlorine and other chemicals that can harm your
Conclusion
So, there you have it! Mastering the art of growing basil indoors is not only achievable but also incredibly rewarding. We’ve walked you through the essential steps, from selecting the right variety and providing optimal lighting to ensuring proper watering and addressing potential challenges. But why should you embark on this fragrant journey?
Simply put, having fresh basil readily available at your fingertips elevates your culinary creations to a whole new level. Imagine the burst of flavor from freshly picked basil leaves adorning your homemade pizza, enriching your pesto, or adding a vibrant touch to your Caprese salad. No more last-minute trips to the grocery store or settling for wilted, lackluster herbs. With your own indoor basil garden, you’ll always have a supply of aromatic, flavorful leaves ready to enhance your meals.
Beyond the culinary benefits, growing basil indoors offers a therapeutic and aesthetically pleasing experience. Nurturing a plant from seed to harvest can be incredibly satisfying, providing a sense of accomplishment and connection to nature, even within the confines of your home. The vibrant green foliage of a thriving basil plant also adds a touch of natural beauty to your living space, creating a calming and inviting atmosphere.
But the best part? This DIY trick is incredibly versatile. Feel free to experiment with different varieties of basil to discover your favorites. Try growing Genovese basil for classic Italian dishes, Thai basil for Asian-inspired cuisine, or lemon basil for a citrusy twist. You can also explore different growing methods, such as hydroponics or using self-watering containers, to find what works best for your lifestyle and space.
Don’t be afraid to get creative and personalize your indoor basil garden!
We encourage you to take the plunge and try growing basil indoors. It’s a simple, rewarding, and delicious way to enhance your life. And once you’ve experienced the joy of harvesting your own fresh basil, we’d love to hear about your journey! Share your tips, tricks, and successes in the comments below. Let’s create a community of indoor basil enthusiasts and inspire others to discover the magic of homegrown herbs. Your experience with growing basil indoors could be the inspiration someone else needs to start their own journey!
Frequently Asked Questions (FAQ)
What is the best type of basil to grow indoors?
The best type of basil to grow indoors depends on your personal preferences and culinary needs. However, some varieties tend to thrive better in indoor environments than others. Genovese basil is a popular choice due to its classic flavor and compact growth habit. It’s ideal for making pesto and other Italian dishes. Thai basil is another excellent option, offering a unique anise-like flavor that complements Asian cuisine. Bush basil is a dwarf variety that’s well-suited for small spaces, while lemon basil adds a refreshing citrusy note to salads and beverages. Experiment with different varieties to discover your favorites!
How much light does my indoor basil plant need?
Basil requires at least six to eight hours of direct sunlight per day to thrive. If you don’t have a sunny windowsill, you can supplement with artificial lighting. Fluorescent grow lights or LED grow lights are excellent options. Position the lights a few inches above the plants and keep them on for 12-16 hours per day. Insufficient light can lead to leggy growth and reduced flavor.
How often should I water my indoor basil plant?
Water your basil plant when the top inch of soil feels dry to the touch. Avoid overwatering, as this can lead to root rot. Ensure that your pot has drainage holes to allow excess water to escape. During the warmer months, you may need to water more frequently than during the cooler months. Check the soil moisture regularly and adjust your watering schedule accordingly.
What type of soil is best for growing basil indoors?
Basil prefers well-draining soil that is rich in organic matter. A good potting mix for basil should contain a blend of peat moss, perlite, and vermiculite. You can also add compost or other organic amendments to improve the soil’s fertility and drainage. Avoid using garden soil, as it can be too heavy and may contain pests or diseases.
How do I harvest basil leaves from my indoor plant?
To harvest basil leaves, pinch or cut them off just above a leaf node (the point where leaves grow from the stem). This will encourage the plant to branch out and produce more leaves. Avoid removing more than one-third of the plant’s leaves at a time, as this can stress the plant. Regular harvesting will also help to prevent the plant from flowering, which can reduce the flavor of the leaves.
My basil plant is turning yellow. What could be the problem?
Yellowing leaves on a basil plant can indicate several issues. Overwatering is a common cause, as it can lead to root rot. Check the soil moisture and ensure that your pot has drainage holes. Underwatering can also cause yellowing leaves, so make sure you’re watering your plant regularly. Nutrient deficiencies can also be a culprit. Fertilize your basil plant with a balanced liquid fertilizer every two to four weeks. Pests, such as aphids or spider mites, can also cause yellowing leaves. Inspect your plant for signs of infestation and treat accordingly.
How do I prevent pests and diseases from affecting my indoor basil plant?
To prevent pests and diseases, start with healthy plants and use a well-draining potting mix. Avoid overwatering and provide adequate ventilation. Regularly inspect your plants for signs of pests or diseases. If you spot any problems, treat them promptly with organic pest control methods, such as insecticidal soap or neem oil. You can also try companion planting with herbs like marigolds, which can help to repel pests.
Can I grow basil from seed indoors?
Yes, you can easily grow basil from seed indoors. Start by sowing the seeds in a seed-starting tray or small pots filled with seed-starting mix. Keep the soil moist and warm, and provide plenty of light. Once the seedlings have developed a few sets of true leaves, you can transplant them into larger pots.
How do I encourage my basil plant to grow bushier?
Pinching or pruning your basil plant regularly will encourage it to grow bushier. When the plant is about six inches tall, pinch off the top set of leaves just above a leaf node. This will encourage the plant to branch out and produce more leaves. Continue pinching or pruning the plant as needed to maintain its shape and promote bushy growth.
Can I propagate basil from cuttings?
Yes, basil can be easily propagated from cuttings. Take a cutting that is about four to six inches long and remove the lower leaves. Place the cutting in a glass of water and wait for roots to develop. Once the roots are about an inch long, you can transplant the cutting into a pot filled with potting mix.
Leave a Comment