
Growing Asparagus at Home might seem daunting, but trust me, it’s more achievable (and rewarding!) than you think. Have you ever dreamed of snipping fresh, vibrant asparagus spears right from your own backyard, ready to be steamed, grilled, or tossed into a delicious spring frittata? I know I have! For centuries, asparagus has been prized for its delicate flavor and nutritional benefits, with evidence of its cultivation dating back to ancient Rome. Imagine, you could be continuing a tradition that stretches back millennia!
But why bother with the effort of growing your own? Well, store-bought asparagus simply can’t compare to the taste of freshly harvested spears. Plus, you’ll know exactly where your food is coming from and avoid those pesky pesticides. Let’s be honest, in today’s world, knowing how to cultivate even a small portion of your own food is incredibly empowering. This DIY guide will walk you through every step of the process, from selecting the right variety to harvesting your first crop. I’m going to share some simple tricks and hacks that will make growing asparagus at home a breeze, even if you’re a complete beginner. Get ready to enjoy the freshest, most flavorful asparagus you’ve ever tasted!
Growing Asparagus at Home: A Beginner’s Guide
Asparagus, that delectable spring vegetable, is surprisingly easy to grow at home once you understand its quirks. It’s a long-term commitment, yes, but the rewards of fresh, homegrown asparagus are well worth the wait. I’m going to walk you through everything you need to know to successfully cultivate this perennial delight in your own backyard.
Understanding Asparagus: A Perennial Investment
Before we dive into the nitty-gritty, let’s talk a bit about what makes asparagus unique. It’s a perennial plant, meaning it lives for many years. In fact, a well-maintained asparagus bed can produce for 15-20 years or even longer! This is why proper preparation is so crucial. You’re not just planting a vegetable; you’re establishing a long-term garden resident.
* Patience is Key: Asparagus takes time to mature. You won’t be harvesting a bounty in the first year. It typically takes 2-3 years before you can start harvesting spears.
* Crowns vs. Seeds: You can grow asparagus from seeds, but it’s a much slower process. I highly recommend starting with asparagus crowns, which are one-year-old plants. They’ll give you a head start.
* Sunlight is Essential: Asparagus needs at least 6-8 hours of sunlight per day. Choose a location in your garden that gets plenty of sun.
* Well-Drained Soil is a Must: Asparagus hates wet feet. Make sure your soil drains well. If you have heavy clay soil, you’ll need to amend it.
* Male vs. Female Plants: Modern asparagus varieties are usually all-male hybrids. Male plants produce more spears and don’t waste energy on seed production. ‘Jersey Knight’ and ‘Jersey Giant’ are popular all-male varieties.
Preparing Your Asparagus Bed: The Foundation for Success
This is arguably the most important step. A well-prepared bed will set your asparagus up for years of healthy growth. I can’t stress enough how crucial this is.
* Timing is Important: The best time to plant asparagus crowns is in early spring, as soon as the soil can be worked.
* Choose the Right Location: As mentioned before, select a sunny spot with well-drained soil.
* Soil Testing: Before you start digging, it’s a good idea to get your soil tested. This will tell you the pH level and nutrient content. Asparagus prefers a slightly acidic to neutral soil pH (6.5-7.0).
* Dig Deep: Asparagus roots can grow deep, so you need to dig a trench that’s about 12-18 inches deep and 12 inches wide.
* Amend the Soil: This is where you’ll improve the soil’s drainage and fertility. Mix in plenty of compost, well-rotted manure, or other organic matter. I usually add a generous amount of composted leaves and aged cow manure.
* Consider Drainage: If your soil is prone to waterlogging, consider adding a layer of gravel at the bottom of the trench to improve drainage.
Planting Your Asparagus Crowns: Giving Them a Good Start
Now that your bed is prepared, it’s time to plant your asparagus crowns.
1. Soak the Crowns: Before planting, soak the asparagus crowns in water for about an hour. This will help rehydrate them.
2. Create Mounds: In the bottom of the trench, create small mounds of soil about 18 inches apart.
3. Position the Crowns: Place an asparagus crown on top of each mound, spreading the roots out like a spider.
4. Cover with Soil: Gently cover the crowns with about 2-3 inches of soil.
5. Water Thoroughly: Water the newly planted crowns well.
6. Gradually Fill the Trench: As the asparagus spears emerge, gradually fill in the trench with soil. This will encourage the crowns to develop a strong root system. Over the growing season, you’ll fill the trench completely.
Caring for Your Asparagus Bed: Nurturing Your Investment
Once your asparagus is planted, it’s important to provide proper care to ensure healthy growth and a bountiful harvest in the years to come.
* Watering: Asparagus needs consistent moisture, especially during dry periods. Water deeply and regularly, especially during the first year.
* Weeding: Keep the asparagus bed free of weeds. Weeds compete with the asparagus for nutrients and water. Hand-weeding is the best option, as herbicides can damage the asparagus.
* Fertilizing: Asparagus is a heavy feeder. Fertilize in early spring with a balanced fertilizer or compost. I like to use a fertilizer with a higher phosphorus content to promote root growth.
* Mulching: Mulch around the asparagus plants with straw, wood chips, or other organic mulch. This will help retain moisture, suppress weeds, and regulate soil temperature.
* Pest and Disease Control: Asparagus is relatively pest-resistant, but it can be susceptible to asparagus beetles and asparagus rust. Inspect your plants regularly and take action if you notice any problems. For asparagus beetles, hand-picking or using insecticidal soap can be effective. For asparagus rust, ensure good air circulation and consider using a fungicide if necessary.
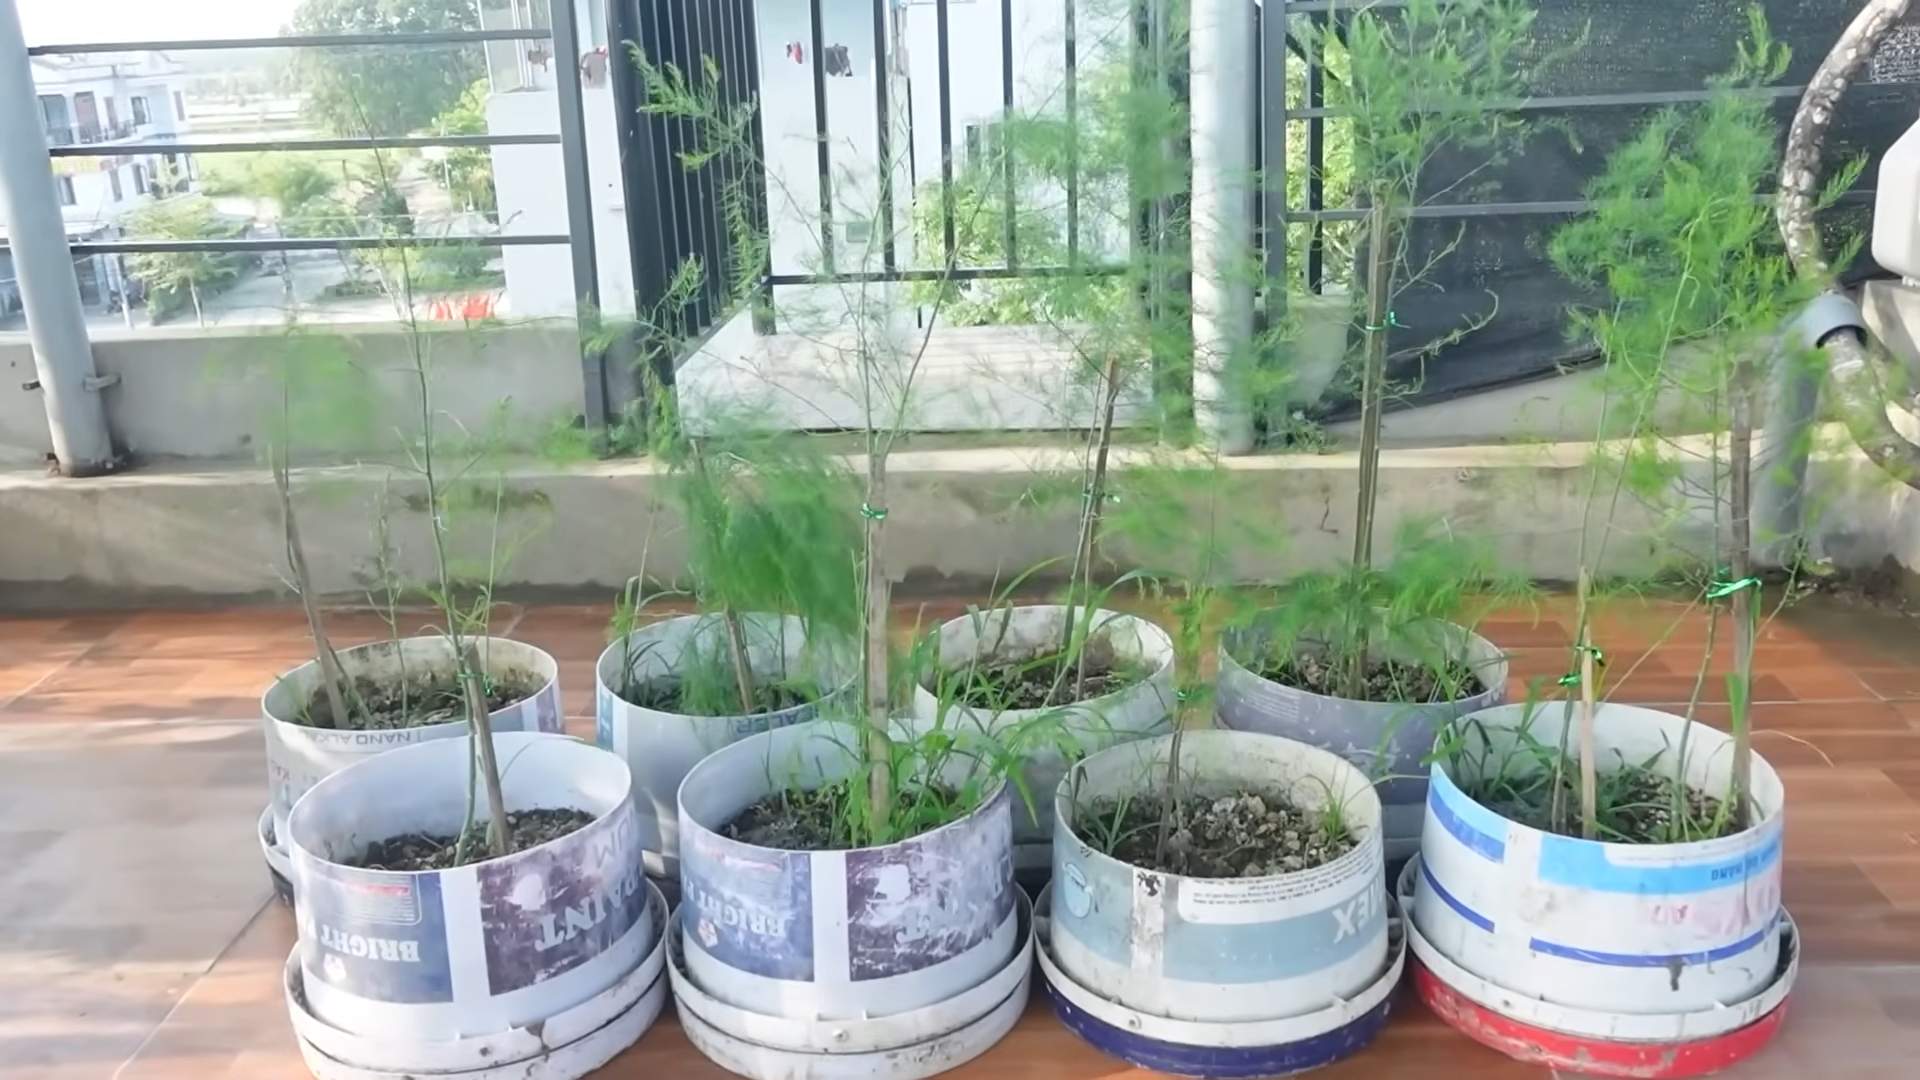
* Fern Management: After the harvest season, allow the asparagus ferns to grow and mature. These ferns are essential for replenishing the plant’s energy reserves for the following year. In late fall or early winter, after the ferns have turned brown, cut them back to about 2 inches above the ground.
Harvesting Your Asparagus: The Sweet Reward
After waiting patiently for 2-3 years, you’ll finally be able to harvest your own homegrown asparagus!
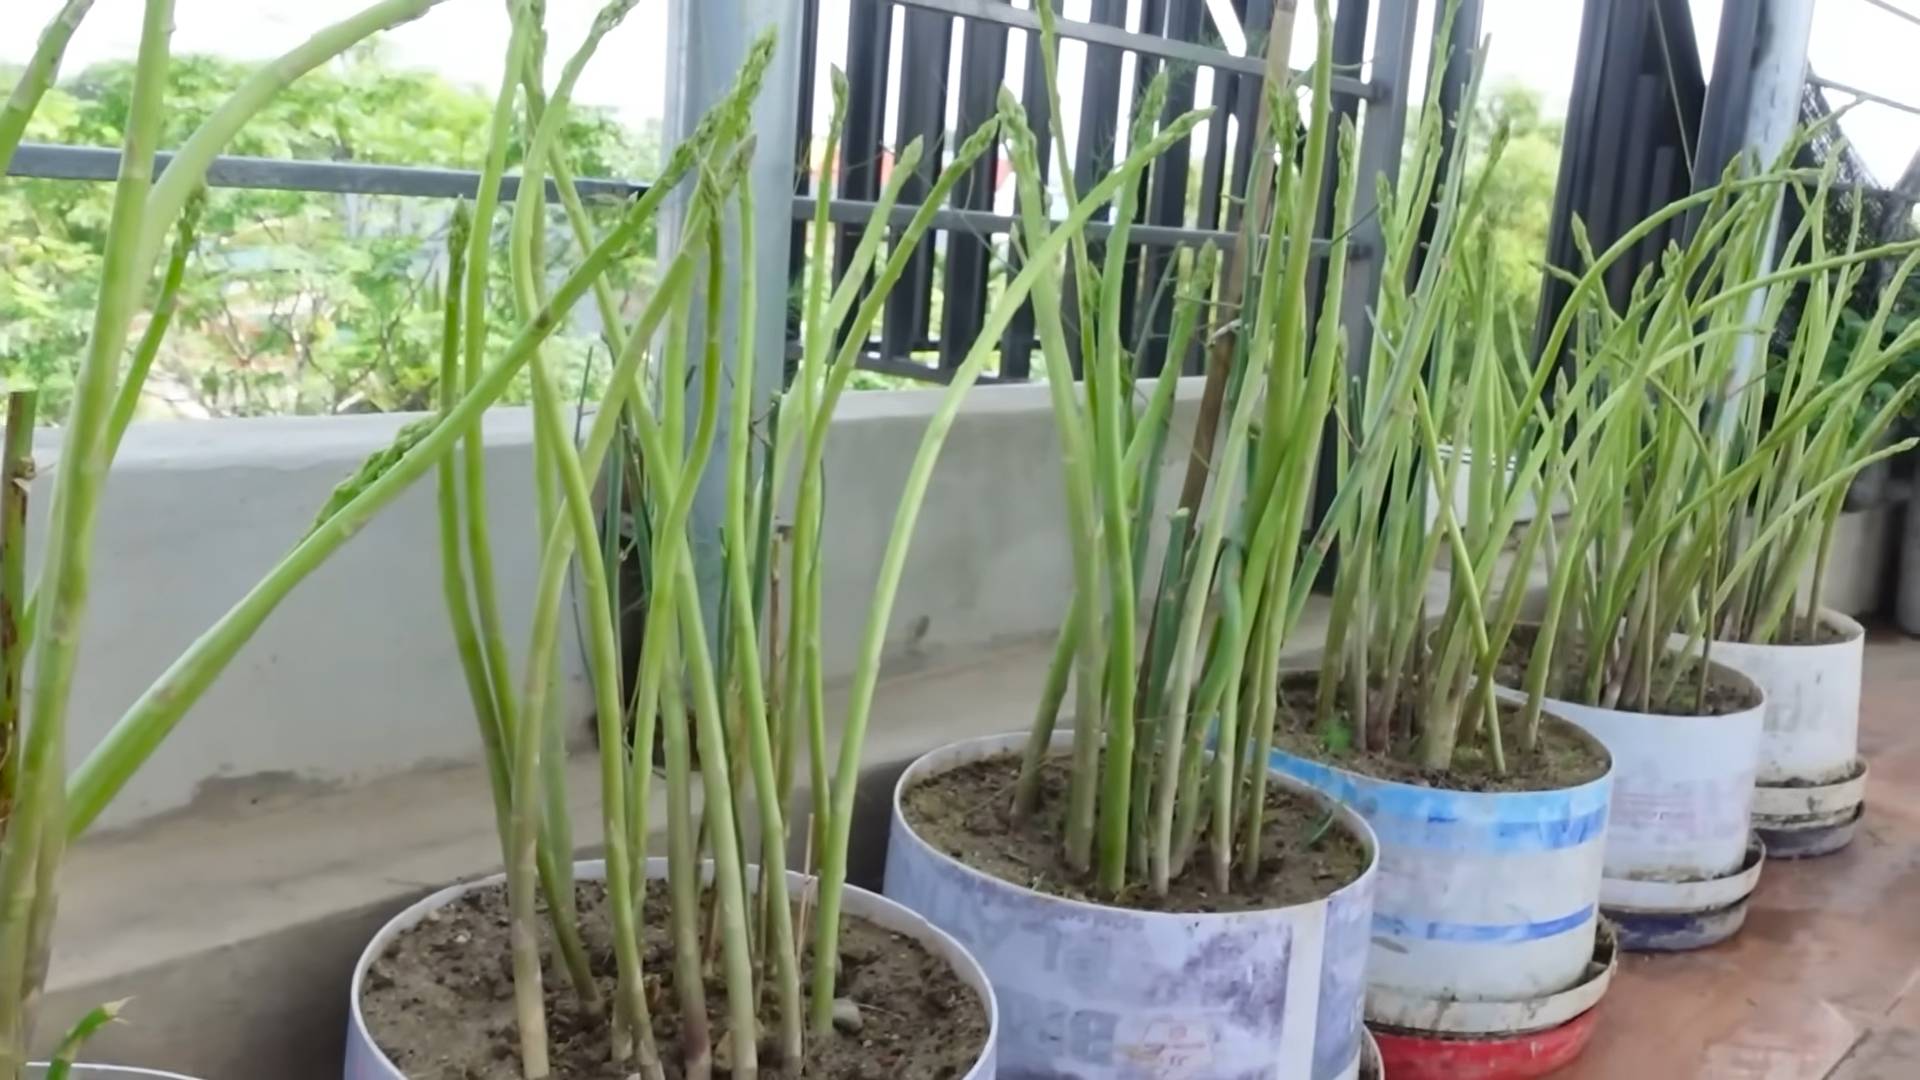
* Harvesting Time: Start harvesting when the spears are about 6-8 inches tall and about as thick as your finger.
* Harvesting Technique: Use a sharp knife to cut the spears at or slightly below the soil surface.
* Harvesting Period: In the first year of harvesting, only harvest for a few weeks. In subsequent years, you can harvest for a longer period, typically 6-8 weeks.
* Stop Harvesting: Stop harvesting when the spears become thin and spindly. This indicates that the plant needs to replenish its energy reserves.
* Post-Harvest Care: After harvesting, continue to care for the asparagus bed as described above.
Extending the Asparagus Season
While asparagus season is relatively short, there are a few things you can do to extend it.
* Variety Selection: Different asparagus varieties mature at different times. By planting a mix of early, mid-season, and late-season varieties, you can extend the harvest period.
* Mulching: Mulching can help warm the soil in early spring, encouraging earlier spear emergence.
* Cold Frames: Using cold frames or row covers can also help protect the plants from frost and extend the growing season.
Troubleshooting Common Asparagus Problems
Even with the best care, you might encounter some problems with your asparagus. Here are a few common issues and how to address them:
* Thin Spears: Thin spears can be a sign of nutrient deficiency, overcrowding, or over-harvesting. Make sure you’re fertilizing regularly and not harvesting for too long. If the plants are overcrowded, you may need to thin them out.
* Yellowing Ferns: Yellowing ferns can be caused by a variety of factors, including nutrient deficiency, disease, or pest infestation. Check the plants carefully for signs of pests or diseases and take appropriate action.
* Asparagus Beetles: Asparagus beetles can damage the spears and ferns. Hand-picking or using insecticidal soap can be effective.
* Asparagus Rust: Asparagus rust is a fungal disease that can cause orange or brown spots on the ferns. Ensure good air circulation and consider using a fungicide if necessary.
Enjoying Your Homegrown Asparagus
The best part of growing your own asparagus is, of course, enjoying the delicious spears! Freshly harvested asparagus is so much better than anything you can buy in the store. You can steam it, grill it, roast it, or add it to salads, soups, and omelets. The possibilities are endless!
Growing asparagus at home is a rewarding experience that will provide you with years of fresh, delicious vegetables. With a little patience and effort, you can enjoy the taste of homegrown asparagus every spring. Good luck, and happy gardening!
Conclusion
So, there you have it! Growing asparagus at home isn’t just a gardening project; it’s an investment in years of delicious, fresh harvests. Forget the limp, expensive spears at the grocery store – imagine stepping into your own backyard and snipping vibrant, tender asparagus whenever the craving strikes. This DIY trick, while requiring patience upfront, pays dividends in flavor, cost savings, and the sheer satisfaction of nurturing your own food.
The beauty of growing asparagus is its adaptability. While we’ve outlined a general approach, feel free to experiment! Consider companion planting with herbs like parsley or basil to deter pests and enhance the flavor of your garden. For those with limited space, dwarf varieties of asparagus can thrive in raised beds or even large containers. And if you’re feeling adventurous, try different asparagus varieties – from the classic green to the more delicate purple types.
Don’t be intimidated by the initial investment of time. Think of it as planting a legacy. Each year, your asparagus patch will become more productive, providing you and your family with a sustainable source of this nutritious and delectable vegetable. Plus, the feathery foliage adds a touch of elegance to any garden.
We wholeheartedly encourage you to give this DIY trick a try. The rewards are well worth the effort. And once you’ve tasted the difference between homegrown and store-bought asparagus, you’ll never look back.
But the journey doesn’t end here! We want to hear about your experiences. Did you try a different variety? Did you encounter any challenges along the way? Share your tips, tricks, and triumphs in the comments below. Let’s build a community of asparagus enthusiasts and help each other cultivate thriving patches. Your insights could be invaluable to other aspiring gardeners. So, grab your gardening gloves, prepare your soil, and get ready to enjoy the unparalleled flavor of homegrown asparagus. Happy gardening!
Frequently Asked Questions (FAQs)
What is the best time of year to plant asparagus?
The ideal time to plant asparagus depends on whether you’re starting from seed or crowns. If you’re starting from seed, begin indoors 12-14 weeks before the last expected frost. This allows the seedlings to develop a strong root system before transplanting them outdoors. If you’re planting crowns (which is the more common and recommended method), the best time is in early spring, as soon as the ground can be worked. This is typically around March or April in most temperate climates. Planting in early spring gives the crowns a head start before the heat of summer arrives. Avoid planting in the heat of summer, as this can stress the young plants and hinder their growth.
How long does it take for asparagus to produce a harvest?
Patience is key when growing asparagus! It typically takes two to three years from planting crowns before you can harvest a significant amount of spears. In the first year, allow the plants to establish themselves and develop a strong root system. Resist the urge to harvest any spears during this time. In the second year, you can harvest a few spears, but only for a short period (about two weeks). In the third year and beyond, you can enjoy a full harvest for six to eight weeks. Harvesting too early or for too long can weaken the plants and reduce their long-term productivity. Remember, asparagus is a long-term investment, so be patient and allow it to mature properly.
What kind of soil is best for growing asparagus?
Asparagus thrives in well-drained, fertile soil with a slightly acidic to neutral pH (around 6.5 to 7.0). The soil should be loose and sandy loam is ideal, allowing the roots to penetrate deeply. Heavy clay soils can be problematic, as they retain too much moisture and can lead to root rot. If you have clay soil, amend it with plenty of organic matter, such as compost, well-rotted manure, or peat moss, to improve drainage and aeration. Asparagus also benefits from soil rich in organic matter, which provides essential nutrients and improves water retention. Before planting, consider conducting a soil test to determine the pH and nutrient levels. Amend the soil accordingly based on the test results.
How much sun does asparagus need?
Asparagus needs at least six to eight hours of direct sunlight per day to thrive. Full sun is essential for optimal growth and spear production. Choose a planting location that receives plenty of sunlight throughout the day. If you live in a particularly hot climate, some afternoon shade may be beneficial to prevent the plants from overheating. However, avoid planting asparagus in shady areas, as this will result in weak, spindly growth and reduced yields.
How often should I water asparagus?
Asparagus needs consistent moisture, especially during the growing season. Water deeply and regularly, especially during dry periods. Aim to keep the soil consistently moist but not waterlogged. Overwatering can lead to root rot, so ensure the soil is well-draining. A good rule of thumb is to water when the top inch of soil feels dry to the touch. Mulching around the plants with organic matter, such as straw or wood chips, can help retain moisture and suppress weeds. During the dormant season (fall and winter), reduce watering frequency.
What are some common pests and diseases that affect asparagus?
Asparagus is relatively pest-resistant, but there are a few common issues to watch out for. Asparagus beetles are a common pest that can damage the spears and foliage. Handpicking the beetles or using insecticidal soap can help control infestations. Asparagus rust is a fungal disease that can cause orange or reddish-brown pustules on the stems and foliage. Good air circulation and proper watering practices can help prevent rust. Fusarium wilt is another fungal disease that can cause yellowing and wilting of the plants. Planting disease-resistant varieties and ensuring good soil drainage can help prevent Fusarium wilt. Regularly inspect your plants for signs of pests or diseases and take appropriate action promptly.
How do I harvest asparagus?
Harvest asparagus spears when they are about 6 to 8 inches tall and about as thick as your finger. Use a sharp knife or asparagus knife to cut the spears at or slightly below the soil surface. Avoid pulling the spears, as this can damage the crown. Harvest spears regularly throughout the harvest season, which typically lasts for six to eight weeks. As the season progresses, the spears may become thinner and less tender. Stop harvesting when the spear production declines or when the plants start to fern out. Allow the ferns to grow and mature, as they will provide energy for the plants to store in their roots for the following year.
How do I care for asparagus after the harvest season?
After the harvest season, allow the asparagus ferns to grow and mature. These ferns are essential for photosynthesis and will provide the plants with the energy they need to store in their roots for the following year. Fertilize the plants with a balanced fertilizer to replenish nutrients. Continue to water regularly, especially during dry periods. Remove any weeds that may compete with the asparagus plants for nutrients and water. In the fall, after the ferns have turned brown and died back, cut them down to the ground level. Mulch around the plants with organic matter to protect the crowns from winter cold.
Can I grow asparagus in containers?
Yes, you can grow asparagus in containers, but it requires some extra care. Choose a large container (at least 18 inches in diameter and 24 inches deep) to accommodate the extensive root system. Use a well-draining potting mix and ensure the container has drainage holes. Dwarf varieties of asparagus are best suited for container growing. Water regularly and fertilize frequently, as container-grown plants tend to dry out and deplete nutrients more quickly than those grown in the ground. Provide adequate sunlight (at least six to eight hours per day). Be aware that container-grown asparagus may not be as productive as those grown in the ground.
What are some good companion plants for asparagus?
Companion planting can benefit asparagus by deterring pests, attracting beneficial insects, and improving soil health. Some good companion plants for asparagus include:
* **Tomatoes:** Tomatoes deter asparagus beetles.
* **Basil:** Basil repels asparagus beetles and other pests.
* **Parsley:** Parsley attracts beneficial insects that prey on asparagus pests.
* **Marigolds:** Marigolds repel nematodes and other soil pests.
* **Nasturtiums:** Nasturtiums attract aphids, which can distract them from asparagus.
* **Garlic and Onions:** These plants deter various pests and have antifungal properties.
Avoid planting asparagus near alliums (like onions and garlic) if you are concerned about flavor transfer, although many gardeners find the effect minimal.

Leave a Comment