
Grow Winged Beans at Home and unlock a world of culinary possibilities right in your backyard! Have you ever dreamt of harvesting your own exotic, nutrient-packed vegetables? Well, dream no more! This guide is your passport to cultivating the fascinating winged bean, a plant with a rich history and incredible versatility.
Winged beans, also known as Goa beans or asparagus peas, have been a staple in Southeast Asian cuisine for centuries. Their cultivation dates back to ancient times, where they were prized for their ability to thrive in humid climates and provide a complete source of protein. Imagine bringing that same tradition and abundance to your own garden!
Why should you learn to grow winged beans at home? In today’s world, we’re all looking for ways to eat healthier, reduce our carbon footprint, and connect with nature. Winged beans offer all of that and more! They’re incredibly nutritious, packed with vitamins, minerals, and protein. Plus, every part of the plant is edible – from the pods and leaves to the flowers and tubers. By growing your own, you’ll have access to fresh, organic produce and the satisfaction of knowing exactly where your food comes from. So, let’s dive in and discover the secrets to successfully cultivating these amazing beans!
Grow Your Own Winged Beans: A Complete DIY Guide
Hey there, fellow gardening enthusiasts! Ever heard of winged beans? They’re these amazing, nutrient-packed legumes that are not only delicious but also incredibly beautiful to grow. Seriously, the flowers are gorgeous! I’ve been growing them for a few years now, and I’m excited to share my secrets with you so you can enjoy fresh, homegrown winged beans too. This guide will walk you through everything, from choosing the right location to harvesting your bounty. Let’s get started!
Choosing the Right Location and Preparing the Soil
Winged beans are tropical plants, so they love warmth and sunshine. Think of them as sunbathers who also appreciate a good drink! Here’s what you need to consider:
* Sunlight: They need at least 6-8 hours of direct sunlight per day. The more, the merrier!
* Soil: Well-draining soil is crucial. Winged beans don’t like soggy feet. A slightly acidic to neutral pH (around 6.0-7.0) is ideal.
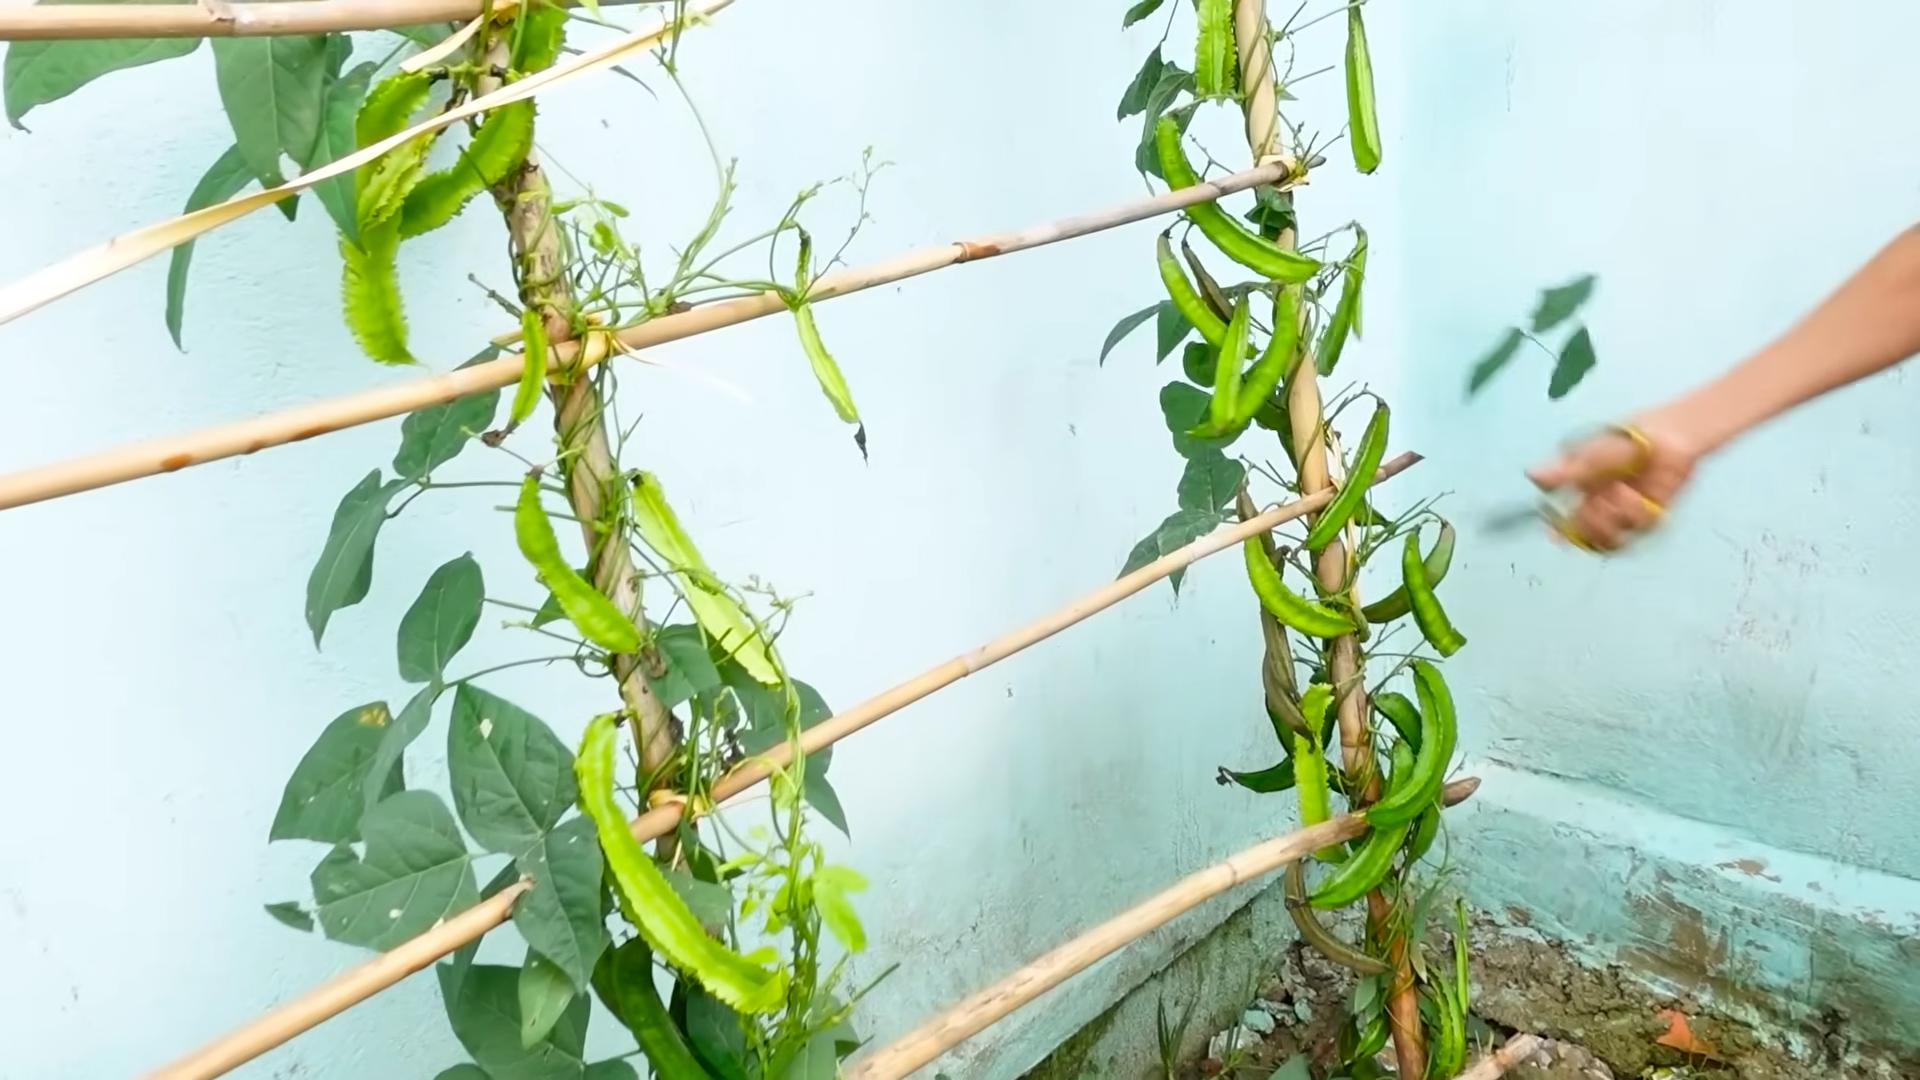
* Support: These are climbing plants, so they need a sturdy trellis, fence, or other support structure to climb on. They can get pretty heavy, so make sure your support is strong!
* Warmth: Winged beans are sensitive to frost. Wait until all danger of frost has passed before planting.
Now, let’s get that soil ready!
1. Clear the area: Remove any weeds, rocks, or debris from the planting area. I like to use a garden fork to loosen the soil.
2. Amend the soil: Winged beans are heavy feeders, so amending the soil with compost or well-rotted manure is essential. I usually add a generous layer (about 2-3 inches) and mix it in thoroughly. This will improve drainage, add nutrients, and help retain moisture.
3. Check the pH: If you’re unsure about your soil’s pH, you can get a soil testing kit from your local garden center. If the pH is too high (alkaline), you can lower it by adding sulfur or peat moss. If it’s too low (acidic), you can raise it by adding lime.
4. Create a raised bed (optional): If your soil is heavy clay or doesn’t drain well, consider creating a raised bed. This will improve drainage and provide a better growing environment for your winged beans.
Starting Your Winged Bean Seeds
You can either start your winged bean seeds indoors or directly sow them in the garden. I prefer starting them indoors to get a head start, especially if you have a short growing season.
* Starting Indoors: This gives you a head start and protects the seedlings from early pests.
* Direct Sowing: Simpler, but requires warmer soil and more vigilance against pests.
Here’s how I do it:
1. Soak the seeds: Before planting, soak the seeds in warm water for 24 hours. This will help soften the seed coat and improve germination.
2. Prepare your seed starting mix: Use a well-draining seed starting mix. I like to make my own by mixing equal parts peat moss, perlite, and vermiculite.
3. Plant the seeds: Fill small pots or seed trays with the seed starting mix. Plant the seeds about 1 inch deep.
4. Water gently: Water the soil gently to moisten it, but don’t overwater.
5. Provide warmth and light: Place the pots in a warm location (around 70-75°F) and provide plenty of light. A sunny windowsill or a grow light will work well.
6. Keep the soil moist: Keep the soil consistently moist, but not soggy.
7. Harden off the seedlings: Once the seedlings have developed a few sets of true leaves, gradually acclimate them to outdoor conditions by hardening them off. This involves exposing them to increasing amounts of sunlight and wind over a period of about a week.
If you’re direct sowing:
1. Wait for warm soil: Make sure the soil temperature is at least 65°F before planting.
2. Plant the seeds: Plant the seeds about 1 inch deep and 6-8 inches apart.
3. Water gently: Water the soil gently to moisten it.
4. Keep the soil moist: Keep the soil consistently moist until the seedlings emerge.
Transplanting and Providing Support
Once your seedlings are ready (or if you’ve direct sown and they’ve emerged), it’s time to transplant them to their final location.
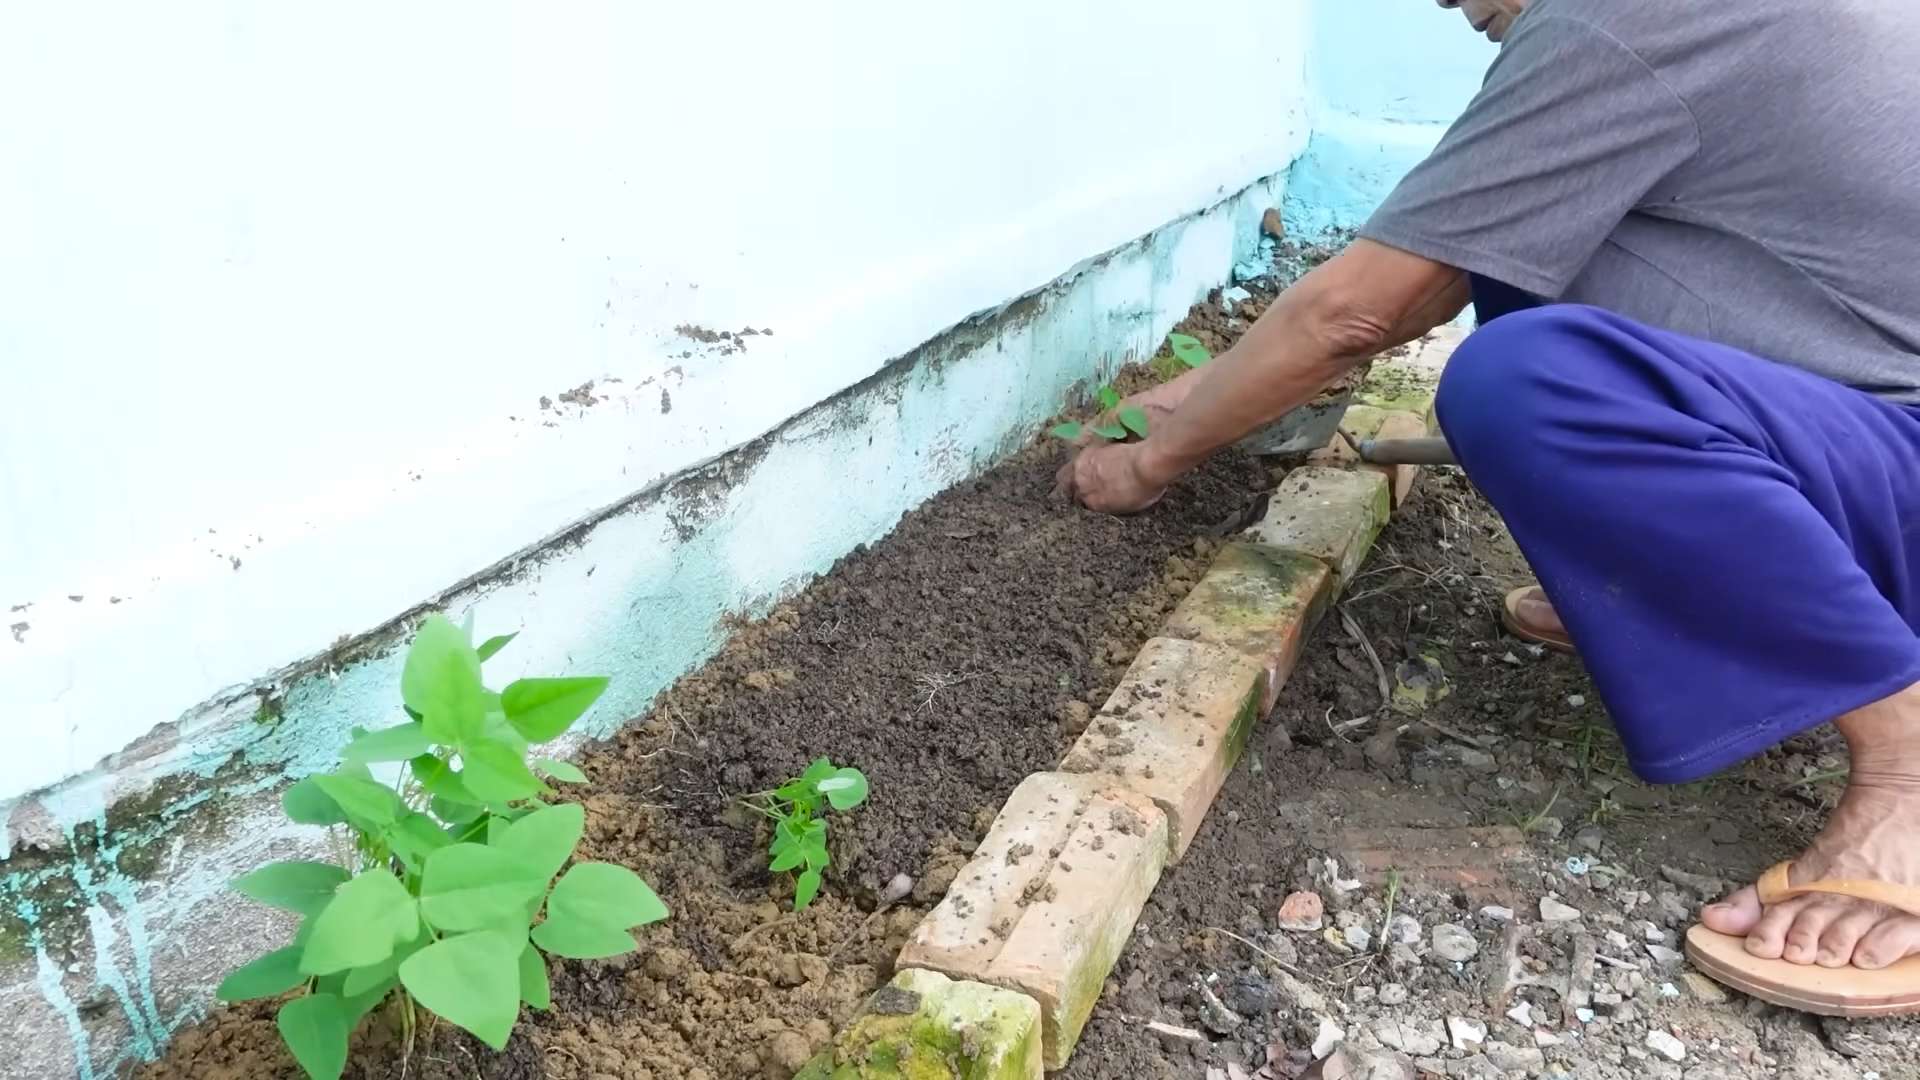
1. Prepare the planting holes: Dig holes that are slightly larger than the root balls of the seedlings. Space the holes about 12-18 inches apart.
2. Transplant the seedlings: Gently remove the seedlings from their pots and place them in the planting holes.
3. Backfill with soil: Backfill the holes with soil and gently firm the soil around the base of the plants.
4. Water thoroughly: Water the plants thoroughly after transplanting.
5. Provide support: Immediately after transplanting, provide the plants with a trellis, fence, or other support structure to climb on. I’ve found that a sturdy trellis made of wood or metal works best. You can also use a chain-link fence or even a sturdy tomato cage.
6. Guide the vines: As the plants grow, gently guide the vines onto the support structure. You may need to tie them to the support with twine or plant clips.
Caring for Your Winged Bean Plants
Now that your winged bean plants are in the ground, it’s time to provide them with the care they need to thrive.
* Watering: Water regularly, especially during dry periods. Winged beans need consistent moisture to produce well. Aim for about 1 inch of water per week.
* Fertilizing: Fertilize every few weeks with a balanced fertilizer. I like to use a liquid fertilizer diluted to half strength. You can also side-dress with compost or well-rotted manure.
* Weeding: Keep the area around the plants free of weeds. Weeds can compete with the plants for nutrients and water.
* Pest control: Winged beans are relatively pest-resistant, but they can be susceptible to aphids, spider mites, and bean beetles. Inspect your plants regularly for pests and take action if you see any. I like to use insecticidal soap or neem oil to control pests.
* Pruning: Prune the plants as needed to keep them from becoming too overgrown. You can also prune off any yellowing or damaged leaves.
* Pollination: Winged beans are self-pollinating, but you can improve pollination by gently shaking the plants or using a small brush to transfer pollen from one flower to another.
Harvesting Your Winged Beans
The best part! Winged beans are ready to harvest about 2-3 months after planting.
* Harvesting the pods: Harvest the pods when they are young and tender, about 6-8 inches long. The pods should be bright green and snap easily. If the pods are too mature, they will be tough and fibrous.
* Harvesting the leaves: You can also harvest the leaves of the winged bean plant. The leaves are nutritious and can be eaten raw or cooked. Harvest the young, tender leaves.
* Harvesting the flowers: The flowers are also edible and can be used in salads or as a garnish.
* Harvesting the tubers: The tubers of the winged bean plant are also edible and can be harvested after the plant has died back in the fall. The tubers are similar to potatoes and can be cooked in the same way.
* Harvesting the seeds: If you want to save seeds for next year, allow some of the pods to mature and dry on the plant. Once the pods are dry, shell the seeds and store them in a cool, dry place.
Enjoying Your Harvest
Winged beans are incredibly versatile in the kitchen. You can eat the pods raw in salads, stir-fry them, steam them, or add them to soups and stews. The leaves can be used in salads or cooked like spinach. The flowers can be used as a garnish or added to salads. The tubers can be cooked like potatoes.
Here are a few of my favorite ways to enjoy winged beans:
* Winged bean stir-fry: Stir-fry sliced winged beans with garlic, ginger, and your favorite vegetables.
* Winged bean salad: Combine sliced winged beans with tomatoes, cucumbers, and a vinaigrette dressing.
* Winged bean soup: Add sliced winged beans to your favorite soup or stew.
* Roasted winged bean tubers: Roast the tubers with olive oil, salt, and pepper.
Troubleshooting
Even with the best care, you might encounter some problems while growing winged beans. Here are a
Conclusion
So, there you have it! Growing winged beans at home is not just a gardening project; it’s an adventure in flavor, sustainability, and self-sufficiency. This often-overlooked legume offers a unique culinary experience, providing edible pods, leaves, flowers, seeds, and even tubers – a true “one-stop shop” for the home gardener. Forget those bland, store-bought vegetables; imagine stepping into your backyard and harvesting fresh, vibrant winged beans, bursting with nutrients and a slightly nutty, asparagus-like flavor.
Why is this DIY trick a must-try? Because it empowers you to control the quality and freshness of your food. You know exactly what goes into your garden, avoiding harmful pesticides and herbicides. Plus, the satisfaction of nurturing a plant from seed to harvest is unparalleled. It’s a rewarding experience that connects you to nature and provides a tangible sense of accomplishment.
But the benefits don’t stop there. Winged beans are nitrogen-fixing plants, meaning they enrich the soil with nitrogen, reducing the need for synthetic fertilizers. They’re also relatively low-maintenance, making them an ideal choice for beginner gardeners. And let’s not forget the aesthetic appeal – the beautiful, climbing vines and delicate flowers add a touch of elegance to any garden.
Ready to take your winged bean growing to the next level? Consider these variations:
* **Vertical Gardening:** Maximize your space by training your winged beans to climb a trellis, fence, or even a sturdy sunflower stalk. This not only saves space but also creates a stunning visual display.
* **Companion Planting:** Plant winged beans alongside corn, sunflowers, or other tall plants to provide natural support and create a mutually beneficial ecosystem.
* **Different Varieties:** Explore different varieties of winged beans to discover your favorite flavor and texture. Some varieties are more heat-tolerant, while others produce larger pods.
* **Seed Saving:** Save seeds from your best-performing plants to ensure a continuous supply of winged beans for years to come.
We encourage you to embrace this DIY trick and experience the joy of growing your own winged beans. It’s a simple, sustainable, and incredibly rewarding way to enhance your garden and your diet. Don’t be intimidated – even if you’re a novice gardener, you can successfully grow winged beans with a little patience and care.
So, grab your seeds, prepare your soil, and get ready to embark on a delicious and fulfilling gardening journey. And most importantly, we want to hear about your experience! Share your tips, tricks, and triumphs in the comments below. Let’s create a community of winged bean enthusiasts and inspire others to discover the wonders of this amazing plant. We are confident that with the right care, you will be enjoying a bountiful harvest of homegrown **winged beans** in no time!
Frequently Asked Questions (FAQ)
What are the ideal growing conditions for winged beans?
Winged beans thrive in warm, humid climates with plenty of sunshine. They require at least 6-8 hours of direct sunlight per day. The ideal soil is well-draining, loamy, and slightly acidic to neutral (pH 6.0-7.0). While they are relatively drought-tolerant once established, consistent watering is crucial, especially during flowering and pod development. Protect young plants from strong winds.
How long does it take for winged beans to mature and produce pods?
Winged beans typically take 120-180 days from planting to harvest, depending on the variety and growing conditions. You can start harvesting young pods about 2-3 months after planting. The pods are best harvested when they are young and tender, usually around 6-8 inches long. Older pods can become tough and fibrous.
Can I grow winged beans in containers?
Yes, you can successfully grow winged beans in containers, but you’ll need to choose a large container (at least 15-20 gallons) to accommodate their extensive root system. Ensure the container has good drainage and use a high-quality potting mix. Provide a sturdy trellis or support structure for the vines to climb. Container-grown winged beans may require more frequent watering and fertilization than those grown in the ground.
Are winged beans susceptible to any pests or diseases?
Winged beans are generally resistant to most pests and diseases, but they can occasionally be affected by aphids, spider mites, or bean beetles. Regularly inspect your plants for signs of infestation and take appropriate action if necessary. Organic pest control methods, such as insecticidal soap or neem oil, are often effective. Good air circulation and proper watering practices can help prevent fungal diseases.
How do I save seeds from my winged bean plants?
To save seeds, allow some of the pods to mature fully on the vine until they are dry and brown. Harvest the pods and remove the seeds. Spread the seeds out on a tray in a cool, dry place for a few days to ensure they are completely dry. Store the seeds in an airtight container in a cool, dark place. Properly stored winged bean seeds can remain viable for several years.
Can I eat the entire winged bean plant?
Yes, almost all parts of the winged bean plant are edible! The young pods are the most commonly consumed part, but the leaves, flowers, seeds, and tubers are also edible. The leaves can be eaten raw in salads or cooked like spinach. The flowers can be added to salads or used as a garnish. The seeds can be cooked and eaten like soybeans. The tubers can be boiled, baked, or fried like potatoes. However, it’s important to note that the mature seeds contain trypsin inhibitors, which can interfere with protein digestion. Cooking the seeds thoroughly eliminates these inhibitors.
How do I prepare winged beans for cooking?
To prepare winged bean pods for cooking, simply wash them and trim off the ends. You can then slice them thinly or leave them whole, depending on your preference. Winged beans can be steamed, boiled, stir-fried, or added to soups and stews. They have a slightly nutty, asparagus-like flavor that pairs well with a variety of seasonings and sauces.
Are there any health benefits to eating winged beans?
Yes, winged beans are a highly nutritious food source. They are rich in protein, fiber, vitamins, and minerals. They are also a good source of antioxidants, which can help protect against cell damage. Winged beans are known to have anti-inflammatory properties and may help lower cholesterol levels. Including winged beans in your diet can contribute to overall health and well-being.
My winged bean plant is flowering, but not producing pods. What could be the problem?
There are several reasons why your winged bean plant might be flowering but not producing pods. One possibility is that the plant is not getting enough sunlight. Another possibility is that the soil is lacking essential nutrients. You can try fertilizing your plant with a balanced fertilizer to provide the necessary nutrients. Insufficient pollination can also be a factor. While winged beans are self-pollinating, providing support for pollinators, such as bees, can improve pod set. Finally, extreme temperatures or water stress can also inhibit pod production. Ensure your plant is getting adequate water and protection from extreme weather conditions.


Leave a Comment