
Grow Wheatgrass with Water: Unlock the secrets to a vibrant, green oasis right in your kitchen! Have you ever dreamed of having fresh, nutrient-packed wheatgrass readily available for your morning smoothie or juice? Well, dream no more! This DIY guide will walk you through the surprisingly simple process of cultivating your own wheatgrass using just water 鈥?no soil required!
Wheatgrass, with its vibrant green blades, isn’t just a pretty plant; it’s a powerhouse of vitamins, minerals, and antioxidants. Its use dates back thousands of years, with evidence suggesting ancient Egyptians valued it for its health benefits. Today, it’s a popular addition to health-conscious diets worldwide.
But why should you bother growing your own? Let’s face it, buying pre-cut wheatgrass can be expensive and often lacks the freshness you desire. Plus, knowing exactly where your food comes from and how it’s grown is incredibly empowering. This DIY trick not only saves you money but also allows you to enjoy the purest, most potent wheatgrass possible. I’m excited to show you how easy it is to grow wheatgrass with water, transforming your kitchen counter into a mini-farm!
Grow Your Own Wheatgrass with Just Water: A Simple DIY Guide
Hey there, fellow plant enthusiasts! Ever wanted to have a little patch of vibrant green goodness right in your kitchen? Well, you’re in luck! Growing wheatgrass is surprisingly easy, and you don’t even need soil. That’s right, we’re going to grow it with just water! This method is super clean, quick, and perfect for beginners. Plus, fresh wheatgrass juice is packed with nutrients 鈥?a fantastic addition to your smoothies or a shot of pure energy. Let’s get started!
What You’ll Need
Before we dive in, let’s gather our supplies. This is a pretty minimal setup, which is one of the things I love about it.
* Wheatgrass Seeds: Make sure you get seeds specifically for growing wheatgrass, not the kind for planting in a field. You can find these at most health food stores or online. I usually buy organic to avoid any unwanted chemicals.
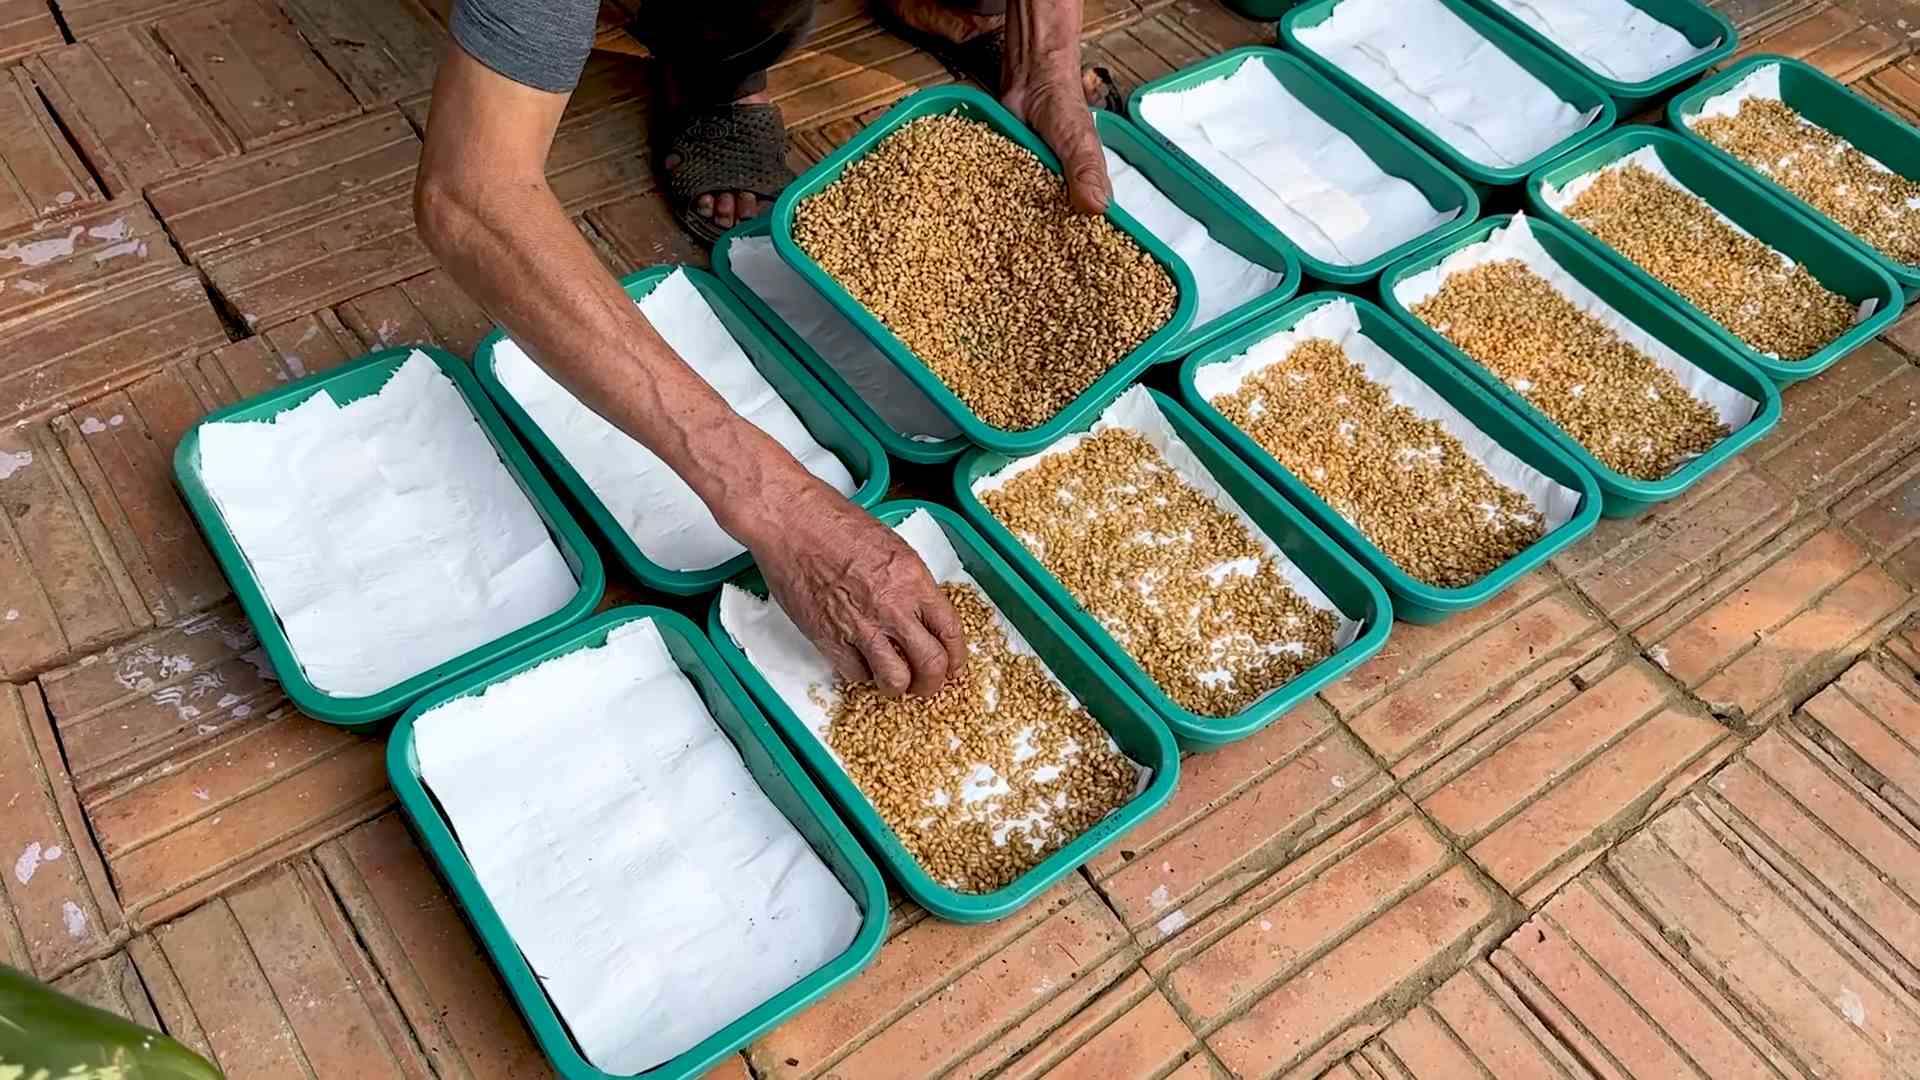
* Shallow Trays: You’ll need a tray with drainage holes and another tray without drainage holes to act as a water reservoir. I use plastic trays, but you can also use glass or ceramic. Just make sure they’re clean!
* Water: Filtered water is best, but tap water that’s been sitting out for a while to let the chlorine evaporate will also work.
* Spray Bottle: For misting the seeds and sprouts.
* Dark Towel or Lid: To keep the seeds in the dark during the initial germination phase.
* Optional: Hydrogen Peroxide (3%): A little hydrogen peroxide can help prevent mold growth, but it’s not essential.
Step-by-Step Instructions: From Seed to Sprout
Okay, let’s get our hands dirty (well, not really, since we’re using water!). Here’s the breakdown of how to grow wheatgrass with just water:
1. Soaking the Seeds: This is a crucial first step. Pour your wheatgrass seeds into a bowl and cover them with cool water. I usually use about twice as much water as seeds. Let them soak for 8-12 hours, or even overnight. This kickstarts the germination process. You’ll notice the seeds swelling up 鈥?that’s a good sign!
2. Preparing the Tray: After soaking, drain the seeds thoroughly. Now, spread them evenly across the tray with drainage holes. Don’t overcrowd them; they need space to breathe. A single layer is ideal. If you have too many seeds, you can always start another tray.
3. The Dark Period: Germination Time! This is where the dark towel or lid comes in. Cover the tray completely to block out the light. This mimics the conditions underground and encourages the seeds to sprout. Place the tray in a cool, dark place. I usually use my pantry or a cupboard.
4. Misting is Key: For the next 2-3 days, mist the seeds with water 2-3 times a day. You want to keep them consistently moist, but not soaking wet. Lift the towel or lid to mist, then replace it immediately. This is super important to prevent them from drying out.
5. Introducing Light: After 2-3 days, you should see little white sprouts emerging from the seeds. Hooray! Now it’s time to introduce them to light. Remove the towel or lid and place the tray in a well-lit area, but avoid direct sunlight, which can scorch the delicate sprouts. An east-facing window is perfect.
6. Watering Time: Now, place the tray with drainage holes inside the tray without drainage holes (the water reservoir). Pour water into the bottom tray, making sure the water level is just below the bottom of the top tray. The wheatgrass roots will reach down and absorb the water.
7. Maintaining Moisture: Check the water level in the bottom tray daily and replenish as needed. You also want to continue misting the wheatgrass 1-2 times a day to keep the blades hydrated.
8. Watching it Grow: Over the next few days, your wheatgrass will grow rapidly. It’s amazing to watch! Keep an eye out for any signs of mold. If you see any, you can try spraying the affected area with a diluted hydrogen peroxide solution (1 part hydrogen peroxide to 10 parts water). Good ventilation also helps prevent mold.
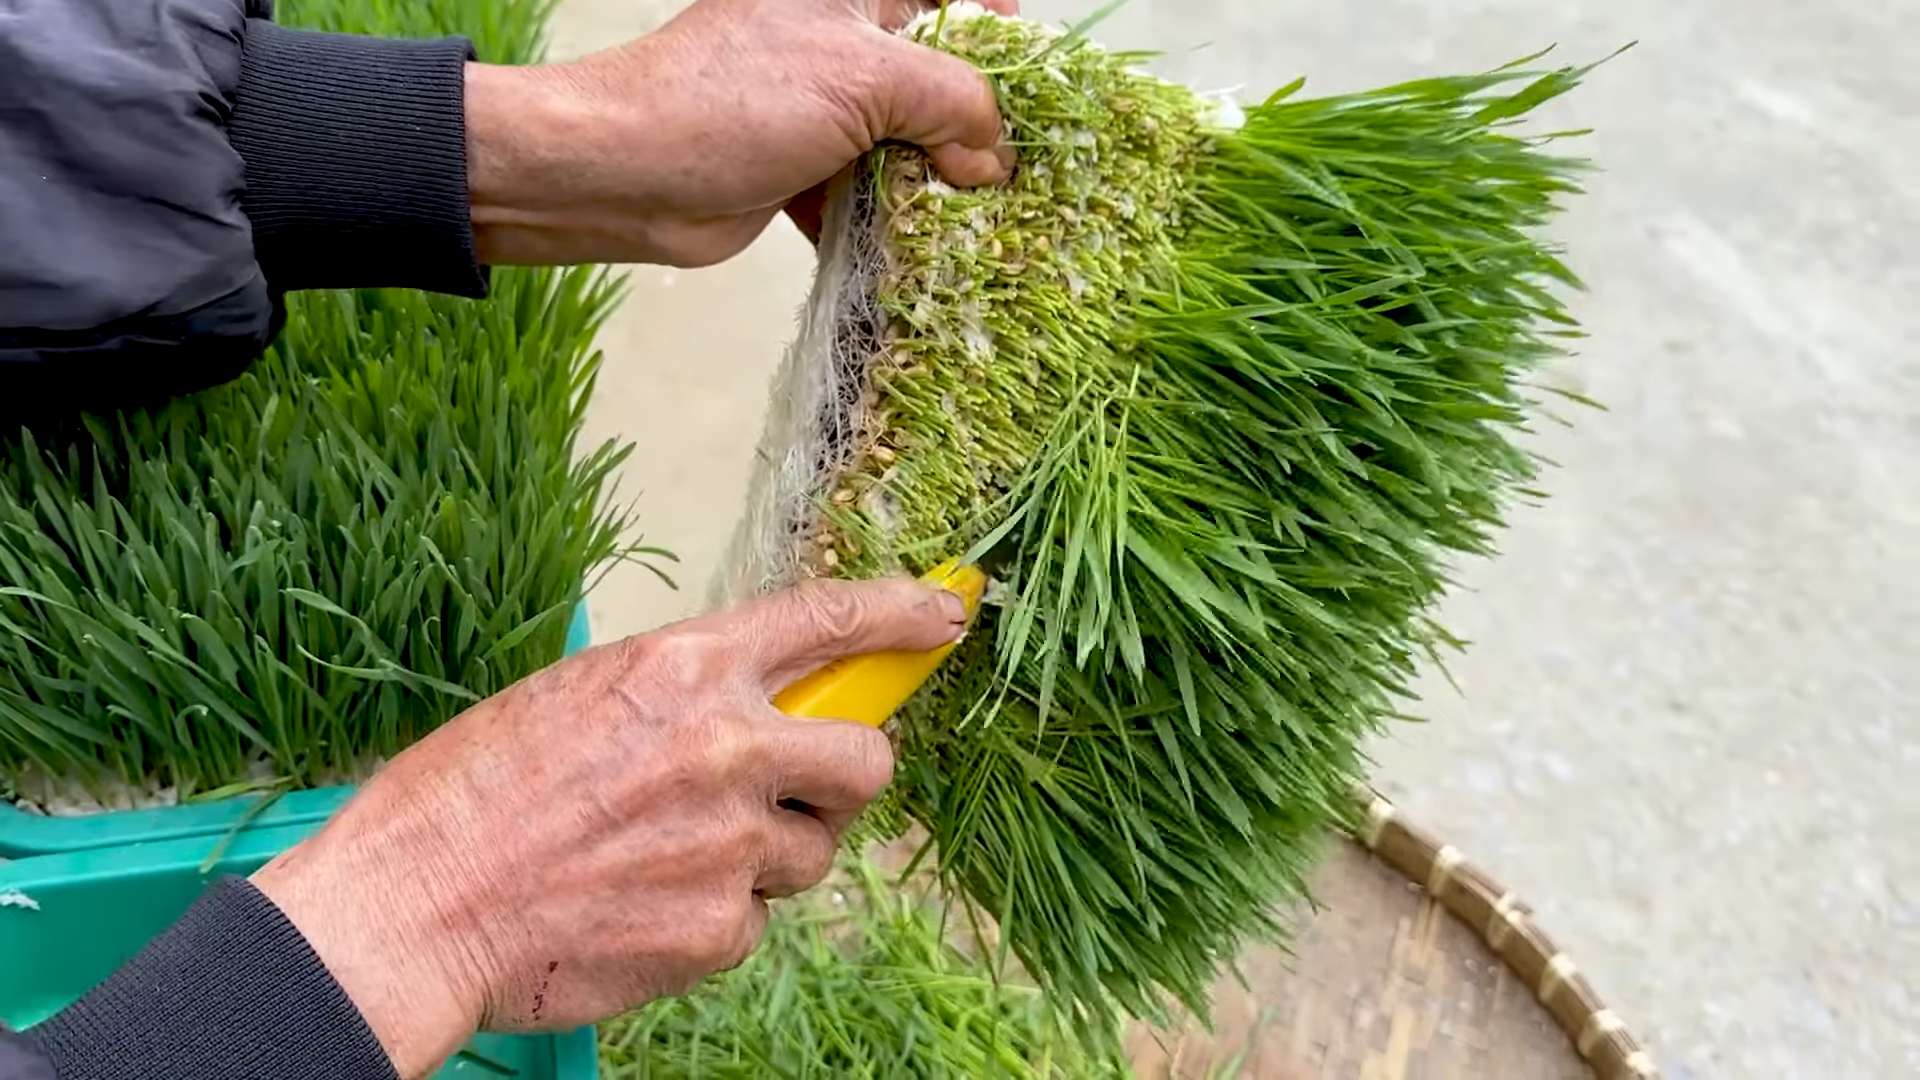
9. Harvest Time! Your wheatgrass is ready to harvest when it’s about 4-7 inches tall. This usually takes about 7-10 days from the start of the process.
Harvesting and Using Your Wheatgrass
Okay, so you’ve got a beautiful tray of vibrant green wheatgrass. Now what? Here’s how to harvest and use it:
1. Harvesting: Use clean scissors or a knife to cut the wheatgrass just above the seed level. You can harvest the entire tray at once, or just cut what you need.
2. Using Your Wheatgrass: The most common way to use wheatgrass is to juice it. You’ll need a special wheatgrass juicer (a masticating juicer works best) to extract the juice. You can also blend it into smoothies, but you’ll need to strain out the pulp.
3. Storage: Freshly harvested wheatgrass is best used immediately. However, you can store it in the refrigerator for a few days. Wrap it in a damp paper towel and place it in a plastic bag.
Troubleshooting Tips and Tricks
Even with the simplest methods, sometimes things don’t go exactly as planned. Here are a few common issues and how to address them:
* Mold Growth: Mold is the biggest challenge when growing wheatgrass with water. To prevent it, make sure your seeds aren’t overcrowded, provide good ventilation, and use filtered water. If you see mold, try spraying with a diluted hydrogen peroxide solution.
* Slow Germination: If your seeds aren’t sprouting, make sure they’re getting enough moisture and darkness. The temperature also plays a role; wheatgrass prefers cooler temperatures (around 60-75掳F).
* Yellowing Blades: Yellowing blades can be a sign of overwatering or underwatering. Adjust your watering schedule accordingly. It can also be caused by nutrient deficiencies, but this is less common when growing with water.
* Uneven Growth: Uneven growth can be caused by uneven light exposure. Rotate the tray regularly to ensure all parts of the wheatgrass get enough light.
Why Grow Wheatgrass at Home?
I know, I know, you can buy wheatgrass juice at most health food stores. But growing it yourself is so much more rewarding (and often cheaper!). Here’s why I love growing my own wheatgrass:
* Freshness: You can’t beat the freshness of homegrown wheatgrass. You know exactly when it was harvested, and you can be sure it’s packed with nutrients.
* Cost-Effective: Buying wheatgrass juice regularly can get expensive. Growing it yourself is a much more affordable option.
* Control: You have complete control over the growing process. You can choose organic seeds and avoid any unwanted chemicals.
* Therapeutic: There’s something incredibly satisfying about watching something grow from seed to harvest. It’s a great way to connect with nature and reduce stress.
* Nutrient Powerhouse: Wheatgrass is loaded with vitamins, minerals, and antioxidants. It’s a fantastic addition to a healthy diet.
Experiment and Enjoy!
Growing wheatgrass with water is a fun and rewarding experience. Don’t be afraid to experiment and find what works best for you. You might try different types of trays, different watering schedules, or even different lighting conditions. The most important thing is to have fun and enjoy the process! Happy growing!
Conclusion
So, there you have it! Growing your own wheatgrass with just water is not only incredibly simple, but it’s also a rewarding and cost-effective way to access a powerhouse of nutrients right in your own home. Forget expensive juice bar visits or pre-packaged wheatgrass shots. With minimal effort and just a few readily available supplies, you can cultivate your own vibrant, green patch of health.
This DIY trick is a must-try for several compelling reasons. First, the freshness factor is unbeatable. You’re consuming wheatgrass that’s been harvested at its peak nutritional value, unlike store-bought options that may have been sitting on shelves for days. Second, you have complete control over the growing process, ensuring that your wheatgrass is free from pesticides and other harmful chemicals. Third, it’s a fantastic way to connect with nature and experience the satisfaction of growing your own food. And finally, it’s significantly cheaper than buying wheatgrass regularly.
But the beauty of this method lies in its adaptability. Feel free to experiment with different types of wheatgrass seeds to find your preferred flavor profile. Some varieties are sweeter, while others have a more intense, grassy taste. You can also adjust the growing environment to influence the speed and density of growth. For example, providing more indirect sunlight can result in a deeper green color and potentially enhance the nutrient content.
Consider these variations to personalize your wheatgrass growing experience:
* Layering your seeds: Instead of spreading the seeds in a single layer, try layering them slightly for a denser growth. Just be sure to monitor for mold and ensure adequate airflow.
* Using different containers: While a plastic tray works well, you can also use glass containers or even repurposed plastic containers. Just make sure they have drainage holes.
* Adding a touch of organic fertilizer: While water is sufficient, a very diluted organic fertilizer can give your wheatgrass a boost, especially if you’re growing it in nutrient-poor conditions. Be extremely cautious with the amount, as too much fertilizer can harm the seedlings.
* Creating a wheatgrass “carpet”: For a more visually appealing display, grow your wheatgrass in a shallow, wide container to create a dense, green carpet. This is perfect for adding a touch of nature to your kitchen or living room.
We wholeheartedly encourage you to give this simple yet effective DIY trick a try. It’s a fantastic way to incorporate more greens into your diet, boost your energy levels, and experience the joy of growing your own food. Once you’ve harvested your first batch of homegrown wheatgrass, we’d love to hear about your experience! Share your tips, tricks, and photos in the comments below. Let’s create a community of wheatgrass enthusiasts and inspire others to embrace this healthy and sustainable practice. Don’t forget to share this article with your friends and family who might be interested in learning how to grow wheatgrass with water!
Frequently Asked Questions (FAQ)
What exactly is wheatgrass, and why should I grow it?
Wheatgrass is the young grass of the common wheat plant (Triticum aestivum). It’s a nutritional powerhouse, packed with vitamins, minerals, antioxidants, and enzymes. Many people consume wheatgrass juice for its potential health benefits, including boosting energy levels, detoxifying the body, and improving digestion. Growing your own wheatgrass ensures you have access to fresh, nutrient-rich greens whenever you need them, and it’s a much more affordable option than buying pre-made wheatgrass products.
How long does it take to grow wheatgrass with water?
Typically, it takes about 7-10 days to grow wheatgrass with water from seed to harvest. The exact timeframe can vary depending on factors such as temperature, humidity, and the quality of the seeds. You’ll know it’s ready to harvest when the blades are about 4-7 inches tall and have developed a vibrant green color.
What kind of seeds should I use to grow wheatgrass?
You should use hard red winter wheat seeds specifically labeled for sprouting or growing wheatgrass. Avoid using seeds that are treated with fungicides or other chemicals, as these are not safe for consumption. You can find wheatgrass seeds at most health food stores, garden centers, or online retailers.
Do I need special equipment to grow wheatgrass with water?
No, you don’t need any special equipment. All you need is a shallow tray or container with drainage holes, wheatgrass seeds, water, and a spray bottle. A dark place for the first few days of germination is also helpful.
How often should I water the wheatgrass?
You should water the wheatgrass at least once a day, or more often if the soil is drying out quickly. Use a spray bottle to mist the seeds and seedlings, keeping them consistently moist but not waterlogged. Avoid overwatering, as this can lead to mold growth.
How much sunlight does wheatgrass need?
Wheatgrass needs indirect sunlight to thrive. Avoid placing it in direct sunlight, as this can scorch the leaves. A bright, indirect light source, such as a windowsill or a grow light, is ideal.
How do I prevent mold from growing on my wheatgrass?
Mold growth is a common concern when growing wheatgrass. To prevent it, ensure adequate airflow around the plants. Don’t overcrowd the seeds, and avoid overwatering. If you notice any mold, remove the affected areas immediately. You can also try spraying the wheatgrass with a diluted solution of hydrogen peroxide and water.
How do I harvest wheatgrass?
Harvest wheatgrass when the blades are about 4-7 inches tall. Use scissors or a sharp knife to cut the grass close to the soil surface. It’s best to harvest just before you plan to use it for optimal freshness and nutrient content.
How do I store harvested wheatgrass?
Harvested wheatgrass is best used immediately. However, you can store it in the refrigerator for up to a week. Wrap the cut grass in a damp paper towel and place it in a sealed plastic bag.
Can I regrow wheatgrass after harvesting it?
Wheatgrass can be harvested multiple times, but the subsequent harvests will be less productive and nutrient-rich. After the first harvest, you can continue to water and care for the wheatgrass, and it will likely regrow. However, the second harvest will typically be smaller and less flavorful. After the second harvest, it’s best to start a new batch of seeds.
Is it safe to consume wheatgrass if I have a gluten allergy?
Wheatgrass is generally considered safe for people with gluten allergies because it’s harvested before the wheat plant produces gluten-containing grains. However, it’s essential to ensure that the wheatgrass is grown in a gluten-free environment to avoid cross-contamination. If you have a severe gluten allergy, it’s always best to consult with your doctor before consuming wheatgrass.
What are some ways to use wheatgrass?
The most common way to use wheatgrass is to juice it. You can use a wheatgrass juicer or a regular juicer with a wheatgrass attachment. You can also blend wheatgrass into smoothies, salads, or other dishes. Some people even use wheatgrass powder as a dietary supplement.
Can I grow wheatgrass outdoors?
Yes, you can grow wheatgrass outdoors, but it’s important to protect it from extreme temperatures and direct sunlight. A shaded area with well-draining soil is ideal.
What if my wheatgrass doesn’t grow?
If your wheatgrass doesn’t grow, there could be several reasons. Make sure you’re using viable seeds, providing adequate moisture, and maintaining a suitable temperature. Also, check for mold or other signs of disease. If you’re still having trouble, try starting a new batch of seeds in a different location or with different growing conditions.

Leave a Comment