
Grow Thyme Indoors? Absolutely! Imagine having the fresh, aromatic flavor of thyme readily available, right in your kitchen, no matter the season. Forget those sad, wilted sprigs from the grocery store – we’re talking vibrant, flavorful thyme at your fingertips!
For centuries, thyme has been more than just a culinary herb. Ancient Egyptians used it in embalming, while the Greeks associated it with courage and elegance, often burning it as incense in temples. This humble herb boasts a rich history, and now, you can easily bring a piece of that history into your home.
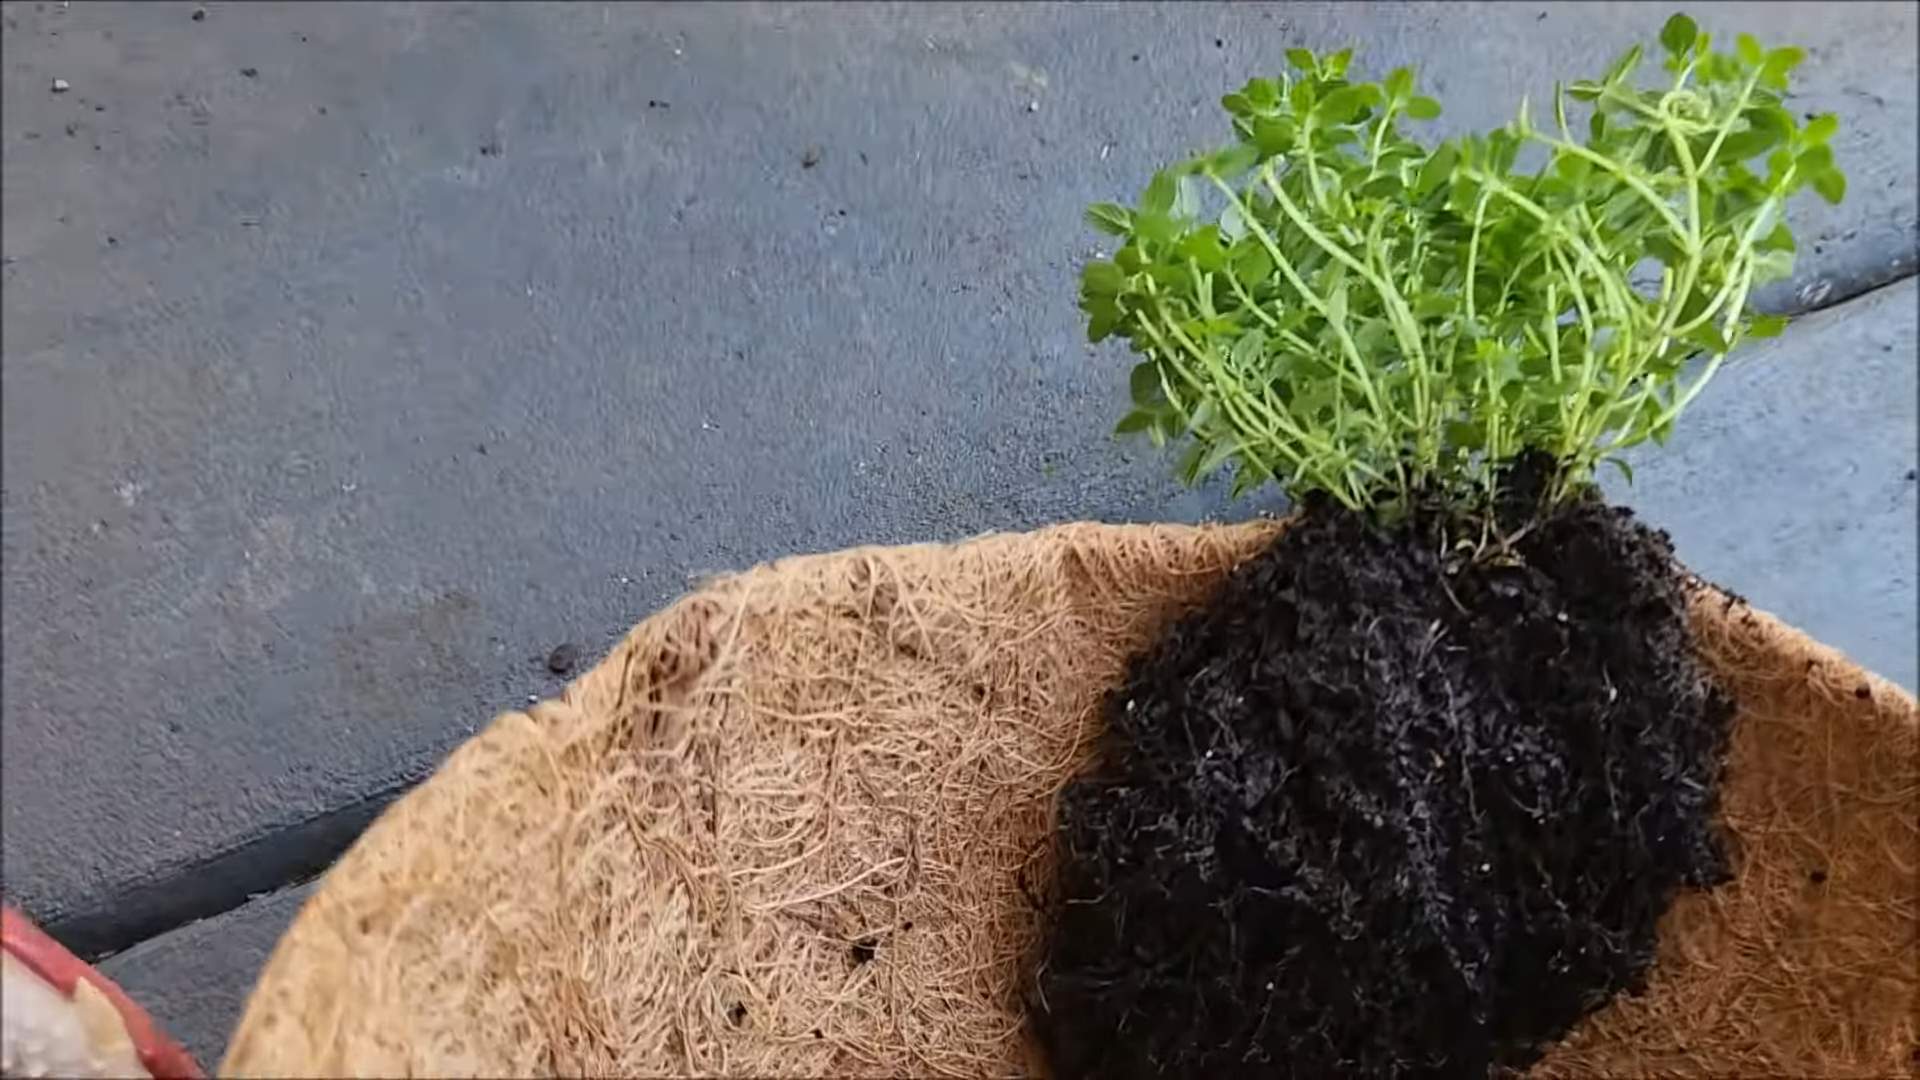
Let’s face it, life gets busy. Running to the store for a single herb can feel like a monumental task. That’s where the magic of growing thyme indoors comes in. Not only does it save you time and money, but it also adds a touch of greenery and freshness to your living space. Plus, the satisfaction of harvesting your own herbs is simply unmatched. I’m going to show you some simple, effective DIY tricks and hacks to successfully grow thyme indoors, even if you don’t have a green thumb. Get ready to enjoy the delightful aroma and flavor of homegrown thyme all year round!
DIY Home Security System: Turning Old Smartphones into Security Cameras
Okay, so you want to beef up your home security without breaking the bank? I get it! Store-bought security systems can be expensive, and sometimes you just need a little extra peace of mind. That’s where this awesome DIY hack comes in: turning your old smartphones into security cameras! It’s easier than you think, and I’m going to walk you through every step.
What You’ll Need
Before we dive in, let’s gather our supplies. The beauty of this project is that you probably already have most of what you need lying around.
* Old Smartphones: The heart of our system! Make sure they still power on and have a working camera. Even if the screen is cracked, as long as the camera functions, you’re good to go.
* Smartphone Chargers: You’ll need to keep those cameras powered, so grab the chargers that go with your old phones.
* Wi-Fi Connection: A stable Wi-Fi network is essential for streaming video and receiving alerts.
* Security Camera App: We’ll use a free app to turn our phones into cameras. I recommend “AlfredCamera” or “Manything,” but there are others out there. Feel free to experiment!
* Mounting Options: Think about how you want to position your cameras. You could use:
* Tripods: Small, flexible tripods are great for placing cameras on shelves or tables.
* Suction Cup Mounts: Perfect for windows.
* Adhesive Mounts: These stick to walls or other surfaces. Be careful not to damage the paint!
* DIY Mounts: Get creative! You can use cardboard boxes, LEGOs, or anything else you can think of to create a custom mount.
* (Optional) Power Banks: If you need to place a camera somewhere without easy access to an outlet, a power bank can provide backup power.
* (Optional) MicroSD Cards: Some apps allow you to record footage locally on an SD card. This is a good option if you don’t want to rely solely on cloud storage.
Choosing the Right Security Camera App
This is a crucial step, as the app will handle the video streaming, motion detection, and alerts. Here’s what I look for in a good security camera app:
* Free to Use: There are plenty of free apps available with basic features. You can usually upgrade to a premium version for more advanced options.
* Motion Detection: This is a must-have! The app should be able to detect movement and send you notifications.
* Remote Viewing: You need to be able to view the live feed from your cameras from anywhere.
* Two-Way Audio (Optional): This allows you to talk through the camera, which can be useful for scaring off intruders or communicating with family members.
* Cloud Storage (Optional): Some apps offer cloud storage for recorded footage. This is convenient, but it may come with a subscription fee.
* User-Friendly Interface: The app should be easy to navigate and understand.
I’ve personally used AlfredCamera and Manything with great success. They both offer free versions with all the essential features.
Setting Up Your DIY Security System: A Step-by-Step Guide
Alright, let’s get this show on the road! Here’s how to set up your DIY security system:
1. Download and Install the App: On both your old smartphone(s) (which will be the cameras) and your current smartphone (which will be the viewer), download and install your chosen security camera app.
2. Create an Account: Open the app on both devices and create an account. You’ll likely need to use an email address and password. Make sure you use the *same* account on all devices.
3. Designate Camera and Viewer: On your old smartphone(s), open the app and select the option to designate it as a “Camera.” On your current smartphone, select the option to designate it as a “Viewer.” The app will guide you through this process.
4. Configure Camera Settings: On each of your old smartphones (the cameras), take some time to configure the settings. Here are some things to consider:
* Resolution: Higher resolution means better image quality, but it also uses more data. Experiment to find a balance that works for you.
* Motion Detection Sensitivity: Adjust the sensitivity of the motion detection to avoid false alarms.
* Notification Settings: Choose how you want to be notified when motion is detected (e.g., push notifications, email).
* Night Vision (if available): Some apps offer a night vision mode that uses the phone’s flash to illuminate the scene.
* Continuous Recording (if available): Decide whether you want the camera to record continuously or only when motion is detected.
5. Position Your Cameras: Now it’s time to strategically place your cameras. Here are some tips:
* Entry Points: Focus on doors and windows, as these are the most common entry points for burglars.
* High-Traffic Areas: Monitor areas where people frequently pass through, such as hallways and living rooms.
* Blind Spots: Identify areas around your home that are not easily visible and place cameras there.
* Angle and Height: Position your cameras at an angle that provides a good view of the area you want to monitor. Make sure they’re high enough to be out of reach.
* Concealment (Optional): If you want to be discreet, you can try to conceal your cameras. However, make sure they still have a clear view.
6. Connect to Power: Plug in your smartphone chargers and connect them to your cameras. You don’t want your cameras to run out of battery in the middle of the night!
7. Test Your System: Walk around in front of your cameras and make sure the motion detection is working properly. Check the live feed on your viewer smartphone to ensure that you can see everything clearly.
8. Fine-Tune Your Settings: Based on your testing, you may need to adjust the camera settings, such as the motion detection sensitivity or the notification settings.
Optimizing Your DIY Security System
Once you have your basic system set up, here are some tips for optimizing it:
* Use Multiple Cameras: The more cameras you have, the more coverage you’ll get. Consider placing cameras at all entry points and in key areas of your home.
* Consider Lighting: Good lighting is essential for clear video footage. Make sure your cameras are well-lit, especially at night. You might consider adding motion-activated lights to deter intruders.
* Secure Your Wi-Fi Network: A strong password and a secure Wi-Fi network are crucial for protecting your security system from hackers.
* Regularly Check Your System: Make sure your cameras are still working properly and that the batteries are charged.
* Update Your App: Keep your security camera app updated to ensure that you have the latest features and security patches.
* Consider a Dummy Camera: A dummy camera can be a cheap and effective way to deter burglars. Place it in a visible location to make it look like you have a more sophisticated security system.
* Use IFTTT (If This Then That): IFTTT is a free web service that allows you to connect different apps and devices. You can use IFTTT to create custom rules for your security system. For example, you could set up a rule that turns on your smart lights when motion is detected by your camera.
Troubleshooting Common Issues
Even with the best planning, you might run into some issues. Here are some common problems and how to fix them:
* Camera Not Connecting: Make sure both your camera and viewer smartphones are connected to the same Wi-Fi network. Also, check that you’re using the same account on both devices.
* Motion Detection Not Working: Adjust the motion detection sensitivity in the app settings. Also, make sure there are no obstructions blocking the camera’s view.
* Poor Video Quality: Try adjusting the resolution in the app settings. Also, make sure your Wi-Fi connection is strong.
* Battery Draining Quickly: Keep your cameras plugged in whenever possible. If you’re using a power bank, make sure it’s fully charged.
* False Alarms: Reduce the motion detection sensitivity or adjust the detection zone to exclude areas that are prone to false alarms (e.g., trees blowing in the wind).
Important Security Considerations
While this DIY system is a great start, it’s important to remember that it’s not a replacement for a professional security system. Here are some things to keep in mind:
* Limited Functionality: DIY systems typically don’t offer the same level of functionality as professional systems. For example, they may
Conclusion
So, there you have it! Growing thyme indoors is not only achievable, but it’s also a rewarding experience that brings the fresh, aromatic flavors of the Mediterranean right into your kitchen. Forget those wilted, overpriced sprigs from the grocery store. With a little effort and the right setup, you can have a constant supply of vibrant, flavorful thyme at your fingertips.
Why is this DIY trick a must-try? Because it empowers you to control the quality and freshness of your herbs. You know exactly where your thyme comes from, how it’s been cared for, and that it’s free from any unwanted pesticides or chemicals. Plus, it’s incredibly satisfying to nurture a plant from a tiny seedling or cutting into a thriving herb that enhances your culinary creations. Imagine the pride you’ll feel when you sprinkle your own homegrown thyme onto a roasted chicken, a creamy pasta dish, or a flavorful soup.
But the benefits don’t stop there. Growing thyme indoors also adds a touch of greenery and life to your home. It’s a small, manageable plant that can thrive in a sunny windowsill, bringing a bit of the outdoors in, even during the coldest months. And let’s not forget the delightful aroma that fills the air whenever you brush against the leaves. It’s a natural air freshener that’s both invigorating and calming.
Ready to take your indoor herb gardening to the next level? Consider experimenting with different varieties of thyme. Lemon thyme adds a citrusy twist to your dishes, while creeping thyme can be used as a fragrant ground cover in larger pots. You can also try propagating your thyme from cuttings to expand your collection and share with friends and family. Another great variation is to create a small indoor herb garden, combining thyme with other complementary herbs like rosemary, oregano, and sage. This allows you to have a diverse range of flavors readily available for all your cooking needs.
Don’t be intimidated if you’re new to indoor gardening. Growing thyme indoors is relatively easy, even for beginners. Just remember to provide plenty of sunlight, well-draining soil, and regular watering. And don’t be afraid to experiment and learn as you go. Every plant is different, and you’ll quickly develop a feel for what your thyme needs to thrive.
We wholeheartedly encourage you to give this DIY trick a try. It’s a simple, affordable, and rewarding way to enhance your cooking, beautify your home, and connect with nature. Once you experience the joy of harvesting your own fresh thyme, you’ll never go back to store-bought herbs again.
So, grab a pot, some soil, and a thyme plant, and get started today! We’re confident that you’ll be amazed at how easy and rewarding it is to grow your own thyme indoors. And most importantly, we want to hear about your experience! Share your tips, successes, and challenges in the comments below. Let’s create a community of indoor herb gardeners and inspire others to discover the joys of growing their own food. Happy gardening!
Frequently Asked Questions (FAQ)
What kind of soil is best for growing thyme indoors?
Thyme thrives in well-draining soil. A mixture of potting soil, perlite, and sand is ideal. This combination ensures that the soil doesn’t retain too much water, which can lead to root rot. You can also use a commercially available cactus or succulent mix, as these are typically well-draining. Avoid using heavy garden soil, as it can become compacted and prevent proper drainage.
How much sunlight does indoor thyme need?
Thyme needs at least six hours of direct sunlight per day to thrive. A south-facing windowsill is usually the best location. If you don’t have enough natural light, you can supplement with a grow light. Place the grow light a few inches above the plant and keep it on for 12-14 hours per day. Rotate the plant regularly to ensure that all sides receive adequate light.
How often should I water my indoor thyme plant?
Water thyme when the top inch of soil feels dry to the touch. Avoid overwatering, as this can lead to root rot. When you water, water thoroughly until water drains out of the bottom of the pot. Then, allow the soil to dry out before watering again. During the winter months, when the plant is not actively growing, you may need to water less frequently.
How do I harvest thyme from my indoor plant?
Harvest thyme by snipping off stems with scissors or pruning shears. Avoid removing more than one-third of the plant at a time, as this can stress the plant. The best time to harvest thyme is in the morning, after the dew has dried. This is when the essential oils are most concentrated, resulting in the best flavor. You can use the fresh thyme immediately or dry it for later use.
Can I grow thyme from seed indoors?
Yes, you can grow thyme from seed indoors, but it can be a slow process. Start the seeds indoors 6-8 weeks before the last expected frost. Sow the seeds thinly on the surface of a seed-starting mix and gently press them into the soil. Keep the soil moist but not soggy, and provide plenty of light. Germination can take up to three weeks. Once the seedlings are large enough to handle, transplant them into individual pots.
My thyme plant is looking leggy. What should I do?
Leggy growth, characterized by long, spindly stems with few leaves, is often a sign of insufficient light. Move your thyme plant to a sunnier location or supplement with a grow light. You can also prune the plant back to encourage bushier growth. Use clean pruning shears to trim the stems back to just above a leaf node.
How do I fertilize my indoor thyme plant?
Thyme doesn’t require heavy fertilization. Feed your plant every 2-3 months with a diluted liquid fertilizer formulated for herbs. Follow the instructions on the fertilizer label carefully. Avoid over-fertilizing, as this can lead to weak growth and a build-up of salts in the soil.
What are some common pests and diseases that affect indoor thyme?
Common pests that can affect indoor thyme include aphids, spider mites, and whiteflies. Inspect your plant regularly for signs of infestation, such as sticky residue, webbing, or tiny insects. Treat infestations with insecticidal soap or neem oil. Root rot is a common disease that can affect thyme, especially if the soil is not well-draining. Prevent root rot by avoiding overwatering and ensuring that the pot has drainage holes.
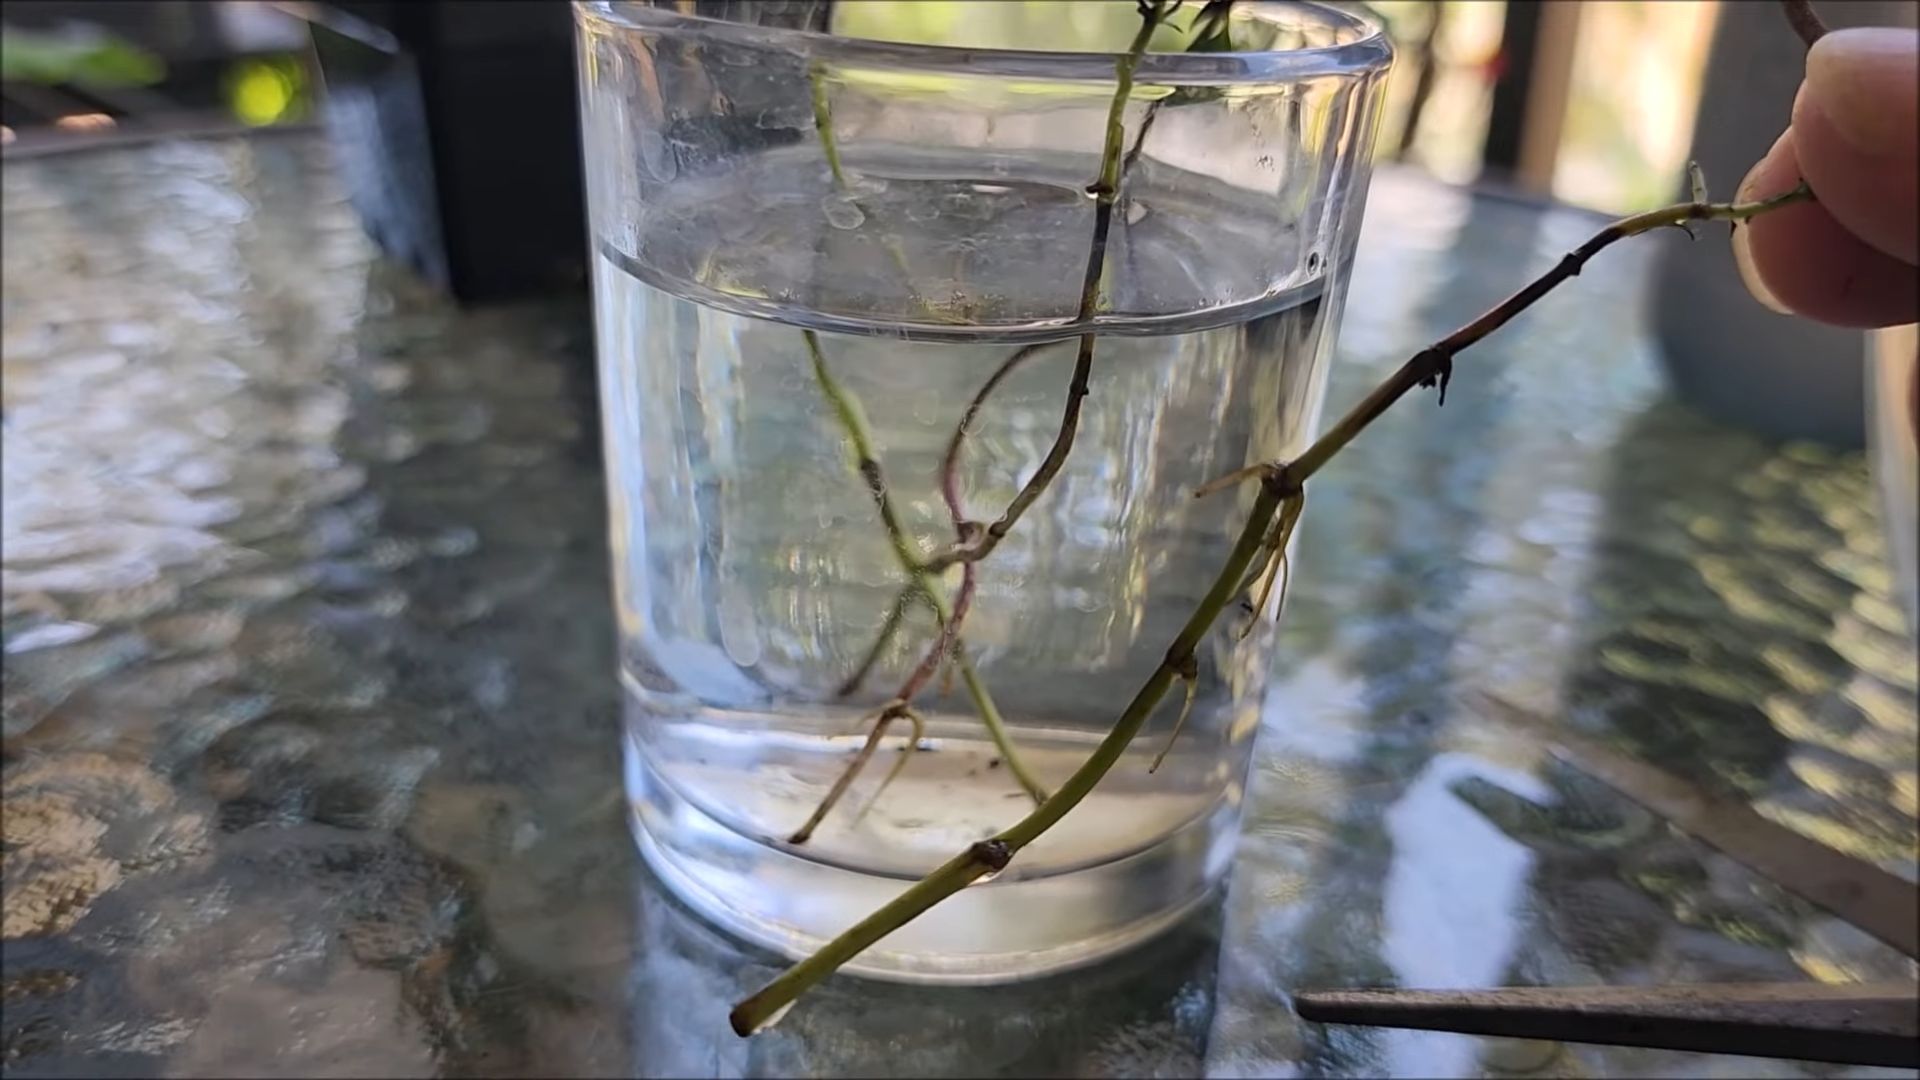
Can I propagate thyme from cuttings?
Yes, propagating thyme from cuttings is a relatively easy way to create new plants. Take cuttings from healthy stems that are about 4-6 inches long. Remove the leaves from the bottom inch of the cutting and dip the cut end in rooting hormone. Plant the cutting in a pot filled with well-draining potting mix. Keep the soil moist and provide plenty of light. The cutting should root within a few weeks.
Is growing thyme indoors year-round possible?
Absolutely! With the right conditions – sufficient light, well-draining soil, and proper watering – you can enjoy fresh thyme from your indoor garden all year long. Remember to adjust your watering schedule based on the season and provide supplemental light if needed during the darker winter months. Regular harvesting will also encourage new growth and keep your thyme plant healthy and productive.


Leave a Comment