
Grow Snake Gourd Easily, even if you think you don’t have a green thumb! Have you ever looked at those long, winding snake gourds at the market and thought, “Wow, I wish I could grow those myself”? Well, guess what? You absolutely can! This often overlooked vegetable, with its fascinating shape and mild flavor, is surprisingly easy to cultivate at home with a few simple tricks and DIY hacks.
For centuries, snake gourds have been a staple in Asian cuisine and traditional medicine, prized not only for their culinary versatility but also for their purported health benefits. From stir-fries to curries, this unique vegetable adds a delightful touch to any dish. But beyond its culinary uses, growing your own snake gourd connects you to a rich agricultural heritage.
Why should you bother with this DIY project? Because fresh, homegrown produce simply tastes better! Plus, knowing exactly where your food comes from is incredibly rewarding. In this article, I’m going to share my favorite tips and tricks to help you grow snake gourd easily, even if you’re a beginner gardener. We’ll cover everything from seed starting to trellising, ensuring you have a bountiful harvest of these fascinating vegetables. Get ready to impress your friends and family with your gardening prowess!
Schlangenkürbis einfach selbst anbauen: Mein DIY-Leitfaden für eine reiche Ernte
Hallo Gartenfreunde! Ich liebe es, ungewöhnliche Gemüsesorten anzubauen, und der Schlangenkürbis (Trichosanthes cucumerina) ist definitiv einer meiner Favoriten. Er ist nicht nur super lecker, sondern auch ein echter Hingucker im Garten. Viele denken, er sei schwer anzubauen, aber mit meinen Tipps und Tricks wirst du sehen, dass es gar nicht so kompliziert ist. In diesem Artikel zeige ich dir, wie du deinen eigenen Schlangenkürbis erfolgreich anbauen kannst – von der Aussaat bis zur Ernte. Los geht’s!
Was du über Schlangenkürbis wissen solltest
Bevor wir loslegen, hier ein paar wichtige Infos über den Schlangenkürbis:
* Wachstum: Schlangenkürbisse sind Kletterpflanzen und können sehr lang werden (bis zu 2 Meter!). Du brauchst also unbedingt eine Rankhilfe.
* Klima: Sie lieben die Wärme! Schlangenkürbisse brauchen viel Sonne und Temperaturen über 20°C, um gut zu wachsen.
* Boden: Der Boden sollte nährstoffreich, locker und gut durchlässig sein.
* Bestäubung: Schlangenkürbisse haben männliche und weibliche Blüten. Die Bestäubung erfolgt meist durch Insekten, aber manchmal muss man auch selbst Hand anlegen.
* Ernte: Die Kürbisse werden jung geerntet, wenn sie noch zart und grün sind.
Die richtige Vorbereitung ist alles
Bevor du mit der Aussaat beginnst, solltest du ein paar Vorbereitungen treffen:
* Samen besorgen: Du kannst Schlangenkürbis-Samen online oder in gut sortierten Gärtnereien kaufen. Achte auf eine gute Qualität.
* Rankhilfe bauen oder kaufen: Eine stabile Rankhilfe ist unerlässlich. Du kannst eine einfache Konstruktion aus Holz bauen oder eine fertige Rankhilfe kaufen. Ich bevorzuge eine stabile Laube oder ein Spalier.
* Standort wählen: Suche einen sonnigen und windgeschützten Platz in deinem Garten.
* Boden vorbereiten: Lockere den Boden gut auf und reicher ihn mit Kompost oder anderem organischen Dünger an.
Schritt-für-Schritt-Anleitung zur Aussaat
Ich ziehe meine Schlangenkürbisse immer vor, um ihnen einen Vorsprung zu verschaffen. Hier ist, wie ich es mache:
1. Aussaatzeitpunkt: Beginne mit der Aussaat im März oder April im Haus.
2. Aussaatgefäße vorbereiten: Verwende kleine Töpfe oder Anzuchtschalen. Fülle sie mit Anzuchterde.
3. Samen säen: Lege in jeden Topf 1-2 Samen, etwa 1-2 cm tief.
4. Angießen: Gieße die Erde vorsichtig an, sodass sie feucht, aber nicht nass ist.
5. Warm stellen: Stelle die Töpfe an einen warmen Ort (ca. 22-25°C). Ein Mini-Gewächshaus oder eine Fensterbank über der Heizung sind ideal.
6. Feucht halten: Halte die Erde gleichmäßig feucht.
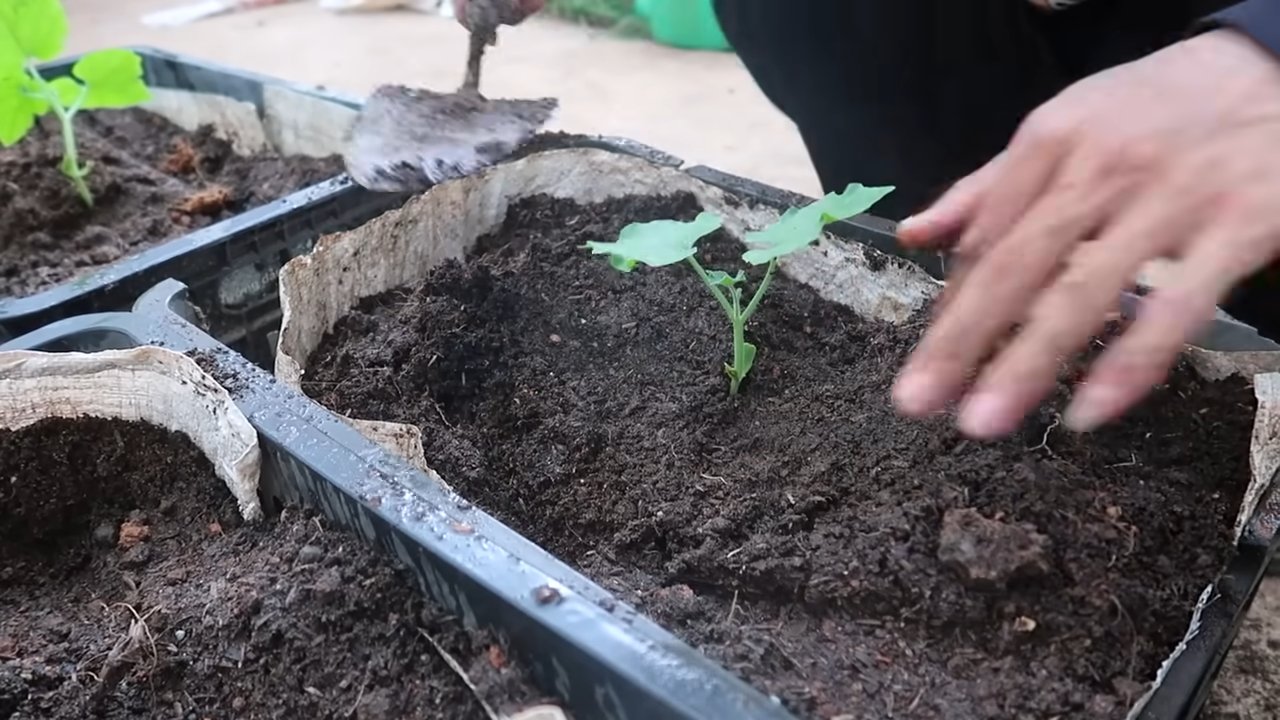
7. Pikieren: Sobald die Sämlinge 2-3 echte Blätter haben, kannst du sie in größere Töpfe pikieren.
Aussetzen ins Freie
Sobald die Temperaturen steigen und keine Frostgefahr mehr besteht (meist ab Mitte Mai), kannst du die Jungpflanzen ins Freie setzen.
1. Abhärten: Gewöhne die Pflanzen langsam an die Außenbedingungen, indem du sie täglich für ein paar Stunden ins Freie stellst.
2. Pflanzloch vorbereiten: Hebe ein ausreichend großes Pflanzloch aus.
3. Pflanzen einsetzen: Setze die Jungpflanzen vorsichtig in die Pflanzlöcher. Achte darauf, die Wurzeln nicht zu beschädigen.
4. Angießen: Gieße die Pflanzen gründlich an.
5. Rankhilfe anbringen: Leite die Triebe der Pflanzen an der Rankhilfe entlang.
Pflege während der Wachstumsphase
Die richtige Pflege ist entscheidend für eine reiche Ernte.
1. Gießen: Gieße die Pflanzen regelmäßig, besonders bei trockenem Wetter. Achte darauf, dass der Boden nicht austrocknet.
2. Düngen: Dünge die Pflanzen alle 2-3 Wochen mit einem organischen Gemüsedünger. Ich verwende gerne Brennnesseljauche oder Komposttee.
3. Ausgeizen: Entferne Seitentriebe, um die Bildung von Früchten zu fördern.
4. Bestäubung unterstützen: Wenn du feststellst, dass wenig Insekten unterwegs sind, kannst du die Bestäubung selbst übernehmen. Trage mit einem kleinen Pinsel Pollen von den männlichen auf die weiblichen Blüten. Du erkennst die weiblichen Blüten an dem kleinen Fruchtansatz direkt hinter der Blüte.
5. Schädlingsbekämpfung: Kontrolliere die Pflanzen regelmäßig auf Schädlinge wie Blattläuse oder Schnecken. Bei Bedarf kannst du biologische Schädlingsbekämpfungsmittel einsetzen.
Erntezeit!
Die Erntezeit beginnt etwa 2-3 Monate nach der Aussaat.
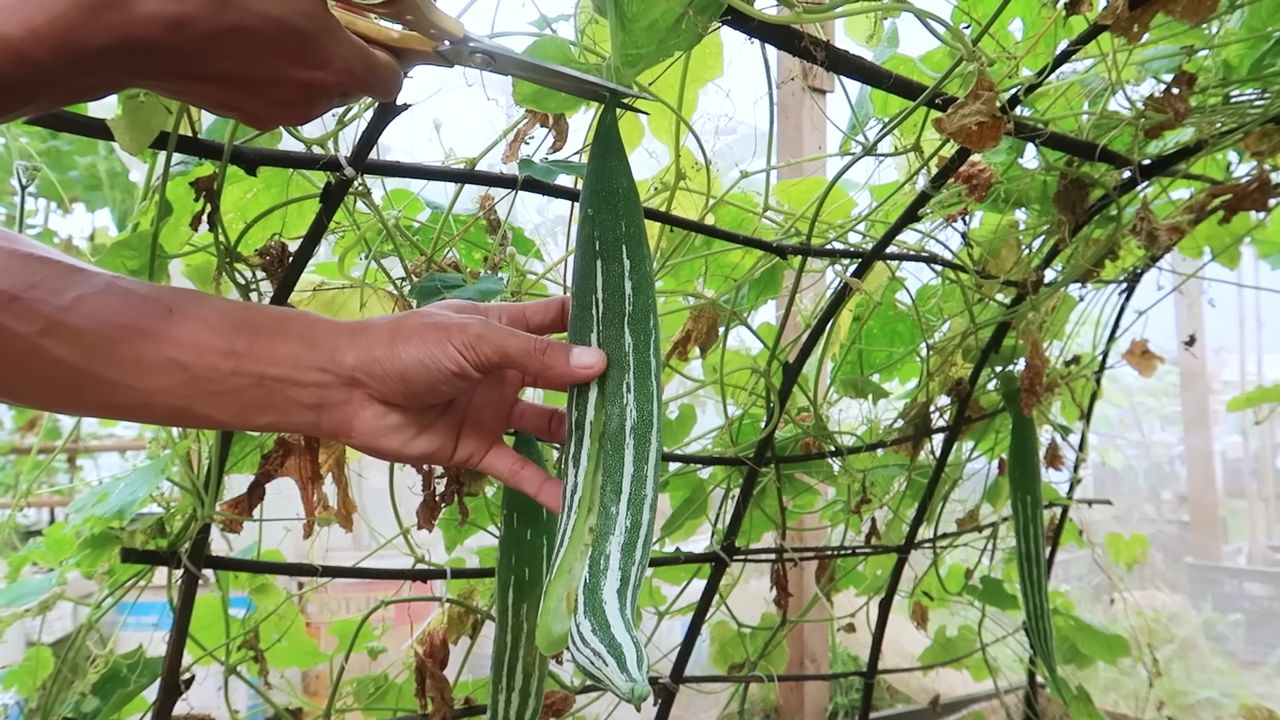
1. Erntezeitpunkt: Ernte die Kürbisse, wenn sie noch jung und zart sind (ca. 30-50 cm lang). Sie sollten sich fest anfühlen und eine grüne Farbe haben.
2. Ernten: Schneide die Kürbisse mit einem scharfen Messer oder einer Gartenschere ab.
3. Lagerung: Schlangenkürbisse sind nicht lange haltbar. Du solltest sie möglichst bald verarbeiten. Im Kühlschrank halten sie sich ein paar Tage.
Herausforderungen und Lösungen
Auch beim Anbau von Schlangenkürbissen kann es zu Problemen kommen. Hier sind ein paar häufige Herausforderungen und meine Lösungen:
* Keine Früchte: Wenn keine Früchte entstehen, kann das an mangelnder Bestäubung liegen. Unterstütze die Bestäubung selbst oder locke Insekten an, indem du blühende Pflanzen in der Nähe anpflanzt.
* Gelbe Blätter: Gelbe Blätter können auf Nährstoffmangel hindeuten. Dünge die Pflanzen mit einem organischen Dünger.
* Schädlingsbefall: Kontrolliere die Pflanzen regelmäßig auf Schädlinge und bekämpfe sie bei Bedarf mit biologischen Mitteln.
* Fruchtfäule: Fruchtfäule kann durch zu viel Feuchtigkeit entstehen. Achte auf eine gute Belüftung und vermeide Staunässe.
Meine Lieblingsrezepte mit Schlangenkürbis
Schlangenkürbis ist vielseitig verwendbar. Du kannst ihn roh in Salaten essen, braten, grillen, füllen oder in Currys verwenden. Hier sind ein paar meiner Lieblingsrezepte:
* Schlangenkürbis-Curry: Ein leckeres und einfaches Curry mit Kokosmilch, Gewürzen und Gemüse.
* Gefüllter Schlangenkürbis: Ein herzhaftes Gericht mit Hackfleisch, Reis und Gemüse gefüllt.
* Gebratener Schlangenkürbis: Einfach in Scheiben schneiden, mit Öl und Gewürzen beträufeln und in der Pfanne braten.
* Schlangenkürbis-Salat: Rohe Schlangenkürbis-Scheiben mit einem leichten Dressing und Kräutern.
Zusätzliche Tipps für eine erfolgreiche Ernte
Hier sind noch ein paar zusä
Conclusion
So, there you have it! Growing snake gourd doesn’t have to be a daunting task. By implementing this simple yet effective DIY trick, you’re not just planting seeds; you’re cultivating a thriving vine that will reward you with an abundance of these fascinating and delicious vegetables. This method, focusing on optimized soil preparation and strategic support systems, significantly increases your chances of success, even if you’re a beginner gardener.
Why is this a must-try? Because it addresses the two most common challenges faced by snake gourd growers: poor germination rates and inadequate support for the rapidly growing vines. By pre-sprouting your seeds and providing a robust trellis system, you’re giving your snake gourds the best possible start in life. This translates to healthier plants, higher yields, and ultimately, a more rewarding gardening experience.
But don’t stop there! Feel free to experiment with variations to suit your specific climate and growing conditions. For example, if you live in a particularly hot and dry area, consider adding a layer of mulch around the base of your plants to help retain moisture. You could also try companion planting with beneficial herbs like basil or marigolds to deter pests naturally. Another variation could be to experiment with different types of trellises. While a simple A-frame trellis works well, you might find that a more elaborate structure allows for better air circulation and sunlight penetration, leading to even healthier plants. Consider using recycled materials to build your trellis for an eco-friendly approach. Bamboo poles, old ladders, or even repurposed metal fencing can be creatively transformed into sturdy supports for your growing snake gourds.
Remember, gardening is all about learning and adapting. What works for one person might not work for another, so don’t be afraid to tweak this DIY trick to fit your own unique circumstances. The key is to observe your plants closely and respond to their needs. Are the leaves turning yellow? Perhaps they need more fertilizer. Are the fruits developing slowly? They might need more sunlight.
We are confident that this DIY trick will revolutionize your snake gourd growing experience. It’s a game-changer that simplifies the process and maximizes your chances of a bountiful harvest. Imagine the satisfaction of harvesting your own homegrown snake gourds, knowing that you nurtured them from tiny seeds to mature vegetables. Think of the delicious meals you can create with your fresh produce, from flavorful curries to refreshing salads.
So, what are you waiting for? Grab your seeds, gather your supplies, and get ready to embark on a rewarding gardening adventure. We encourage you to try this DIY trick for growing snake gourd and share your experiences with us. Let us know what worked well for you, what challenges you faced, and any variations you tried. Your feedback will help us refine this method and make it even more accessible to other gardeners. Share your photos and stories on our social media pages using #GrowSnakeGourdEasily. We can’t wait to see your amazing results! Let’s build a community of passionate snake gourd growers and share our knowledge and experiences with the world. Happy gardening!
Frequently Asked Questions (FAQ)
Q: How long does it take for snake gourd seeds to germinate using this pre-sprouting method?
A: Typically, snake gourd seeds can take anywhere from 10 to 21 days to germinate when directly sown in the soil. However, by using the pre-sprouting method described in this article, you can significantly reduce this timeframe. You should start to see signs of germination within 5 to 7 days. Keep the paper towels consistently moist and maintain a warm environment to encourage faster germination. Remember to check the seeds daily and transplant them carefully into your prepared soil as soon as the root emerges.
Q: What type of soil is best for growing snake gourds?
A: Snake gourds thrive in well-drained, fertile soil that is rich in organic matter. A loamy soil is ideal, but you can amend other soil types to improve their suitability. Before planting, incorporate plenty of compost, well-rotted manure, or other organic amendments into the soil to improve drainage, aeration, and nutrient content. A slightly acidic to neutral soil pH (around 6.0 to 7.0) is optimal. You can test your soil pH using a home testing kit or by sending a sample to a local agricultural extension office.
Q: How much sunlight do snake gourds need?
A: Snake gourds require at least 6 to 8 hours of direct sunlight per day to thrive. Choose a planting location that receives ample sunlight throughout the day. If you live in a particularly hot climate, some afternoon shade may be beneficial to prevent the plants from overheating. Insufficient sunlight can lead to stunted growth, reduced flowering, and lower fruit production.
Q: How often should I water my snake gourd plants?
A: Snake gourds need consistent moisture, especially during hot and dry weather. Water deeply and regularly, ensuring that the soil remains consistently moist but not waterlogged. Avoid overhead watering, as this can increase the risk of fungal diseases. Instead, water at the base of the plants, using a soaker hose or drip irrigation system if possible. Check the soil moisture regularly and adjust your watering schedule accordingly.
Q: What kind of fertilizer should I use for snake gourds?
A: Snake gourds are heavy feeders and benefit from regular fertilization. Start with a balanced fertilizer (e.g., 10-10-10) at planting time, following the instructions on the package. As the plants begin to grow and flower, switch to a fertilizer that is higher in phosphorus and potassium to promote fruit development. You can also supplement with organic fertilizers such as compost tea or fish emulsion. Avoid over-fertilizing, as this can lead to excessive vegetative growth at the expense of fruit production.
Q: How do I prevent pests and diseases from affecting my snake gourd plants?
A: Snake gourds can be susceptible to various pests and diseases, including aphids, squash bugs, powdery mildew, and fungal leaf spots. To prevent these problems, practice good garden hygiene, such as removing weeds and debris from around the plants. Encourage beneficial insects, such as ladybugs and lacewings, which prey on aphids and other pests. If you notice signs of pests or diseases, treat them promptly with appropriate organic or chemical controls. Ensure good air circulation around the plants to reduce the risk of fungal diseases.
Q: How do I know when my snake gourds are ready to harvest?
A: Snake gourds are typically harvested when they are young and tender, before they become too seedy. The ideal size for harvesting depends on the variety and your personal preference. Generally, snake gourds are ready to harvest when they are about 12 to 18 inches long and still relatively thin. The skin should be smooth and firm, and the flesh should be white and tender. Use a sharp knife or pruning shears to cut the gourds from the vine, leaving a short stem attached.
Q: Can I grow snake gourds in containers?
A: Yes, you can grow snake gourds in containers, but you will need a large container (at least 20 gallons) to accommodate their extensive root system. Choose a container with good drainage holes and fill it with a well-draining potting mix. Provide a sturdy trellis or support system for the vines to climb on. Container-grown snake gourds may require more frequent watering and fertilization than those grown in the ground.
Q: What are some creative ways to use snake gourds in cooking?
A: Snake gourds are a versatile vegetable that can be used in a variety of dishes. They can be stir-fried, curried, added to soups and stews, or even used in salads. The young, tender gourds have a mild, slightly sweet flavor, while the more mature gourds can be slightly bitter. Snake gourds are also a good source of vitamins, minerals, and fiber. Experiment with different recipes and flavor combinations to discover your favorite ways to enjoy this unique vegetable.

Leave a Comment