
Grow Pineapple on Terrace: Imagine plucking a juicy, sun-ripened pineapple straight from your own terrace garden! Sounds like a tropical dream, right? Well, it doesn’t have to be just a dream. I’m here to tell you that growing your own pineapple at home, even without a sprawling backyard, is totally achievable and incredibly rewarding.
Pineapples, with their iconic crown and sweet, tangy flavor, have a rich history. Originating in South America, they were a symbol of hospitality and luxury, gracing the tables of royalty and explorers alike. Now, you can bring a touch of that exotic elegance to your own home.
Why should you embark on this DIY adventure? Well, for starters, store-bought pineapples can be expensive, and let’s be honest, sometimes they just don’t taste as good as you’d hoped. But more importantly, growing your own pineapple is a fantastic way to connect with nature, learn about plant life cycles, and enjoy the satisfaction of nurturing something from start to finish. Plus, it’s a conversation starter! Who wouldn’t be impressed by a thriving pineapple plant on your terrace? This DIY project is perfect for anyone looking to add a touch of the tropics to their urban oasis and enjoy the freshest, most delicious pineapple imaginable. So, let’s dive in and discover the secrets to successfully grow pineapple on terrace!

Growing Pineapples on Your Terrace: A Tropical DIY Adventure!
Hey there, fellow plant enthusiasts! Ever dreamt of sipping on a freshly squeezed pineapple juice made from a fruit you grew yourself? Well, guess what? You can actually grow pineapples right on your terrace! It’s easier than you might think, and I’m here to guide you through the whole process. Get ready to transform your terrace into a mini tropical paradise!
What You’ll Need: Your Pineapple Growing Arsenal
Before we dive in, let’s gather our supplies. This is crucial for a smooth and successful pineapple-growing journey.
* A Fresh Pineapple: This is your starting point! Choose a ripe pineapple from the grocery store. Look for one with healthy, green leaves and a firm body.
* A Sharp Knife: For separating the crown from the fruit. Safety first, always be careful when handling sharp objects!
* A Pot: Choose a pot that’s at least 10-12 inches in diameter. Pineapples need room to grow their roots.
* Well-Draining Potting Mix: This is super important! Pineapples hate soggy soil. A mix of potting soil, perlite, and sand works wonders.
* Rooting Hormone (Optional): This can help speed up the rooting process, but it’s not essential.
* Watering Can: For gentle watering.
* Spray Bottle: For misting the leaves.
* Gloves: To protect your hands.
* Patience: Growing pineapples takes time, so be prepared to wait!
Phase 1: Preparing the Pineapple Crown
This is where the magic begins! We’re going to turn the top of a pineapple into a brand new plant.
1. Twist or Cut Off the Crown: Hold the pineapple firmly and twist the crown (the leafy top) off. If it doesn’t twist easily, use your sharp knife to carefully cut it off, leaving about an inch of fruit attached.
2. Remove the Bottom Leaves: Gently peel off the bottom few layers of leaves from the crown. This will expose the stem, where the roots will eventually emerge. You should aim to expose about 1-2 inches of the stem.
3. Let the Crown Dry: This is a crucial step to prevent rot. Place the crown in a cool, dry place for 2-3 days. This allows the cut end to callous over, reducing the risk of fungal infections. I usually put mine on a paper towel in a shaded area.
Phase 2: Rooting the Pineapple Crown
Now that our crown is prepped, it’s time to encourage those roots to grow! There are two main methods you can use: water rooting and direct planting. I’ll explain both.
Method 1: Water Rooting (My Preferred Method)
This method allows you to see the roots develop, which is super satisfying!
1. Prepare a Glass or Jar: Fill a glass or jar with water. Make sure the water is clean and fresh.
2. Submerge the Stem: Place the pineapple crown in the glass, ensuring that only the exposed stem is submerged in water. The leaves should be above the water line.
3. Find a Sunny Spot: Place the glass in a bright, sunny location. A windowsill is perfect.
4. Change the Water Regularly: Change the water every 2-3 days to prevent algae growth and keep the water fresh.
5. Wait for Roots to Appear: Be patient! It can take several weeks (usually 2-4) for roots to start appearing. You’ll see small, white roots emerging from the stem.
6. Plant When Roots are Established: Once the roots are about 2-3 inches long, it’s time to plant your pineapple crown in soil.
Method 2: Direct Planting
This method skips the water rooting step and plants the crown directly into the soil.
1. Apply Rooting Hormone (Optional): Dip the cut end of the pineapple crown in rooting hormone powder. This can help stimulate root growth.
2. Prepare the Pot: Fill your pot with well-draining potting mix.
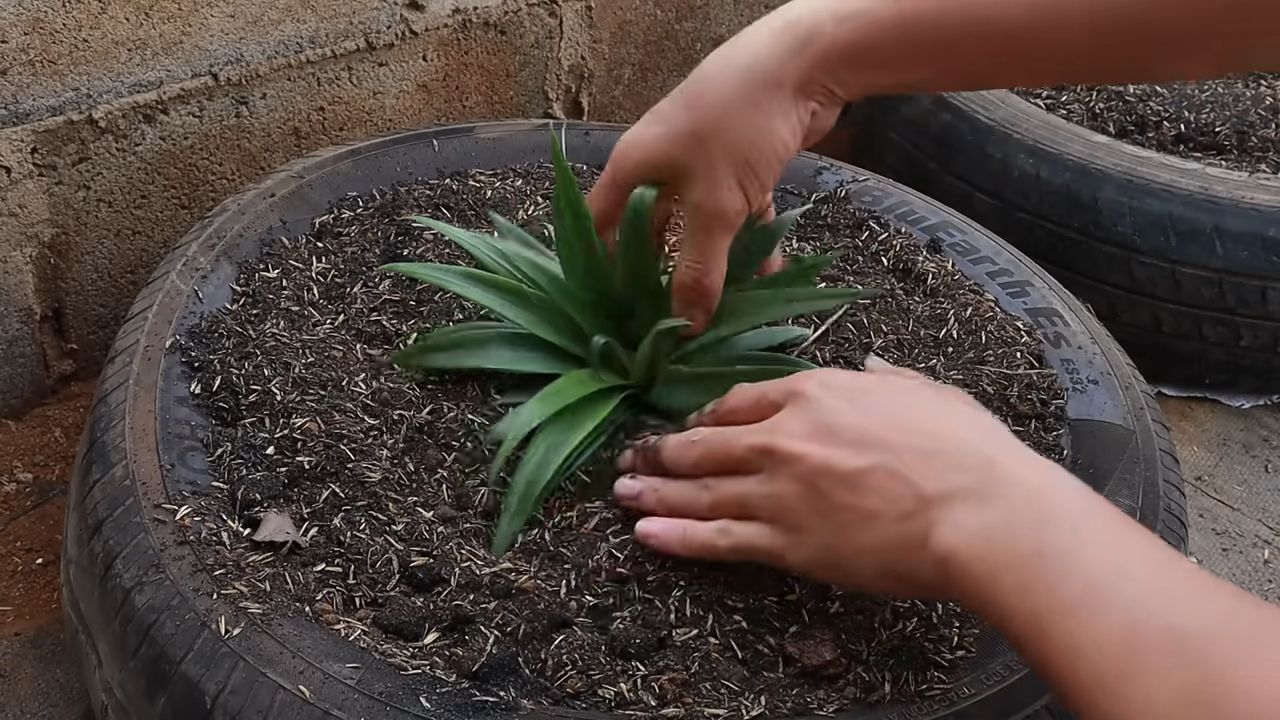
3. Plant the Crown: Make a hole in the center of the soil and plant the pineapple crown, burying the stem up to the base of the leaves.
4. Water Gently: Water the soil gently, making sure not to overwater.
5. Provide Support (Optional): If the crown is wobbly, you can use small sticks or skewers to provide support until the roots establish.
Phase 3: Planting and Caring for Your Pineapple Plant
Whether you water-rooted or directly planted, now it’s time to give your pineapple plant the care it needs to thrive.
1. Choose the Right Potting Mix: As I mentioned earlier, well-draining potting mix is essential. A mix of potting soil, perlite, and sand works great. You can also add some compost for extra nutrients.
2. Planting Depth: Make sure the base of the leaves is just above the soil line. You don’t want to bury the leaves, as this can lead to rot.
3. Watering: Water your pineapple plant regularly, but don’t overwater! Allow the soil to dry out slightly between waterings. I usually water mine once a week, but this can vary depending on the weather and humidity.
4. Sunlight: Pineapples love sunlight! Place your plant in a location that receives at least 6 hours of direct sunlight per day. A south-facing terrace is ideal.
5. Fertilizing: Feed your pineapple plant with a balanced liquid fertilizer every 2-3 months during the growing season (spring and summer). Follow the instructions on the fertilizer label.
6. Temperature: Pineapples thrive in warm temperatures (between 65°F and 85°F). Protect your plant from frost and freezing temperatures. If you live in a colder climate, you may need to bring your plant indoors during the winter.
7. Humidity: Pineapples appreciate humidity. You can increase humidity by misting the leaves regularly with a spray bottle or placing a tray of water near the plant.
8. Pest Control: Keep an eye out for pests like mealybugs and scale. If you spot any pests, treat them with insecticidal soap or neem oil.
Phase 4: Waiting for Your Pineapple to Fruit
This is the most challenging part – the waiting game! It can take anywhere from 1 to 3 years for a pineapple plant to produce fruit. But trust me, it’s worth the wait!
1. Patience is Key: Don’t get discouraged if you don’t see fruit right away. Just keep providing your plant with the care it needs, and eventually, it will reward you.
2. Encouraging Fruiting (Optional): There’s a trick you can try to encourage your pineapple plant to fruit. Place an apple core or a banana peel near the base of the plant. The ethylene gas released by the fruit can stimulate flowering. You can also cover the plant with a clear plastic bag for a week to trap the ethylene gas.
3. Flowering: When your pineapple plant is ready to fruit, it will produce a beautiful flower stalk from the center of the plant.
4. Fruit Development: After the flower fades, a small pineapple will start to develop. It will gradually grow larger and larger over several months.
5. Harvesting: Your pineapple is ready to harvest when it turns a golden-yellow color and has a sweet aroma. Gently twist the pineapple off the plant.
Troubleshooting: Common Pineapple Growing Problems
Even with the best care, you might encounter some problems along the way. Here are a few common issues and how to address them:
* Rotting Crown: This is usually caused by overwatering or poor drainage. Make sure your potting mix is well-draining and avoid overwatering. If the crown starts to rot, remove the affected leaves and let the crown dry out completely before replanting.
* Yellowing Leaves: This can be caused by a variety of factors, including nutrient deficiencies, underwatering, or overwatering. Check the soil moisture and adjust your watering accordingly. Fertilize your plant with a balanced fertilizer.
* Slow Growth: This can be caused by insufficient sunlight, poor soil, or lack of nutrients. Make sure your plant is getting enough sunlight and fertilize it regularly.
* No Fruit: As I mentioned earlier, it can take a long time for a pineapple plant to fruit. Be patient and keep providing your plant with the care it needs. You can also try the ethylene gas trick to encourage fruiting.
Growing pineapples on your terrace is a rewarding experience that brings a touch of the tropics to your home. With a little patience and care, you can enjoy the sweet taste of homegrown pineapple. Happy growing!
Conclusion
So, there you have it! Growing your own pineapple on your terrace isn’t just a quirky gardening project; it’s a rewarding experience that brings a touch of the tropics right to your doorstep. We’ve walked you through the process, from selecting the perfect pineapple top to nurturing your plant to maturity. The satisfaction of harvesting a sweet, juicy pineapple that you’ve grown yourself is unparalleled. It’s a testament to your patience, dedication, and a little bit of gardening magic.
But why is this DIY trick a must-try? Beyond the sheer novelty, growing your own pineapple offers several compelling advantages. Firstly, you have complete control over the growing process, ensuring that your pineapple is free from harmful pesticides and chemicals. Secondly, it’s an incredibly sustainable practice, reducing your reliance on commercially grown pineapples that often travel long distances, contributing to carbon emissions. Thirdly, it’s a fantastic educational opportunity, especially for children, teaching them about plant life cycles and the importance of sustainable living. Finally, and perhaps most importantly, it’s a fun and engaging hobby that can bring joy and a sense of accomplishment to your life.
Don’t be afraid to experiment with variations! Consider using different types of potting mix to see which one works best for your climate and growing conditions. You could also try growing your pineapple in a larger container or even directly in the ground if you live in a warm enough region. For those in colder climates, consider bringing your pineapple plant indoors during the winter months to protect it from frost. You can also experiment with different fertilizers to see which one promotes the healthiest growth and the sweetest fruit. Some gardeners have even had success using organic fertilizers like compost tea or worm castings.
Remember, patience is key. Growing a pineapple from a top takes time, but the end result is well worth the wait. Imagine serving your guests a slice of homegrown pineapple, knowing that you nurtured it from a simple fruit top to a delicious, tropical treat. It’s a conversation starter, a source of pride, and a testament to your green thumb.
We wholeheartedly encourage you to give this DIY trick a try. It’s easier than you might think, and the rewards are immeasurable. Once you’ve embarked on your pineapple-growing journey, we’d love to hear about your experience! Share your photos, tips, and challenges with us in the comments section below. Let’s create a community of pineapple enthusiasts and inspire others to embrace the joy of homegrown fruit. Let us know if you found success with our guide on how to grow pineapple on terrace. Your insights could be invaluable to fellow gardeners. Happy growing!
Frequently Asked Questions (FAQ)
How long does it take to grow a pineapple from a top?
Growing a pineapple from a top is a patience-testing endeavor, but the reward is well worth the wait. Generally, it takes anywhere from 2 to 3 years for a pineapple plant grown from a top to produce fruit. The exact timeframe depends on several factors, including the climate, the quality of the soil, the amount of sunlight the plant receives, and the overall care it receives. Warmer climates tend to promote faster growth, while cooler climates may require more time. Consistent watering and fertilization are also crucial for optimal growth and fruit production. Don’t be discouraged if it takes longer than expected; just keep providing your plant with the care it needs, and eventually, you’ll be rewarded with a delicious, homegrown pineapple.
What kind of soil is best for growing pineapples?
Pineapples thrive in well-draining, slightly acidic soil. A sandy loam soil is ideal, as it allows for good drainage while still retaining enough moisture to support the plant’s growth. You can create a suitable potting mix by combining equal parts of potting soil, perlite, and sand. The perlite helps to improve drainage, while the sand adds weight and stability to the mix. Avoid using heavy clay soils, as they tend to retain too much water, which can lead to root rot. You can also amend your soil with organic matter, such as compost or well-rotted manure, to improve its fertility and drainage. A soil pH between 5.5 and 6.5 is optimal for pineapple growth. You can test your soil’s pH using a soil testing kit and adjust it accordingly with lime (to raise the pH) or sulfur (to lower the pH).
How much sunlight does a pineapple plant need?
Pineapple plants are sun-loving creatures and require at least 6 hours of direct sunlight per day to thrive. The more sunlight they receive, the better they will grow and the more likely they are to produce fruit. If you’re growing your pineapple plant indoors, place it near a sunny window where it can receive ample sunlight. You may also need to supplement with artificial lighting, such as a grow light, especially during the winter months when sunlight is limited. If you’re growing your pineapple plant outdoors, choose a location that receives full sun throughout the day. Be mindful of the intensity of the sunlight, especially during the hottest part of the day. In extremely hot climates, you may need to provide some afternoon shade to prevent the leaves from scorching.
How often should I water my pineapple plant?
Watering frequency depends on several factors, including the climate, the type of soil, and the size of the pot. Generally, you should water your pineapple plant when the top inch of soil feels dry to the touch. Avoid overwatering, as this can lead to root rot. Pineapples are relatively drought-tolerant, so it’s better to err on the side of underwatering than overwatering. During the warmer months, you may need to water your plant more frequently, while during the cooler months, you can reduce the watering frequency. When watering, water thoroughly until the water drains out of the bottom of the pot. This ensures that the entire root system is adequately hydrated. Avoid getting water on the crown of the plant, as this can promote fungal growth.
What kind of fertilizer should I use for my pineapple plant?
Pineapple plants benefit from regular fertilization, especially during the growing season. A balanced fertilizer with a ratio of 10-10-10 or 14-14-14 is a good choice. You can also use a fertilizer specifically formulated for bromeliads, as pineapples are members of the bromeliad family. Apply the fertilizer according to the manufacturer’s instructions, typically every 2-3 months during the growing season. Avoid over-fertilizing, as this can damage the plant. You can also supplement with organic fertilizers, such as compost tea or worm castings, to provide additional nutrients and improve soil health. Foliar feeding, where you spray the leaves with a diluted fertilizer solution, can also be beneficial.
How do I know when my pineapple is ripe?
Determining when a pineapple is ripe can be tricky, but there are several indicators to look for. The first is the color of the skin. A ripe pineapple will typically have a golden-yellow color, although some varieties may remain greenish even when ripe. The second is the aroma. A ripe pineapple will have a sweet, fragrant smell, especially at the base of the fruit. The third is the firmness of the fruit. A ripe pineapple will be slightly soft to the touch, but not mushy. You can also try pulling out one of the leaves from the crown. If it comes out easily, the pineapple is likely ripe. Finally, you can tap on the side of the pineapple. A ripe pineapple will have a dull, thudding sound, while an unripe pineapple will have a hollow sound. Once you’ve harvested your pineapple, it will not continue to ripen, so it’s important to harvest it at the peak of ripeness.
My pineapple plant is not fruiting. What can I do?
There are several reasons why your pineapple plant may not be fruiting. The most common reason is that the plant is not mature enough. It typically takes 2-3 years for a pineapple plant grown from a top to produce fruit. Another reason could be insufficient sunlight. Pineapple plants need at least 6 hours of direct sunlight per day to fruit properly. Lack of proper fertilization can also hinder fruit production. Make sure you are fertilizing your plant regularly with a balanced fertilizer. You can also try inducing flowering by exposing your plant to ethylene gas. You can do this by placing an apple core or a banana peel near the plant, as these fruits release ethylene gas as they ripen. Cover the plant with a plastic bag for a few days to trap the gas. This can sometimes trigger the plant to flower.


Leave a Comment