
Grow Napa Cabbage at Home and unlock the secrets to fresh, flavorful, and homegrown goodness right in your backyard! Have you ever dreamt of strolling through your garden, harvesting crisp, vibrant Napa cabbage for a delicious stir-fry or a tangy kimchi batch? Well, dream no more! This DIY guide is your passport to cultivating this versatile vegetable with ease, even if you’re a beginner gardener.
Napa cabbage, also known as Chinese cabbage, boasts a rich history deeply intertwined with Asian culinary traditions. For centuries, it has been a staple ingredient, prized for its mild flavor, crisp texture, and nutritional benefits. From the bustling markets of Beijing to the family kitchens of Korea, Napa cabbage has nourished communities and delighted palates.
But why should you bother growing your own? In today’s world, where access to fresh, locally sourced produce can be a challenge, mastering the art of growing your own Napa cabbage offers a rewarding solution. Not only will you enjoy the unparalleled taste of freshly harvested vegetables, but you’ll also gain control over the growing process, ensuring that your cabbage is free from harmful pesticides and chemicals. Plus, let’s be honest, there’s something incredibly satisfying about nurturing a plant from seed to table. So, let’s dive in and discover the simple yet effective tricks and hacks that will empower you to grow Napa Cabbage at Home successfully!
Napa Kohl zu Hause anbauen: Dein umfassender DIY-Leitfaden
Hallo Gartenfreunde! Habt ihr schon mal darüber nachgedacht, euren eigenen Napa Kohl (auch Chinakohl genannt) anzubauen? Es ist einfacher, als ihr vielleicht denkt, und der Geschmack von frisch geerntetem Napa Kohl ist einfach unschlagbar. In diesem Artikel zeige ich euch Schritt für Schritt, wie ihr das hinbekommt. Los geht’s!
Warum Napa Kohl selbst anbauen?
Bevor wir ins Detail gehen, lasst mich euch kurz erklären, warum es sich lohnt, Napa Kohl selbst anzubauen:
* Frische: Nichts schlägt den Geschmack von frisch geerntetem Gemüse.
* Kontrolle: Ihr wisst genau, was in eurem Garten passiert und könnt Pestizide vermeiden.
* Nachhaltigkeit: Ihr reduziert Transportwege und unterstützt lokale Lebensmittelproduktion.
* Spaß: Gärtnern ist eine entspannende und lohnende Tätigkeit.
Was du brauchst: Die Materialliste
Bevor wir loslegen, solltet ihr sicherstellen, dass ihr alles Notwendige zur Hand habt. Hier ist eine Liste der Dinge, die ihr benötigt:
* Napa Kohl Samen: Wählt eine Sorte, die für euer Klima geeignet ist.
* Anzuchterde: Für die Voranzucht im Haus.
* Gartenerde: Für das Beet im Garten.
* Kompost oder organischer Dünger: Um den Boden anzureichern.
* Anzuchttöpfe oder -schalen: Für die Voranzucht.
* Gießkanne oder Gartenschlauch: Zum Bewässern.
* Gartenwerkzeug: Spaten, Harke, Pflanzkelle.
* Mulchmaterial: Stroh oder Holzhackschnitzel, um den Boden feucht zu halten und Unkraut zu unterdrücken.
* Schutznetz (optional): Gegen Schädlinge wie Kohlweißlinge.
Die Vorbereitung: Der Schlüssel zum Erfolg
Eine gute Vorbereitung ist das A und O beim Gärtnern. Hier sind die Schritte, die ihr unternehmen solltet, bevor ihr mit dem Pflanzen beginnt:
1. Den richtigen Zeitpunkt wählen
Napa Kohl ist eine Kühlwetterpflanze. Das bedeutet, dass er am besten im Frühjahr oder Spätsommer angebaut wird.
* Frühjahrspflanzung: Beginnt die Voranzucht im Haus etwa 6-8 Wochen vor dem letzten erwarteten Frost.
* Spätsommerpflanzung: Beginnt die Voranzucht im Haus etwa 6-8 Wochen vor dem ersten erwarteten Frost.
2. Den Standort vorbereiten
Napa Kohl braucht einen sonnigen Standort mit mindestens 6 Stunden direkter Sonneneinstrahlung pro Tag. Der Boden sollte gut durchlässig und reich an organischen Stoffen sein.
* Boden testen: Führt einen Bodentest durch, um den pH-Wert und den Nährstoffgehalt zu bestimmen. Napa Kohl bevorzugt einen pH-Wert zwischen 6,0 und 7,5.
* Boden verbessern: Mischt Kompost oder organischen Dünger in den Boden, um ihn anzureichern und die Drainage zu verbessern.
* Beet vorbereiten: Lockert den Boden mit einem Spaten oder einer Harke auf und entfernt Steine und Unkraut.
Die Anzucht: Der Start ins Leben
Ich ziehe meine Napa Kohl Pflanzen gerne im Haus vor, um ihnen einen Vorsprung zu verschaffen. Hier ist, wie ich es mache:
1. Samen säen
* Anzuchttöpfe füllen: Füllt eure Anzuchttöpfe oder -schalen mit Anzuchterde.
* Samen säen: Säet 2-3 Samen pro Topf, etwa 1 cm tief.
* Gießen: Gießt die Erde vorsichtig, bis sie feucht, aber nicht durchnässt ist.
* Warm stellen: Stellt die Töpfe an einen warmen Ort (ca. 20-25°C).
2. Keimung und Pflege
* Keimung beobachten: Die Samen sollten innerhalb von 7-10 Tagen keimen.
* Ausdünnen: Sobald die Sämlinge ein paar Blätter haben, dünnt ihr sie aus, sodass nur der stärkste Sämling pro Topf übrig bleibt.
* Licht: Stellt die Sämlinge an einen hellen Ort oder unter eine Pflanzenlampe.
* Gießen: Haltet die Erde feucht, aber nicht durchnässt.
* Düngen: Düngt die Sämlinge alle 2 Wochen mit einem verdünnten Flüssigdünger.
Das Umpflanzen: Raus in den Garten
Sobald die Sämlinge stark genug sind (ca. 10-15 cm hoch), können sie ins Freie umgepflanzt werden.
1. Abhärten
Bevor ihr die Sämlinge ins Freie pflanzt, müsst ihr sie abhärten. Das bedeutet, dass ihr sie allmählich an die Bedingungen im Freien gewöhnt.
* Erster Tag: Stellt die Sämlinge für 1-2 Stunden an einen geschützten Ort im Freien.
* Zweiter Tag: Erhöht die Zeit im Freien auf 3-4 Stunden.
* Dritter Tag: Lasst die Sämlinge den ganzen Tag draußen, aber bringt sie über Nacht wieder herein.
* Vierter Tag: Pflanzt die Sämlinge ins Beet.
2. Pflanzen
* Löcher graben: Grabt Löcher, die etwas größer sind als die Wurzelballen der Sämlinge.
* Pflanzen: Setzt die Sämlinge in die Löcher und füllt sie mit Erde auf.
* Gießen: Gießt die Pflanzen gründlich.
* Mulchen: Tragt eine Schicht Mulch um die Pflanzen auf, um den Boden feucht zu halten und Unkraut zu unterdrücken.
Die Pflege: Damit es wächst und gedeiht
Napa Kohl ist relativ pflegeleicht, aber es gibt ein paar Dinge, die ihr beachten solltet:
1. Bewässerung
Napa Kohl braucht regelmäßige Bewässerung, besonders während trockener Perioden. Achtet darauf, dass der Boden immer feucht, aber nicht durchnässt ist.
2. Düngung
Düngt die Pflanzen alle 4-6 Wochen mit einem organischen Dünger oder Kompost.
3. Unkrautbekämpfung
Haltet das Beet frei von Unkraut, da Unkraut Nährstoffe und Wasser raubt.
4. Schädlingsbekämpfung
Napa Kohl kann von verschiedenen Schädlingen befallen werden, wie z.B. Kohlweißlingen, Blattläusen und Schnecken.
* Kohlweißlinge: Verwendet ein Schutznetz, um die Pflanzen vor Kohlweißlingen zu schützen.
* Blattläuse: Spritzt die Pflanzen mit einem Wasserstrahl ab oder verwendet ein Insektizid auf Basis von Neemöl.
* Schnecken: Sammelt die Schnecken von Hand ab oder verwendet Schneckenkorn.
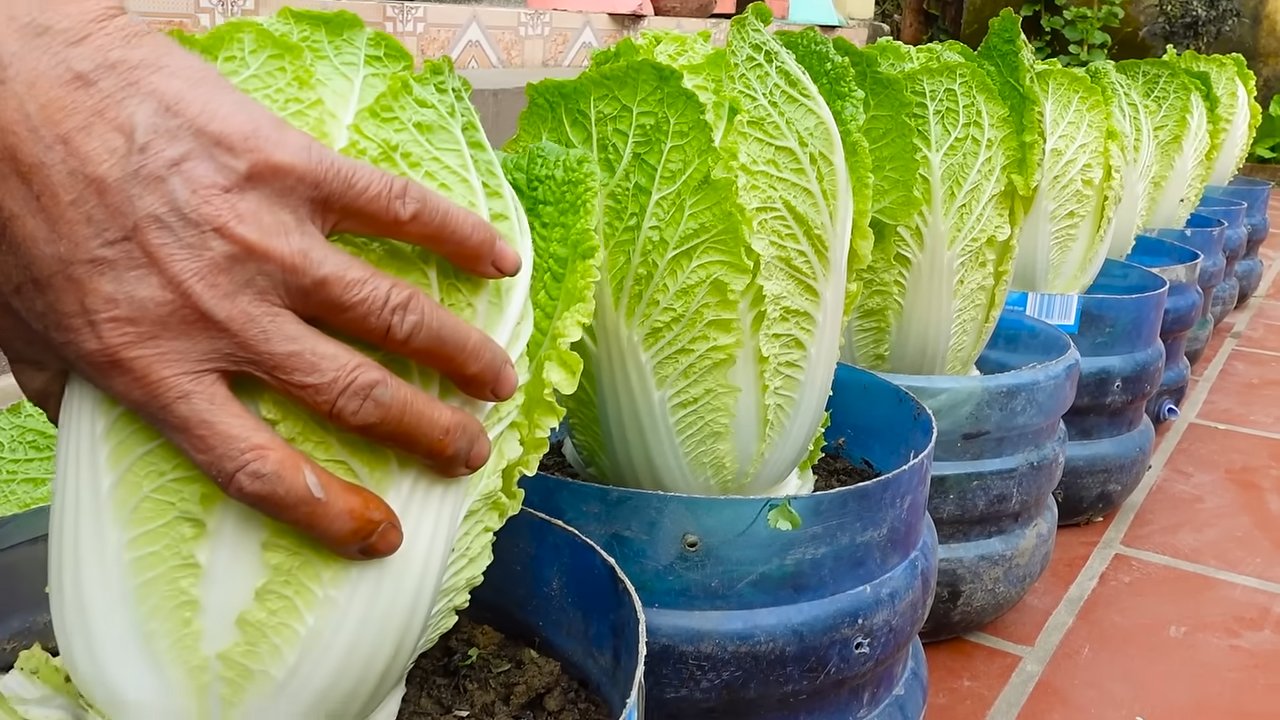
Die Ernte: Der Lohn der Arbeit
Napa Kohl ist in der Regel 70-80 Tage nach der Aussaat erntereif.
* Erntezeitpunkt: Der Kohlkopf sollte fest und kompakt sein.
* Erntemethode: Schneidet den Kohlkopf mit einem scharfen Messer am Strunk ab.
Lagerung: Damit der Kohl frisch bleibt
Napa Kohl kann im Kühlschrank bis zu 2 Wochen gelagert werden. Wickelt den Kohlkopf in ein feuchtes Tuch oder eine Plastiktüte, um ihn frisch zu halten.
Verwendung: Vielseitig in der Küche
Napa Kohl ist ein vielseitiges Gemüse, das in vielen verschiedenen Gerichten verwendet werden kann. Hier sind ein paar Ideen:
* Salate: Napa Kohl ist eine tolle Ergänzung zu Salaten.
* Suppen: Napa Kohl kann in Suppen und Eintöpfen verwendet werden.
* Kimchi: Napa Kohl ist der Hauptbestandteil von Kimchi, einem koreanischen Nationalgericht.
* Pfannengerichte: Napa Kohl kann in Pfannengerichten verwendet werden.
* Gedünstet: Napa Kohl kann gedünstet und als Beilage serviert werden.
Ich hoffe, dieser Leitfaden hat euch
Conclusion
So, there you have it! Growing Napa cabbage at home is not only achievable, but it’s also incredibly rewarding. From the crisp, tender leaves perfect for stir-fries and slaws to the satisfaction of nurturing your own food from seed to harvest, this DIY project is a must-try for any home gardener, regardless of experience level. Forget relying solely on grocery store produce; imagine stepping into your backyard and harvesting fresh, vibrant Napa cabbage whenever you need it.
The benefits extend beyond just fresh ingredients. You have complete control over the growing process, ensuring your Napa cabbage is free from harmful pesticides and herbicides. Plus, gardening is a fantastic way to connect with nature, reduce stress, and get some much-needed vitamin D.
Don’t be afraid to experiment! Try different varieties of Napa cabbage to find your favorite flavor profile. Some popular choices include ‘Blues,’ known for its disease resistance, and ‘Wong Bok,’ a classic variety with a mild, sweet taste. You can also adjust the planting schedule based on your local climate to maximize your harvest. If you live in a warmer region, consider planting in late summer for a fall harvest. For cooler climates, a spring planting might be more suitable.
Consider companion planting to further enhance your Napa cabbage growing experience. Marigolds can help deter pests, while dill attracts beneficial insects. Interplanting with herbs like rosemary or thyme can also add a delightful aroma to your garden.
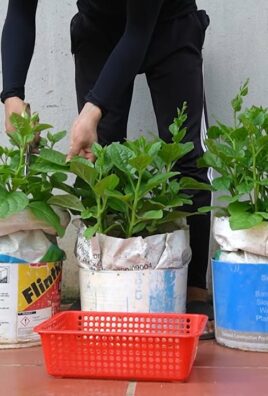
And remember, even if you don’t have a large garden, you can still grow Napa cabbage in containers. Choose a large pot with good drainage and use a high-quality potting mix. Container gardening allows you to move your plants to optimal locations, ensuring they receive the right amount of sunlight and protection from harsh weather.
We’ve covered the basics, from seed starting to harvesting, but the real magic happens when you get your hands dirty. Don’t be intimidated by the process. Start small, be patient, and learn from your experiences. Every gardener faces challenges, but the rewards of growing your own food are well worth the effort.
We are confident that with a little planning and effort, you can successfully grow Napa cabbage at home and enjoy the delicious, healthy benefits of this versatile vegetable. So, grab your seeds, prepare your soil, and get ready to embark on a rewarding gardening adventure.
We encourage you to try this DIY trick and share your experiences with us! Let us know what varieties you tried, what challenges you faced, and what tips you discovered along the way. Share your photos and stories on social media using #HomegrownNapaCabbage. We can’t wait to see your beautiful Napa cabbage creations! Happy gardening!
Frequently Asked Questions (FAQ)
What is the best time to plant Napa cabbage?
The ideal planting time for Napa cabbage depends on your climate. In cooler regions with long summers, you can plant in early spring for a summer harvest. In warmer regions with mild winters, plant in late summer or early fall for a winter harvest. Napa cabbage prefers cooler temperatures and can bolt (go to seed) in hot weather. Check your local frost dates and choose a planting time that allows the cabbage to mature before the first frost or the onset of extreme heat. Generally, aim for a planting window that allows for 75-85 days of cool weather.
How much sunlight does Napa cabbage need?
Napa cabbage thrives in full sun, requiring at least 6 hours of direct sunlight per day. However, in hotter climates, some afternoon shade can be beneficial to prevent bolting. If you’re growing Napa cabbage indoors under grow lights, ensure the lights are positioned close enough to the plants and provide sufficient intensity. Insufficient sunlight can result in leggy growth and smaller heads.
What kind of soil is best for growing Napa cabbage?
Napa cabbage prefers well-drained, fertile soil that is rich in organic matter. The ideal soil pH is between 6.0 and 7.5. Before planting, amend the soil with compost or well-rotted manure to improve drainage and fertility. Avoid heavy clay soils, as they can retain too much moisture and lead to root rot. If you have clay soil, consider adding sand and organic matter to improve drainage. A soil test can help you determine the pH and nutrient levels of your soil and guide you in making necessary amendments.
How often should I water Napa cabbage?
Napa cabbage needs consistent moisture, especially during head formation. Water deeply and regularly, aiming to keep the soil consistently moist but not waterlogged. Check the soil moisture regularly and water when the top inch feels dry to the touch. Avoid overhead watering, as it can promote fungal diseases. Instead, water at the base of the plants using a soaker hose or drip irrigation system. Mulching around the plants can help retain moisture and suppress weeds.
What are some common pests and diseases that affect Napa cabbage?
Napa cabbage is susceptible to several pests and diseases, including cabbage worms, aphids, flea beetles, clubroot, and downy mildew. Regularly inspect your plants for signs of infestation or disease. Cabbage worms can be controlled with Bacillus thuringiensis (Bt), a natural insecticide. Aphids can be washed off with a strong stream of water or treated with insecticidal soap. Flea beetles can be deterred with row covers. Clubroot is a soilborne disease that can be prevented by practicing crop rotation and maintaining a soil pH above 7.0. Downy mildew is a fungal disease that can be prevented by providing good air circulation and avoiding overhead watering.
How do I harvest Napa cabbage?
Napa cabbage is ready to harvest when the head is firm and compact. The exact size will vary depending on the variety, but generally, heads are ready to harvest when they reach about 12-18 inches in length. To harvest, use a sharp knife to cut the head at the base of the plant. Remove any loose or damaged outer leaves. Napa cabbage can be stored in the refrigerator for several weeks.
Can I grow Napa cabbage in containers?
Yes, Napa cabbage can be successfully grown in containers. Choose a large pot that is at least 12 inches in diameter and has good drainage. Use a high-quality potting mix that is rich in organic matter. Water regularly and fertilize every few weeks with a balanced fertilizer. Container-grown Napa cabbage may require more frequent watering than plants grown in the ground, as the soil in containers tends to dry out more quickly.
How do I prevent Napa cabbage from bolting?
Bolting, or premature flowering, can occur when Napa cabbage is exposed to stress, such as high temperatures or inconsistent watering. To prevent bolting, choose bolt-resistant varieties, plant at the appropriate time of year, provide consistent moisture, and protect plants from extreme heat. Shading plants during the hottest part of the day can also help prevent bolting.
What are some good companion plants for Napa cabbage?
Companion planting can help improve the growth and health of Napa cabbage. Good companion plants include marigolds, which deter pests; dill, which attracts beneficial insects; and herbs like rosemary and thyme, which can add a delightful aroma to your garden. Avoid planting Napa cabbage near other members of the brassica family, such as broccoli, cauliflower, and kale, as they can attract the same pests and diseases.
How can I use my homegrown Napa cabbage?
Homegrown Napa cabbage is incredibly versatile and can be used in a variety of dishes. It’s delicious in stir-fries, slaws, salads, and soups. It can also be fermented to make kimchi or sauerkraut. The tender leaves can be used as wraps for spring rolls or lettuce wraps. Experiment with different recipes and enjoy the fresh, delicious flavor of your homegrown Napa cabbage!

Leave a Comment