
Grow Mushrooms at Home – imagine plucking fresh, flavorful mushrooms right from your own kitchen! Forget those pricey grocery store varieties; with a few simple tricks and a dash of DIY spirit, you can cultivate a thriving mushroom garden indoors.
For centuries, mushroom cultivation has been shrouded in mystery, often associated with ancient practices and specialized knowledge. From the shiitake logs of East Asia to the truffle hunts of Europe, the allure of these fungi has captivated cultures worldwide. But you don’t need to be a seasoned mycologist to enjoy the fruits (or rather, fungi!) of your labor.
In today’s world, where sustainability and self-sufficiency are more important than ever, learning to grow mushrooms at home is a game-changer. Not only will you have access to a constant supply of delicious and nutritious food, but you’ll also reduce your carbon footprint and gain a fascinating new hobby. Plus, let’s be honest, who wouldn’t want to impress their friends with homegrown gourmet mushrooms? This DIY guide will break down the process into easy-to-follow steps, ensuring that even beginners can experience the joy of harvesting their own fungi. So, grab your supplies, and let’s get growing!
Grow Your Own Gourmet Mushrooms at Home: A Beginner’s Guide
Hey there, fellow fungi fanatics! Ever dreamt of harvesting your own delicious mushrooms right in your kitchen? Well, dream no more! Growing mushrooms at home is surprisingly achievable, even for beginners. I’m going to walk you through a simple and effective method using readily available materials. Get ready to embark on a fascinating journey into the world of mycology!
Choosing Your Mushroom Variety
Before we dive in, let’s talk about which mushrooms are easiest to grow at home. While you can technically cultivate many varieties, some are much more forgiving for beginners. I highly recommend starting with:
* Oyster Mushrooms (Pleurotus spp.): These are incredibly versatile, fast-growing, and tolerate a wide range of conditions. They come in various colors, like pearl, blue, and pink, adding a touch of visual appeal to your grow.
* Shiitake Mushrooms (Lentinula edodes): Known for their rich, umami flavor, shiitakes are a bit more demanding than oysters but still manageable for home growers.
* Wine Cap Mushrooms (Stropharia rugosoannulata): These are great for outdoor beds and can be grown in wood chips or straw.
For this guide, I’ll focus on growing oyster mushrooms, as they’re the most beginner-friendly.
Gathering Your Supplies
Okay, let’s get our hands dirty! Here’s what you’ll need to get started:
* Oyster Mushroom Spawn: This is essentially the “seed” of the mushroom. You can purchase it online from reputable mushroom suppliers. Look for grain spawn, as it’s easy to work with.
* Substrate: This is the material the mushrooms will grow on. Straw is an excellent choice for oyster mushrooms. You can use wheat straw, oat straw, or even shredded cardboard.
* Heat-Resistant Bags: These bags need to be able to withstand the heat of pasteurization. Special mushroom grow bags are ideal, but oven bags can also work in a pinch.
* Large Pot or Container: Big enough to submerge your straw in water.
* Bleach: For sanitizing your work area and tools.
* Spray Bottle: For misting your mushrooms.
* Gloves: To keep your hands clean and prevent contamination.
* Face Mask: To avoid inhaling dust and spores.
* Thermometer: To monitor the temperature of the pasteurization process.
* Well-Ventilated Area: For fruiting your mushrooms. A spare room, basement, or even a closet can work.
* Optional: A humidity controller and humidifier can help maintain optimal conditions, but they’re not strictly necessary for beginners.
Preparing the Substrate: Pasteurization
This is a crucial step! Pasteurization kills off competing organisms that could prevent your mushrooms from growing. We’re not sterilizing the straw (which would kill beneficial microbes too), just reducing the competition.
1. Chop the Straw: Cut the straw into smaller pieces, about 2-4 inches long. This makes it easier to pack into the bags and allows the mushroom mycelium to colonize it more efficiently.
2. Soak the Straw: Fill your large pot or container with water and add a small amount of bleach (about 1 tablespoon per gallon of water). This helps to further sanitize the straw. Submerge the chopped straw in the water and let it soak for at least 24 hours. This ensures the straw is fully hydrated, which is essential for mushroom growth.
3. Pasteurize the Straw: Drain the straw and place it in your heat-resistant bags. Pack the straw tightly, leaving a few inches of space at the top of the bag. Seal the bags tightly with tape or zip ties.
4. Heat the Bags: Place the bags of straw in a large pot filled with water. Make sure the bags are fully submerged. Use a weight to keep them from floating.
5. Monitor the Temperature: Heat the water to 160-180°F (71-82°C) and maintain that temperature for 60-90 minutes. Use a thermometer to monitor the water temperature closely. This is crucial for effective pasteurization.
6. Cool Down: After pasteurization, carefully remove the bags from the hot water and let them cool completely. This can take several hours. Make sure the bags are clean and free from any punctures.
Inoculating the Substrate: Introducing the Mushroom Spawn
Now for the exciting part – introducing the mushroom spawn to the pasteurized straw!
1. Sanitize Your Work Area: Clean your work surface with a bleach solution (1 part bleach to 10 parts water). This helps to prevent contamination.
2. Sanitize Your Hands: Wear gloves and sanitize them with alcohol.
3. Open the Bags: Carefully open the cooled bags of pasteurized straw.
4. Inoculate the Straw: Sprinkle the oyster mushroom spawn evenly throughout the straw. Aim for a spawn rate of about 5-10% of the weight of the straw. For example, if you have 10 pounds of straw, use 0.5-1 pound of spawn.
5. Mix Thoroughly: Gently mix the spawn into the straw, ensuring it’s evenly distributed.
6. Reseal the Bags: Reseal the bags tightly with tape or zip ties.
7. Create Air Exchange: Poke small holes (about ¼ inch in diameter) in the bags to allow for air exchange. Space the holes about 4-6 inches apart.
Incubation: Letting the Mycelium Colonize
This is where the magic happens! The mushroom mycelium will spread throughout the straw, colonizing it and preparing it for fruiting.
1. Find a Warm, Dark Place: Place the inoculated bags in a warm, dark place with a temperature of 65-75°F (18-24°C). A closet, basement, or spare room works well.
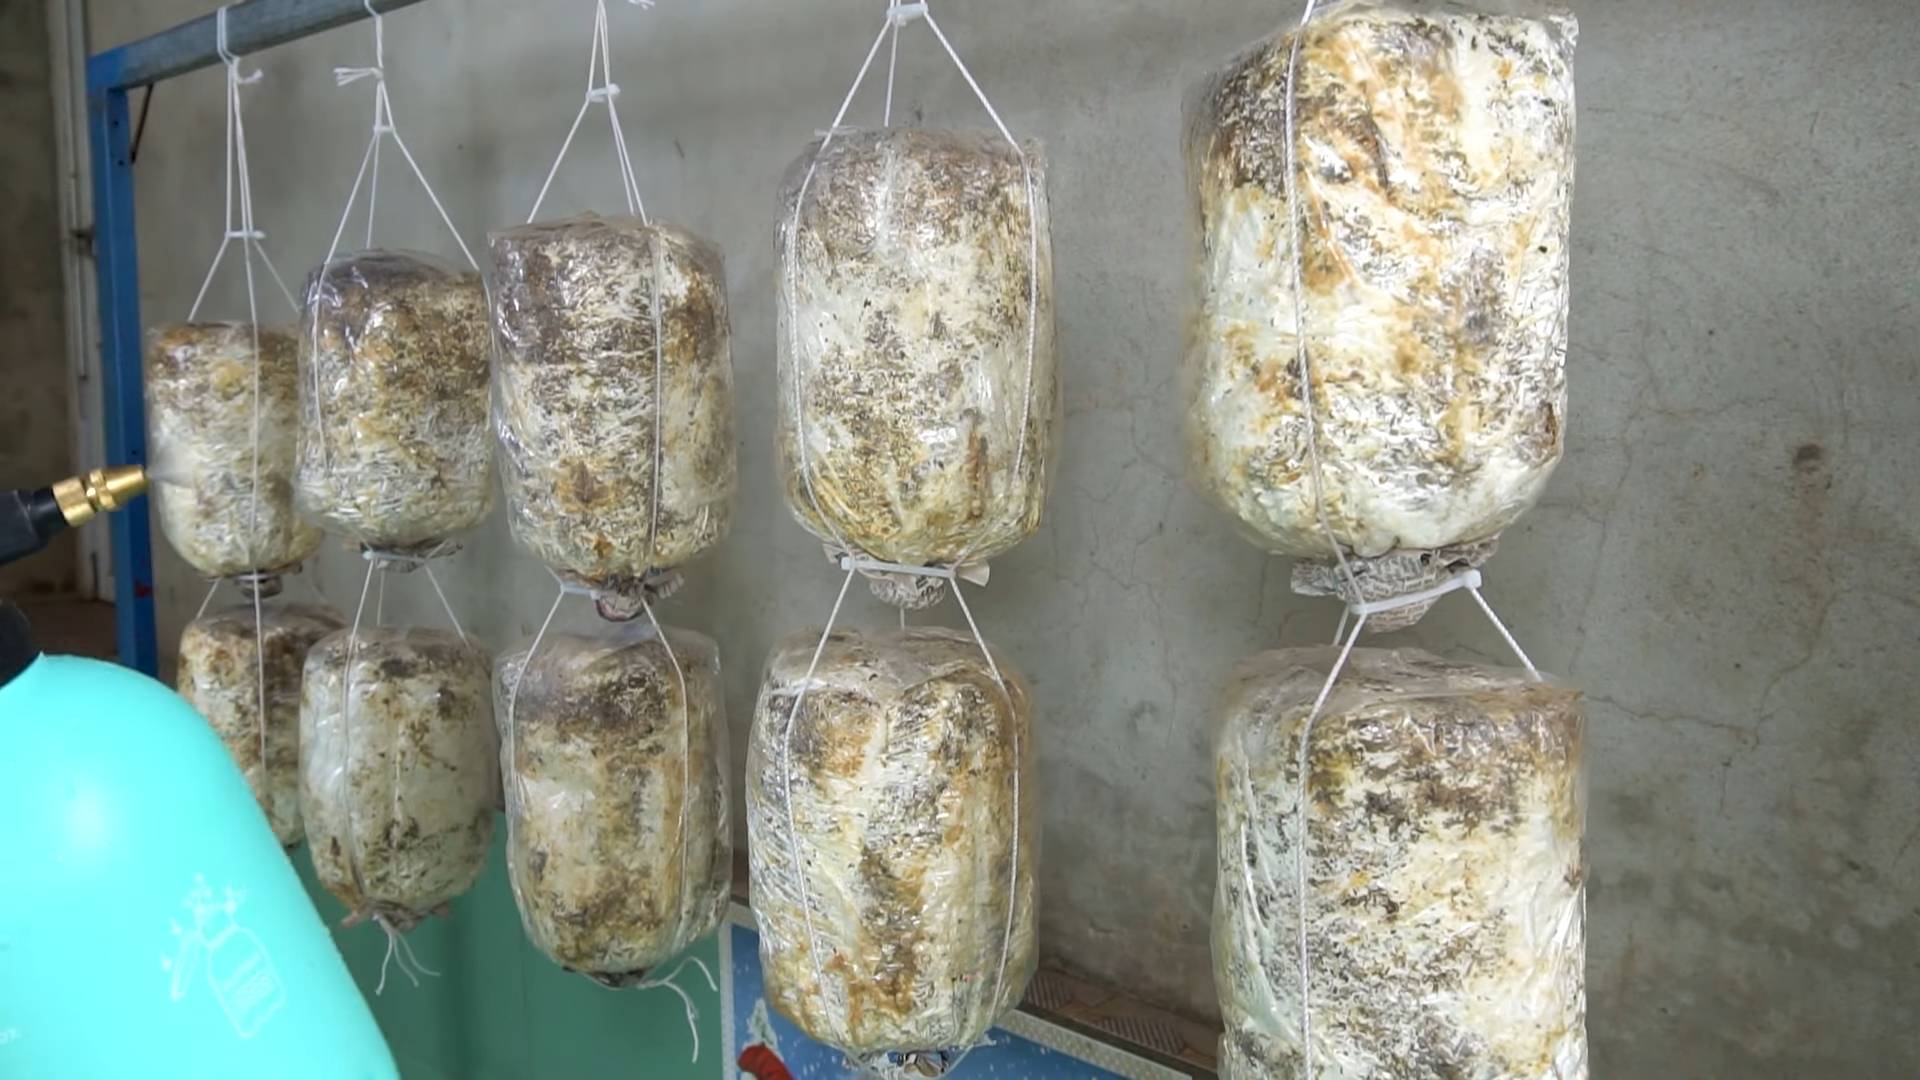
2. Monitor Colonization: Check the bags regularly for signs of colonization. You should see white, fuzzy mycelium spreading throughout the straw.
3. Wait for Full Colonization: It typically takes 2-4 weeks for the mycelium to fully colonize the straw. The bags should be almost entirely white with mycelium.
Fruiting: Triggering Mushroom Growth
Once the straw is fully colonized, it’s time to trigger fruiting – the formation of mushrooms!
1. Choose a Fruiting Location: Move the bags to a well-ventilated area with indirect light. A spare room, basement, or even a shaded outdoor area can work.
2. Increase Humidity: Oyster mushrooms need high humidity to fruit properly. Aim for a humidity level of 80-90%. You can achieve this by misting the bags regularly with water, using a humidifier, or placing the bags in a humidity tent (a plastic bag or container with holes for ventilation).
3. Lower the Temperature (Optional): Lowering the temperature slightly (to around 60-70°F or 15-21°C) can also help trigger fruiting.
4. Cut Slits in the Bags: Cut slits or X’s in the bags where you want the mushrooms to grow. These slits provide access to fresh air and light, which are essential for fruiting.
5. Maintain Humidity and Ventilation: Continue to mist the bags regularly to maintain high humidity. Ensure there is adequate ventilation to prevent mold growth.
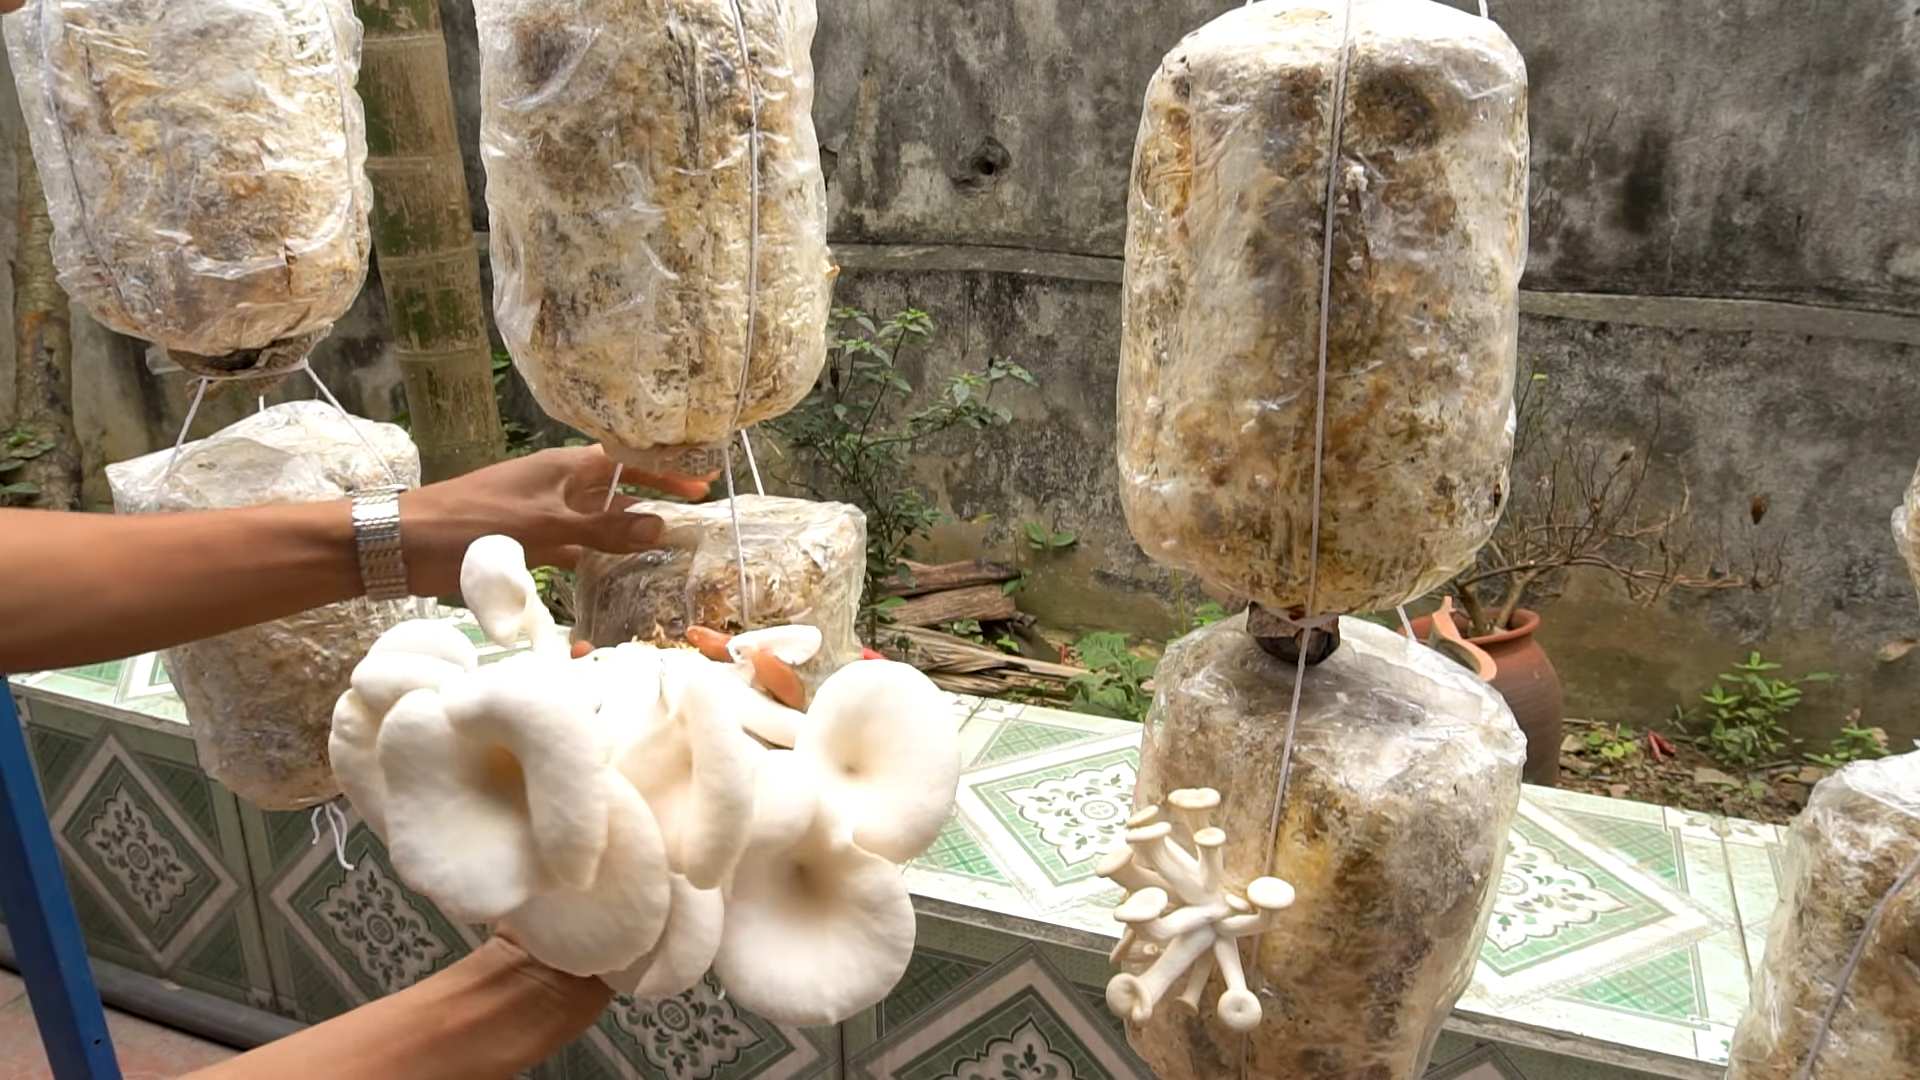
6. Watch for Pinning: After a few days, you should start to see small mushroom “pins” forming around the slits. These are the beginnings of your mushrooms!
Harvesting: Enjoying Your Homegrown Mushrooms
The moment you’ve been waiting for!
1. Harvest When Mature: Harvest the mushrooms when the caps are fully developed but before they start to drop spores. The edges of the caps will start to flatten out or even curl upwards slightly.
2. Twist and Pull: Gently twist and pull the mushrooms from the substrate.
3. Enjoy Your Harvest: Cook and enjoy your freshly harvested oyster mushrooms! They’re delicious sautéed, grilled, or added to soups and stews.
4. Second Flush: After harvesting, you can often get a second (or even third) flush of mushrooms. Simply continue to mist the bags and maintain high humidity. You may need to cut new slits in the bags to encourage new growth.
Troubleshooting
Even with the best intentions, things don’t always go as planned. Here are some common problems and how to address them:
* Contamination: If you see green, black, or other colored mold growing on the substrate, it’s likely contaminated. Unfortunately, there’s not much you can do at this point except discard the bag. To prevent contamination, ensure you pasteurize the substrate properly and maintain a clean work environment.
* Slow
Conclusion
So, there you have it! Cultivating your own mushrooms at home is not only surprisingly simple, but it’s also incredibly rewarding. Imagine the satisfaction of harvesting fresh, flavorful mushrooms grown with your own two hands, knowing exactly where they came from and what went into their cultivation. Forget those bland, pre-packaged mushrooms from the grocery store; with this DIY trick, you’ll unlock a world of gourmet possibilities right in your own kitchen.
This method is a must-try for several reasons. First, it’s incredibly cost-effective. Once you’ve made the initial investment in your mushroom spawn and substrate, the ongoing costs are minimal. Second, it’s environmentally friendly. You’re reducing your carbon footprint by growing your own food locally, and you can even use recycled materials for your growing containers. Third, it’s a fantastic learning experience. You’ll gain a deeper understanding of the fascinating world of fungi and the intricate processes involved in their growth. Finally, and perhaps most importantly, it’s fun! There’s something truly magical about watching these little fungi emerge and flourish.
But the beauty of this DIY project lies in its adaptability. Feel free to experiment with different types of mushrooms. Oyster mushrooms are a great starting point due to their ease of cultivation and delicious flavor, but you can also try shiitake, lion’s mane, or even more exotic varieties as you gain experience. You can also adjust the substrate to suit your preferences and the specific needs of your chosen mushroom species. Coffee grounds, straw, sawdust, and even cardboard can all be used as a base for your mushroom garden.
Consider adding supplements to your substrate to boost growth and yield. Things like bran, gypsum, or even a small amount of molasses can provide extra nutrients for your mushrooms. Just be sure to research the specific needs of your chosen species before making any changes.
Another variation to consider is the growing environment. While a dark, humid space is generally ideal, you can fine-tune the temperature and humidity levels to optimize growth. A simple humidity tent made from a plastic bag can work wonders in drier climates.
Ultimately, the key to success with this DIY trick is experimentation and observation. Pay close attention to your mushrooms, monitor their growth, and adjust your methods as needed. Don’t be afraid to make mistakes – they’re all part of the learning process.
We wholeheartedly encourage you to give this DIY mushroom growing method a try. It’s a fun, rewarding, and sustainable way to add fresh, flavorful mushrooms to your diet. And most importantly, we want to hear about your experiences! Share your successes, your failures, and any tips or tricks you discover along the way. Let’s build a community of home mushroom growers and unlock the full potential of this amazing DIY project. So, get your hands dirty, embrace the fungal frontier, and start growing your own delicious mushrooms today! Remember, mastering the art of grow mushrooms at home is easier than you think, and the rewards are well worth the effort.
Frequently Asked Questions (FAQ)
What type of mushrooms are easiest to grow at home for beginners?
Oyster mushrooms are generally considered the easiest type of mushroom to grow at home for beginners. They are relatively forgiving, grow quickly, and tolerate a wider range of environmental conditions than other species. They also fruit readily on a variety of substrates, including straw, coffee grounds, and even cardboard. Shiitake mushrooms are another popular choice, but they require a bit more patience and attention to detail.
What is the best substrate to use for growing mushrooms at home?
The best substrate depends on the type of mushroom you’re growing. Oyster mushrooms thrive on straw, coffee grounds, and cardboard. Shiitake mushrooms prefer hardwood sawdust or logs. For beginners, pasteurized straw is often recommended as it’s readily available, easy to work with, and provides a good balance of nutrients and aeration. Coffee grounds are also a great option, especially if you have a readily available source. Just be sure to pasteurize them before use to kill any competing organisms.
How do I pasteurize my substrate?
Pasteurization is crucial to eliminate competing molds and bacteria that can hinder mushroom growth. There are several ways to pasteurize your substrate. For straw, you can soak it in hot water (around 160-180°F) for 1-2 hours. For coffee grounds, you can microwave them for a few minutes or bake them in the oven at a low temperature (around 170°F) for about an hour. The goal is to heat the substrate enough to kill off unwanted organisms without completely sterilizing it, as some beneficial microbes can actually aid in mushroom growth.
How much light do mushrooms need to grow?
Mushrooms don’t need direct sunlight. In fact, too much direct sunlight can be harmful. They prefer indirect light or even low-light conditions. A dimly lit room or a shaded area is usually sufficient. The key is to provide enough light for the mushrooms to orient themselves and grow upwards.
How do I maintain the humidity for my mushroom grow?
Maintaining adequate humidity is essential for successful mushroom cultivation. Mushrooms need a humid environment to prevent them from drying out. You can increase humidity by misting the growing area with water several times a day. You can also create a humidity tent by placing a plastic bag over the growing container, making sure to leave some ventilation for air exchange. A humidifier can also be used to maintain consistent humidity levels in the growing area.
How long does it take for mushrooms to grow?
The time it takes for mushrooms to grow depends on the species and the growing conditions. Oyster mushrooms can typically be harvested within a few weeks of inoculation. Shiitake mushrooms take longer, often several months. Factors such as temperature, humidity, and substrate quality can also affect the growth rate.
What are the signs of contamination in my mushroom grow?
Contamination is a common problem in mushroom cultivation. Signs of contamination include the presence of mold, unusual colors (green, blue, black), foul odors, and slow or stunted growth. If you suspect contamination, it’s best to remove the affected area or discard the entire grow to prevent the contamination from spreading.
Can I use tap water to mist my mushrooms?
Tap water can be used to mist your mushrooms, but it’s best to let it sit out for 24 hours to allow the chlorine to evaporate. Chlorine can be harmful to mushrooms. Alternatively, you can use distilled or filtered water.
How do I harvest my mushrooms?
Harvest your mushrooms when the caps are fully formed but before they start to release spores. Gently twist or cut the mushrooms off at the base of the stem. Be careful not to damage the surrounding substrate.
What can I do with my spent mushroom substrate?
Spent mushroom substrate is a valuable resource. It can be used as a soil amendment in your garden, as compost, or even as a mulch. It’s rich in nutrients and beneficial microbes that can improve soil health.
Is it safe to eat mushrooms grown at home?
Yes, it is generally safe to eat mushrooms grown at home, provided that you have correctly identified the species and followed proper cultivation techniques. Always research the species you are growing to ensure that it is edible. If you are unsure about the identity of a mushroom, it’s best to err on the side of caution and discard it.
Leave a Comment