
Grow Mushrooms at Home: Imagine stepping into your kitchen and harvesting fresh, flavorful mushrooms that you nurtured yourself! Sounds like a dream, right? Well, it’s more achievable than you think! This DIY guide will unlock the secrets to cultivating your own mushroom bounty, transforming your home into a miniature mushroom farm.
For centuries, mushrooms have held a revered place in various cultures, from ancient medicinal practices in the East to culinary delicacies in Europe. The art of mushroom cultivation, once shrouded in mystery, is now accessible to everyone, thanks to simple and effective DIY techniques.
Why should you embark on this mushroom-growing adventure? Because store-bought mushrooms, while convenient, often lack the freshness and unique flavors that homegrown varieties offer. Plus, you’ll be reducing your carbon footprint by sourcing your food locally – right in your own home! More importantly, learning to grow mushrooms at home is a rewarding and educational experience, connecting you with the fascinating world of fungi. This article will provide you with easy-to-follow instructions, tips, and tricks to successfully cultivate a variety of mushrooms, even if you’re a complete beginner. So, let’s get our hands dirty (or rather, our substrate inoculated!) and discover the joy of homegrown mushrooms!
Grow Your Own Gourmet Mushrooms: A Beginner’s Guide
Hey there, fellow fungi fanatics! Ever dreamt of harvesting your own delicious mushrooms right in your kitchen? Well, dream no more! Growing mushrooms at home is surprisingly achievable, even for beginners. It might seem intimidating at first, but with a little patience and the right guidance, you’ll be enjoying fresh, homegrown mushrooms in no time. I’m going to walk you through a simple method using readily available materials. Let’s get started!
Choosing Your Mushroom Variety
Before we dive into the nitty-gritty, let’s talk about which mushrooms are easiest to grow at home. While you can technically cultivate many varieties, some are much more beginner-friendly than others. Here are a few of my top recommendations:
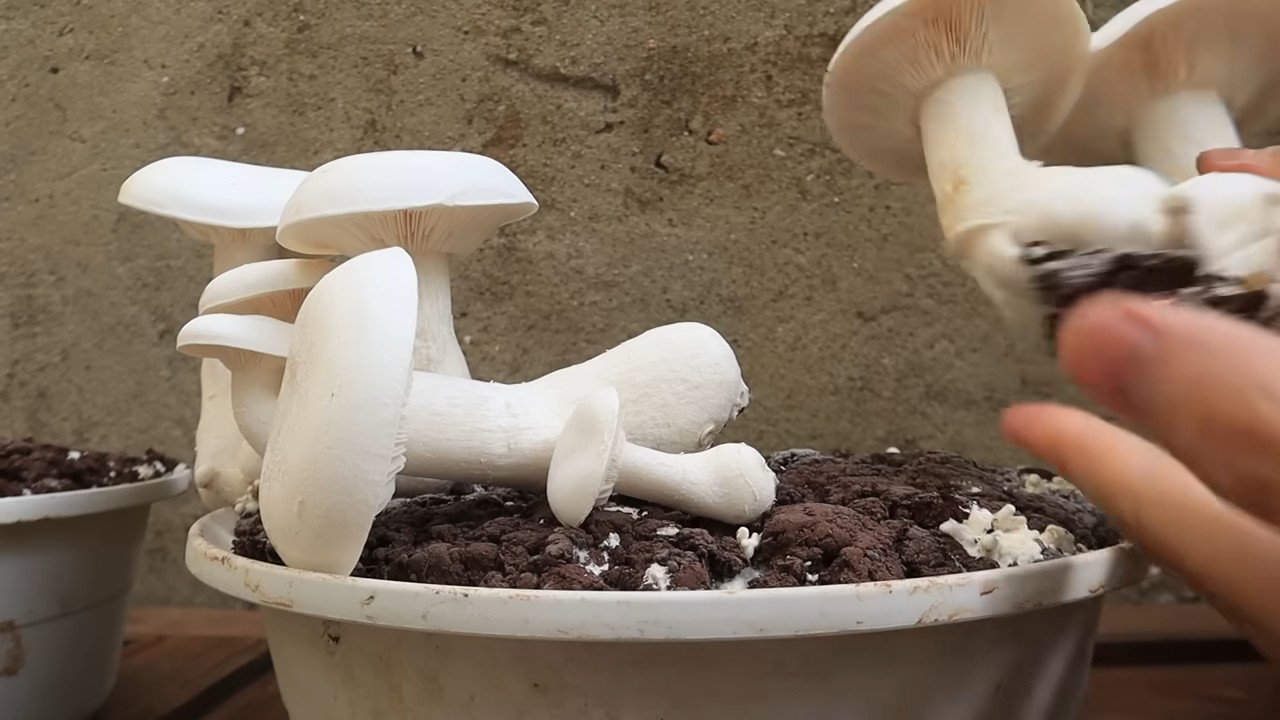
* Oyster Mushrooms (Pleurotus spp.): These are arguably the easiest to grow and come in a variety of colors, including pearl, blue, and pink. They’re fast-growing and tolerate a wider range of conditions.
* Shiitake Mushrooms (Lentinula edodes): A bit more challenging than oysters, but still manageable for beginners. They have a rich, savory flavor and are widely available in grocery stores.
* Lion’s Mane (Hericium erinaceus): Known for its unique texture and medicinal properties, Lion’s Mane is becoming increasingly popular for home cultivation. It requires slightly more attention to humidity.
For this guide, I’ll focus on growing oyster mushrooms, as they’re the most forgiving and provide the quickest results.
Gathering Your Supplies
Okay, time to assemble your mushroom-growing arsenal! Here’s what you’ll need:
* Oyster Mushroom Spawn: This is essentially the “seed” for your mushrooms. You can purchase it online from reputable mushroom suppliers. Look for grain spawn, which is typically grown on sterilized rye berries.
* Substrate: This is the material your mushrooms will grow on. Straw is an excellent and readily available option. You can also use hardwood sawdust, coffee grounds (used), or even cardboard. For this guide, we’ll use straw.
* Large Plastic Bag: A clear or translucent plastic bag (like a heavy-duty garbage bag) will serve as your growing container. Make sure it’s clean and free of any holes.
* Spray Bottle: For misting your mushrooms to maintain humidity.
* Rubbing Alcohol: For sanitizing your work area and tools.
* Large Pot or Container: For pasteurizing the straw.
* Thermometer: To monitor the temperature of the straw during pasteurization.
* Gloves: To keep things sterile and prevent contamination.
* Optional: Micropore Tape: To cover the air exchange holes in the bag.
Preparing the Substrate: Pasteurization is Key!
This is arguably the most crucial step in the entire process. Pasteurization kills off competing organisms that could hinder mushroom growth. We’re not sterilizing (which requires an autoclave), but rather creating an environment where the oyster mushrooms have a competitive advantage.
1. Chop the Straw: Cut the straw into smaller pieces, about 2-4 inches long. This will make it easier to pack into the bag and for the mycelium (mushroom roots) to colonize.
2. Soak the Straw: Place the chopped straw in your large pot or container and cover it with water. You want to ensure the straw is completely submerged. Let it soak for at least an hour, or even overnight. This helps to hydrate the straw, which is essential for mushroom growth.
3. Pasteurize the Straw: Drain the soaked straw and place it back in the pot. Add fresh water until the straw is covered again. Heat the water to between 160-180°F (71-82°C) and maintain that temperature for 60-90 minutes. Use your thermometer to monitor the temperature closely. This process kills off unwanted bacteria and fungi that could compete with your oyster mushrooms.
4. Cool and Drain: After pasteurization, carefully drain the hot water from the straw. Let the straw cool down to room temperature. This is important because the heat can kill the mushroom spawn. You want the straw to be moist but not dripping wet. Squeeze out any excess water.
Inoculating the Substrate: Mixing Spawn and Straw
Now for the fun part – introducing the mushroom spawn to the prepared straw!
1. Sanitize Your Work Area: Before you begin, thoroughly clean and sanitize your work surface with rubbing alcohol. This will help minimize the risk of contamination.
2. Prepare the Bag: Take your large plastic bag and poke several small holes (about ¼ inch in diameter) around the bag for air exchange. Space them a few inches apart. These holes will allow the mushrooms to breathe. You can cover these holes with micropore tape if you’re concerned about contamination.
3. Layer the Straw and Spawn: Put on your gloves. Start by placing a layer of pasteurized straw at the bottom of the bag. Then, sprinkle a layer of oyster mushroom spawn over the straw. Repeat this process, layering straw and spawn, until the bag is almost full. The final layer should be straw. Aim for a spawn rate of about 5-10% of the total weight of the straw. For example, if you have 10 pounds of straw, use 0.5-1 pound of spawn.
4. Seal the Bag: Close the top of the bag securely. You can use a zip tie, tape, or simply tie a knot.
Incubation: Letting the Mycelium Grow
This is the waiting game! During incubation, the mycelium (the vegetative part of the mushroom) will colonize the straw.
1. Find a Suitable Location: Place the inoculated bag in a dark, warm location with a temperature between 65-75°F (18-24°C). A closet, basement, or spare room works well. Avoid direct sunlight, as it can overheat the bag.
2. Monitor Colonization: Over the next few weeks, you’ll notice the white mycelium spreading throughout the straw. It will look like a network of white threads. This is a good sign!
3. Patience is Key: The colonization process can take anywhere from 2-4 weeks, depending on the temperature and the amount of spawn used. Be patient and avoid disturbing the bag too much.
Fruiting: Time for Mushrooms!
Once the straw is fully colonized (it will appear almost entirely white), it’s time to initiate fruiting, which is when the mushrooms start to form.
1. Increase Humidity: Move the bag to a location with higher humidity. You can achieve this by placing the bag in a bathroom, near a humidifier, or by misting it regularly with a spray bottle. Aim for a humidity level of around 80-90%.
2. Increase Light: While mushrooms don’t need direct sunlight, they do need some light to fruit properly. Move the bag to a location with indirect light, such as near a window.
3. Cut Slits in the Bag: Using a clean knife or scissors, cut slits or X’s in the bag where you want the mushrooms to grow. These slits will provide an opening for the mushrooms to emerge.
4. Maintain Humidity and Ventilation: Continue to mist the bag regularly to maintain high humidity. Also, ensure there is adequate ventilation to prevent the buildup of carbon dioxide.
5. Watch for Pinning: After a few days, you’ll start to see tiny mushroom “pins” forming at the slits. These are the baby mushrooms!
Harvesting and Enjoying Your Mushrooms
The moment you’ve been waiting for!
1. Harvest When Mature: Harvest the mushrooms when the caps are fully developed but before they start to drop spores. The edges of the caps will start to curl upwards slightly.
2. Twist and Pull: To harvest, gently twist and pull the mushrooms from the bag. Try to remove the entire cluster at once.
3. Enjoy Your Harvest: Your homegrown oyster mushrooms are now ready to be cooked and enjoyed! They’re delicious sautéed, grilled, or added to soups and stews.
4. Second Flush: After harvesting, you can often get a second (or even third) flush of mushrooms. Simply continue to mist the bag and maintain humidity. You may need to cut new slits in the bag for the second flush.
Troubleshooting
Even with the best intentions, things don’t always go according to plan. Here are a few common problems you might encounter and how to address them:
* Contamination: If you see green, black, or other colored molds growing on the straw, it’s likely contaminated. Unfortunately, there’s not much you can do at this point except discard the bag. To prevent contamination, ensure you pasteurize the straw properly and maintain a clean work environment.
* Slow Colonization: If the mycelium is slow to colonize, it could be due to

Conclusion
So, there you have it! Cultivating your own mushrooms at home isn’t just a quirky hobby; it’s a rewarding journey that connects you directly to the source of your food. From the satisfaction of nurturing life to the unparalleled freshness and flavor of homegrown fungi, the benefits are undeniable. We’ve demystified the process, breaking it down into manageable steps that even the most novice gardener can follow. Forget the expensive grocery store prices and the uncertainty of where your mushrooms come from. With a little patience and the right setup, you can enjoy a constant supply of delicious, organic mushrooms right from your own home.
This DIY project is a must-try for several compelling reasons. First, it’s incredibly cost-effective in the long run. The initial investment in supplies is quickly offset by the savings you’ll accrue from not buying mushrooms at the store. Second, you have complete control over the growing environment, ensuring that your mushrooms are free from pesticides and other harmful chemicals. Third, it’s an educational and engaging activity that can be enjoyed by the whole family. Imagine the wonder and excitement of watching tiny pins emerge and transform into fully formed mushrooms!
But the best reason to embark on this adventure is the unparalleled flavor and freshness. Store-bought mushrooms simply can’t compare to the taste of freshly harvested, homegrown varieties. The difference is truly remarkable.
Don’t be afraid to experiment with different types of mushrooms. Oyster mushrooms are a great starting point due to their ease of cultivation and rapid growth. Shiitake mushrooms offer a more complex flavor profile and are also relatively easy to grow. For the more adventurous, consider exploring varieties like lion’s mane or reishi, known for their medicinal properties. You can also experiment with different substrates, such as straw, coffee grounds, or hardwood sawdust, to see which yields the best results for your chosen mushroom variety. Consider adding supplements to your substrate to boost growth, such as bran or gypsum.
Remember, the key to success is patience and attention to detail. Monitor your growing environment closely, ensuring that the temperature and humidity levels are optimal. Don’t be discouraged if your first attempt isn’t perfect. Like any skill, growing mushrooms takes practice. Learn from your mistakes, adjust your approach, and keep experimenting.
We wholeheartedly encourage you to give this DIY trick a try. It’s a fun, rewarding, and sustainable way to enjoy fresh, delicious mushrooms. And most importantly, it’s a fantastic way to learn more about the fascinating world of fungi.
Once you’ve harvested your first crop, we’d love to hear about your experience! Share your photos, tips, and tricks in the comments section below. Let’s build a community of home mushroom growers and learn from each other. What substrate did you use? What variety did you grow? What challenges did you face, and how did you overcome them? Your insights could be invaluable to other aspiring mushroom cultivators. So, get growing and share your story! Let’s all learn how to grow mushrooms at home together!
Frequently Asked Questions (FAQ)
What are the easiest mushrooms to grow at home for beginners?
Oyster mushrooms are generally considered the easiest to grow for beginners. They are fast-growing, relatively forgiving of environmental fluctuations, and can thrive on a variety of substrates, including straw, coffee grounds, and even cardboard. Shiitake mushrooms are also a good option, although they require a bit more patience as they take longer to fruit. Avoid more demanding varieties like morels or truffles when you’re just starting out.
What kind of setup do I need to grow mushrooms at home?
The specific setup will depend on the type of mushroom you’re growing and the scale of your operation. However, some basic requirements include:
* **A suitable growing container:** This could be a plastic tub, a bucket, or even a bag.
* **A substrate:** This is the material that the mushrooms will grow on, such as straw, coffee grounds, or hardwood sawdust.
* **Mushroom spawn:** This is the “seed” of the mushroom, containing the mycelium that will colonize the substrate.
* **A humid environment:** Mushrooms need high humidity to thrive. You can achieve this by using a humidifier, misting the growing area regularly, or creating a humidity tent.
* **Proper ventilation:** While mushrooms need humidity, they also need fresh air. Ensure that your growing area has adequate ventilation to prevent the buildup of carbon dioxide.
* **Indirect light:** Mushrooms don’t need direct sunlight, but they do need some light to fruit properly. A shaded area or a room with indirect light is ideal.
How long does it take to grow mushrooms at home?
The time it takes to grow mushrooms varies depending on the variety and the growing conditions. Oyster mushrooms can typically be harvested within a few weeks of inoculation, while shiitake mushrooms may take several months. Factors such as temperature, humidity, and substrate can also affect the growth rate.
What are some common problems when growing mushrooms at home, and how can I prevent them?
Some common problems include:
* **Contamination:** Mold and other fungi can compete with your mushrooms for resources. To prevent contamination, sterilize your substrate thoroughly before inoculation and maintain a clean growing environment.
* **Pests:** Fungus gnats and other pests can damage your mushrooms. Use sticky traps or introduce beneficial insects to control pests.
* **Low humidity:** If the humidity is too low, your mushrooms may dry out and fail to fruit. Increase humidity by misting regularly or using a humidifier.
* **Poor ventilation:** If the ventilation is poor, carbon dioxide can build up and inhibit mushroom growth. Ensure that your growing area has adequate ventilation.
Can I use coffee grounds to grow mushrooms at home?
Yes, coffee grounds are an excellent substrate for growing certain types of mushrooms, particularly oyster mushrooms. Coffee grounds are rich in nutrients and have already been sterilized during the brewing process, making them less susceptible to contamination. Be sure to use fresh coffee grounds and mix them with other substrates, such as straw or sawdust, for best results.
How do I know when my mushrooms are ready to harvest?
The signs of readiness vary depending on the mushroom variety. Generally, mushrooms are ready to harvest when the caps have fully opened and the gills are visible. The caps should also be firm and slightly dry to the touch. Don’t wait too long to harvest, as the mushrooms can become tough and less flavorful if they are allowed to overmature.
Are there any mushrooms that are poisonous to grow at home?
While it’s unlikely you’ll accidentally cultivate poisonous mushrooms from a purchased spawn, it’s crucial to source your spawn from a reputable supplier. Never consume wild mushrooms unless you are absolutely certain of their identification. When you grow mushrooms at home from a kit or spawn, you can be confident in their safety.
How can I improve the yield of my mushroom crops?
Several factors can influence the yield of your mushroom crops:
* **Use a high-quality spawn:** Start with a reputable source of mushroom spawn to ensure that it is healthy and vigorous.
* **Optimize the growing environment:** Maintain optimal temperature, humidity, and ventilation levels.
* **Supplement the substrate:** Add nutrients to the substrate, such as bran or gypsum, to boost mushroom growth.
* **Harvest regularly:** Harvesting mushrooms as soon as they are ready encourages the production of more flushes.
* **Maintain cleanliness:** Keep your growing area clean to prevent contamination and pest infestations.
Where can I buy mushroom spawn?
Mushroom spawn can be purchased from a variety of sources, including online retailers, garden centers, and specialty mushroom suppliers. Be sure to choose a reputable supplier that offers high-quality spawn and provides good customer support. Look for suppliers that specialize in the specific type of mushroom you want to grow.
What do I do with the substrate after I harvest my mushrooms?
The spent substrate can be composted and used as a soil amendment in your garden. It is rich in nutrients and beneficial microbes that can improve soil health. You can also use it as mulch around plants. Alternatively, you can dispose of it in your yard waste bin.
Leave a Comment