
Grow Mini Carrots Home? Absolutely! Imagine plucking perfectly petite, sweet carrots straight from your own backyard – or even your balcony! It’s easier than you think, and this guide is packed with DIY tricks and hacks to make it a reality, even if you’re a complete beginner. Forget those bland, store-bought carrots; we’re talking about vibrant, flavorful mini carrots bursting with freshness.
For centuries, home gardening has been a source of sustenance and joy. From ancient Roman kitchen gardens to the victory gardens of World War II, growing your own food connects us to a rich history of self-sufficiency and resourcefulness. While large-scale agriculture has become the norm, the desire to cultivate our own little patch of earth remains strong.
But why grow mini carrots home, specifically? Well, space is often a constraint in modern living. Mini carrots are perfect for container gardening, raised beds, or even small garden plots. Plus, they mature faster than full-sized carrots, offering a quicker reward for your efforts. And let’s be honest, they’re just incredibly cute! This DIY guide will provide you with all the tips and tricks you need to successfully grow these delightful little veggies, from seed selection to harvesting techniques. I’m excited to share these secrets with you, so let’s get started!
Growing Mini Carrots at Home: A Step-by-Step Guide
Hey there, fellow gardening enthusiasts! Ever dreamt of plucking perfectly petite, sweet mini carrots straight from your own garden? Well, dream no more! Growing mini carrots at home is surprisingly easy and incredibly rewarding. I’m going to walk you through everything you need to know, from choosing the right seeds to harvesting your tiny treasures. Let’s get our hands dirty!
Choosing the Right Carrot Variety
First things first, not all carrots are created equal when it comes to miniaturization. You’ll want to select a variety specifically bred for producing those adorable little roots. Here are a few of my personal favorites:
* **’Thumbelina’:** These are round, almost like little radishes, and super sweet. They’re perfect for containers.
* **’Paris Market’:** Similar to Thumbelina, these are round and mature quickly.
* **’Little Finger’:** As the name suggests, these are small and slender, about the size of your pinky finger.
* **’Short n Sweet’:** A classic choice, these are shorter than standard carrots and have a lovely sweet flavor.
Tip: Always check the seed packet for information on size and days to maturity.
Preparing Your Growing Space
Carrots need loose, well-draining soil to thrive. Compacted soil can lead to stunted or misshapen roots, and nobody wants that!
* **Sunlight:** Carrots need at least 6 hours of sunlight per day. Choose a sunny spot in your garden or on your balcony.
* **Soil:** The ideal soil is sandy loam, but you can amend your existing soil to make it suitable.
* **Container Gardening:** If you’re growing in containers, choose pots that are at least 6-8 inches deep. This gives the carrots enough room to develop.
Step-by-Step Planting Guide
Now for the fun part – planting!
1. **Prepare the Soil:** Whether you’re using a garden bed or a container, loosen the soil to a depth of at least 6 inches. Remove any rocks, clumps, or debris.
* If you have heavy clay soil, amend it with compost, peat moss, or sand to improve drainage.
* For container gardening, use a high-quality potting mix.
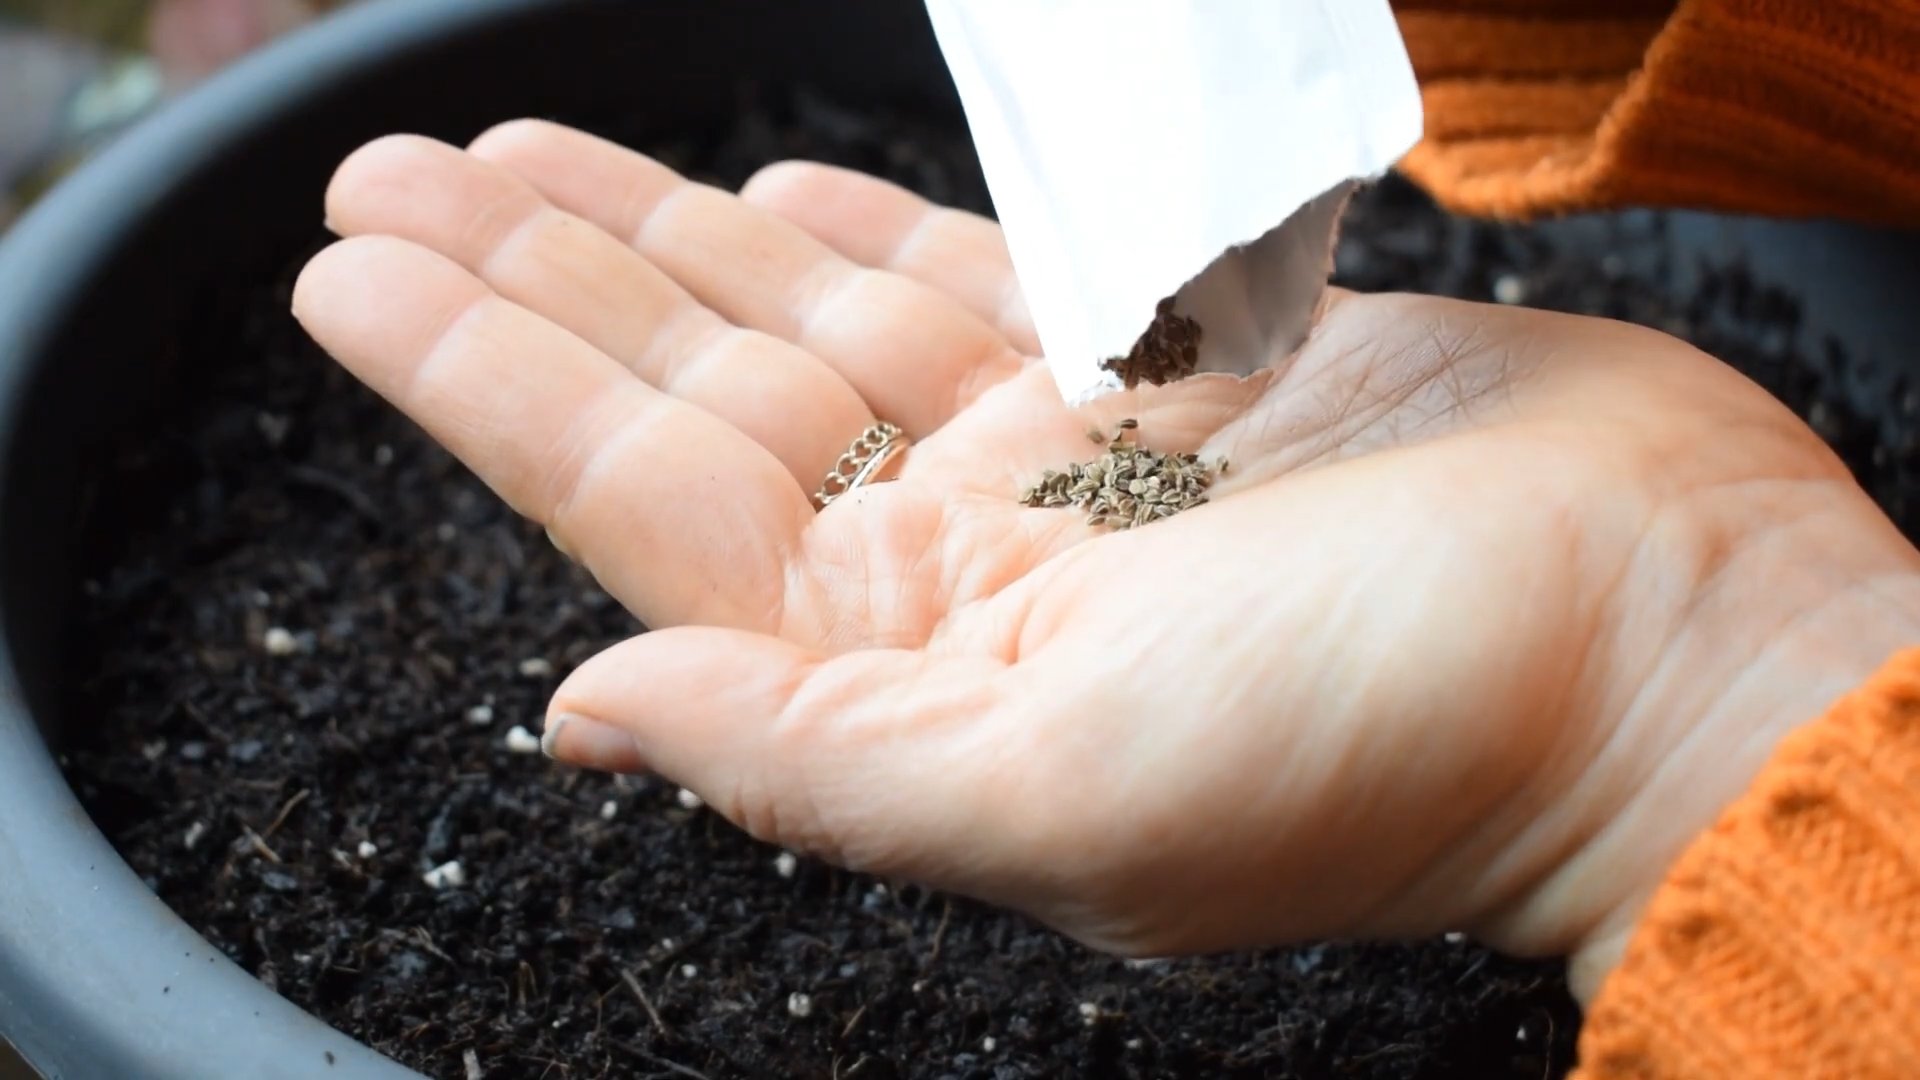
2. **Sow the Seeds:** Carrot seeds are tiny, so it’s easy to sow them too thickly.
* Create shallow furrows about ¼ inch deep and 1-2 inches apart.
* Sprinkle the seeds thinly along the furrows. I find it helpful to mix the seeds with sand to make them easier to distribute evenly.
* Gently cover the seeds with soil and pat it down lightly.
3. **Water Thoroughly:** Water the soil gently but thoroughly after planting. You want to keep the soil consistently moist until the seeds germinate.
* Use a watering can with a gentle rose attachment to avoid washing away the seeds.
4. **Germination:** Carrot seeds can take anywhere from 7 to 21 days to germinate, depending on the temperature and moisture levels.
* Be patient and keep the soil consistently moist.
* You can cover the planting area with a piece of burlap or shade cloth to help retain moisture. Remove it once the seedlings emerge.
Thinning the Seedlings
This is a crucial step for growing healthy mini carrots. If you don’t thin the seedlings, they’ll compete for resources and you’ll end up with a bunch of spindly, underdeveloped carrots.
1. **When to Thin:** Thin the seedlings when they are about 1-2 inches tall.
2. **How to Thin:** Gently pull out the weaker seedlings, leaving about 1-2 inches between the remaining plants.
* I know it feels brutal to pull out perfectly good seedlings, but trust me, it’s necessary!
* You can use small scissors to snip the seedlings at the soil line if you’re worried about disturbing the roots of the remaining plants.
3. **Second Thinning (Optional):** If the carrots are still crowded after the first thinning, you can thin them again a few weeks later, leaving about 2-3 inches between plants.
Caring for Your Mini Carrots
Once your carrots are established, it’s time to focus on providing them with the care they need to thrive.
* **Watering:** Carrots need consistent moisture, especially during hot, dry weather. Water deeply whenever the top inch of soil feels dry.
* Avoid overwatering, as this can lead to root rot.
* **Weeding:** Keep the area around your carrots free of weeds. Weeds compete with the carrots for nutrients and water.
* Hand-pull weeds carefully to avoid disturbing the carrot roots.
* **Fertilizing:** Carrots are not heavy feeders, but they will benefit from a light feeding of fertilizer.
* Use a balanced fertilizer (e.g., 10-10-10) or a fertilizer specifically formulated for root vegetables.
* Apply the fertilizer according to the package directions.
* **Pest Control:** Carrots can be susceptible to certain pests, such as carrot rust flies and aphids.
* Inspect your plants regularly for signs of pests.
* Use organic pest control methods, such as insecticidal soap or neem oil, to control pests.
* Row covers can also be used to protect your carrots from pests.
Harvesting Your Mini Carrots
The moment you’ve been waiting for! Harvesting your own homegrown mini carrots is incredibly satisfying.
1. **When to Harvest:** Mini carrots are typically ready to harvest in 50-70 days, depending on the variety.
* Check the seed packet for the specific days to maturity for your chosen variety.
* You can harvest them when they reach the desired size.
2. **How to Harvest:** Gently loosen the soil around the carrots with a garden fork or trowel.
* Grasp the carrot tops near the base and pull gently but firmly.
* If the carrots are difficult to pull, loosen the soil further.
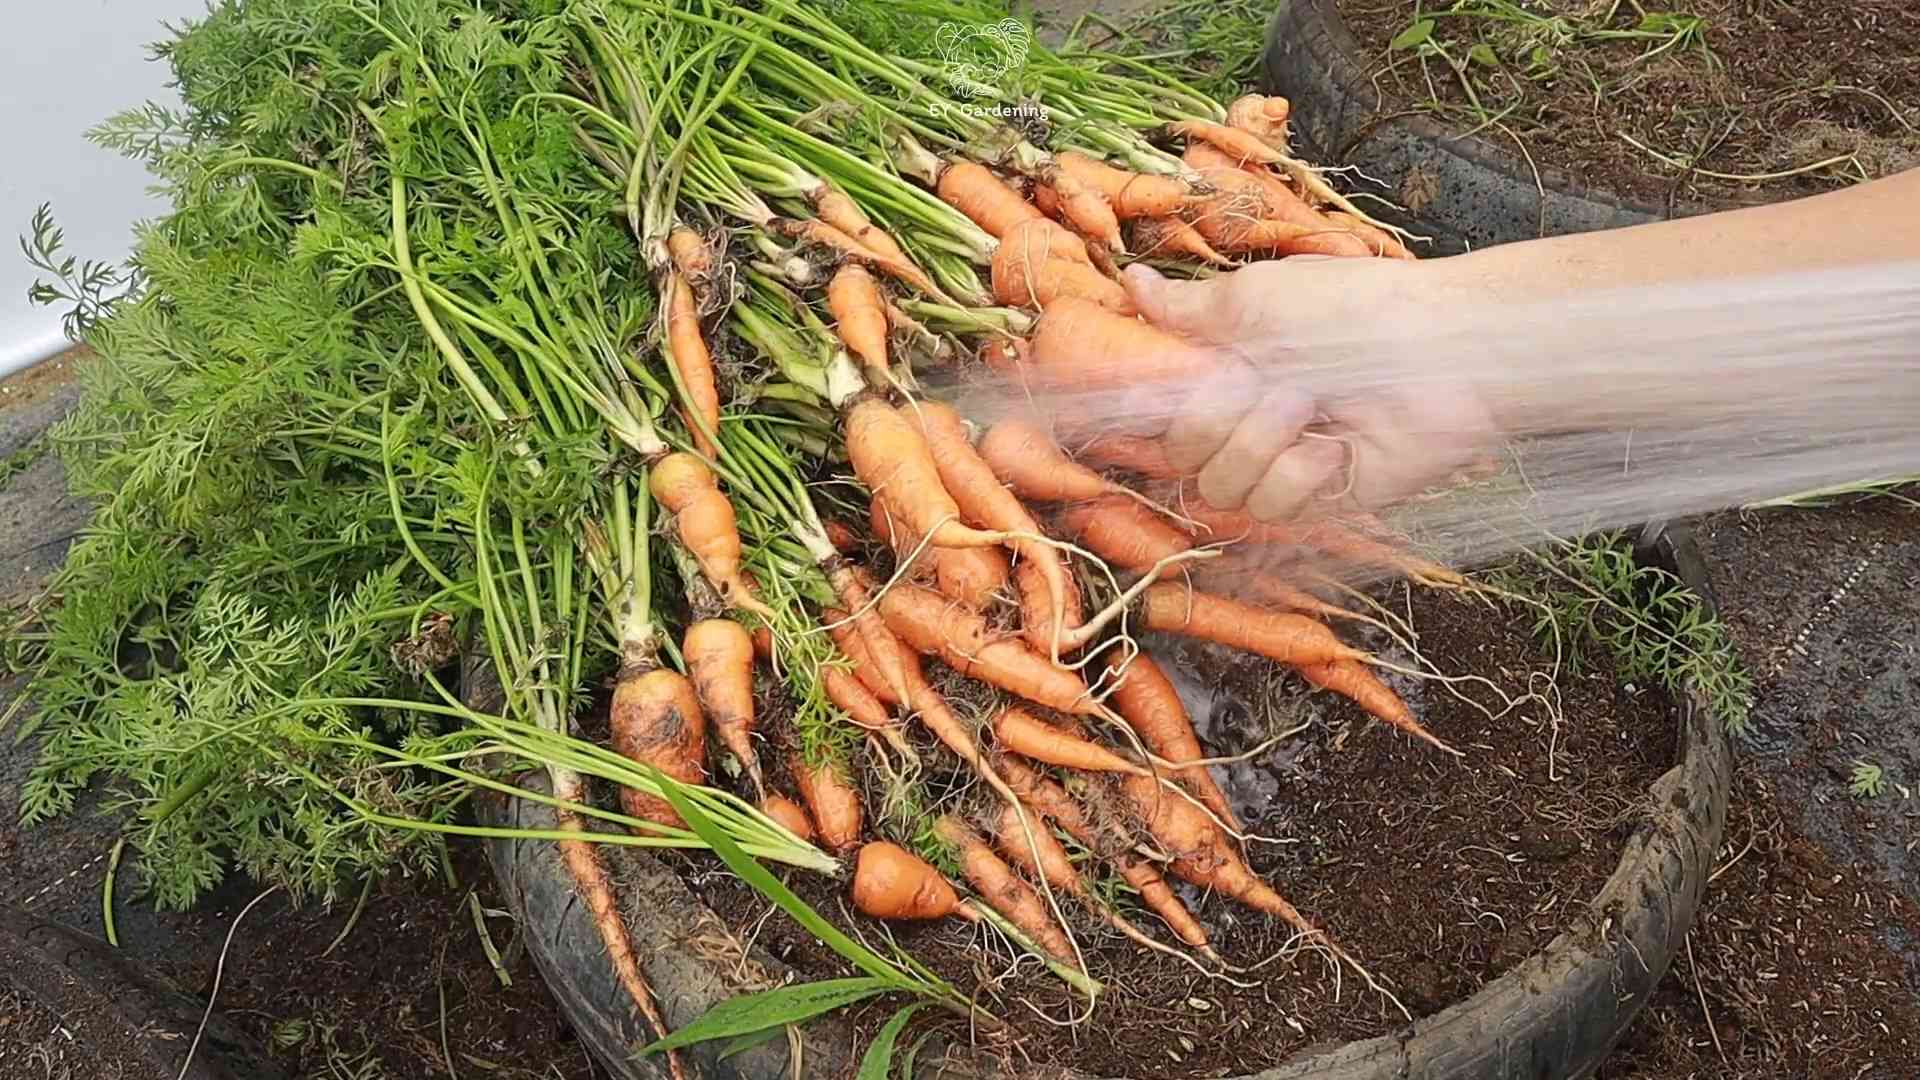
3. **Cleaning and Storing:** Wash the carrots thoroughly to remove any dirt.
* Store them in the refrigerator in a plastic bag or container.
* They will keep for several weeks.
Troubleshooting Common Problems
Even with the best care, you might encounter some problems along the way. Here are a few common issues and how to address them:
* **Forked or Misshapen Carrots:** This is usually caused by compacted soil or rocks in the soil. Make sure to prepare the soil thoroughly before planting.
* **Stunted Growth:** This can be caused by a lack of nutrients, insufficient sunlight, or overcrowding. Thin the seedlings and fertilize as needed.
* **Pest Infestations:** Inspect your plants regularly for pests and take action promptly.
* **Bolting (Premature Flowering):** This can be caused by stress, such as extreme temperatures or inconsistent watering. Try to provide consistent care and protect your plants from extreme weather.
Enjoying Your Harvest
Now that you’ve harvested your beautiful mini carrots, it’s time to enjoy them! Here are a few ideas:
* **Eat them raw:** Mini carrots are delicious and nutritious eaten raw as a snack.
* **Add them to salads:** They add a pop of color and sweetness to salads.
* **Roast them:** Roasting brings out their natural sweetness.
* **Steam them:** Steamed mini carrots are a healthy and delicious side dish.
* **Pickle them:** Pickled mini carrots are a tangy and flavorful treat.
Tip: Don’t throw away the carrot tops! They’re edible and can be used to make pesto or added to soups and stews.
Growing mini carrots at home is a fun and rewarding experience. With a little bit of care and attention, you can enjoy a bountiful harvest of these sweet and adorable little vegetables. Happy gardening!
Conclusion
So, there you have it! Growing mini carrots at home is not only achievable but also incredibly rewarding. Forget those bland, pre-packaged baby carrots from the store. Imagine biting into a sweet, crisp, and perfectly petite carrot that you nurtured from seed to harvest, right in your own backyard or even on your windowsill. This DIY trick transforms the way you think about fresh produce and puts the power of homegrown goodness directly into your hands.
Why is this a must-try? Because it’s about more than just carrots. It’s about connecting with nature, understanding the growing process, and enjoying the unparalleled flavor of truly fresh vegetables. It’s about reducing your reliance on store-bought produce, minimizing your environmental impact, and adding a touch of green to your living space. And let’s be honest, there’s a certain satisfaction that comes from saying, “I grew these myself!”
But the beauty of this DIY project lies in its adaptability. Feel free to experiment with different varieties of carrot seeds. Nantes carrots are known for their sweetness and cylindrical shape, making them ideal for mini carrots. Chantenay carrots are another great option, offering a slightly shorter and sturdier root. Consider adding companion plants like radishes or lettuce to your container. They mature quickly and can help break up the soil, making it easier for your mini carrots to thrive.
For those with limited space, container gardening is your best friend. A simple pot on a sunny balcony or patio can become a miniature carrot farm. Just ensure your container is deep enough (at least 6-8 inches) to accommodate the growing roots. If you have a larger garden, dedicate a small raised bed specifically to your mini carrots. This allows for better soil control and easier harvesting.
Don’t be afraid to get your hands dirty! Gardening is a tactile experience, and there’s something incredibly therapeutic about working with soil and nurturing plants. Watch your mini carrots sprout, grow, and mature. Observe the subtle changes in their color and shape. Learn from any challenges you encounter along the way. Each growing season is a learning opportunity, and with a little patience and care, you’ll be rewarded with a bountiful harvest of delicious mini carrots.
We wholeheartedly encourage you to try this DIY trick for growing mini carrots at home. It’s a simple, affordable, and incredibly satisfying project that will bring joy to your kitchen and your garden. Once you’ve experienced the taste of homegrown mini carrots, you’ll never go back to the store-bought variety.
So, grab your seeds, prepare your soil, and get ready to embark on a mini carrot growing adventure! And most importantly, we want to hear about your experience. Share your photos, tips, and stories with us in the comments below. Let’s create a community of mini carrot enthusiasts and inspire others to embrace the joys of homegrown produce. Let us know what worked for you, what challenges you faced, and any creative variations you tried. Together, we can unlock the secrets to growing the perfect mini carrot at home.
Frequently Asked Questions (FAQs)
What kind of soil is best for growing mini carrots?
The ideal soil for growing mini carrots is loose, well-draining, and rich in organic matter. Carrots prefer a slightly acidic to neutral pH (around 6.0 to 7.0). Avoid heavy clay soils, as they can restrict root growth and result in misshapen carrots. Amend your soil with compost, well-rotted manure, or other organic materials to improve drainage and fertility. You can also purchase a pre-made potting mix specifically designed for vegetables. Ensure the soil is free of rocks and debris, as these can also hinder root development.
How much sunlight do mini carrots need?
Mini carrots require at least 6 hours of direct sunlight per day to thrive. Choose a location that receives ample sunlight throughout the day. If you’re growing them indoors, place them near a sunny window or supplement with grow lights. Insufficient sunlight can lead to leggy growth and smaller, less flavorful carrots. Rotate your containers regularly to ensure even sunlight exposure on all sides of the plants.
How often should I water my mini carrots?
Water your mini carrots regularly, keeping the soil consistently moist but not waterlogged. Overwatering can lead to root rot, while underwatering can stunt growth. Check the soil moisture by sticking your finger about an inch deep. If the soil feels dry, it’s time to water. Water deeply and thoroughly, allowing the water to drain out of the bottom of the container. Avoid overhead watering, as this can promote fungal diseases. Mulching around the plants can help retain moisture and suppress weeds.
When is the best time to plant mini carrots?
The best time to plant mini carrots depends on your climate. In general, carrots are a cool-season crop and can be planted in early spring or late summer for a fall harvest. In warmer climates, you can plant them throughout the fall and winter. Check your local planting calendar for specific dates. Avoid planting during the hottest months of the year, as high temperatures can inhibit germination and growth.
How long does it take for mini carrots to grow?
Mini carrots typically take 50-70 days to mature, depending on the variety and growing conditions. Check the seed packet for specific information. You can start harvesting them when they reach your desired size. Don’t wait too long, as they can become tough and woody if left in the ground for too long.
How do I prevent pests and diseases from affecting my mini carrots?
To prevent pests and diseases, practice good gardening hygiene. Remove any weeds or debris from around your plants. Rotate your crops each year to avoid soilborne diseases. Monitor your plants regularly for signs of pests or diseases. Common pests that affect carrots include carrot rust flies, aphids, and nematodes. Use organic pest control methods, such as insecticidal soap or neem oil, to control pests. Ensure good air circulation to prevent fungal diseases.
Can I grow mini carrots in containers?
Yes, mini carrots are well-suited for container gardening. Choose a container that is at least 6-8 inches deep and has drainage holes. Use a well-draining potting mix. Water regularly and fertilize as needed. Place the container in a sunny location.
What are some good companion plants for mini carrots?
Good companion plants for mini carrots include radishes, lettuce, onions, garlic, rosemary, and sage. Radishes and lettuce mature quickly and can help break up the soil. Onions and garlic repel carrot rust flies. Rosemary and sage deter other pests.
How do I harvest mini carrots?
To harvest mini carrots, gently loosen the soil around the base of the plant. Grasp the carrot near the top and pull it straight out of the ground. If the soil is dry, water it beforehand to make harvesting easier. Wash the carrots thoroughly before eating.
Can I save seeds from my mini carrots?
Saving seeds from carrots is a bit more complex than saving seeds from other vegetables. Carrots are biennials, meaning they require two growing seasons to produce seeds. In the first year, they produce roots and foliage. In the second year, they flower and produce seeds. To save seeds, you’ll need to overwinter your carrots and allow them to flower in the spring. However, carrots are also cross-pollinated, so you’ll need to isolate them from other carrot varieties to ensure true-to-type seeds. For beginners, it’s generally easier to purchase seeds from a reputable source.

Leave a Comment