
Grow Malabar Spinach Fast and unlock a world of fresh, vibrant greens right in your own backyard! Have you ever dreamed of harvesting your own delicious, nutritious spinach without the long wait? Well, you’re in the right place! This isn’t just about gardening; it’s about connecting with nature, enjoying the fruits (or rather, the leaves!) of your labor, and adding a touch of green magic to your daily life.
Malabar spinach, unlike traditional spinach, thrives in warmer climates, making it a fantastic alternative for those of us who struggle with cooler-weather crops. Its history stretches back centuries, with roots in Southeast Asia and Africa, where it’s been a culinary staple and a source of vital nutrients. Imagine, you’re not just growing a plant; you’re participating in a tradition that spans continents and cultures!
But why should *you* learn to grow Malabar spinach fast? Because time is precious! We all want to enjoy the benefits of homegrown produce without spending months waiting for a harvest. Plus, with rising grocery prices, having a readily available source of fresh greens is not only convenient but also budget-friendly. In this article, I’m going to share my top DIY tricks and hacks to accelerate the growth of your Malabar spinach, ensuring you’ll be enjoying delicious, homegrown meals in no time. Get ready to transform your garden and your plate!

Grow Malabar Spinach Like a Pro: A DIY Guide to Speedy Success
Hey there, fellow gardening enthusiasts! I’m so excited to share my secrets for growing Malabar spinach – and growing it *fast*! This leafy green is a fantastic addition to any garden, offering a delicious and nutritious alternative to traditional spinach, especially during the hotter months. It thrives in warm weather, is incredibly easy to care for, and, with a few clever tricks, you can harvest a bountiful crop in no time. Let’s dive in!
Understanding Malabar Spinach: Your New Favorite Vine
Before we get our hands dirty, let’s talk a little about what makes Malabar spinach so special. Unlike true spinach, Malabar spinach (Basella alba or Basella rubra) is a vine. This means it needs something to climb on, like a trellis, fence, or even a sturdy tomato cage. It’s also incredibly heat-tolerant, making it a perfect choice for those of us who struggle to keep regular spinach alive during the summer. Plus, it’s packed with vitamins and minerals!
Materials You’ll Need: Setting Yourself Up for Success
To get started, you’ll need a few essential items. Don’t worry, most of these are readily available and won’t break the bank.
* Malabar Spinach Seeds or Seedlings: You can find these online or at your local garden center. I personally prefer starting from seeds, but seedlings will give you a head start.
* Potting Mix (for starting seeds): A good quality potting mix is crucial for healthy seedlings.
* Garden Soil or Raised Bed Mix: This will be the foundation for your plants once they’re ready to go into the garden.
* Compost or Aged Manure: This is your secret weapon for boosting growth! Malabar spinach loves nutrient-rich soil.
* Trellis, Fence, or Support Structure: Remember, it’s a vine!
* Gardening Gloves: Protect those hands!
* Watering Can or Hose: Essential for keeping your plants hydrated.
* Optional: Seed Starting Tray or Small Pots: If you’re starting from seeds.
* Optional: Liquid Fertilizer: For an extra boost of nutrients.
Phase 1: Starting Your Malabar Spinach Seeds (The Patient Approach)
If you’re starting from seeds, this is where the magic begins. While you can directly sow seeds into the ground, I’ve found that starting them indoors gives them a significant advantage, especially in areas with shorter growing seasons.
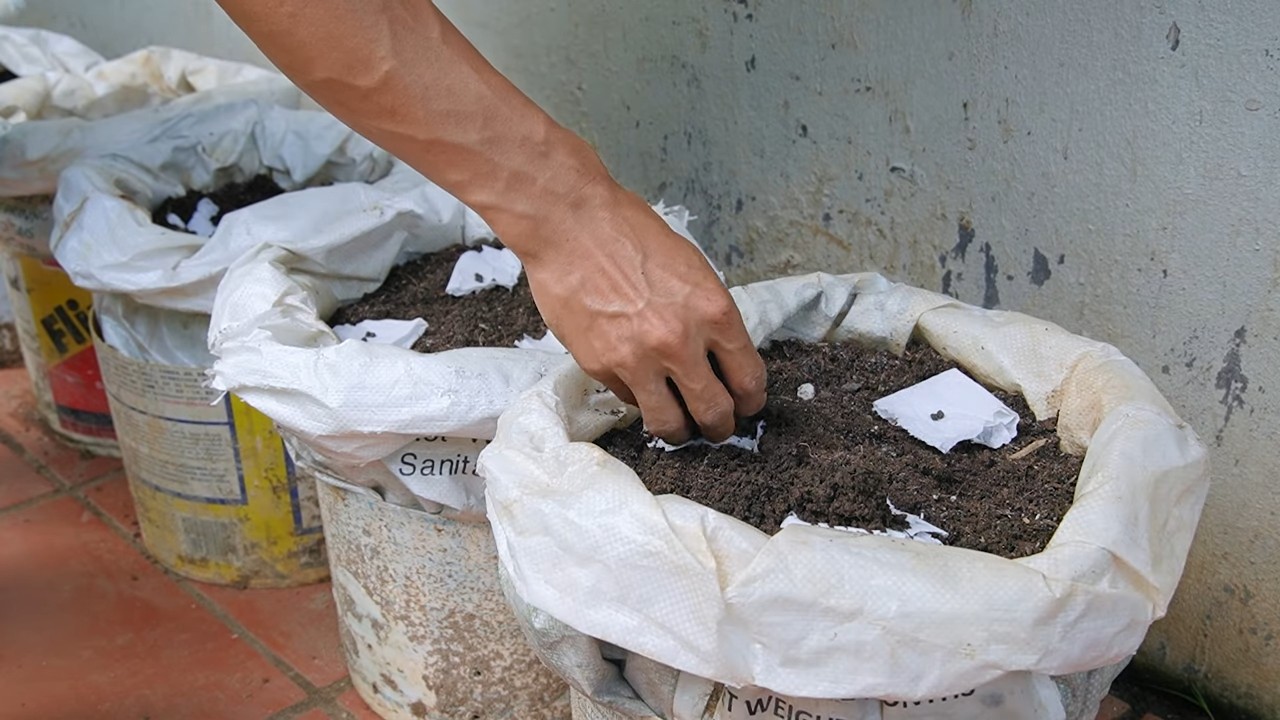
1. Soak the Seeds: Malabar spinach seeds have a tough outer coating. To improve germination rates, soak them in warm water for 24-48 hours before planting. This helps soften the shell and allows moisture to penetrate. I usually put them in a small bowl on my kitchen counter.
2. Prepare Your Seed Starting Tray or Pots: Fill your seed starting tray or small pots with a good quality potting mix. Moisten the soil thoroughly, but don’t let it become waterlogged.
3. Sow the Seeds: Plant the soaked seeds about ½ inch deep in the soil. I usually plant 2-3 seeds per cell or pot to increase my chances of success.
4. Provide Warmth and Light: Malabar spinach seeds need warmth to germinate. Aim for a soil temperature of around 70-80°F (21-27°C). You can use a heat mat to help maintain the temperature. Place the tray or pots in a bright location, such as a sunny windowsill or under grow lights.
5. Keep the Soil Moist: Water gently to keep the soil consistently moist, but not soggy. I use a spray bottle to avoid disturbing the seeds.
6. Be Patient: Germination can take anywhere from 1-3 weeks, so don’t get discouraged if you don’t see sprouts right away. Just keep the soil moist and warm, and they’ll eventually pop up.
Phase 2: Transplanting Your Seedlings (Giving Them Room to Grow)
Once your seedlings have developed a few sets of true leaves (the leaves that look like miniature versions of the adult leaves), they’re ready to be transplanted into the garden.
1. Harden Off the Seedlings: Before transplanting, you need to “harden off” the seedlings. This means gradually exposing them to outdoor conditions to help them adjust to the sun, wind, and temperature changes. Start by placing them outdoors in a sheltered location for an hour or two each day, gradually increasing the amount of time they spend outside over the course of a week.
2. Prepare the Planting Site: Choose a sunny location with well-drained soil. Malabar spinach prefers at least 6 hours of sunlight per day. Amend the soil with compost or aged manure to improve its fertility and drainage. I like to dig in a generous amount – it really makes a difference!
3. Install Your Support Structure: Before you plant, make sure your trellis, fence, or other support structure is in place. This will give the vines something to climb on as they grow.
4. Transplant the Seedlings: Gently remove the seedlings from their pots or tray, being careful not to damage the roots. Plant them about 12-18 inches apart, near the base of your support structure.
5. Water Thoroughly: After transplanting, water the seedlings thoroughly to help them settle in.
Phase 3: Nurturing Your Malabar Spinach for Rapid Growth (The Secret Sauce)
This is where the real magic happens! With the right care and attention, you can encourage your Malabar spinach to grow quickly and produce a bountiful harvest.
1. Water Regularly: Malabar spinach needs consistent moisture, especially during hot weather. Water deeply whenever the top inch of soil feels dry. I usually water in the morning to give the plants time to dry out before nightfall, which helps prevent fungal diseases.
2. Fertilize Regularly: Malabar spinach is a heavy feeder, meaning it needs plenty of nutrients to thrive. Fertilize every 2-3 weeks with a liquid fertilizer or compost tea. I personally love using fish emulsion – it smells a bit strong, but it works wonders!
3. Provide Support: As the vines grow, they’ll need help climbing your support structure. Gently guide the vines and tie them to the trellis or fence as needed. I use soft twine or plant ties to avoid damaging the stems.
4. Pinch Back the Tips: Pinching back the tips of the vines encourages branching and bushier growth. This will result in a more productive plant. I usually pinch back the tips every few weeks.
5. Mulch Around the Plants: Mulching helps retain moisture in the soil, suppress weeds, and regulate soil temperature. I use straw or wood chips for mulching.
6. Watch Out for Pests and Diseases: Malabar spinach is generally pest and disease-resistant, but it can occasionally be affected by aphids or fungal diseases. Inspect your plants regularly and take action if you notice any problems. For aphids, I usually spray them with a strong stream of water or use insecticidal soap. For fungal diseases, make sure the plants have good air circulation and avoid overwatering.
Phase 4: Harvesting Your Bountiful Crop (The Rewarding Part)
The best part of growing Malabar spinach is, of course, harvesting the delicious leaves!
1. Harvest Regularly: You can start harvesting leaves as soon as the vines are long enough. The more you harvest, the more the plant will produce. I usually harvest the young, tender leaves, as they have the best flavor.
2. Cut the Stems: Use scissors or pruning shears to cut the stems just above a leaf node. This will encourage new growth.
3. Enjoy Your Harvest: Malabar spinach can be used in a variety of dishes, just like regular spinach. It’s great in salads, stir-fries, soups, and stews. I personally love adding it to my morning smoothies!
Extra Tips for Supercharged Growth:
* Soil Solarization: Before planting, consider solarizing your soil to kill off any weed seeds or soilborne diseases. This involves covering the soil with clear plastic for several weeks during the hottest part of the summer.
* Companion Planting: Plant Malabar spinach alongside beneficial companion plants, such as basil, marigolds, or nasturtiums. These plants can help deter pests and attract pollinators.
* Succession Planting: To ensure a continuous harvest, plant new seeds or seedlings every few weeks. This will keep you supplied with fresh Malabar spinach throughout the growing season.
* Water deeply and less frequently: This encourages deep root growth, making your plants more drought-tolerant.
* Observe your plants daily: Catching problems early is key to a healthy and productive garden.
Growing Malabar spinach is a rewarding experience, and with these tips, you’ll be enjoying a delicious and abundant harvest in no time. Happy gardening!
Conclusion
So, there you have it! Growing Malabar Spinach fast isn’t just a gardener’s dream; it’s an achievable reality with these simple yet effective DIY tricks. We’ve explored the importance of optimal soil conditions, strategic planting techniques, and consistent care to accelerate the growth of this nutritious and delicious leafy green.
Why is this a must-try? Because beyond the satisfaction of harvesting your own fresh produce, you’re gaining access to a powerhouse of vitamins and minerals, all while saving money and reducing your reliance on store-bought vegetables. Imagine the vibrant green leaves adorning your salads, stir-fries, and soups, knowing you nurtured them from seed to table. The taste is undeniably fresher, the texture more succulent, and the pride in your accomplishment immeasurable.
But the journey doesn’t end here! Feel free to experiment with different variations to tailor the process to your specific environment and preferences. For instance, if you live in a particularly hot climate, consider providing afternoon shade to prevent leaf scorch. If your soil is naturally acidic, amend it with lime to achieve the ideal pH level. You can also try different trellising methods to maximize vertical growth and space utilization. Some gardeners even swear by companion planting, suggesting that basil or marigolds can deter pests and enhance the flavor of your Malabar Spinach.
Don’t be afraid to get creative and adapt these techniques to suit your unique gardening style. The beauty of DIY is the freedom to personalize and optimize the process for your own success.
We wholeheartedly encourage you to give these DIY tricks a try. Witness the remarkable transformation as your Malabar Spinach plants flourish and provide you with a bountiful harvest. And most importantly, share your experience with us! We’d love to hear about your successes, challenges, and any innovative variations you discover along the way. Your insights can inspire other gardeners and contribute to a collective knowledge base that benefits everyone.
Post your photos, tips, and stories on our social media channels or in the comments section below. Let’s create a community of passionate Malabar Spinach growers who are dedicated to sharing their expertise and helping each other succeed. Together, we can unlock the full potential of this amazing plant and enjoy the rewards of a thriving home garden. Remember, growing Malabar Spinach fast is within your reach – all it takes is a little knowledge, effort, and a whole lot of enthusiasm!
Frequently Asked Questions (FAQ)
What exactly is Malabar Spinach, and why should I grow it?
Malabar Spinach (Basella alba or Basella rubra) isn’t actually a true spinach, but a leafy green vine that thrives in warm weather. It’s an excellent alternative to spinach, especially in hot climates where traditional spinach struggles. It’s packed with vitamins A and C, iron, and calcium, making it a highly nutritious addition to your diet. Plus, it’s incredibly versatile in the kitchen, suitable for salads, stir-fries, soups, and more. Growing your own ensures you have access to fresh, organic greens without the need for store-bought options.
How long does it typically take for Malabar Spinach to grow?
Under optimal conditions, Malabar Spinach can grow quite rapidly. You can expect to start harvesting leaves within 60-70 days from sowing seeds. However, with the DIY tricks mentioned above – focusing on soil preparation, strategic planting, and consistent care – you can potentially accelerate this growth and begin harvesting even sooner. Factors like climate, sunlight exposure, and soil fertility will also play a significant role in the overall growth rate.
What are the best soil conditions for growing Malabar Spinach fast?
Malabar Spinach thrives in well-draining, fertile soil with a slightly acidic to neutral pH (around 6.5 to 7.0). Before planting, amend your soil with plenty of organic matter, such as compost or well-rotted manure. This will improve drainage, aeration, and nutrient content, providing the ideal foundation for rapid growth. Consider adding a slow-release fertilizer at planting time to provide a steady supply of nutrients throughout the growing season.
How much sunlight does Malabar Spinach need?
Malabar Spinach needs at least 6 hours of direct sunlight per day to thrive. However, in extremely hot climates, providing some afternoon shade can prevent leaf scorch. Monitor your plants closely and adjust their sun exposure as needed to ensure they receive adequate light without being overwhelmed by excessive heat.
What’s the best way to water Malabar Spinach?
Consistent watering is crucial for promoting rapid growth. Keep the soil consistently moist, but avoid overwatering, which can lead to root rot. Water deeply and regularly, especially during hot, dry periods. Mulching around the base of the plants can help retain moisture and suppress weeds.
How do I trellis Malabar Spinach?
Malabar Spinach is a vining plant and requires a trellis or other support structure to climb. You can use a variety of trellising methods, such as a bamboo stake, a fence, or a commercially available trellis. Train the vines to climb the trellis by gently guiding them and tying them loosely with twine or plant clips. Trellising not only provides support but also improves air circulation and makes harvesting easier.
What are some common pests and diseases that affect Malabar Spinach, and how can I prevent them?
Malabar Spinach is generally resistant to pests and diseases, but it can occasionally be affected by aphids, spider mites, or fungal diseases. To prevent these problems, maintain good air circulation, avoid overwatering, and inspect your plants regularly for any signs of infestation or disease. If you spot pests, you can try spraying them with insecticidal soap or neem oil. For fungal diseases, use a copper-based fungicide.
Can I grow Malabar Spinach in containers?
Yes, Malabar Spinach can be successfully grown in containers, making it a great option for gardeners with limited space. Choose a large container (at least 12 inches in diameter) with good drainage holes. Use a high-quality potting mix and provide a trellis or other support structure for the vines to climb. Water and fertilize regularly, and ensure the container receives adequate sunlight.
How do I harvest Malabar Spinach?
You can start harvesting Malabar Spinach leaves once the plants are established and have reached a sufficient size. Simply snip off the leaves as needed, leaving at least a few leaves on each stem to encourage continued growth. Regular harvesting will also promote bushier growth and a more abundant yield.
Can I save seeds from my Malabar Spinach plants?
Yes, you can save seeds from your Malabar Spinach plants. Allow some of the flowers to mature and form berries. Once the berries turn dark purple or black, they are ready to harvest. Remove the seeds from the berries and dry them thoroughly before storing them in an airtight container in a cool, dark place. These seeds can be used to grow new Malabar Spinach plants in the following season.
Leave a Comment