
Grow Kale at Home? Absolutely! Imagine stepping outside your door and harvesting fresh, vibrant kale for your morning smoothie or a delicious salad. No more trips to the grocery store, no more wondering about pesticides – just pure, homegrown goodness. For centuries, kale has been a staple in diets around the world, from the hearty soups of Scotland to the vibrant stews of East Africa. Its resilience and nutritional power have made it a beloved crop for generations.
But let’s be honest, sometimes gardening can feel a little intimidating, right? That’s where these DIY tricks and hacks come in! I’m here to show you that you don’t need a sprawling farm or a green thumb of legend to successfully grow kale at home. Whether you have a tiny balcony, a sunny windowsill, or a backyard garden, I’ve got simple, effective strategies to help you cultivate this superfood with ease.
In this article, I’ll share my favorite tips and tricks for planting, nurturing, and harvesting your own kale. We’ll cover everything from choosing the right variety to dealing with common pests, all presented in a way that’s easy to understand and implement. Get ready to unlock the secrets to a thriving kale patch and enjoy the satisfaction of growing your own healthy, delicious food!
Growing Kale at Home: A Beginner’s Guide
Hey there, fellow gardening enthusiasts! I’m so excited to share my experience growing kale at home. It’s surprisingly easy, incredibly rewarding, and gives you access to fresh, nutritious greens right in your backyard (or even on your balcony!). Kale is a super versatile veggie, perfect for salads, smoothies, soups, and even kale chips. Let’s dive in!
Choosing Your Kale Variety
Before we get our hands dirty, let’s talk kale varieties. There are tons to choose from, each with its own unique flavor and texture. Here are a few of my favorites:
* **Curly Kale (Scotch Kale):** This is the classic kale you probably picture. It has tightly curled, frilly leaves and a slightly bitter taste that mellows out when cooked.
* **Lacinato Kale (Dinosaur Kale, Tuscan Kale):** Also known as dinosaur kale because of its bumpy, almost prehistoric-looking leaves, Lacinato kale has a milder, slightly sweeter flavor than curly kale. It’s fantastic in soups and stews.
* **Red Russian Kale:** This variety has flat, fringed leaves with reddish-purple stems. It’s known for its tender texture and slightly sweet, nutty flavor. It’s great in salads.
* **Redbor Kale:** This is an ornamental variety with deeply fringed, purple leaves. It’s beautiful in the garden and also edible, though it can be a bit tougher than other varieties.
I recommend trying a few different varieties to see which ones you like best!
Starting from Seed vs. Buying Seedlings
You have two main options for starting your kale journey: starting from seed or buying seedlings from a nursery. Both have their pros and cons:
* **Starting from Seed:** This is the more economical option, and it gives you more control over the entire growing process. However, it requires a bit more time and effort. You’ll need to start your seeds indoors about 6-8 weeks before the last expected frost.
* **Buying Seedlings:** This is the easier option, especially for beginners. You can simply transplant the seedlings directly into your garden or containers. However, it can be more expensive, and your variety choices may be limited.
I personally prefer starting from seed because I enjoy the process and I like having a wider selection of varieties. But if you’re short on time or just want to get started quickly, buying seedlings is a great option.
Preparing Your Growing Space
Kale needs plenty of sunlight and well-drained soil to thrive. Here’s how to prepare your growing space:
* **Sunlight:** Kale needs at least 6 hours of sunlight per day. Choose a location in your garden that gets plenty of sun. If you’re growing kale in containers, make sure to place them in a sunny spot.
* **Soil:** Kale prefers well-drained soil that is rich in organic matter. Before planting, amend your soil with compost or well-rotted manure. This will improve drainage and provide essential nutrients. The ideal soil pH for kale is between 6.0 and 7.5.
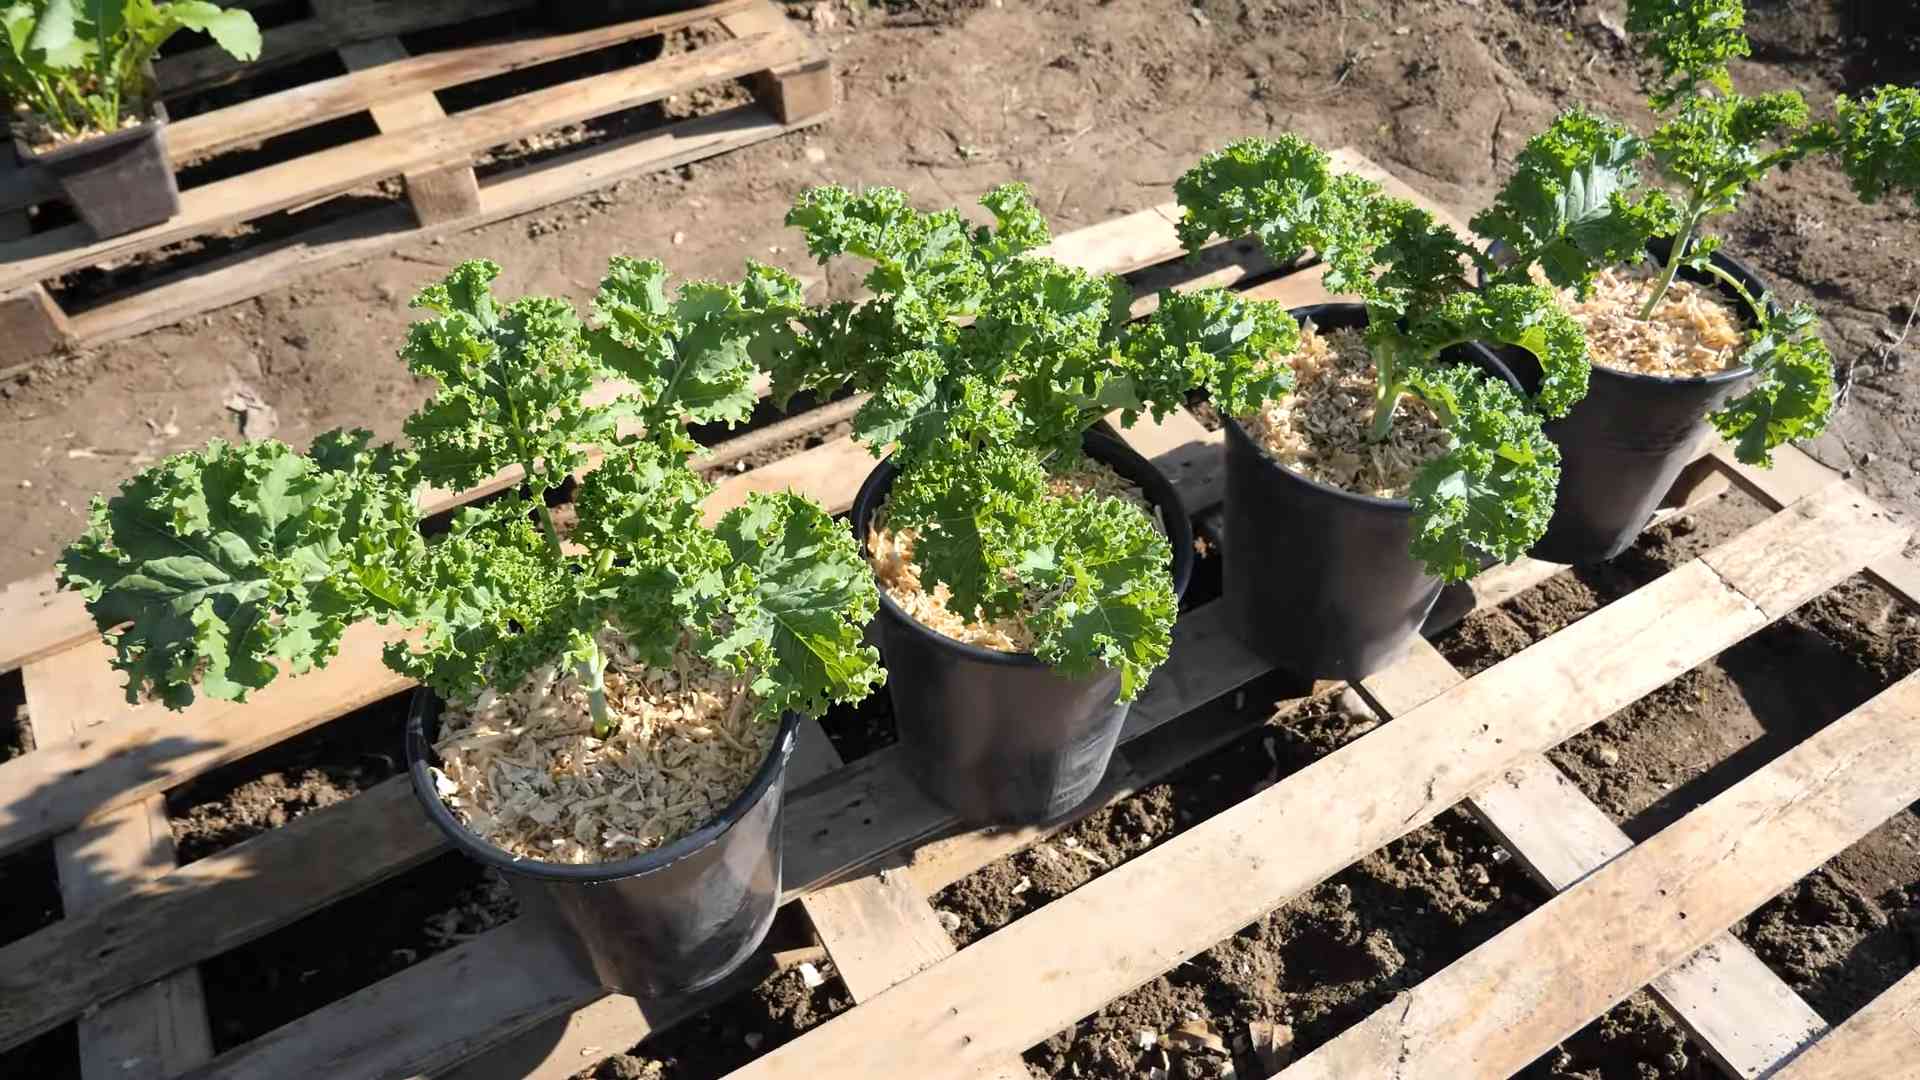
* **Container Gardening:** If you’re growing kale in containers, choose pots that are at least 12 inches in diameter. Make sure the pots have drainage holes to prevent waterlogging. Use a high-quality potting mix that is specifically designed for vegetables.
Step-by-Step Planting Guide
Alright, let’s get down to the nitty-gritty of planting! Whether you’re starting from seed or transplanting seedlings, these steps will guide you through the process.
Starting from Seed Indoors (Optional)
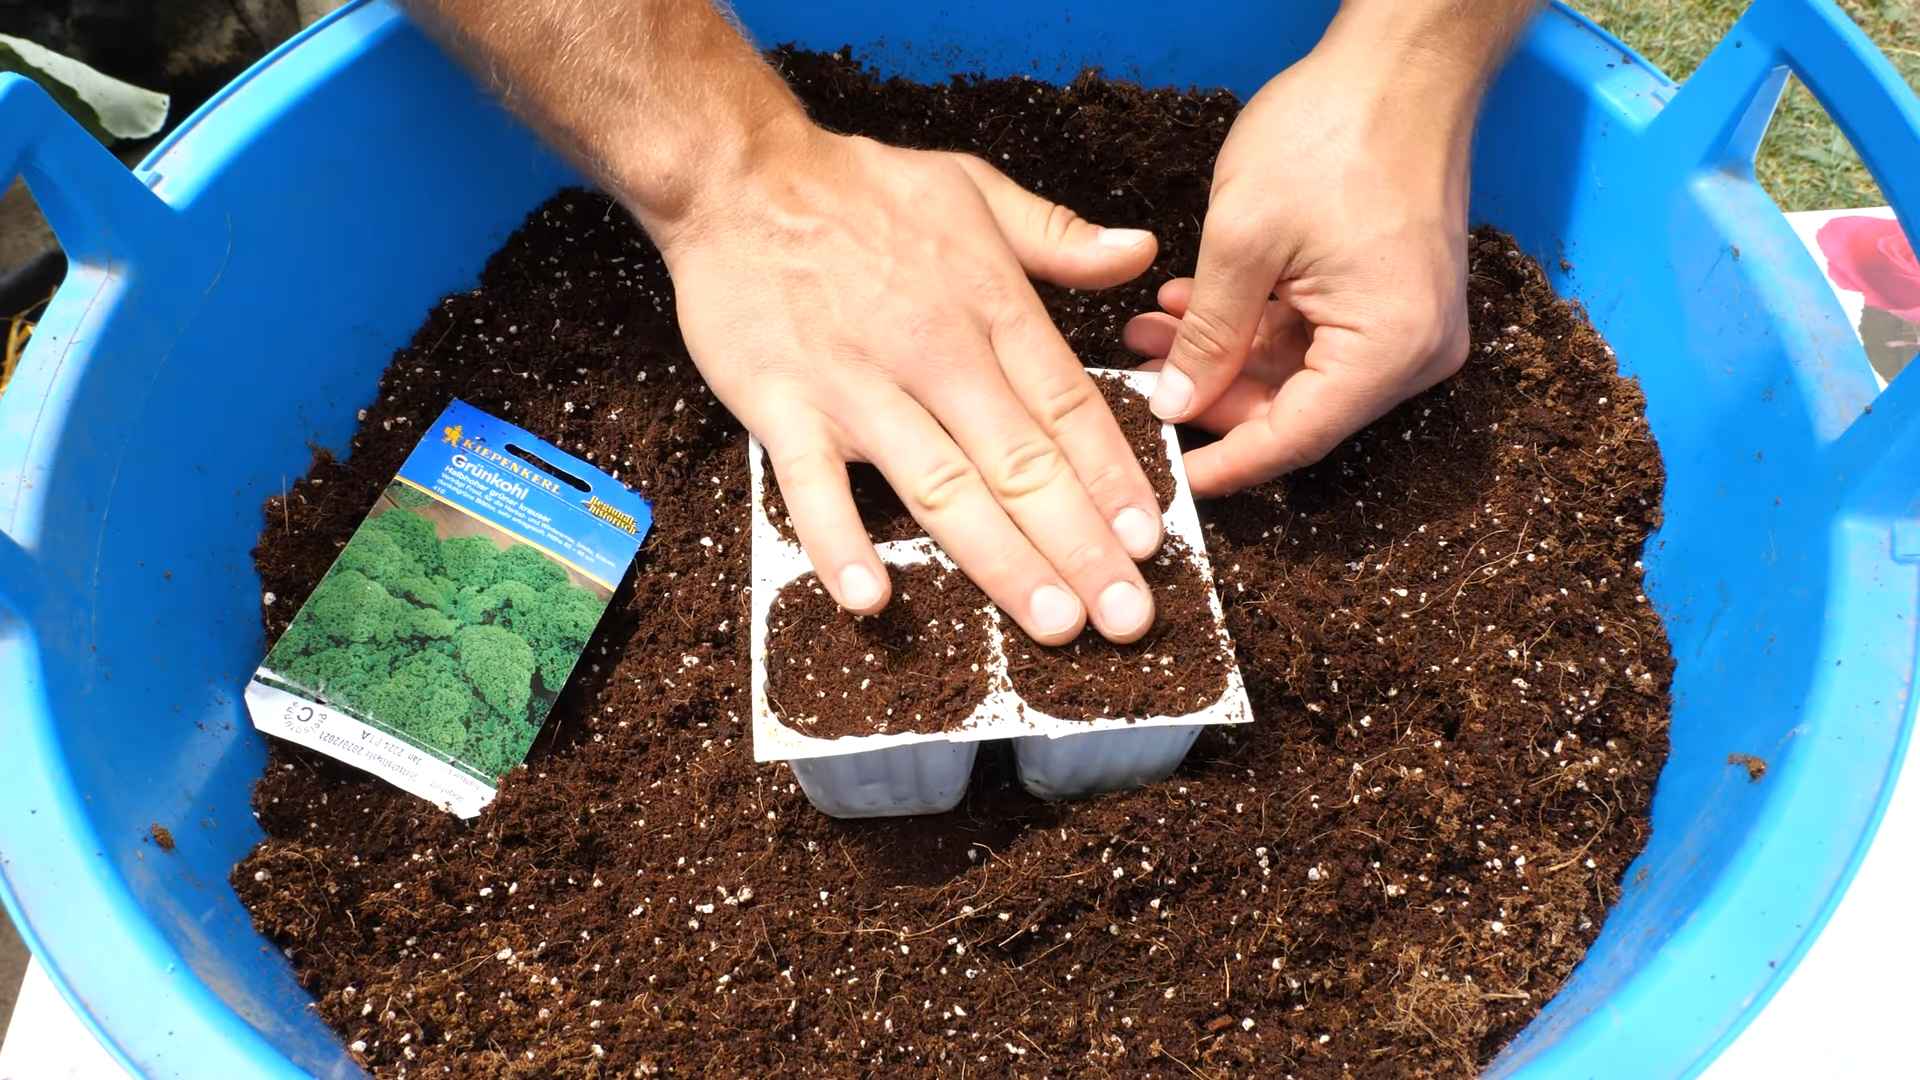
1. **Gather Your Supplies:** You’ll need seed starting trays or small pots, seed starting mix, kale seeds, a spray bottle, and a grow light (optional).
2. **Sow the Seeds:** Fill your seed starting trays or pots with seed starting mix. Moisten the mix with a spray bottle. Sow 2-3 kale seeds per cell or pot, about ¼ inch deep.
3. **Provide Light and Moisture:** Place the trays or pots under a grow light or in a sunny window. Keep the soil consistently moist, but not soggy.
4. **Thin the Seedlings:** Once the seedlings emerge and have a few true leaves, thin them to one seedling per cell or pot. Choose the strongest seedling and snip off the others at the soil line.
5. **Harden Off the Seedlings:** About a week before transplanting, gradually acclimate the seedlings to outdoor conditions. Start by placing them outside for a few hours each day, increasing the amount of time each day. This will help them adjust to the sun and wind.
Transplanting Seedlings or Direct Sowing
1. **Prepare the Soil:** Whether you’re transplanting seedlings or direct sowing, make sure your soil is well-prepared. Amend it with compost or well-rotted manure and loosen it with a garden fork or tiller.
2. **Planting Seedlings:** Dig holes that are slightly larger than the root balls of your seedlings. Gently remove the seedlings from their containers and place them in the holes. Backfill with soil and gently firm around the base of the plants. Space the seedlings about 12-18 inches apart.
3. **Direct Sowing:** If you’re direct sowing, sow the seeds about ½ inch deep and 1-2 inches apart. Once the seedlings emerge, thin them to 12-18 inches apart.
4. **Water Thoroughly:** After planting, water the seedlings or seeds thoroughly. This will help them establish roots and get off to a good start.
5. **Mulch (Optional):** Apply a layer of mulch around the plants to help retain moisture, suppress weeds, and regulate soil temperature. Straw, wood chips, or shredded leaves are all good options.
Caring for Your Kale Plants
Once your kale plants are in the ground, it’s important to provide them with the care they need to thrive. Here’s what you need to know:
* **Watering:** Kale needs consistent moisture, especially during hot, dry weather. Water deeply whenever the top inch of soil feels dry. Avoid overwatering, as this can lead to root rot.
* **Fertilizing:** Kale is a heavy feeder, so it benefits from regular fertilization. Use a balanced organic fertilizer or side-dress with compost every few weeks.
* **Weeding:** Keep your kale patch free of weeds, as they can compete with the plants for nutrients and water. Hand-pull weeds regularly or use a hoe to cultivate the soil.
* **Pest Control:** Kale can be susceptible to a few common pests, such as aphids, cabbage worms, and flea beetles. Inspect your plants regularly and take action if you see any signs of infestation. You can use organic pest control methods, such as insecticidal soap or neem oil.
* **Bolting:** Kale can bolt (go to seed) in hot weather. This will make the leaves bitter and tough. To prevent bolting, provide your plants with shade during the hottest part of the day and water them regularly. You can also choose bolt-resistant varieties.
Harvesting Your Kale
The best part of growing kale is, of course, harvesting it! You can start harvesting kale leaves as soon as they are large enough to eat, usually about 6-8 weeks after planting.
* **Harvesting Technique:** Harvest the outer leaves first, leaving the inner leaves to continue growing. This will allow you to harvest kale continuously throughout the growing season. Simply snap or cut the leaves off near the base of the plant.
* **When to Harvest:** Harvest kale in the morning, after the dew has dried. This is when the leaves are at their freshest and most flavorful.
* **Storing Kale:** Kale can be stored in the refrigerator for up to a week. Wrap the leaves in a damp paper towel and place them in a plastic bag.
Troubleshooting Common Problems
Even with the best care, you may encounter some problems while growing kale. Here are a few common issues and how to address them:
* **Yellowing Leaves:** Yellowing leaves can be a sign of nutrient deficiency, overwatering, or underwatering. Check the soil moisture and fertilize if necessary.
* **Holes in Leaves:** Holes in leaves are often caused by pests, such as cabbage worms or flea beetles. Inspect your plants and take action if you see any signs of infestation.
* **Stunted Growth:** Stunted growth can be caused by poor soil, lack of sunlight, or pests. Make sure your soil is well-drained and rich in organic matter, and provide your plants with at least 6 hours of sunlight per day.
* **Bolting:** As mentioned earlier, bolting can occur in hot weather. Provide your plants with shade and water them regularly to prevent bolting.
Enjoying Your Homegrown Kale
Now that you’ve successfully grown your own kale, it’s time to enjoy the fruits (or rather, vegetables) of your labor! Kale is incredibly versatile and can be used in a variety of dishes. Here are a few of my favorite ways to enjoy homegrown kale:
* **Salads:** Massage kale leaves with olive oil and lemon juice to soften them and make them more
Conclusion
So, there you have it! Growing kale at home is not only achievable, but it’s also a rewarding experience that brings fresh, nutritious greens right to your kitchen. We’ve walked through the simple steps, from choosing the right variety to harvesting your bountiful crop. But why is this DIY trick a must-try?
Firstly, consider the unparalleled freshness. Store-bought kale, even when organic, can’t compete with the vibrant flavor and crisp texture of kale picked straight from your garden. You’re cutting out the middleman, reducing transportation time, and ensuring you’re consuming kale at its peak nutritional value. Think of the difference it will make in your salads, smoothies, and cooked dishes! The taste alone is worth the effort.
Secondly, growing your own kale is incredibly cost-effective. A single packet of seeds can yield a substantial amount of kale over several harvests, far exceeding the cost of buying it regularly from the grocery store. Plus, you’re in control of the growing process, avoiding potentially harmful pesticides and herbicides. It’s a win-win for your wallet and your health.
Thirdly, it’s empowering! There’s a unique satisfaction that comes from nurturing a plant from seed to harvest. Watching your kale thrive, knowing you provided the right conditions for its growth, is a deeply rewarding experience. It connects you to nature and provides a sense of accomplishment that’s hard to replicate.
But the benefits don’t stop there. Growing kale at home allows for endless experimentation and customization. Want to add a spicy kick to your salads? Try growing Red Russian kale with its slightly peppery flavor. Prefer a milder taste? Lacinato kale, also known as dinosaur kale, is a great choice. You can even experiment with different growing methods, such as container gardening or raised beds, to find what works best for your space and lifestyle.
Variations and Suggestions:
* Succession Planting: Plant new kale seeds every few weeks to ensure a continuous harvest throughout the growing season.
* Companion Planting: Plant kale alongside beneficial companions like marigolds (to deter pests) or garlic (to improve soil health).
* Kale Chips: Don’t forget to use your homegrown kale to make delicious and healthy kale chips! Simply toss the leaves with olive oil and your favorite seasonings, then bake until crispy.
* Freezing Kale: If you have a surplus of kale, blanch and freeze it for later use in soups, stews, and smoothies.
* Kale Smoothies: Add a handful of kale to your morning smoothie for a boost of vitamins and minerals. The taste is surprisingly mild when blended with fruits.
We strongly encourage you to give this DIY trick a try. It’s easier than you might think, and the rewards are well worth the effort. Start small, learn as you go, and don’t be afraid to experiment.
Once you’ve harvested your first batch of homegrown kale, we’d love to hear about your experience! Share your photos, tips, and recipes in the comments below. Let’s create a community of home gardeners who are passionate about growing their own food. Happy gardening! Remember, fresh, homegrown kale is just a few steps away.
Frequently Asked Questions (FAQ)
Q: What is the best time of year to plant kale?
A: Kale is a cool-season crop, meaning it thrives in cooler temperatures. The best time to plant kale is in early spring or late summer/early fall. For a spring crop, start seeds indoors 6-8 weeks before the last expected frost. For a fall crop, sow seeds directly into the garden in late summer or early fall. This allows the kale to mature before the first hard frost. In warmer climates, you can grow kale throughout the winter.
Q: How much sunlight does kale need?
A: Kale needs at least 6 hours of sunlight per day to thrive. While it can tolerate some shade, especially in hotter climates, insufficient sunlight will result in leggy, less productive plants. Choose a sunny location in your garden for optimal growth. If you’re growing kale indoors, use grow lights to supplement natural sunlight.
Q: What kind of soil is best for growing kale?
A: Kale prefers well-drained soil that is rich in organic matter. The ideal soil pH is between 6.0 and 7.5. Before planting, amend the soil with compost or well-rotted manure to improve its fertility and drainage. You can also add a slow-release fertilizer to provide essential nutrients. If your soil is heavy clay, consider growing kale in raised beds or containers.
Q: How often should I water kale?
A: Kale needs consistent moisture to thrive. Water deeply whenever the top inch of soil feels dry to the touch. Avoid overwatering, as this can lead to root rot. During hot, dry weather, you may need to water more frequently. Mulching around the plants can help retain moisture and suppress weeds.
Q: What are some common pests and diseases that affect kale?
A: Common pests that affect kale include aphids, cabbage worms, flea beetles, and slugs. You can control these pests by handpicking them off the plants, using insecticidal soap, or applying Bacillus thuringiensis (Bt) for cabbage worms. Common diseases include black rot, clubroot, and downy mildew. To prevent these diseases, practice crop rotation, ensure good air circulation, and avoid overhead watering.
Q: How do I harvest kale?
A: You can begin harvesting kale leaves when they are about 4-6 inches long. Start by harvesting the outer leaves, leaving the inner leaves to continue growing. This allows the plant to produce a continuous harvest throughout the growing season. Simply snap or cut the leaves off near the base of the plant. Avoid harvesting more than one-third of the plant at a time.
Q: Can I grow kale in containers?
A: Yes, kale grows well in containers. Choose a container that is at least 12 inches deep and wide to provide enough room for the roots to grow. Use a high-quality potting mix and ensure the container has good drainage. Water regularly and fertilize every few weeks with a balanced fertilizer. Container-grown kale may need more frequent watering than kale grown in the ground.
Q: How do I store harvested kale?
A: To store harvested kale, wash the leaves thoroughly and dry them completely. Wrap the kale in a paper towel and store it in a plastic bag in the refrigerator. Kale can be stored for up to a week using this method. You can also blanch and freeze kale for longer storage.
Q: Is kale a good source of nutrients?
A: Yes, kale is an excellent source of nutrients. It is packed with vitamins A, C, and K, as well as calcium, iron, and antioxidants. Kale is also a good source of fiber and protein. Adding kale to your diet can help improve your overall health and well-being.
Q: Can I eat the stems of kale?
A: Yes, you can eat the stems of kale, but they can be tough and fibrous. To make them more palatable, remove the leaves and chop the stems into small pieces. You can then sauté, steam, or roast the stems until they are tender. Alternatively, you can add the stems to soups or stews for added flavor and nutrients.
Q: How can I make kale taste better?
A: Some people find the taste of kale to be bitter. To reduce the bitterness, massage the leaves with olive oil and lemon juice before using them in salads. You can also cook kale with acidic ingredients like vinegar or tomatoes. Roasting kale with olive oil and garlic can also enhance its flavor. Experiment with different recipes and seasonings to find what you enjoy.

Leave a Comment